Advertisement
Available languages
Available languages
R E V I S E D
by the Graphic Development Department
Please review all content carefully.
9:09 am, Nov 22, 2010
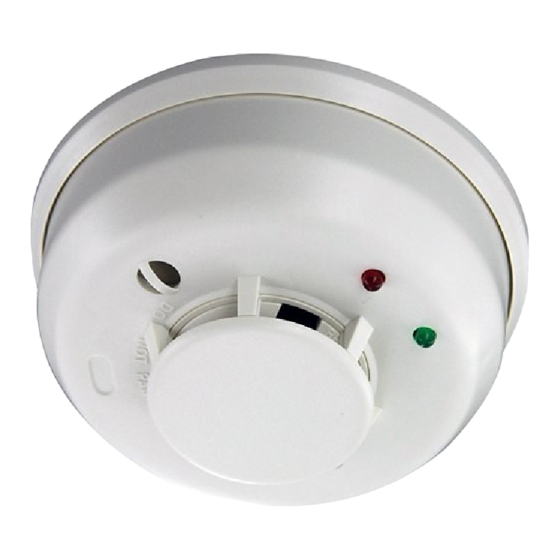
DF8M – Wireless optical smoke detector – Installation instructions
Figure 1:
Bouton de test / Conmutador Test /
Testknopf / Testknop /
Interruttore di test /
Test Switch
LED verte / Diodo
electroluminiscente verde /
Grüne LED / Groene
LED / LED verde /
Green LED
LED rouge / Diodo
electroluminiscente rojo /
Rote LED / Rode LED /
LED rosso / Red LED
Appuyez sur le bouton encastré avec un outil de 4,6 mm de diamètre maximum /
Pulse el conmutador empotrado con una herramienta de 4,6 mm (0,18") de diámetro como máximo. /
Drücken Sie den eingelassenen Knopf mit einem Werkzeug mit einem Durchmesser von maximal 4,6 mm (0,18 Zoll). /
Druk de verzonken knop in. Gebruik hiervoor een gereedschap met een diameter van max. 4,6 mm /
Premere l'interruttore rientrato con un utensile dal diametro massimo di 4,6 mm. /
Push the recessed switch with a 0.18" max. diameter tool
Orifices de montage direct / Orificios de montaje directo /
Figure 4:
Löcher zur Direktmontage / Direct Mount Holes
Klikmontagesleuven / Fori di montaggio diretto /
Direct Mount Holes
Languette d'autoprotection (découpez la languette pour activer la fonction
autoprotection) / Lengüeta de antiforzamiento (corte la pequeña lengüeta
para activar lafunción de antiforzamiento) / Manipulationsschutzlasche
(kleine Lasche abschneiden, um die Manipulations-schutzfunktion
zu aktivieren) / Vals-alarmpreventie (Tabje afsnijden om preventie
van vals alarm te activeren) / Linguetta antimanomissione
(tagliare la linguetta per attivare la funzione antimanomissione) /
Tamper Resistant Tab(Cut off small tab to activate tamper resist feature)
Figure 6:
Battery Flag must be pressed
down before inserting the battery.
When the battery is removed,
the battery flag will prevent the
detector from mounting to the base
HW-500-004
60 cm
Optimal / Óptimo / Optimal / Optimaal / Ottimale / Optimal
Satisfaisant / Satisfactorio / Zufriedenstellend / Voldoende / Sufficiente / Satisfactory
Figure 2:
S0303-00
S0304-02
Figure 7:
Sélection du protocole / Seleccione el protocolo /
Protokoll auswählen / Protocolselectie /
Selezionare il protocollo / Select protocol
S0325-00
1
7.6 m
Figure 3:
S0306-01
Figure 5:
V2GY
10 cm
S0318-02
Couvercle amovible du détecteur /
Tapa extraíble del detector /
Abnehmbare Abdeckung /
Afneembare dekplaat /
Coperchio del rilevatore rimovibile /
Removable Detector Cover
Chambre de détection avec écran
anti-moustique (partie supérieure) /
Pantalla / cámara de detección
(mitad superior) / Schutzgitter/Sensorkammer
(obere Hälfte) / Filter detectiekamer
(bovenste helft) / Camera di rilevamento /
schermatura (metà superiore) /
Screen SensingChamber(top half)
Boîtier du détecteur /
Carcasa del detector /
Gehäuse /
Detectorbehuizing /
Alloggiamento del
rilevatore /
Detector Housing
S0307-00
S0305-00
ALPHA
(par défaut) / (predeterminado) / (Standard) /
(standaard) / (predefinito) / (Default)
S0324-00
I56-3683-001
Advertisement
Table of Contents

Related Manuals for Honeywell DF8M


Summary of Contents for Honeywell DF8M
- Page 1 R E V I S E D by the Graphic Development Department Please review all content carefully. 9:09 am, Nov 22, 2010 DF8M – Wireless optical smoke detector – Installation instructions 10 cm 7.6 m 60 cm S0318-02 Optimal / Óptimo / Optimal / Optimaal / Ottimale / Optimal Satisfaisant / Satisfactorio / Zufriedenstellend / Voldoende / Sufficiente / Satisfactory Couvercle amovible du détecteur /...
- Page 2 1 DESCRIPTION GÉNÉRALE Connectez l’outil de programmation à la centrale d’alarme et suivez la procédure Le détecteur de fumée DF8M est conçu pour fonctionner en association avec des systèmes d'enregistrement des périphériques décrite dans le manuel de la centrale. d’alarme sans fil qui prennent en charge les protocoles ALPHA ou V2GY tels que les centrales IMPORTANT : L'étape 4 doit être réalisée avant de mettre le détecteur sous tension.
- Page 3 Power the detector by removing the paper tab from the battery. The DF8M smoke detector is intended for use with wireless alarm systems that support the Turn the detector in a clockwise direction in the mounting base until it clicks into place.
- Page 4 Utilizzare il collegamento installato per selezionare il protocollo ALPHA o V2GY in base alle Il rilevatore di fumo DF8M è destinato all'utilizzo con sistemi di allarme wireless che sup- proprie esigenze. Il collegamento è installato in posizione ALPHA in modo predefinito.
- Page 5 Utilice el enlace instalado para seleccionar el protocolo ALPHA o V2GY según sea necesario. El detector de humo DF8M está diseñado para su uso con sistemas de alarma inalámbricos El enlace está instalado en la posición ALPHA de manera predeterminada.
- Page 6 Blinkt alle 5 Blinkt alle 5 Sekunden. 5 REGISTRIERUNG Sekunden Registrierung ist der Vorgang, mit dem der DF8M an der Meldezentrale angemeldet wird. Für diesen Vorgang ist ein Programmierwerkzeug erforderlich. Der vollständige Vorgang wird im Normal Blinkt alle 10 Installationshandbuch der Meldezentrale oder im Handbuch des...
- Page 7 5 REGISTRATIE maximaal aan te sluiten aantal apparaten. Alarmsignalen en informatie over de batterijstatus Registratie is het proces waarbij de DF8M wordt ‘geassocieerd' met – gekoppeld aan – het worden door de zender doorgegeven aan de systeemontvanger. bedieningspaneel. Hiervoor is een programmeerprogramma vereist. De volledige procedure Bij een alarm kan de piëzo-elektrische sirene voor 5 minuten worden uitgeschakeld door e...
- Page 8 Fax: +33 (0)4 92 94 29 60 www.honeywell.com © 2010 Honeywell International Inc. Honeywell is a registered of Honeywell International Inc. All other trade-marks are the properties of their respective owners. All rights reserved. HW-500-004 I56-3683-001 © 2010 Honeywell International, Inc.
Need help?
Do you have a question about the DF8M and is the answer not in the manual?
Questions and answers
The battery flag has come out and it seems too long to go back into position. How can I get it back in to correct position