
Subscribe to Our Youtube Channel
Related Manuals for Dream H12


Summary of Contents for Dream H12
- Page 1 Wet and Dry Vacuum User Manual The illustrations in this manual are for reference only. Please refer to the actual product.
- Page 2 THANK YOU Contents FOR PURCHASING THIS DREAME User Manual WET AND DRY VACUUM. Manual de usuario Registration Quick Start Welcome to register a Dreame account by scaning the QR code. You are available for the User Manual and Special Offers. With it you are obtaining a high quality product that is engineered for optimal performance.
-
Page 3: Safety Information
Safety Information Safety Information Important Safety Instructions • Do not put any object into openings. Do not use the appliance when any opening is blocked; keep free of dust, lint, hair, and anything that may inhibit air flow. For Household Use Only •... -
Page 4: Product Overview
Safety Information Product Overview SAVE THESE INSTRUCTIONS Packing List IMPORTANT SAFEGUARDS • Have servicing performed by a qualified repair person using only identical replacement parts. This will ensure that the safety of the product is maintained. • Do not modify or attempt to repair the appliance excepts as indicated in the instructions for use and care. -
Page 5: Brush Assembly
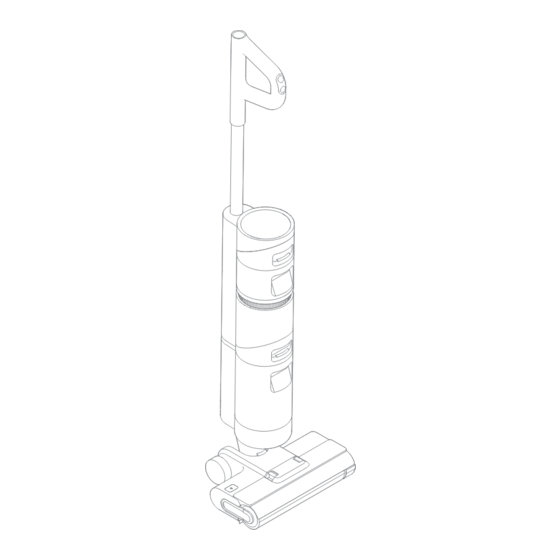
Product Overview Product Overview Vacuum Brush Assembly Self-Cleaning Button Rear Wheel Suction Button Front Wheel On/Off Switch Brush Roller LED Display Screen Charging Base Clean Water Tank Release Button Voice Prompt Button Clean Water Tank Used Water Tank Release Button Charging Contacts Used Water Tank... -
Page 6: Vacuum Installation
Product Overview Installation Display Screen Accessory Holder Installation Install the accessory holder into the charging base as indicated. Dust Concentration Indicator The color of the curve changes with the amount of dust in real Self-Cleaning time. Auto Mode Suction Mode Vacuum Installation Battery Status Indicator Battery Level /... -
Page 7: How To Use
Charging How to Use Filling the Clean Water Tank Note: Fully charge the vacuum before first use. 1. Place the charging base on the level ground against a wall. Connect one end of the 1. Press the clean water tank release 2. -
Page 8: Care And Maintenance
How to Use Care & Maintenance Starting Cleaning Tips: 1. Turn off the vacuum before care and maintenance. Briefly press the button to power on, and the vacuum will start cleaning. The vacuum 2. Replace parts if needed. The parts must be replaced by those available from the comes with an upright/reclining switch. -
Page 9: Cleaning The Brush Roller
Care & Maintenance Care & Maintenance Cleaning the Brush Roller Cover Cleaning the Brush Roller * Clean it as needed. * Clean it as needed. Replacing every 3 to 6 months is recommended. 2. Clean out any hair and debris 1. Press the brush roller release button, 1. - Page 10 Care & Maintenance Care & Maintenance Cleaning the Used Water Tank Cleaning the Filter * Replace it every 3 to 6 months. * Cleaning the used water tank after each use and before and after enabling the self-cleaning function is recommended. 1. Remove the filter from the top of the 2.
- Page 11 Error Possible Cause Solution Error Possible Cause Solution The handle is not installed in Re-install the handle. place. The battery Make sure the vacuum is status indicator The vacuum is not placed onto placed onto the charging does not light up the charging base properly.
-
Page 12: Troubleshooting
Troubleshooting Specifications If the vacuum is not working properly, the screen display will show an error message. Wet and Dry Vacuum Floor Washer Please refer to the troubleshooting table to find your solution. Model HHR14B Charging Time Approx. 5 hours Error Possible Cause Solution... -
Page 13: Información De Seguridad
Información de Seguridad Información de Seguridad Instrucciones de Seguridad Importantes que pueda impedir el flujo de aire. • No lo use sin los filtros instalados correctamente. Uso Doméstico Sólo • No utilice el aparato con un adaptador dañado. Si el adaptador está dañado, debe •... -
Page 14: Descripción Del Producto
Safety Information Descripción del producto GUARDE ESTAS INSTRUCCIONES Lista de paquete CONSIDERACIONES IMPORTANTES • El servicio debe ser realizado por un técnico calificado que utilice únicamente piezas de repuesto idénticas. Esto asegura que se mantiene la seguridad del producto. • No modifique ni intente reparar el aparato salvo que se indique en las instrucciones de uso y cuidado. -
Page 15: Conjunto De Cepillo
Descripción del producto Descripción del producto Aspirador Conjunto de Cepillo Botón de autolimpieza Rueda Trasera Botón de Succión Rueda Delantera Interruptor encendido/ apagado Cepillo de Rodillo Pantalla de visualización LED Base de carga Botón de Liberación del Tanque de Agua Limpia Botón de Aviso de Voz Tanque de agua limpia Botón de Liberación del... -
Page 16: Instalación
Descripción del producto Instalación Pantalla de visualización Instalación del Recipiente de Accesorios Instale el recipiente de accesorios en la base de carga como se indica. Indicador de Concentración de Polvo El color cambia de acuerdo con el nivel de polvo inhalado Diagrama de instalación de Autolimpieza Modo Automático... - Page 17 Cargando Instrucción del Uso Llenar el Tanque de Agua Limpia Nota: Cargue completamente el aspirador antes de primer uso. 1. Coloque la base de carga en el suelo nivelado contra una pared. Conecte un extremo 1. Presione el botón de liberación del 2.
-
Page 18: Cuidado Y Mantenimiento
Instrucción del Uso Cuidado y mantenimiento Iniciar Limpieza Consejos: 1. Apague el aspirador antes del cuidado y mantenimiento. Presione brevemente el botón para encenderlo y el aspirador comenzará a limpiar. 2. Las piezas deben ser reemplazadas si es necesario. Utilice solamente las piezas El aspirador viene con un interruptor vertical/reclinable. - Page 19 Cuidado y Mantenimiento Cuidado y Mantenimiento Limpieza de la cubierta del cepillo cilíndrico Limpieza de Tapa de Cepillo de Rodillo * Límpielo cuando sea necesario. * Límpielo cuando sea necesario. Se recomienda reemplazarlo cada 3 a 6 meses. 2. Quite los pelos y la suciedad 1.
- Page 20 Cuidado y Mantenimiento Cuidado y Mantenimiento Limpieza del tanque de agua usada Limpiar el Filtro * Se recomienda limpiar el depósito de agua usada después de cada uso y antes y después de *Reemplácelo cada 3 a 6 meses. activar la función de autolimpieza. 1.
-
Page 21: Preguntas Más Frecuentes
Preguntas Más Frecuentes Preguntas Más Frecuentes Error Causa Posible Solución Error Causa Posible Solución El asa no está instalada en su El indicador de Vuelva a instalar el asa. lugar. estado de la La base de carga no está Asegúrese de que el batería no se conectada al aspirador aspirador esté... -
Page 22: Especificaciones
Indicación de fallo Especificaciones Si la aspiradora no funciona con normalidad, en la pantalla aparecerá un mensaje de Lavadora de Piso de Vacío Seco y Húmedo error. Consulte la tabla siguiente para encontrar la solución al problema en función del mensaje de error. - Page 23 • The word "dreame" is the abbreviation of Dreame Technology Co., Ltd. and its subsidiaries in China. It is the transliteration of the company's Chinese name " 追觅 ", which means striving for excellence in every endeavor and reflects the company's vision of continuous pursuit, exploration and search in technology.
Need help?
Do you have a question about the H12 and is the answer not in the manual?
Questions and answers