
Related Manuals for YitaHome FTBFVT-0027


Summary of Contents for YitaHome FTBFVT-0027
- Page 2 FTBFVT-0027 XJYSD-V1 FTBFVT-0028 ASSEMBLY INSTRUCTIONS ASSEMBLY INSTRUCTIONS FTBFVT-0029 FTBFVT-0030 1. Two or more people are needed to complete the installation. Item Item 2. Please protect the wires and remote control accessories from damage during Reference Image Qty. Reference Image Qty.
- Page 3 ASSEMBLY INSTRUCTIONS ASSEMBLY INSTRUCTIONS Item Item Reference Image Qty. Reference Image Qty. M4X18mm ST5X40mm ST3.5X25mm...
- Page 4 ASSEMBLY INSTRUCTIONS ASSEMBLY INSTRUCTIONS PRE-FIX DRAWER RUNNER INSTRUCTIONS USING CAM LOCK AND QUICKFIT Pull inner and outer drawer runners apart before fixing them to panels. Tighten quickfit until shouIder is flush with panel.Do not overtighten or undertighten. as shown. Slide drawer runners apart until the drawer lock can be seen OUTER RUNNER INNER RUNNER Press and hold the drawer runner lock and then continue to slide drawer runners apart...
- Page 5 ASSEMBLY INSTRUCTIONS ASSEMBLY INSTRUCTIONS HINGE ADJUSTMENT GUIDE It may be necessary to adjust the hinges so that the doors align. Use the instructions below as a guide. 4pcs 16pcs 8pcs a. To adjust the door vertically loosen the screw asshown and move up and down as needed. b.
- Page 6 ASSEMBLY INSTRUCTIONS ASSEMBLY INSTRUCTIONS 4pcs 2pcs 4pcs φ15X9.5mm φ15X12mm Pay attention to the position of the groove at the triangle mark (make sure that the groove is in the same direction).
- Page 7 ASSEMBLY INSTRUCTIONS ASSEMBLY INSTRUCTIONS 2pcs 2pcs 8pcs...
- Page 8 ASSEMBLY INSTRUCTIONS ASSEMBLY INSTRUCTIONS 4pcs 4pcs 4pcs 11pcs 2pcs φ15X9.5mm φ15X12mm 180° x 11...
- Page 9 ASSEMBLY INSTRUCTIONS ASSEMBLY INSTRUCTIONS 2pcs 2pcs 2pcs 2pcs 8pcs 4pcs 4pcs φ15X9.5mm φ15X12mm φ15X9.5mm φ15X12mm 180° 180°...
- Page 10 ASSEMBLY INSTRUCTIONS ASSEMBLY INSTRUCTIONS 4pcs 16pcs 4pcs 4pcs φ15X9.5mm φ15X12mm...
- Page 11 ASSEMBLY INSTRUCTIONS ASSEMBLY INSTRUCTIONS 10pcs 3pcs φ15X9.5mm φ15X12mm...
- Page 12 ASSEMBLY INSTRUCTIONS ASSEMBLY INSTRUCTIONS 4pcs 2pcs 11pcs Connect the red line to the blue line. wall space wall space rear panel After the cabinet assembly, please install the wall fixing wall space rear panel device on the back of the cabinet to avoid accidents.
- Page 13 ASSEMBLY INSTRUCTIONS ASSEMBLY INSTRUCTIONS 16pcs 16pcs 8pcs 8pcs 4pcs 4pcs 4pcs 4pcs 4pcs 4pcs 16pcs 16pcs φ15X9.5mm φ15X12mm Pay attention to the position of the groove at the triangle mark (make sure that the groove is in the same direction).
- Page 14 ASSEMBLY INSTRUCTIONS ASSEMBLY INSTRUCTIONS 2pcs Mode A Mode B Install at a location based on your needs.
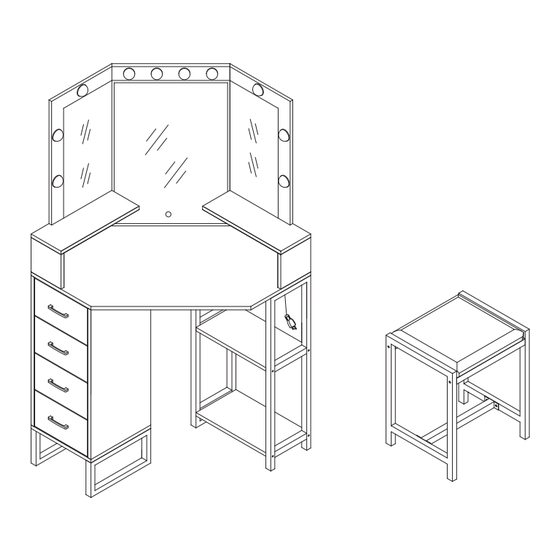
- Page 15 ASSEMBLY INSTRUCTIONS ASSEMBLY INSTRUCTIONS 2pcs 2pcs 4pcs 4pcs 4pcs Installation Completed...
Need help?
Do you have a question about the FTBFVT-0027 and is the answer not in the manual?
Questions and answers