
Related Manuals for DiscreteHeat ThermaCurve

Summary of Contents for DiscreteHeat ThermaCurve
- Page 5 Installing the Power Connection PCB Bracket Bend here 90 Bed up to 45 ~200mm/8” ~225mm/9” ~250mm/10” 1. Mount the ‘Easy Bend’ PCB bracket 2. When secure. Bend the bottom edge 3. Installing the 1st Wall & Ceiling approx. 25mm (1”) from the corner up at 45°...
- Page 6 Preparing the ThermaCurve Profile When cutting the ThermaCurve profile, the following allowances should be made: Power Connection Internal Corner External corner Special Angle End Termination / PCB Wall length Wall length Wall length Wall length Wall length MINUS MINUS MINUS...
- Page 7 Note: Heating cables are usually supplied pre-prepared. If not, prepare the cable ends before inserting into the ThermaCurve profile; the cable is difficult to strip and mistakes are hard to correct once the cable is in the cable channels. 25mm 80mm 1.
- Page 8 Preparing the Power Connection Cable 25mm 30mm 100-120mm 3. Apply some RTV silicone glue/sealant 4. Using an air heat gun, heat shrink and slide the silicone ‘trousers’ over the the trousers to the cable to create a conducting cores. Secure the trousers permanent joint.
- Page 9 12) Heat Shrink tubing 50mm 4. If the ThermaCurve is heating a single straight wall (no 5. Using the silicone ‘boots’, RTV/silicone sealant and the corners or onward connections) then simply cut any excess heat shrink tubing, make safe the end of the cable.
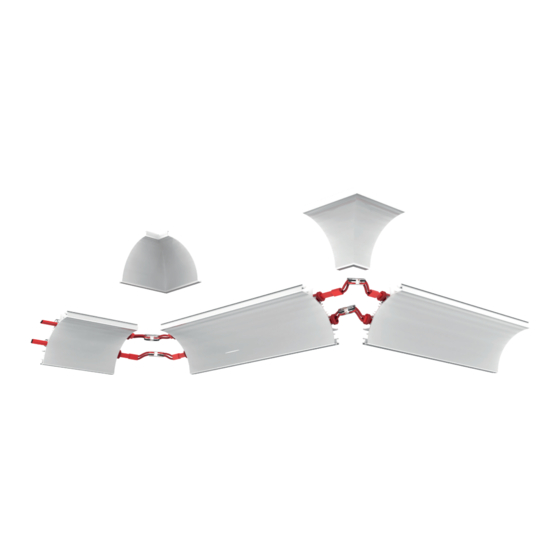
- Page 10 Preparing the cable ends – Making a corner or onward connection 1. For an Internal Corner, the cable should be prepared as per 2. For an External corner, the cable should be prepared as per the Power connection 9.1 – 100mm longer than the cut profile the Power Connection 9.1, but 25mm/1”...
- Page 11 Installing the 1st piece Safety Cables Earth Lead Security Pins 1. In the 2 wall brackets at either end 2. At the power connection end, DON’T 3. Insert the security pins into the lower/ of the run, insert the 100mm/4” safety forget to attach the EARTH lead into the wall hinge point.
- Page 12 Installing the 1st piece Power Connection 1. With both ends suspended, move to the middle and raise the profile to the wall bracket. Locate onto hinge point. A firm push may be required Security Pins ‘Click’ Security Pins ‘Click’ End Termination 2.
- Page 13 Connecting the Heating Cables & Earth Terminal Block 1. If cut and secured correctly the Trouser ends of the cable 2. Connect the cables to the terminal. Do not over tighten to should be well located to reach the terminal blocks on the prevent damage to the terminal blocks.
- Page 14 Fitting the Next Section(s) (if a single length only, skip to 16) First Piece Second Section Earth Leads 1. Using the same sequence as the first piece, install the 2. EARTH CONTINUITY! Ensure that the earth leads are securely second section onto the wall and ceiling brackets, using the connected using the saddle connectors and self tapping screws.
- Page 15 1st 5 minutes the meter will read 100~120VAC as the system goes through its soft-start phase) 4. If all ThermaCurve sections are not 5. Note: on 1st energisation, there may warming after 5 minutes, power down be a slight aroma from the heating and check any connections between cables.
-
Page 16: Fitting The Covers
Fitting the covers Self Tapping ‘Click’ Screws ‘Click’ PCB Covers ‘OFF’ 1. Power down so it is safe to work on 2. Fit the PCB cover to the Easy Bend 3. Fit the Curved start end cover. This is the system. PCB bracket, using the self tapping best achieved by hooking over the top screws provided. - Page 17 Fitting the Sealing Gasket 1. The sealing gasket (standard or wide 2. With the long leg to the wall/ceiling, 3. Trim ends to length. In the corners, option) are best inserted using a wet feed in the gasket, and smooth using cut at 45°and glue using instant, super wipe/baby wipe to provide a slippery the wet wipe.
- Page 18 1. The Capping mounting rail is cut to length and then clicked 2. The mounting rail should be secured to the wall/ceiling into the ThermaCurve profile. using appropriate fixings every 600~1000mm (2~3’) 4. The profile capping can be cut to the wall length. For 5.
-
Page 19: Troubleshooting
Maintenance Routine maintenance if your ThermaCurve system is not required, except for perhaps a wipe down to Remove any dust or marks that a traditional skirting board might accrue over time. 01942 88 00 60 info@discreteheat.co.uk...
Need help?
Do you have a question about the ThermaCurve and is the answer not in the manual?
Questions and answers