
Related Manuals for Gallagher 33101


Summary of Contents for Gallagher 33101
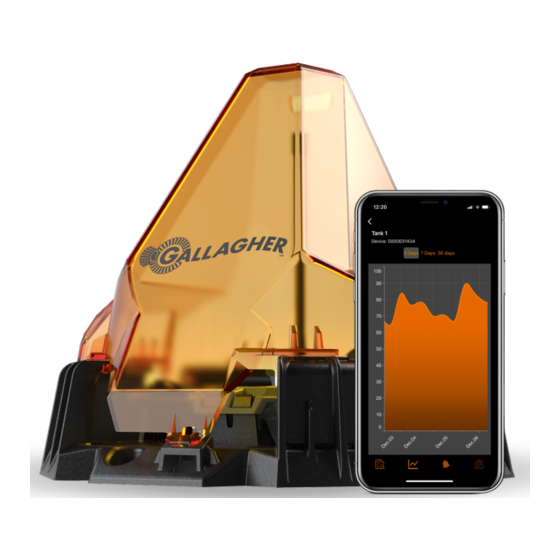
- Page 1 Satellite Liquid Monitoring System Models 33101 & 33102 U S E R M A N U A L v1.12 | 07/23 U S E R M A N U A L...
- Page 2 DISCLAIMER: Whilst every effort has been made to ensure accuracy, neither Gallagher Group Limited nor any employee of the company shall be liable on any ground whatsoever to any party in respect of decisions or actions they may make as a result of using this information.
-
Page 3: Table Of Contents
Contents SATELLITE LIQUID MONITORING SYSTEM Getting Started App Features Box contents General features How-to-videos Offline mode Setting alerts Map view Setting Up Account & subscription Troubleshooting set up App download & login Satellite update Create your own asset & Message optimistation activate the device Asset profile update Activation not at... -
Page 4: Satellite Liquid Monitoring System
SECTION 1 Getting Started 1.1 BOX CONTENTS 1 x Gallagher Universal 1 x Protection Cover 1 x Cable Management Monitor (Micro Satellite) Mounting Base Satellite Liquid Monitoring System Q U I C K S TA R T G U I D E Système de Surveillance des Liquides par Satellite... -
Page 5: Setting Up
Google Play or Apple out in field to install. Store. Trouble accessing your account The Gallagher Liquid Monitoring App is powered by Agbot Remember before attempting to log into the app, you must have an active subscription. Therefore, it is recommended to start your subscription first before attempting to log in to the app. -
Page 6: Create Your Own Asset & Activate The Device
The Gallagher Liquid Monitoring App Upon launching the app, you will be directed to the "Inventory Page" which serves as the primary screen. From here, you can perform the following actions: Configure and activate your device View a map displaying your resources' locations... - Page 7 Following the instructions to add an asset to your app: From the bottom of From the dropdown the Inventory page select "Sensor Type select "+ Add Device" & Length" and tap and select an asset "Next" The sensor type. There are 6 length is indicated on asset types to choose the packaging.
-
Page 8: Physical Installation
SECTION 3 Physical Installation 3.1 TOOLS REQUIRED Before you head out to site, ensure you have the following tools which are not supplied with the product. Your phone with the app installed. The A drill with a 25mm (1 inch) hole saw or app can add a device without relying on drill bit. - Page 9 Example permissible site installation: obscured sky view below 30° of device horizon line Satellite passes below a 30° angle to the horizon have a lower probability of transmission, therefore obstacles within this angle of the device are not preferred but are permissable (see the diagram).
-
Page 10: Installation On Tank
3.3 INSTALLATION ON TANK It is recommended to add your asset and activate your device via NFC on site, next to the tank. This is to enable accurate geolocation of your asset to the satellite. Wi-Fi is not required for these steps, you can use Offline Mode (see Offline Mode section in this User Guide) and then complete the process when you have Wi-Fi or mobile data. -
Page 11: Nfc Activiation
3.4 NFC ACTIVATION It is essential to remove your phone case or any magnets from the back of the mobile phone before initiating the process. This step is crucial to ensure that no obstructions interfere with the NFC activation. During the activation process, make sure that your phone and the device's NFC reader are in contact, remain stationary and aligned properly. - Page 12 Dependent on which position your NFC Antenna is in your phone will depend on which position you place your phone on the device. Please ensure you wait 3 mins before trying another position. You may feel a vibration when the NFC connection is made, do not move your phone, keep it stationary.
- Page 13 Attach the cover. Align the protective cover with “Gallagher” at the front. Then, rotate it to secure it firmly in position. Photograph the device installation. Refer back to the app – you will be prompted to take a photo of the installation including the surrounding area.
-
Page 14: About Nfc
3.5 ABOUT NFC What is NFC? Most smartphones are equipped with NFC, The NFC chip in your phone is a passive which is a method of wireless data transfer scanner that only connects when it closely called Near-Field Communication (NFC) that interacts with another NFC device or tag. - Page 15 3.6 NFC ANTENNA POSITIONS NFC antenna positions - Samsung The most common NFC antenna positions for Samsung phones are outlined below. Samsung Galaxy S10, Samsung Galaxy S20 Samsung Galaxy S21 S10+, S10e (+, Ultra), A50s, A51, A52, (+, Ultra), S22 (+, Ultra), A60, A70, A71, A8, Note10 S23 (+, Ultra), S20 FE, (Lite, +)
- Page 16 NFC antenna positions - iPhone The most common NFC antenna positions for iPhones are outlined to the right. NFC requires enabling on these phone models. iPhone 14 (Plus, Pro, Pro Max) iPhone 8 (Plus) iPhone 13 (Pro, Pro Max) iPhonne 7 (Plus) iPhone 12 (Pro, Pro Max) iPhone 11 (Pro, Pro Max) iPhone XS, XS Max, XR, X...
- Page 17 NFC antenna positions - Telstra The most common NFC antenna positions for Telstra phones are outlined below. ZTE T86 / Telstra Tough Max 3, ZTE Blade A7S 2020T / Telstra Evoke Plus 2 NFC antenna positions - general If your phone make and model is not covered in the above diagrams, please refer to your phone's user manual.
-
Page 18: Nfc Troubleshooting
3.7 NFC TROUBLESHOOTING To prevent any challenges with NFC activation, or if you are experiencing challenges, please review the following instructions. If you have an older model phone, Identify the location of your phone's please check that your phone is NFC NFC antenna, please see the compatible. -
Page 19: App Features
SECTION 4 App Features 4.1 GENERAL FEATURES Main inventory page Asset detailed view On this page, you can view all Select an asset from the installed assets, current asset Inventory Page to view a detailed levels at each location and when historical view of the selected the last message was updated assets' fill levels. - Page 20 Location dropdown Wi-Fi symbol The location dropdown lets you The Wi-Fi symbol appears on view a list of all locations within the top right corner of the your account and allows you to inventory page. This indicates select a particular asset to show if your phone currently has an in the inventory list.
-
Page 21: Offline Mode
4.2 OFFLINE MODE The app has a feature called "Offline Mode", which allows for activation flow to be completed without a Wi-Fi connection or mobile data. This feature is useful for installations in remote areas. Offline Mode activates automatically when the phone is not connected to Wi-Fi or mobile data. - Page 22 Select "Retry" to upload the information to the cloud and complete the process. Pending Activation This icon will show when the device activation has been performed offline (all data captured). Successful Activation This icon will show when device activation has been submitted successfully Activation Error This icon will show when an error has occurred...
-
Page 23: Setting Alerts
4.3 SETTING ALERTS From the main inventory page, select the asset for which you want to set alerts. This will open the graph page for that asset: At the bottom of the graph page, you will see a bell icon. Click on this icon to open the alert page. -
Page 24: Map View
4.4 MAP VIEW From the main inventory page, select the asset for which you want to set alerts. This will open the graph page for that asset: At the bottom of the graph page, you will see a map and pin icon. Click on this icon to open the map view page. -
Page 25: Troubleshooting
SECTION 5 Troubleshooting 5.1 SATELLITE UPDATE If you have activated your device and it has been more than 72 hours without receiving any readings/data through your app, it is recommended to update the satellite information. To complete a satellite update, follow these steps: Place the device on a flat surface. - Page 26 Press the blue "Refresh" button and wait for the pop-up to say "File Saved Successfully", then press "Update Device" to start the process. For iPhones: put the phone's top side against the edge of device where the QR code/NFC icon is located (dependent on model).
- Page 27 If the phone is in the correct location, it will begin updating the satellite data. Leave the phone in this position until the update process is finished. This should take approximately 2-3 minutes - keep the device stationary. Once the green circle is filled, you will see the message "Network Information Updated Successfully"...
-
Page 28: Message Optimistation
5.2 MESSAGE OPTIMISATION 5.3 ASSET PROFILE UPDATE This feature optimises the messages between If you have set the asset dimensions the devices and satellites. incorrectly, it is very easy to update this information. To complete the message optimisation, for your device: Launch the app. -
Page 29: Specifications
Cable mounting bracket measures 256 x 256 x 63 mm Sensor Cable length is available at 3 metres/9.8 feet or 8 metres/26.25 feet SECTION 7 7.1 GENERAL QUESTIONS For helpful videos and FAQs, please visit website: am.gallagher.com 7.2 SUPPORT am.gallagher.com/support/customer-technical-support...
Need help?
Do you have a question about the 33101 and is the answer not in the manual?
Questions and answers