Beko VRT 61814 VR; VRT 61818 VW; VRT 61821 VD - Cordless Stick Vacuum Cleaner Manual
- User manual (158 pages) ,
- User manual (154 pages) ,
- User manual (154 pages)
Advertisement
Meanings of the Symbols
Following symbols are used in various sections of this manual:
 | Important information and useful hints about usage. |
 |  Warnings against dangerous situations concerning the security of life and property. |
 | Protection class for electric shock. |
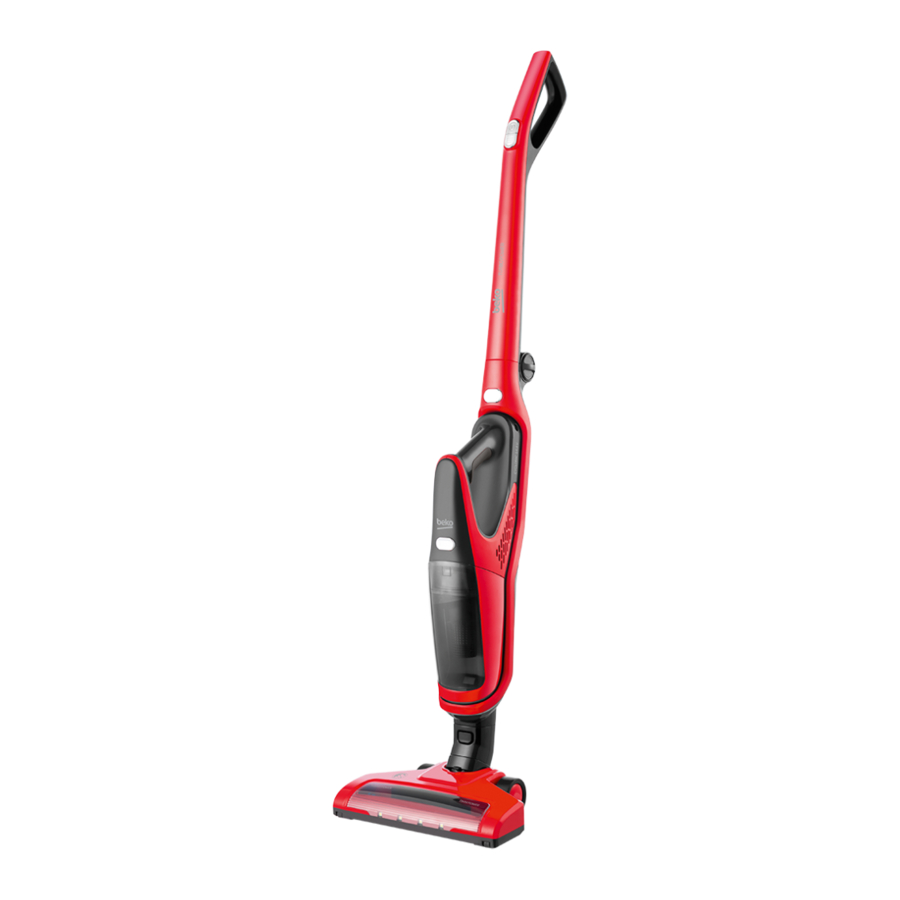
Your Product
Overview

- Stick vacuum cleaner handle
- Stick vacuum cleaner on/off button
- Speed adjustment button
- Handle collapsing button
- Cordless vacuum cleaner removal button
- Cordless vacuum cleaner handle
- Cordless vacuum cleaner on/off button
- Body
- Dust container removal button
- Dust container
- Brush removal button
- Brush
- LED light
- Handheld vacuum cleaner
- Charging and power indicator
The values which are declared on the markings affixed to your product or in other printed documents supplied with it represent the values which have been obtained in the laboratories pursuant to the pertinent standards. These values may vary according to the usage of the appliance and ambient conditions.
Technical data
| Model | VRT 61814 VR | VRT 61818 VW | VRT 61821 VD |
| Supply voltage | 100-240V~ 50-60Hz | ||
| Power | 14.4 W | 18 W | 21.6 W |
| Product spec | DC 14.4V 2000mAh Li-on | DC 18V 2000mAh Li-on | DC 21.6V 2000mAh Li-on |
| Apaptor Input | 100-240V~50/60Hz 0.3A | 100-240V~50/60Hz 0.3A | 100-240V~50/60Hz 0.5A |
| Apaptor Output | 18V 500mA | 22V 500mA | 27V 500mA |
| Brush spec | 14.4V 5W | 14.4V 5W | 21.6V 8W |
| Charging time | 4~6H | ||
Technical and design modification rights are reserved.
Operation
Intended use
The appliance has been designed for household use and is not suitable for industrial use.
Installing the body and brush
- Lift the handle (1) in the arrow direction.
![]()
- Attach the brush (12) to the body (8).
![]()
- Attach the handheld cleaner to the body (8).
![]()


Charging the appliance
- Insert the thin end of the adapter to the charger and plug the adapter in.
- The charging indicator LED (15) will come on and the product will start to be charged; when charging is done, all charging indicators will be on.
- If the charging indicator LED (15) is on, this means that the product is being charged.
- If all levels of the charging indicator LED (15) is on, this means that the product is fully charged.
It takes up to 4-6 hours for the appliance to be fully charged.
Appliance cannot be operated during the charging process.
Operating the appliance
- Press the on/off button (2) to switch on the appliance.
- When you press on/off button (2), appliance will start at maximum speed. Press speed adjustment button (3) to use in low speed. When you press speed adjustment button again, the appliance will run at maximum speed again.
- After using the appliance, switch it off by pressing the On/off button (2).
Check the power indicator LEDs (15) during operation. As charging level decreases, these indicators will gradually go off and the appliance will stop working when all indicators are off.
Appliance will automatically stop if it is placed on charger while still in use.
Starting cordless vacuum cleaner
- Press removal button (5) to remove the vacuum cleaner from the body (8).
- Press on/off button (7) of the cordless vacuum cleaner to switch on your appliance.
- After using the appliance, switch it off by pressing the On/off button (7) of the cordless vacuum cleaner.
Accessories
You can use your accessories by inserting them to the end of your vacuum cleaner.
Dust brush
Suitable for cleaning the curtains, and sensitive and fragile objects.

Upholstery tool
Suitable for cleaning the floorings, stair steps, inside of the cars, sofas, armchairs etc.

Cleaning and care
Switch off and unplug the appliance before cleaning it.
Never use gasoline, A solvent, abrasive cleaning agents, metal objects or hard brushes to clean the appliance.
Cleaning the dust container
It is recommended to clean the dust container after every use.
- Press the dust container removal button (9) to remove the dust container (10).
- Pull the filter by holding the handle and remove it from dust container (10).

- Remove the HEPA filter by grasping the handle of the filter holder and turning counterclockwise.

- Wash out the dust container (10), filter holder and HEPA filter under the running water.
- Clean the body of the cordless vacuum cleaner (14) with a soft damp cloth.
- Replace the HEPA filter in its holder after all parts are dried and place filter holder in the dust container (10).
![]()
- Replace the dust container (10) in the body of cordless vacuum cleaner (14).


Cleaning the brush
- Press the brush removal button (11) and remove the brush (12) from the body (8).
- To clean the brush (12), release the lock using the roller brush release tab as shown below.
![]()
- Remove the roller brush.
![]()
- After cleaning and drying the roller brush, reattach it and lock the tab.


Storage
- If you do not intend to use the appliance for a long time, store it carefully.
- Unplug the appliance.
- Store the appliance in a vertical position or with its handle folded.
- In order to fold the handle, turn the folding button (4) clockwise and fold the handle (1).
- Keep the appliance out of the reach of children.
Handling and transportation
- During handling and transportation, carrythe appliance in its original packaging. The packaging of the appliance protects it against physical damages.
- Do not place heavy loads on the appliance or on the packaging. The appliance may get damaged.
- Dropping the appliance may render it nonoperational or cause permanent damage.
Important safety instructions
This section contains safety instructions that will help protect from risk of personal injury or material damage. Failure to follow these instructions voids any granted warranty.
General safety
- This appliance complies with international safety standards.
- This appliance may be used by children aged 8 years and above and persons whose physical, perceptive or mental skills are impaired or who are inexperienced or not knowledgeable about the appliance as long as they are supervised or informed and made aware of the safe use of the appliance and the encountered dangers. Children should not play with the appliance. Cleaning and user maintenance should not be performed by children unless they are supervised by an adult.
- If the power cable or the appliance itself is damaged, do not use it. Contact an authorised service.
- Your mains power supply should comply with the information supplied on the rating plate of the appliance.
- The mains plug is fitted with a 13A fuse. Ensure the same rating fuse is used should it need replacement.
- Do not use the appliance with an extension cable.
- Prevent damage to the power cable by not squeezing, bending, or rubbing it on sharp edges.
- Do not touch the appliance or its plug when it is plugged in if your hands are damp or wet.
- Do not pull the power cable when unplugging the appliance.
- Do not vacuum flammable materials and when vacuuming cigarette ash, make sure that it has cooled down.
- Do not vacuum water or other liquids.
- Protect the appliance from rain, humidity and heat sources.
- Never use the appliance in or near places where combustible or inflammable ambience or places are present.
- Unplug the appliance before cleaning and maintenance.
- Do not immerse the appliance or its power cable in water for cleaning.
- Do not attempt to dismantle the appliance.
- Only use original parts or parts recommended by the manufacturer.
- Do not clean particles such as cement, plaster and compressed paper in order to prevent the filter from being clogged and the motor being damaged.
- Only use the appliance with the supplied adapter.
- Do not use the appliance without filters; otherwise it can be damaged.
- If you keep the packaging materials, store them out of the reach of children.
Plug Wiring
The moulded plug on this appliance incorporates a 13 A fuse. Should the fuse need to be replaced an ASTA approved BS1362 fuse of the same rating must be used. Do not forget to refit the fuse cover. In the event of losing the fuse cover, the plug must not to be used until a replacement fuse cover has been fitted. Colour of the replacement fuse cover must be the same colour as that visible on the pin face of the plug Fuse covers are availabe from any good electrical store.
- Fiting a different plug
- As the colours of the wires in the mains lead of this appliance may not correspond with the coloured markings identifying the terminals on your plug, proceed as follows:
![]()
- Brown cable = L (Live)
- Blue cable = N (Neutral)
- Green/yellow cable must be connected to ground (E)
![]() line
line - With the alternative plugs a 13 A fuse must be fitted either in the plug or adaptore or in the main fuse box. If in doubt contact a qualified electrician.

 line
lineProduct Guarantee
Guarantor: Beko plc, 1 Greenhill Crescent, Watford, Hertfordshire. WD18 8UF
Please call our UK based Customer Service department if you need help or advice from us:
| United Kingdom and Northern Ireland: | 0333 207 9710 |
| Republic of Ireland: | 01 862 3411 |
| You can also contact us through our website: | www.beko.co.uk |

Documents / Resources
References
Download manual
Here you can download full pdf version of manual, it may contain additional safety instructions, warranty information, FCC rules, etc.
Download Beko VRT 61814 VR; VRT 61818 VW; VRT 61821 VD - Cordless Stick Vacuum Cleaner Manual
Advertisement


Need help?
Do you have a question about the VRT 61814 VR and is the answer not in the manual?
Questions and answers