Advertisement
SETUP
Follow the below steps for setup of your GoAux.
Visit www.krkmusic.com for support videos and guides.
- Unzip the protective carry bag and remove both adjustable isolation stands and both speakers.
- Locate and remove the knurled thumb screws from the bag pocket (2 pieces).
- With the speakers positioned upside down, mount the stands to the speakers using the thumbscrews, notating the direction of the speakers.
- The front of the speakers should be oriented to the front of the stand if you need to angle the speakers up. If you need the speakers to angle down, then orient the front of the speakers to the rear.
- Place the speakers according to the instructions in the PLACEMENT section.
- Connect the power cable, OUT TO RIGHT speaker cable to both speakers, and input cables (if not using Bluetooth).
- Turn on the power switch located on the rear of the left speaker; notice that the front volume knob lights up amber, indicating that the system is active and ready to use.
- If you are using the Bluetooth option, push the Bluetooth button on the rear of the left speaker to enable pairing, and pair to your source device according to your device's instructions.
- If you are using the USB input (GoAux 4 only); ensure that you select it as your audio output in the sound settings of your computer or DAW.
- Play an audio track from your source and slowly bring up the volume of the source device (mixer, audio interface, or computer) to the desired listening level; Then, use the volume knob on the front of the left speaker to further adjust the level.
- If you have a GoAux 4 and want to use the Automatic Room Correction feature, please see the AUTO ARC SETUP section.
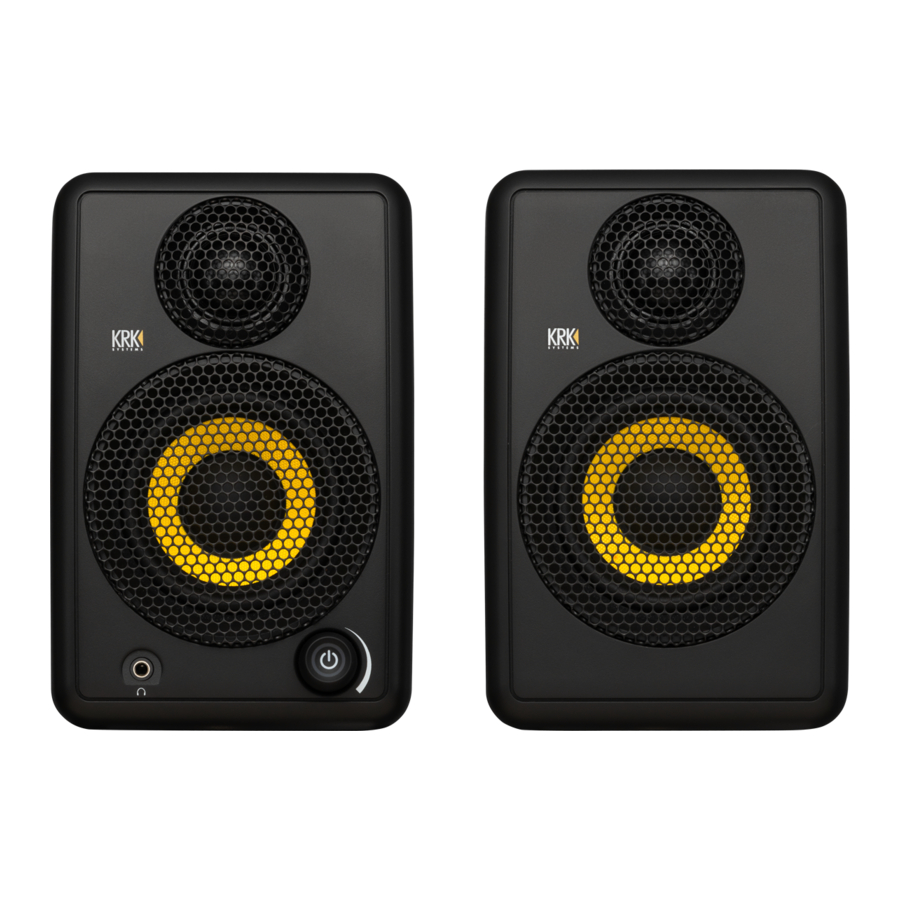
SYSTEM CONTROLS AND CONNECTIONS


Images – GoAux 4 shown (GoAux 3 is similar).
AUX IN – Stereo 1/8" analog input. Connect to computer, media player, or cell phone outputs.
RCA LEFT / RIGHT IN – Unbalanced RCA inputs. Connection to audio interfaces, DJ mixers, or consumer audio gear.
TRS LEFT / RIGHT IN (GoAux 4 only) – Balanced ¼" inputs. Connection to audio interfaces, mixing consoles, or other professional audio equipment.
USB AUDIO IN (GoAux 4 only) – USB-Type B input. Connection directly to USB computer port. When using this connection, be sure that you select it as your audio output in the sound settings of your computer or DAW.
BLUETOOTH – Bluetooth input for wireless audio streaming. Connect to Bluetooth-capable audio device, i.e., computer, iPhone, Android, media player, etc. Push and hold to pair; the blue LED will blink rapidly when in pairing mode and become solid color when paired.
LF / HF EQ – Adjusts the level of the Low Frequency band and High Frequency band to help balance for your listening environment or tastes. Push the button to adjust between +2dB (white LED bright), FLAT (white LED nominal), and -3dB (white LED dim).
AUTO ARC (GoAux 4 only) – Automatic Room Correction feature. Push and hold to begin. (See the AUTO
ARC SETUP section for details.)
OUT TO RIGHT SPEAKER – Speaker-level connection to the right speaker via 4-pin locking connectors.
MAIN POWER SWITCH – Main power switch for the system. Ensure the switch is in the "ON" position to supply power to the system.
AC INPUT – Connect the included power cable here.
HEADPHONE OUTPUT – Stereo 1/8" headphone output. Disables output from the speakers when headphones are plugged in. Use for checking your work or for silent listening.
AUTO ARC MIC INPUT (GoAux 4 only) – 1/8" input for the AUTO ARC measurement microphone (See Auto ARC Setup section for details).
VOLUME / STANDBY – Multi-function knob. Turn clockwise to raise volume and counterclockwise to reduce volume. Push twice to wake up system out of standby mode. Push and hold for 3 seconds to put system into standby mode. (The LED ring will glow amber when the system is active and turn off when the system is in standby mode.)
PLACEMENT
Ensure that you place the monitor with the power and input connections on the left side. Download and use the free KRK Audio Tools app for the next steps. The left and right studio monitors should be approximately 1 to 1.5 meters (3 to 5 feet) apart and directed at a 60-degree angle towards the listening location. Measure the distance between the left and right studio monitors and note that the listening position is the same distance to both sides. This will form an equilateral triangle. It is important that both left and right studio monitors are level matched.

The GoAux monitor series are a two-way studio monitor with a tweeter (producing high frequencies) and a woofer (producing mid and low frequencies) in one enclosure. The midpoint between the tweeter and woofer is the acoustic axis. Ensure the acoustic axis is pointed to ear level in the listening position. Use the tilting mechanism integrated into the isolation stands to orient the acoustic axis to the correct position.

AUTO ARC SETUP
GoAux 4 only
Ensure that you have completed the PLACEMENT section before beginning.
- Attach the included microphone to the microphone input on the front left of the monitor.
- Position the microphone at ear level in your ideal listening position.
- Push and hold the Auto ARC button on the rear of the left speaker.
- The speakers will produce a series of 25 tones then repeat; this may last several minutes. Do not move the microphone during this time.
- When the test is complete, a quick low frequency tone will indicate that the Auto ARC is finished.
You can now disconnect and store your microphone in the carry bag.
PRODUCT WARRANTY
To contact a Gibson Customer Service Representative, call 1.800.4GIBSON or email service@gibson.com. For support in Europe, please call 00+800.4GIBSON1 or email service.europe@gibson.com. All other regions, please contact 1.615.871.4500 or email service@gibson.com.
IMPORTANT SAFETY INSTRUCTIONS FOLLOW
SAFETY INSTRUCTIONS
- Read instructions - All the safety and operating instructions should be read before the product is operated.
- Retain instructions - The safety and operating instructions should be retained for future reference.
- Heed Warnings - All warnings on the product and in the operating instructions should be adhered to.
- Follow Instructions - All operating and use instructions should be followed.
- Cleaning - Unplug this product from the wall outlet before cleaning. Do not use liquid cleaners or aerosol cleaners. Use a damp cloth for cleaning.
- Attachments - Do not use attachments not recommended by the product manufacturer as they may cause hazards.
- Water and Moisture - Do not use this product near water-for example, near a bathtub, washbowl, kitchen sink, or laundry tub; in a wet basement; or near a swimming pool; and the like.
- Accessories - Do not place this product on an unstable cart, stand, tripod, bracket, or table. The product may fall, causing serious injury to a child or adult and serious damage to the product. Use only with a cart, stand, tripod, bracket, or table recommended by the manufacturer or sold with the product. Any mounting of the product should follow the manufacturer's instructions and should use a mounting accessory recommended by the manufacturer.
- Cart - A product and cart combination should be moved with care. Quick stops, excessive force, and uneven surfaces may cause the product and cart combination to overturn.
![]()
- Ventilation - Slots and openings in the cabinet are provided for ventilation to ensure reliable operation of the product and to protect it from overheating. These openings must not be blocked or covered. The openings should never be blocked by placing the product on a bed, sofa, rug, or other similar surface. This product should not be placed in a built-in installation such as a bookcase or rack unless proper ventilation is provided, or the manufacturer's instructions have been adhered to.
- Power Sources - This product should be operated only from the type of power source indicated on the marking label.
- Power-Cord Protection - Power-supply cords should be routed so that they are not likely to be walked on or pinched by items placed upon or against them, paying particular attention to cords at plugs, convenience receptacles, and the point where they exit from the product.
- Mains Plug - Where the mains plug or an appliance coupler is used as the disconnect device, the disconnect device shall remain readily operable.
- Lightning - For added protection for this product during a lightning storm, or when it is left unattended and unused for long periods of time, unplug it from the wall outlet and disconnect the antenna or cable system. This will prevent damage to the product due to lightning and power-line surges.
![burn hazard]()
![shock hazard]()
Overloading - Do not overload wall outlets, extension cords, or integral convenience receptacles as this can result in a risk of fire or electric shock.- Flame Sources - No naked flame sources, such as lighted candles, should be placed on the product.
![burn hazard]()
![shock hazard]()
Object and Liquid Entry - Never push objects of any kind into this product through openings as they may touch dangerous voltage points or short-out parts that could result in a fire or electric shock. Never spill liquid of any kind on the product.- Loudspeakers - Excessive sound pressure from loudspeakers can cause hearing loss.
- Damage Requiring Service - Unplug this product from the wall outlet and refer servicing to qualified service personnel under the following conditions:
- When the power-supply cord or plug is damaged.
- If liquid has been spilled, or objects have fallen into the product.
- If the product has been exposed to rain or water.
- If the product does not operate normally by following the operating instructions. Adjust only those controls that are covered by the operating instructions as an improper adjustment of other controls may result in damage and will often require extensive work by a qualified technician to restore the product to its normal operation.
- If the product has been dropped or damaged in any way.
- When the product exhibits a distinct change in performance-this indicates a need for service.
![burn hazard]()
![shock hazard]()
Replacement Parts - When replacement parts are required, be sure the service technician has used replacement parts specified by the manufacturer or have the same characteristics as the original part. Unauthorized substitutions may result in fire, electric shock, or other hazards.- Safety Check - Upon completion of any service or repairs to this product, ask the service technician to perform safety checks to determine that the product is in proper operating condition.


 The lightning flash with arrowhead symbol, within an equilateral triangle is intended to alert the user to the presence of uninsulated "dangerous voltage" within the product's enclosure that may be of sufficient magnitude to constitute a risk of electric shock to persons.
 The exclamation point within an equilateral triangle is intended to alert the user to the presence of important operating and maintenance (servicing) instructions in the literature accompanying the appliance.

RISK OF ELECTRIC SHOCK
DO NOT OPEN
THE EQUIPMENT MUST BE CONNECTED TO AN EARTHED MAINS SOCKET-OUTLET

CAUTION REGARDING PLACEMENT
To maintain proper ventilation, be sure to leave a space around the unit (from the largest outer dimensions including projections) than is equal to, or greater than shown below.
Top, Bottom, Front, Rear, Left, Right Sides: 10 cm
Changes or modifications to this equipment not expressly approved by KRK SYSTEMS for compliance could void the user's authority to operate this equipment.
To prevent electric shock, match wide blade of plug to wide slot, fully insert.
Marking and rating plate can be found at the rear panel of the apparatus.


To reduce the risk of fire or electric shock, do not expose this apparatus to rain or moisture.
The apparatus shall not be exposed to dripping or splashing and that no objects filled with liquids, such as vases, shall be placed on apparatus.
Mains plug is used as disconnect device and it should remain readily operable during intended use. In order to disconnect the apparatus from the mains completely, the mains plug should be disconnected from the mains socket outlet completely.
Battery shall not be exposed to excessive heat such as sunshine, fire or the like.

Documents / Resources
References
Download manual
Here you can download full pdf version of manual, it may contain additional safety instructions, warranty information, FCC rules, etc.
Advertisement

Need help?
Do you have a question about the GoAux 3 and is the answer not in the manual?
Questions and answers