Advertisement
Available languages
Available languages
Quick Links
GoAux Monitor System
Quick Start Guide
Thank you for purchasing your new KRK GoAux monitoring system. Countless pro engineers, producers, artists, and mixers from all
genres—all over the world, have used KRK monitors to deliver award-winning productions globally. This monitoring system was
engineered with over 30-years of innovation and experience in our state-of-the-art facility in Nashville, TN, USA, where we design and
develop products that deliver a natural and balanced frequency response with low distortion and superior imaging.
ENGLISH
®
Advertisement

Related Manuals for KRK GoAux 4

Summary of Contents for KRK GoAux 4
- Page 1 GoAux Monitor System Quick Start Guide Thank you for purchasing your new KRK GoAux monitoring system. Countless pro engineers, producers, artists, and mixers from all genres—all over the world, have used KRK monitors to deliver award-winning productions globally. This monitoring system was engineered with over 30-years of innovation and experience in our state-of-the-art facility in Nashville, TN, USA, where we design and develop products that deliver a natural and balanced frequency response with low distortion and superior imaging.
- Page 2 IMPORTANT SAFETY INSTRUCTIONS FOLLOW SAFETY INSTRUCTIONS Read instructions - All the safety and operating instructions should be read before the product is operated. Retain instructions - The safety and operating instructions should be retained for future reference. Heed Warnings - All warnings on the product and in the operating instructions should be adhered to. Follow Instructions - All operating and use instructions should be followed.
- Page 3 Top, Bottom, Front, Rear, Left, Right Sides: 10 cm CAUTION Changes or modifications to this equipment not expressly approved by KRK SYSTEMS for compliance could void the user’s authority to operate this equipment. CAUTION To prevent electric shock, match wide blade of plug to wide slot, fully insert.
- Page 4 Cet équipement est conforme aux limites d’ exposition aux rayonnements de la IC établies pour unenvironnement non contrôé. Cet équipement doit être installé et fonctionne Hereby, Gibson Brands, Inc. declares that the radio equipment type GoAux 3 and GoAux 4 is in compliance with Directive 2014/53/EU. The full text of the EU declaration of conformity is available at the following internet address: www.krkmusic.com...
- Page 6 Follow the below steps for setup of your GoAux. Visit www.krkmusic.com for support videos and guides. 1. Unzip the protective carry bag and remove both adjustable isolation stands and both speakers. 2. Locate and remove the knurled thumb screws from the bag pocket (2 pieces). 3.
- Page 7 8. If you are using the USB input (GoAux 4 only); ensure that you select it as your audio output in the sound settings of your computer or DAW.
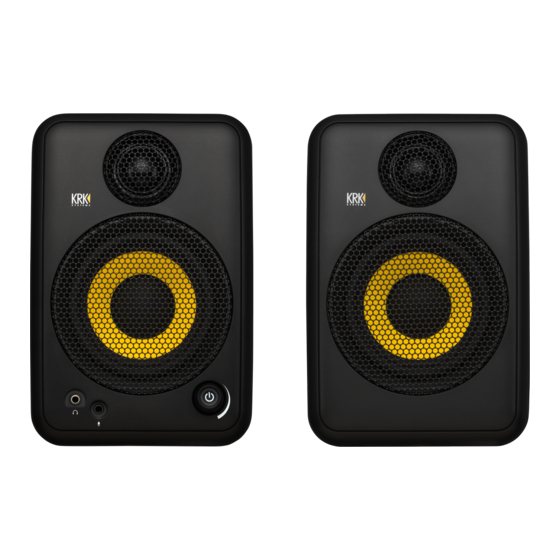
- Page 8 ARC MIC INPUT VOLUME / STANDBY HEADPHONE OUTPUT Images – GoAux 4 shown (GoAux 3 is similar).
- Page 9 RIGHT IN LF EQ / HF EQ PUSH TO ADJUST 1/4” LEFT IN / AUTO ARC RIGHT IN PUSH TO BEGIN USB AUDIO OUT TO RIGHT SPEAKER MAIN POWER AC INPUT SWITCH Images – GoAux 4 shown (GoAux 3 is similar).
- Page 10 RCA LEFT / RIGHT IN – Unbalanced RCA inputs. Connection to audio interfaces, DJ mixers, or consumer audio gear. TRS LEFT / RIGHT IN (GoAux 4 only) – Balanced ¼” inputs. Connection to audio interfaces, mixing consoles, or other professional audio equipment.
- Page 11 AUTO ARC (GoAux 4 only) – Automatic Room Correction feature. Push and hold to begin. (See the AUTO ARC SETUP section for details.) OUT TO RIGHT SPEAKER – Speaker-level connection to the right speaker via 4-pin locking connectors. MAIN POWER SWITCH – Main power switch for the system. Ensure the switch is in the “ON” position to supply power to the system.
- Page 12 Ensure that you place the monitor with the power and input connections on the left side. Download and use the free KRK Audio Tools app for the next steps. The left and right studio monitors should be approximately 1 to 1.5 meters (3 to 5 feet) apart and directed at a 60-degree angle towards the listening location.
- Page 13 AUTO ARC SETUP (GoAux 4 only) Ensure that you have completed the PLACEMENT section before beginning. 1. Attach the included microphone to the microphone input on the front left of the monitor. 2. Position the microphone at ear level in your ideal listening position.
- Page 14 Some states and countries do not allow the exclusion or limitation of incidental or consequential damages, so the above limitation or exclusion may not apply to you. This warranty gives you specific legal rights, and you may also have other rights, which vary from state to state. This warranty only applies to KRK Systems products purchased by the consumer from an authorized KRK dealer.
- Page 15 www.krkmusic.com/warranty...
- Page 16 ® Manuals available in multiple languages. Scan to download. www.krkmusic.com/support/product-documentation...
- Page 17 Gracias por comprar el nuevo sistema de monitorización KRK GoAux. Innumerables ingenieros, productores, artistas y mezcladores profesionales de todos los géneros, y de todo el mundo, han utilizado monitores KRK para ofrecer unas producciones mundialmente galardonadas. Este sistema de monitorización es el fruto de más de 30 años de innovación y experiencia en nuestras instalaciones de vanguardia de Nashville, TN, EE.
- Page 18 INSTRUCCIONES DE SEGURIDAD IMPORTANTES A CONTINUACIÓN INSTRUCCIONES DE SEGURIDAD Lea las instrucciones - Se deben leer todas las instrucciones de seguridad y de funcionamiento antes de poner en funcionamiento este producto. Guarde las instrucciones - Se deben guardar las instrucciones de seguridad y de funcionamiento como referencia futura. Preste atención a las advertencias - Se deben cumplir con todas las advertencias e instrucciones de funcionamiento del producto.
- Page 19 Parte superior, parte inferior, parte frontal, parte posterior, laterales izquierdo y derecho: 10 cm PRECAUCIÓN Los cambios o modificaciones a este equipo que no hayan sido aprobados expresamente por KRK SYSTEMS para su cumplimiento pueden anular la autoridad del usuario para poner en funcionamiento este equipo.
- Page 20 Este equipo cumple los límites de exposición a radiaciones de la IC descritos para un entorno no controlado. Este equipo debe estar instalado y funcionar Por la presente, Gibson Brands, Inc. Declara que el equipo de radio tipo GoAux 3 y GoAux 4 cumple la directiva 2014/53/UE. Puede encontrar el texto completo de la declaracón de conformidad de la UE en la dirección de Internet: www.krkmusic.com...
- Page 22 Siga estos pasos para configurar su GoAux. Visite www.krkmusic.com para ver vídeos y guías de soporte. 1. Abra la cremallera de la bolsa de transporte protectora y retire los soportes de aislamiento ajustables y ambos altavoces. 2. Busque y retire los tornillos moleteados del bolsillo de la bolsa (2 unidades). 3.
- Page 23 (mezcladora, interfaz de audio u ordenador) al nivel deseado. A continuación, utilice la rueda de volumen de la parte frontal del altavoz izquierdo para ajustar más el nivel. 10. Si tiene un GoAux 4 y quiere usar la función de corrección de sala automática, consulte la sección AJUSTES DE ARCO AUTO.
-
Page 24: Salida De Auriculares
ENTRADA DE MICRÓFONO ARC VOLUMEN/ ESPERA SALIDA DE AURICULARES Imágenes – GoAux 4 mostrado (el GoAux 3 es similar). - Page 25 PULSE EQ LF EQ HF PARA AJUSTAR ENTRADA IZQ/ENTRADA PULSE ARC AUTO DER DE 1/4” PARA EMPEZAR SALIDA A ENTRADA DE ALTAVOZ AUDIO USB DERECHO INTERRUPTOR ENTRADA CA DE ENCENDIDO Imágenes – GoAux 4 mostrado (el GoAux 3 es similar).
- Page 26 ENTRADA DE AUDIO USB (solo el GoAux 4): Entrada USB tipo B. Conexión directa a un puerto USB de ordenador. Cuando utilice esta conexión, asegúrese de seleccionarla como salida de audio en los ajustes de sonido de su ordenador o DAW.
- Page 27 Utilícelos para comprobar su trabajo o para escuchar música en silencio. ENTRADA DE MICRÓFONO ARC AUTO (solo para el GoAux 4): Entrada de 1/8” para el micrófono de medición ARC AUTO (consulte la sección Ajustes ARC auto para ver más información).
- Page 28 COLOCACIÓN Asegúrese de colocar el monitor con las conexiones de corriente y entrada en el lado izquierdo. Descargue y utilice la aplicación KRK Audio Tools para realizar los pasos siguientes. Los monitores de estudio izquierdo y derecho deben estar alejados aproximadamente 1 a 1,5 metros (3 a 5 pies) y dirigidos en un ángulo de...
- Page 29 AJUSTES ARC AUTO (solo para GoAux 4) Asegúrese de haber finalizado la sección COLOCACIÓN antes de empezar. 1. Acople el micrófono incluido a la entrada de micrófono de la parte frontal izquierda del monitor. 2. Coloque el micrófono a nivel de oreja en su posición de escucha ideal.
- Page 30 Para los monitores de grabación de la serie Expose, consulte la tarjeta de garantía y la política dedicadas de la serie Expose. KRK Systems garantiza las piezas y mano de obra para todos los auriculares y dispositivos de audio informáticos, incluidos dispositivos de corrección de sala durante un período de un (1) año desde...
- Page 31 www.krkmusic.com/warranty...
- Page 32 Manuales disponibles en diversos idiomas. Escanee para descargar. www.krkmusic.com/support/product-documentation...
- Page 33 Merci d’avoir acheté votre nouveau système de surveillance KRK GoAux. D’innombrables ingénieurs, producteurs, artistes et mixeurs professionnels de tout genre, dans le monde entier, ont utilisé ces moniteurs KRK pour proposer des productions primées au niveau international. Ce système de surveillance a été conçu avec plus de 30 ans d’innovation et d’expérience dans notre usine ultramoderne à...
- Page 34 CONSIGNES DE SÉCURITÉ IMPORTANTES À SUIVRE CONSIGNES DE SECURITE Lire les instructions - Veuillez lire l'ensemble des instructions concernant la sécurité et l'utilisation avant d'utiliser cet appareil. Conserver ce manuel - Les consignes de sécurité et d'utilisation doivent être conservées pour toute référence future. Tenez compte des avertissements - Tous les avertissements sur le produit et dans les instructions de fonctionnement doivent être respectés.
- Page 35 Face supérieure, inférieure, avant, arrière, gauche, droite : 10 cm ATTENTION Tout changement ou toute modification non expressément approuvé par la partie responsable de la conformité de KRK SYSTEMS pourrait annuler l'autorisation accordée à l'usager d'utiliser cet appareil. ATTENTION Pour éviter tout choc électrique, introduisez la lame la plus large de la fiche dans la borne correspondante de la prise et insérez complètement.
- Page 36 Cet équipement est conforme aux limites d’ exposition aux rayonnements de la IC établies pour unenvironnement non contrôé. Cet équipement doit être installé et fonctionne Par la présente, Gibson Brands, Inc. déclare que l’équipement radio de type GoAux 3 ou GoAux 4 est conforme à la directive 2014/53/UE. Le texte intégral de la déclaration de conformité UE est disponible à...
- Page 38 Suivez les étapes ci-dessous pour configurer votre GoAux. Visitez www.krkmusic.com pour accédez aux vidéos et des guides d’assistance. 1. Dézippez le sac protecteur de transport et retirez les deux supports d’isolation réglables et les deux haut-parleurs. 2. Repérez et retirez les vis moletées de la poche du sac (2 pièces). 3.
- Page 39 à l’avant du haut-parleur gauche pour régler davantage le niveau. 10. Si vous possédez un GoAux 4 et que vous souhaitez utiliser la fonction de correction spatiale automatique, veuillez consulter la section CONFIGURATION ARC AUTOMATIQUE.
-
Page 40: Sortie Casque
ENTRÉE MICRO VOLUME/VEILLE SORTIE CASQUE Images – illustration du GoAux 4 (le GoAux 3 est similaire). - Page 41 POUSSER POUR DROITE RCA AJUSTER L’ÉGALISEUR BF/ÉGALISEUR HF ENTRÉE GAUCHE/ENTRÉE POUSSER POUR DROITE 1/4” COMMENCER L’ARC AUTOMATIQUE SORTIE VERS LE ENTRÉE USB HAUT-PARLEUR AUDIO DROIT INTERRUPTEUR ENTRÉE CA D’ALIMENTATION Images – illustration du GoAux 4 (le GoAux 3 est similaire). PRINCIPAL...
- Page 42 ENTRÉE GAUCHE/DROITE TRS (GoAux 4 uniquement) – Entrées ¼” symétriques. Connexion aux interfaces audio, consoles de mixage ou autres équipements audio professionnels. Entrée USB AUDIO (GoAux 4 uniquement) – Entrée USB de type B. Connexion directe au port USB de l’ordinateur. Lorsque vous utilisez cette connexion, assurez-vous de la sélectionner comme sortie audio dans les paramètres sonores de votre ordinateur ou de votre station audio...
- Page 43 écouteurs sont branchés. Utilisez-la pour vérifier votre travail ou pour une écoute silencieuse. ENTRÉE MICRO DE L’ARC AUTOMATIQUE (GoAux 4 uniquement) – Entrée de 1/8” pour le microphone de mesure de l’ARC AUTOMATIQUE (voir la section Configuration de l’ARC automatique pour plus de détails).
- Page 44 Veillez à placer le moniteur avec les connexions d'alimentation et d'entrée sur le côté gauche. Téléchargez et utilisez l’application gratuite KRK Audio Tools pour les prochaines étapes. Les moniteurs de studio gauche et droit doivent être à environ 1 - 1,5 mètres l'un de l'autre et orientés à...
- Page 45 CONFIGURATION DE L’ARC AUTOMATIQUE (GoAux 4 uniquement) Assurez-vous d’avoir terminé la section PLACEMENT avant de commencer. 1. Fixez le microphone inclus à l’entrée du microphone à l’avant gauche du moniteur. 2. Positionnez le microphone à hauteur d’oreilles dans votre position d’écoute idéale.
- Page 46 Pour les moniteurs d’enregistrement de la série Expose, reportez-vous à la politique et à la carte de garantie de la série Expose spécifique. KRK Systems garantit les pièces et le travail sur tous les casques, les appareils audio informatiques, y compris les dispositifs de correction spatiale, pendant une période d’un (1) an à...
- Page 47 www.krkmusic.com/warranty...
- Page 48 Manuels disponibles en plusieurs langues. Numérisez pour télécharger. www.krkmusic.com/support/product-documentation...
- Page 49 Lautsprechersystem Kurzanleitung Vielen Dank, dass Sie sich für unser neues GoAux Lautsprechersystem von KRK entschieden haben. Bereits zahllose professionelle Tontechniker, Produzenten, Künstler und Mixer aus allen Genres und jeder Ecke der Welt haben Lautsprecher von KRK zur Schöpfung preisgekrönter Werke weltweit genutzt. Dieses Lautsprechersystem wurde mit mehr als 30 Jahren Innovation und Erfahrung in unserem hochmodernen Werk in Nashville, TN, USA entwickelt, in dem wir Produkte mit einem natürlichen und ausgewogenen Frequenzgang, geringer Verzerrung und herausragendem Klangbild herstellen.
- Page 50 WICHTIGE SICHERHEITSHINWEISE FOLGEN SICHERHEITSHINWEISE Hinweise lesen - Bevor Sie das Produkt in Betrieb nehmen, sollten Sie sämtliche Sicherheits- und Betriebshinweise lesen. Hinweise aufbewahren - Sie sollten die Sicherheits- und Betriebshinweise zum späteren Nachschlagen aufbewahren. Warnungen beachten - Sie sollten sämtlichen Warnhinweisen auf dem Produkt bzw. in der Bedienungsanleitung Folge leisten. Hinweisen folgen - Sie sollten sämtlichen Anweisungen zum Betrieb und zur Nutzung folgen.
- Page 51 Um eine gute Belüftung zu gewährleisten, sollten Sie die folgenden Mindestabstände rings um das Gehäuse des Lautsprechers einhalten: oben, unten, vorn, hinten, links, rechts: 10 cm VORSICHT Veränderungen oder Modifizierungen des Produkts, die nicht ausdrücklich von KRK SYSTEMS genehmigt sind, können zum Verlust der Betriebserlaubnis für das System führen. VORSICHT Um die Gefahr eines Stromschlags zu vermeiden, muss der Stecker vollständig in die Steckdose eingeführt werden.
- Page 52 Dieses Gerät entspricht den IC-Grenzwerten für Strahlenbelastung, die für eine unkontrollierte Umgebung dargelegt werden. Dieses Gerät muss installiert werden und funktionieren Hiermit erklärt Gibson Brands, Inc. dass die Funkausrüstungen GoAux 3 und GoAux 4 die Richtlinie 2014/53/EU erfüllen. Sie finden den vollständigen Text der EU Konformitätserklärung unter der folgenden Internetadresse: www.krkmusic.com...
- Page 54 Folgen Sie den nachstehenden Schritten zur Einrichtung Ihres GoAux. Besuchen Sie www.krkmusic.com für unterstützende Videos und Anleitungen. 1. Öffnen Sie die Schutzbeutel und nehmen Sie beide verstellbaren schall-isolierenden Ständer und die zwei Lautsprecher heraus. 2. Suchen Sie die Rändelschrauben (2 Stück) in der Tasche des Beutels und nehmen Sie sie heraus.
- Page 55 Lautsprechers, um den Kopplungsvorgang zu aktivieren und koppeln Sie Ihr Quellgerät gemäß den Anweisungen Ihres Geräts. 8. Stellen Sie bei der Verwendung des USB-Eingangs (nur GoAux 4) sicher, dass Sie diesen in den Klangeinstellungen Ihres Computers oder Ihrer DAW (Digitale Audio-Workstation) als Audioausgang einstellen.
- Page 56 ARC- MIKROFONEINGANG LAUTSTÄRKE / STANDBY KOPFHÖRERAUS GANG Abbildungen – GoAux 4 dargestellt (GoAux 3 ist ähnlich).
- Page 57 FÜR HF (Höhen) EQ / LF (Bässe) EQ 6,35-MM-KLINKENBUC AUTO ARC HSE FÜR LEFT IN (automatische (linken Eingang) / RIGHT IN (rechten Eingang) Raumkorrektur) STARTTASTE Ausgang zum USB-Audioeingang rechten Lautsprecher EIN-/AUS- NETZEINGANG SCHALTER Abbildungen – GoAux 4 dargestellt (GoAux 3 ist ähnlich).
- Page 58 RCA LEFT IN (linken Eingang) / RIGHT IN (rechten Eingang) – Unsymmetrische Cincheingänge. Anschluss an die Ausgänge von Audioschnittstellen, DJ-Mischpulten oder Audiogeräten für Endverbraucher. TRS LEFT IN (linken Eingang) / RIGHT IN (rechten Eingang) (nur GoAux 4) – Symmetrische 6,35-mm-Klinkeneingänge. Anschluss an die Ausgänge von Audioschnittstellen, DJ-Mischpulten oder anderen professionellen Audiogeräten.
- Page 59 AUTOM. ARC (nur GoAux 4) – Automatische Raumkorrekturfunktion. Halten Sie zum Starten die Taste gedrückt. (Weitere Informationen finden Sie im Abschnitt AUTOM. ARC-EINRICHTUNG). Ausgang zum rechten Lautsprecher – Lautsprecheranschluss für rechten Lautsprecher über 4-polige Steckverbinder. EIN-/AUS-SCHALTER – Ein-/Aus-Schalter für das System. Achten Sie darauf, dass sich der Schalter in der Position „ON (EIN)“...
- Page 60 Achten Sie darauf, dass sich der Lautsprecher mit dem Netz- und Eingangsanschluss auf der linken Seite befindet. Laden Sie die kostenlose Audio Tools-App von KRK herunter und verwenden Sie sie für die nächsten Schritte. Linker und rechter Studiolautsprecher sollten ca. 1–1,5 m voneinander entfernt und im Winkel von 60 Grad zur Hörposition ausgerichtet sein.
- Page 61 AUTOM. ARC-EINRICHTUNG (nur GoAux 4) Achten Sie darauf, dass Sie den Abschnitt AUFSTELLUNG abgeschlossen haben, bevor Sie beginnen. 1. Schließen Sie das mitgelieferte Mikrofon an den Mikrofoneingang vorne links am Lautsprecher an. 2. Positionieren Sie das Mikrofon auf Ohrhöhe Ihrer optimalen Hörposition.
- Page 62 Bei Gebrauch in völliger Übereinstimmung mit den KRK-Anweisungen und nur für Produkte, die in den Vereinigten Staaten eingesetzt werden, gewährt KRK Systems für alle Lautsprecher und ihr Zubehör eine Garantie von drei (3) Jahren auf Teile und Arbeit ab dem Original-Kaufdatum für alle Produkte, die bei einem autorisierten Händler in den USA gekauft wurden.
- Page 63 www.krkmusic.com/warranty...
- Page 64 Handbücher in mehreren Sprachen erhältlich. Zum Herunterladen scannen. www.krkmusic.com/support/product-documentation...
- Page 65 CHINESE GoAux 监听音箱系统 快速入门指南 感谢您购买新款 KRK GoAux 监听音箱系统。无数来自世界各地、不同流派的专业工程师、制作人、艺术家和混音师使用 KRK 监听音 箱推出了在全球范围内屡获殊荣的作品。以位于美国田纳西州纳什维尔的现代化设施为依托,我们设计和研发的产品可实现自然而又平衡 的频率响应,同时具有低失真、出色声像高质特性,该款监听音箱系统正是借助我们 30 多年的技术创新和丰富经验打造而成。...
- Page 66 重要的安全说明如下 安全说明 阅读说明 — 在使用本产品之前,必须阅读所有的安全和操作说明。 保存说明书 — 必须保存安全和操作说明书以备将来使用。 注意警告 — 必须遵守本产品上以及操作说明书中的所有警告。 遵守说明 — 所有的操作和使用说明都必须遵守。 清洁 — 在进行清洁之前,须将本产品插头从墙壁插座中拔出。不得用液体清洁剂或气雾清洁剂进行清理。须使用一块湿布进行擦拭。 附件 — 必须使用本产品制造商推荐的附件,否则会造成危险。 注意防水 — 不得在靠近水的地方使用本产品,例如,靠近浴缸、洗脸盆、厨房水槽或洗衣盆;在潮湿的地下室;或在泳池附近等。 附件 — 不得将本产品放置在不稳的购物车、看台、三脚架、托架或桌子上。否则,本产品会坠落,从而造成儿童或成人重伤,并使产品严重受损。仅用于由制造商推荐或与本产品一起出售的购物车、 看台、三脚架、托架或桌子。本产品的任何安装都必须符合制造商的说明,并使用制造商推荐的安装附件。 购物车 — 必须小心推动本产品和购物车。突然停止、过度受力以及不平地面都会导致本产品和购物车的倾翻。 通风 — 必须在机柜内配备通风用窄槽和开口,以确保本产品的可靠运行,并使其免于过热。这些开口不得被阻挡或遮住。不得将本产品放置在床、沙发、地毯等类似表面上而使开口受阻。 除非提供适当的通风或已遵守制造商的说明,否则不得将本产品置于内置式装置内,如书架或行李架上。 电源 — 本产品只能使用标签上指定的电源类型。 电源线保护 — 合理布置电源线,使其不会被踩踏或被放置其上的物品挤压,须特别注意插头、电源插座以及产品出口处的电源线。 主电源插头...
- Page 67 与布局有关的注意事项 要保持正常的通风,须确保在本装置的周围留有比如下尺寸(距离最大的外形尺寸,包括凸出部分)相同或更大的尺寸。上面、下面、前面、后面、左侧、右侧:10 cm 注意 未经负责合规的 KRK SYSTEMS 明确批准的对此设备的更改或改装可能会使用户丧失操作此设备的权限。 注意 要避免触电,就要使插头的宽插片完全插入插座的槽内。 注意 能在本装置的后面板处找到铭牌。 警告 为了减少火或触电的危险,请勿将设备暴露在雨水或潮湿环境中。 不将本装置暴露在滴水或溅水环境中,以及不得将装有液体的物体(如花瓶)置于本装置上。 如果将主电源插头用作断开装置,就必须保持在预期的使用期间随时可用。为了将本装置完全从主电源插座断开,就必须将主电源插头从主电源插座内完全拔出。 不得将电池暴露在过热的环境中,如阳光直射、明火等。 有关环境保护的注意事项 在使用寿命结束时,本产品不得与日常生活垃圾一起处置,而是必须送往垃圾收集站以回收电气电子设备。本产品、用户手册和包装上的符号由此说明。 材料能够按照其标志进行再利用。通过材料的再利用、回收利用或旧产品其他形式的回收利用,您对我们的环境保护做出了重要的贡献。 当地管理机构能够可为您提供关于负责废物处理点的建议。 FCC 声明 本设备符合FCC规则第15部分的内容。操作时须遵守下列两个条件: 本设备不得造成有害干扰,以及 本设备必须接受所收到的任何干扰,包括可能导致意外操作的干扰。 注意:根据FCC规则的第15部分,本设备经测试发现符合B类数字设备的限制条件。这些限制条件是为了防护居住区域的有害干扰。 本设备产生、使用并会辐射无线电频率能量;如不按照说明规定进行安装和使用,可能会给无线电通讯产生有害干扰。然而,我们无法保证某个特别装置内不发生干扰。如本设备对无线电或电视接收信号造 成了有害干扰,且这种干扰可通过关闭和打开设备进行判定,这时用户应通过下列一种或多种措施来解除此类干扰: 给接收天线重新定位或换个位置。 扩大设备和接收器之间的距离。 设备与接收器不要连接同一个插座。 咨询经销商或有经验的无线电/电视技术人员寻求帮助。 注意:对于未经授权改装本设备造成的任何无线电或电视干扰,制造商概不负责。这种改装可能会使用户丧失操作此设备的权限。 射频暴露 本设备符合美国联邦通信委员会 (FCC) 针对非受控环境规定的辐射暴露限制。安装和使用本设备时,您的身体和散热器应保持至少 20 cm 的距离。此发射器不能与其他天线或发射器位于同一地点或与这些...
- Page 68 本装置符合 CAN ICES-003 (B)/NMB-003(B) 的规定。 加拿大科学与经济发展部免许可证 RSS 标准。操作时须遵守下列两个条件: (1) 本装置不会产生干扰。 (2) 本装置必须接受任何干扰,包括可能导致设备意外运行的干扰。 本设备符合针对非不受控环境所设定的 IC 辐射暴露限制。本设备必须安装并正常运行。 Gibson Brands, Inc. 特此声明 GoAux 3 和 GoAux 4 类型的无线电设备符合 2014/53/EU 指令。可登录下列网址查询 EU 符合性声明的全文内容:www.krkmusic.com 1.本设备包含型号核准代码为 CMIIT ID:2022DP0306 的无线电发射模块。 型号核准的代码在产品外观可见 仅适用于在非热带气候条件下安全使用 仅适用于在海拔 2000 米以下地区安全使用 制造商信息: 公司名称:Gibson Brands, Inc.
- Page 70 按照以下步骤设置您的 GoAux。 访问 www.krkmusic.com 可观看视频和获取指南。 1. 拉开便携保护包的拉链,取出两个可调减震支架和两个音箱。 2. 从包中口袋里找到并取出滚花指旋螺钉(2 根) 。 3. 将音箱倒置,使用指旋螺钉将支架安装在音箱上,并标记音箱的方向。 如果需要将音箱向上倾斜,则音箱的正面应朝向支架的正面。如果需要将音箱向下倾斜,则音 箱的正面朝向支架的背面。 4. 按照音箱放置部分的说明放置音箱。 5. 将电源线、连接到右音箱线与两个音箱和输入电缆(如果未使用蓝牙)相连接。 打开位于左音箱背面的电源开关;注意:正面的音量旋钮呈琥珀色亮起,表示系统处于活动状态并 可供使用。...
- Page 71 7. 如果使用的是蓝牙选项,则按下左音箱背面的 Bluetooth(蓝牙)按钮以启用配对,并按照您的设备 说明与您的声源设备进行配对。 8. 如果使用的是 USB 输入(仅限 GoAux 4) ;则应确保在电脑或 DAW 的声音设置中选择 USB 端 口作为音频输出。 9. 通过您的声源播放一段音频曲目,并缓慢地将声源设备(混音器、音频接口或电脑)的音量调高至 所需的聆听音量;然后,使用左音箱正面的音量旋钮进一步调节音量。 10. 如果您拥有 GoAux 4 并想使用自动空间校正功能,请参见自动 ARC 设置部分。...
- Page 72 ARC 麦克风输入 音量 / 待机 耳机输出 GoAux 4 GoAux 3 图片 – 示意图( 与其类似) 。...
- Page 73 辅助输入立体声 蓝牙点击配对 1/8” RCA 左声道输入 / 右声道输入 低频均衡 / 高频均 衡按此按钮调整 1/4” 左声道输入 / 自动 ARC 按此按 右声道输入 钮开始 USB 音频输入 连接到右音箱 主电源开关 交流输入 GoAux 4 GoAux 3 图片 – 示意图( 与其类似) 。...
- Page 74 系统控制和连接 辅助输入 – 立体声 1/8” 模拟输入。连接到电脑、媒体播放器或手机输出。 RCA 左声道输入 / 右声道输入 – 非平衡 RCA 输入。连接到音频接口、DJ 混音器或消费类音频设 备。 TRS 左声道输入 / 右声道输入(仅限 GoAux 4) – 平衡 ¼”输入。连接到音频接口、混音台或其他 专业音频设备。 USB 音频输入(仅限 GoAux 4) – USB-B 型输入。直接连接到电脑的 USB 端口。使用此连接时, 确保在电脑或 DAW 的声音设置中选择 USB 端口作为音频输出。...
- Page 75 连接到右音箱 – 音箱电平连接,通过 4 针锁紧连接器连接到右音箱。 主电源开关 – 系统的主电源开关。确保开关处于“ON”位置以向系统供电。 交流输入 – 在此处连接随附电源线。 耳机输出 – 立体声 1/8” 耳机输出。插入耳机时禁用音箱输出。用于检查您的作品或静音聆听。 自动 ARC 麦克风输入(仅限 GoAux 4) – 1/8” 输入,用于自动 AUTO ARC 测试麦克风(请参见 自动 ARC 设置部分了解详细信息。 ) 音量 / 待机 – 多功能旋钮。顺时针旋转可调高音量,逆时针旋转可调低音量。按两下可将系统从待机 模式下唤醒。长按 3 秒可使系统进入待机模式。 (系统处于活动状态时,指示灯环呈琥珀色点亮;系统...
- Page 76 音箱放置 确保将带有电源和输入连接的监听音箱置于左侧。下载并使用免费的 KRK Audio Tools 应用进行后续步骤。 左右两个监听音箱必须相距大约 1 到 1.5 米(3 到 5 英尺)并与收听位 置成 60 度角。 测量左、右监听音箱之间的距离,并注意聆听位置到两侧的距离保持相等。 这样会形成一个等边三角形。左、右监听音箱的声级相同非常重要。 GoAux 监听音箱系列为双向监听音箱,音箱外壳内配有高音单元(产生高 频)和低音单元(产生中低频) 。高音单元和低音单元之间的中点为声轴。 确保声轴处于聆听位置的齐耳高度。 使用减震支架中内置的倾斜机构将声轴 调整到正确位置。...
- Page 77 自动 ARC 设置(仅限 GoAux 4) 确保在开始之前已完成音箱放置部分。 1. 将随附的麦克风连接到监听音箱正面左侧的麦克风输入。 2. 将麦克风置于您理想聆听位置的齐耳高度。 3. 长按左音箱背面的 Auto ARC 按钮。 4. 音箱将播放一段 25 种音调的声音,然后再重复播放;可能会持续几分钟。在此期间切勿移动 麦克风。 5. 测试完成之后, 会发出一段快速的低频音调, 表示 Auto ARC (自动音频回传通道) 设置已完成。 此时可断开麦克风连接并将其放入便携包中。...
- Page 78 KRK 产品保修 关于您的保修 对于所有从美国授权经销商处购买的产品,自原始购买之日起三 (3) 年内,如果严格按照 KRK 说明使用并且仅用于在美国经营的产品,KRK Systems 为 所有监听音箱及护栅配件的提供部件和人工保修。对于在美国境外购买的商品,请联系当地经销商或分销商以了解有关保修条款和条件的具体信息。对于 Expose 系列录音监听音箱,请参照 Expose 系列专用保修卡和政策。自原始购买之日起一 (1) 年内,KRK Systems 为所有耳机、电脑音频设备(包括空间 校正设备)的提供部件和人工保修。如果在正常安装和使用的情况下出现缺陷,则根据本保修对缺陷部件进行维修。 本保修仅限于因工艺或材料缺陷而需要进行的部件维修及更换。对于因不当使用、滥用、疏忽、意外事故、运输损坏或未经授权的维修而导致的损坏或故 障(由 KRK Systems 自行确定) ,KRK 不承担任何责任。任何此类不当使用、滥用、疏忽、意外事故、运输损坏或未经授权的维修均将导致本保修失效。 除非在此另有说明,对于任何 KRK Systems 产品,KRK Systems 未作任何明示或暗示的陈述或保证,包括针对特定用途的适销性或适用性的任何暗示保 证,特此明确放弃和否认所有此类保证。 在任何情况下,KRK Systems 均不对特殊、意外、后果性、惩罚性或间接损害承担责任,包括但不限于利润损失或数据丢失。对于向 KRK Systems 提起...
- Page 79 www.krkmusic.com/warranty...
- Page 80 手册以多种语言提供。扫描下载。 www.krkmusic.com/support/product-documentation...
- Page 81 JAPANESE GoAuxモニターシステム クイックスタートガイド KRK GoAux モニタリングシステムをお買い上げくださりありがとうございます。あらゆるジャンルで、世界中の数多くのプロエンジ ニア、プロデューサー、アーティスト、ミキサーが、KRK モニターを使用して作品を制作し賞を受賞してきました。このモニタリン グシステムは、歪が少なく優れた音像を再現し自然でバランスの取れた周波数応答を実現する製品を設計、開発している、アメリカの テネシー州ナッシュビルの最新設備にて、30 年以上にわたるイノベーションと経験に基づいて設計製造されました。...
- Page 82 安全上の留意項目 補足 安全に関する指示 指示を熟読する — 本器を使用する前に、安全に取り扱うための指示をすべてお読みください。 取扱説明書を保管しておく — 将来参照できるように、本書を大切に保管しておいてください。 警告を遵守する — 製品や取扱説明書に記載されている警告を必ず守ってください。 指示に従う — 操作や使用に関する指示に必ず従ってください。 洗浄 — 本器を洗浄する前に、コンセントを抜いてください。液体クリーナーやスプレー式クリーナーは使わないでください。洗浄には湿らせた布をお使いください。 付属品 — メーカーで推奨していない付属品を取り付けると危険を引き起こす原因となることがあります。 水と湿気 — この製品を水の近くで使用しないでください。たとえば、浴槽、洗面器、台所の流し台、洗濯槽の近く、あるいは湿った地下室、またはプールの近くなどです。 アクセサリ — 本器を、不安定なカート・スタンド・三脚・ブラケット・テーブルの上に置かないでください。本器が人の上に落下すると、大怪我をすることがあります。また、本器に重大な損傷 が発生することがあります。メーカーが推奨するカート・スタンド・三脚・ブラケット・テーブル、または、本器専用に別売されているカート・スタンド・三脚・ブラケット・テーブルの上で使 用してください。本器を据え付ける際にはメーカーの指示に従い、メーカーが推奨するマウント アクセサリをご使用ください。 カート — カートの上に本器を載せて移動する場合には、十分注意を払った上で移動させてください。急激に停止したり、余分な力を加えたり、不均一な面の上を移動させると、本器を載せたカー トが倒れることがあります。 通気 — 筐体には、本器の確実な動作を保証し、過熱から保護するために、通気口が設けてあります。この通気口をふさがないようにご注意ください。本器をベッドやソファーや 敷物などの上に置くと通気口がふさがれることがあるので、絶対にそのような場所で本器を使用しないでください。通気が不十分だったり、メーカーの指示に従うことができない 場合には、本器を既設の本棚やラックなどに設置しないでください。 電源 — 本器はマーキングラベルに記載された電源装置のみを使用して操作してください。 電源コードの保護...
- Page 83 警告 二等辺三角形の中の矢印のついた稲妻の閃光のシンボルは、人に電気ショックを与えるに十分な、絶縁されていない「高電圧」の危険が製品のケース内にあることを警告するものです。 二等辺三角形の中の感嘆符合は、重要な操作方法およびメンテナンス方法の記述が製品に付属の説明書にあることを示します。 注意 本器は接地端子付きのコンセントに接続してください 感電のリスク開封禁止 設置に関する注意事項 通気を十分に維持するため、本器の周囲に(突起など最大寸法の部分から測って) 、以下に示す値よりも大きな空間があることを確認してください。上面、底面、前面、後面、左側面、右側面:10 cm 注意 本装置に、KRK SYSTEMSが明示的に許可していない変更や改造を加えた場合、ユーザーは、本装置を使用する権利を失うことがあります。 注意 感電を防止するため、プラグの幅の広い方の舌片を幅の広い方の溝に入れ、プラグを一番奥まで差し込んでください。 注意 マーキングや定格を記載したプレートは、本器の背面に貼付してあります。 警告 火災や感電を防止するため、本器を雨や水で濡らさないでください。 水滴がかからないように、本器の上に花瓶など液体の入った容器を置かないでください。 断路装置として電源プラグを使用した場合、電源接続器は直ちに動作する状態になっています。本器を電源から完全に切り離すには、コンセントから電源プラグを完全に抜いてください。 バッテリーを、直射日光や裸火などの高温の熱源にさらさないでください。 環境保護に関する注意事項 この製品は、耐用年数の経過後、通常の家庭ごみと一緒に廃棄することはできず、電気電子機器のリサイクルのための収集場所に戻さなければなりません。本器や取扱説明書や梱包材に、その旨記載し てあります。 使用材料は、それぞれのマーキングに従って再利用できます。原材料の再利用やリサイクル、および、古い製品のリサイクルを通じて、大切な環境が保護されます。 回収施設の場所については、お近くの地方自治体にお尋ねください。 FCCステートメント 本装置は、FCC(米国連邦通信委員会)規則第15章の内容に準拠しています。取り扱いは以下の2つの条件を守って行なわれる必要があります: 本装置は、有害な干渉を起こす可能性はありません。また、 本装置は、予期せぬ動作を引き起こす可能性のあるものを含め、すべ て の 干渉を 受信しな ければなりません。 注記: 本機器は、テストされ、FCC(米国連邦通信委員会)規則第15章に従った、クラス B デジタル機器に対する制限に準拠することがわかっています。これらの制限は、住宅への設置における有害...
- Page 84 本装置は CAN ICES-003 (B)/NMB-003(B) を満たしています。 カナダ連邦政府イノベーション・科学経済開発省の免許不要 RSS。取り扱いは以下の2つの条件を守って行なわれる必要があります: (1) 本装置が有害な妨害を発生させないこと。 (2) 本装置は、その動作に影響を及ぼすような妨害を受ける恐れがあることを留意の上で使用すること。 本装置は、非制御環境下でのカナダ産業省電磁波曝露限度に関する規定を遵守しています。本装置は設置され機能していなければなりません Gibson Brands, Inc. では、 無線機器形式名 GoAux 3 および GoAux 4 が指令 2014/53/EU に準拠していることを宣言します。 EU 適合宣言の全文は、 以下の URL でご覧いただけます:www.krkmusic.com 1.本装置には、CMIIT ID が 2022DP0306 である無線送信器モジュールが内蔵されています。 CMIIT IDは、製品外側に表示してあります。 安全のため、熱帯以外の気候でのみご使用ください。 安全のため、標高2000メートル以下でご使用ください。 製造者に関する情報:...
- Page 86 GoAuxの設定は、以下の手順に従ってください。 サポートビデオとガイドは www.krkmusic.com をご覧ください。 1. 保護キャリーバッグを開けて、 アジャスタブルアイソレーションスタンドと2つのスピーカーを取 り出します。 2. バッグのポケットからローレットつまみねじを探して取り出します(2個) 。 3. スピーカーを上下逆さにして、つまみねじでスピーカーにスタンドを取り付けます。スピーカー の方向を記号で表しています。 スピーカーの角度を上に向ける必要がある場合、スピーカーの正面をスタンドの正面に向け ます。スピーカーを下に向ける必要がある場合は、スピーカーの正面を後ろに向けます。 4. 配置セクションの説明に従って、スピーカーを配置します。 5. 電源ケーブル、右スピーカーへ出力ケーブルを両方のスピーカーに接続し、 (Bluetoothを使用しな い場合は)入力ケーブルを接続します。...
- Page 87 左のスピーカー背面にある電源スイッチを入れます。前面のボリュームつまみが黄色に点灯する のを確認してください。システムがアクティブで利用可能であることを示しています。 7. Bluetoothオプションを使う場合は、左のスピーカー背面のBluetoothボタンを押してペアリングを 有効にし、お使いのデバイスの指示に従って、ソースデバイスとペアリングしてください。 8. USB入力を使う場合 (GoAux 4のみ) は、 コンピューターやDAWの音声設定のオーディオ出力で、 これを選択していることを確認してください。 9. ソースデバイスのオーディオトラックを再生し、ソースデバイス(ミキサー、オーディオインタ ーフェイス、コンピューター)の音量をゆっくり上げて、お好みの音量レベルにしてください。 それから、左のスピーカー前面のボリュームつまみを使って、さらに音量レベルを調整してくだ さい。 10. GoAux 4で、自動室内音響補正をお使いになる場合は、自動ARC設定のセクションをご覧くださ い。...
- Page 88 ARC マイク入力 ボリューム / スタ ンバイ ヘッドフォン出力 GoAux 4 (GoAux 3 画像は です も同様 。...
- Page 89 オ 1/8” プしてペアリング RCA 左 入力 / 右 入力 LF EQ / HF EQ 押 して調整 1/4” 左 入力 / 右 自動 ARC 押して開 入力 始 USB 音声入力 右スピーカーへ出 力 AC 入力 主電源スイッチ GoAux 4 (GoAux 3 画像は です も同様 。...
- Page 90 AUX入力 – ステレオ 1/8” アナログ入力。コンピューター、メディアプレーヤー、携帯電話出力に 接続。 RCA 左/右 入力 – アンバランスRCA入力。オーディオインターフェイス、DJミキサー、家庭用オー ディオギアと接続。 TRS 左/右 入力 (GoAux 4のみ) – バランス ¼”入力。オーディオインターフェイス、ミキシングコ ンソール、その他のプロ用オーディオ機器と接続。 USB 音声入力 (GoAux 4のみ) – USB-タイプB 入力。 コンピューターのUSBポートに直接接続。 この 接続を使う場合は、 コンピューターやDAWの音声設定のオーディオ出力で、 これを選択していること を確認してください。 BLUETOOTH – ワイヤレスのオーディオストリーミング用Bluetooth。Bluetooth利用可能なオーディ オデバイス、すなわち、コンピューター、iPhone、Android、メディアプレーヤーなどに接続。長押し でペアリング。青色LEDがペアリングモードになると急速に点滅し、ペアリングすると点灯します。 LF / HF EQ – 低周波帯域と高周波帯域のレベルを調整し、リスニング環境やテイストのバランスを...
- Page 91 自動ARC (GoAux 4のみ) – 自動室内音響補正機能。長押しで開始。(詳細は自動ARC設定セクション をご覧ください。) 右スピーカーへ出力 – ロック付き4ピンコネクタで右スピーカーにスピーカーレベル接続。 主電源スイッチ – システムの主電源スイッチ。システムに電源を供給するには、スイッチが「ON」 になっていることを確認してください。 AC入力 – 付属の電源ケーブルをここに接続。 ヘッドフォン出力 – ステレオ 1/8” ヘッドフォン出力。ヘッドフォン接続時はスピーカーからの出 力は無効になります。作業の確認や静かに聞きたいときに使用してください。 自動ARCマイク入力 (GoAux 4のみ) – 自動ARC測定マイクロフォン用1/8” 入力(詳しくは自動ARC 設定セクション参照)。 ボリューム / スタンバイ – マルチファンクションつまみ。右に回すと音量が上がり、左に回すと音 量が下がります。2回押すと、スタンバイモードを停止し、システムが起動します。3秒間長押しする と、システムはスタンバイモードになります。(システムが起動中はLEDのリングが黄色になり、スタ ンバイモード中は消えます。)
- Page 92 配置 電源と入力端子のついたモニターを必ず左側に配置してください。 次の手 順については、無料のKRK Audio Toolsアプリをダウンロードしてお使い ください。 左右のスタジオ モニターの間の距離を 1~1.5 メートルにし、リスニン グ ポジションから見た左右スピーカーの間の角度が60度になるように配 置します。 左右のスタジオ モニターの間の距離を測り、 リスニング ポジションと左 右のスタジオ モニターとの間の距離が、等しくになるようにします。こ のとき、 リスニング ポジションと左右のスタジオ モニターで正三角形が 構成されます。左右のスタジオ モニターのレベルをマッチさせることが 重要です。 GoAuxモニターシリーズは、ツイーター (高音を再生する) とウーハー (中低音を再生する) が1台の筐体に収納された2 ウェイ スタジオ モニ ターです。ツイーターとウーハーの中間ポイントが音響軸です。音響軸が リスニングポジションの耳の高さになるようにしてください。 アイソレー ションスタンドに組み込まれたティルト機構を使って、 音響軸が正しい位...
- Page 93 自動ARC設定(GoAux 4のみ) 開始する前に、配置セクションが完了したことを確認してください。 1. 付属のマイクをモニターの前面左のマイク入力に取り付けてください。 2. マイクの位置を最適なリスニングポジションの耳の高さにしてください。 3. 左のスピーカー背面の自動 ARC ボタンを長押しします。 4. スピーカーから一連の25の音が出て繰り返します。これは、数分間続く可能性があります。 この間、マイクを動かさないでください。 5. テストが完了したら、短い低周波トーンで、自動ARCが終了したことを示します。これで、 マイクを取り外してキャリーバッグに収納できます。...
- Page 94 KRK 製品保証 保証について KRKの指示に厳密にしたがって使用され、アメリカ国内で運用されている製品にのみ使用される場合、KRK Systemsは、アメリカ国内の正規販売店から 購入したすべてのモニターおよびグリルアクセサリーについて、元の購入日から3年間、部品および対応を保証します。アメリカ国外で購入され商品の 場合、保証条件の具体的な情報については、最寄りの販売店または販売代理店にお問い合わせください。Exposeシリーズのレコーディングモニターに ついては、Exposeシリーズ専用の保証書および保証規定をご参照ください。KRK Systemsは、すべてのヘッドフォン、室内音響補正機器を含む、コンピ ューターオーディオデバイスについて、元の購入日から1年間、部品および対応を保証します。欠陥のある部品については、通常の設置および使用で欠 陥が発生した場合、この保証の下で修理されます。 この保証は、製造または材料の問題によって必要となった部品および交換の修理に限定されます。KRKは、KRK Systems独自の見解に基づき、誤用、濫 用、 不注意、事故、輸送中の損傷、または正規の許可を受けていない修理の結果として生じた損傷または誤動作について責任を負いません。そのよう な誤用、乱用、不注意、事故、輸送中の損傷、または正規の許可を受けていない修理は、この保証を無効にします。 本書に特に記載されている場合を除き、KRK Systemsは、明示または黙示を問わず、KRK Systems製品に関して、商品性または特定目的への適合性の黙 示の保証を含め、一切の表明または保証を行いません。 いかなる場合においてもKRK Systemsは、利益の損失またはデータの損失を含むがこれらに限定されない、特別、偶発的、結果的、懲罰的、または間接 的な損害について責任を負わないものとします。 KRK Systemsに対して提起された訴訟については、 不法行為、 契約またはその他の法理論にかかわらず、 いかなる場合においても、KRK Systemsの責任は、根本的な請求を生じさせた製品について、購入者が認定ディーラーまたは代理人に支払った合計金額 を超えないものとします。 なお、州や国によって黙示的な保証の除外や制限が認められていないことがあり、上記が適用されない場合があります。この保証はお客様に特定の法 的権利を与えますが、また州ごとに異なる他の権利が認められることがあります。この保証は、お客様がKRKの正規販売店から購入したKRK Systems 製品にのみ適用されます。 Gibsonカスタマーサービス担当者に連絡するには、l.800.4GIBSONに電話するか、 service@gibson.com. にメールを送信してください。ヨーロッパでの サポートについては、00+800.4GIBSON1に電話するか、service.europe@gibson.comにメールを送信してください。他のすべての地域については、 1.615.871.4500に連絡するか、メールでお問い合わせください service@gibson.com。...
- Page 95 www.krkmusic.com/warranty...
- Page 96 マニュアルは複数の言語でご利用いただけます。スキャンしてダウンロードしてください。 www.krkmusic.com/support/product-documentation...
Need help?
Do you have a question about the GoAux 4 and is the answer not in the manual?
Questions and answers