Advertisement
- 1 About water-resistant (drip-proof) performance
- 2 For a more comfortable Bluetooth communication experience
- 3 Part names and functions
- 4 Charging case
- 5 Charging the battery
- 6 Power supply ON/OFF
- 7 Connecting via Bluetooth
- 8 Wearing the product
- 9 Touch sensors
- 10 Unlocking
- 11 Using the product
- 12 Indicator lamp display
- 13 Voice guidance
- 14 Cleaning
- 15 Eartips
- 16 Resetting
- 17 Troubleshooting
- 18 Specifications
- 19 Notes on use
- 20 Documents / Resources
About water-resistant (drip-proof) performance
- The water-resistant (drip-proof) specification of this product applies only to the headphones, not the charging case.
- Although the headphones have water-resistant (drip-proof) capabilities equivalent to IPX4, the part where the sound comes from is not water-resistant (drip-proof).
- The water-resistant (drip-proof) performance is designed to protect the headphones if they get wet from rain, etc. (equivalent to IPX4). JIS/IEC protection grade IPX4 means that the product is protected against exposure to flying water from all directions.
- The headphones cannot be used underwater.
- The headphones cannot be used in hot and humid places, such as bathrooms.
- The headphones are not waterproof. Submerging them in water may cause damage.
- The headphones may not function properly if they become wet. Wipe the headphones with a dry cloth, shake them multiple times to remove any excess water, and allow the headphones to dry thoroughly before use.
For a more comfortable Bluetooth communication experience
The effective communication range of this product varies depending on obstructions and radio wave conditions. For a more enjoyable experience, please use the product as close as possible to the Bluetooth device. To minimize noise and sound disruptions, avoid placing your body or other obstacles between the product's antenna and the Bluetooth device.

 Antenna
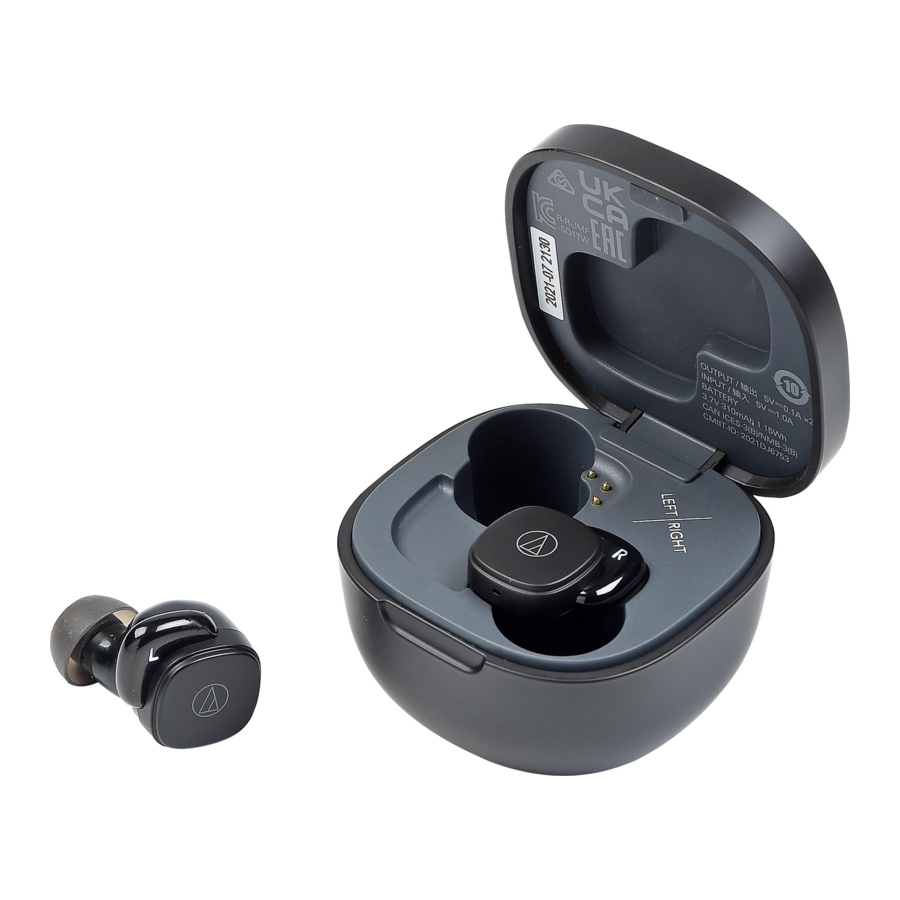
Part names and functions
Headphones

- Indicator lamps (L/R (left/right) indicator)
Displays the operating status and battery level of the headphones. - Touch sensors
Use to play/pause music, answer phone calls, and adjust sound volume. Alternatively, use to operate specific functions such as turning on/off hear-through mode or low latency mode. - Microphones
 The microphone on the L (left) side has a protrusion for distinguishing between the left and right headphones.
Charging case

- Cover
- Battery jack
Use to connect the included USB charging cable and charge the product. - Charging indicator lamp
Lights/flashes when charging the charging case.
Accessories

- USB charging cable (30 cm (12"), USB Type-A / USB Type-C™)
- Eartips (XS, S, M, L)
At the time of purchase, the M-size eartips are attached to the product.
Charging the battery
- Fully charge the battery when using for the first time.
- When the rechargeable battery is running low, the voice guidance will play the message "Low battery", and the indicator lamp will flash in red. Charge the battery as soon as possible.
- It takes about 1.5 hours to fully charge the headphones, and about 2 hours to fully charge the charging case. (Charging times may vary depending on usage conditions.)
- Charge the product in a well-ventilated place (10 to 35°C (50 to 95°F)) away from direct sunlight. Otherwise, the battery may deteriorate, possibly resulting in shorter periods of continuous use or may fail to charge.
Charging the headphones and charging case
- Connect the included USB charging cable (USB Type-C side) to the battery jack of the charging case.
- The included USB charging cable is designed for exclusive use with the product. Do not use any other USB charging cable.
- When inserting the USB charging cable into the USB port or battery jack, insert it directly (horizontally).

- USB Type-A
- USB Type-C
- After placing the headphones in the charging case, close the cover.
![]()
- Connect the included USB charging cable (USB Type-A side) to the computer to start charging.
- While charging, the indicator lamp lights/flashes as follows. (It may take several seconds for the indicator lamp to light.)


| Indicator lamp | Status |
| Flashing white | Charging |
| Lights in white for 12 seconds, and then turns off | Charging complete |
| Flashing white quickly | Charging error [1] |
[1] Charge the product in a well-ventilated place (10 to 35°C (50 to 95°F)) away from direct sunlight.
- When charging is complete, disconnect the USB charging cable (USB Type-A side) from the computer.
- Disconnect the USB charging cable (USB Type-C side) from the battery jack on the charging case.
 When charging, make sure to use the included USB charging cable. The product may not charge with cables other than the included USB charging cable.
Charging headphones without the USB charging cable
A rechargeable battery is built into the charging case. If you have charged the charging case, you can charge the headphones without using the USB charging cable.
- Place the headphones in the charging case and close the cover.
- While charging, the indicator lamps light as follows. (It may take several seconds for the indicator lamps to light.)
![]()
![]() : Indicator lamps
: Indicator lamps
- While charging, the indicator lamps light as follows. (It may take several seconds for the indicator lamps to light.)

 : Indicator lamps
| Indicator lamp | Status |
| Lights in white | Charging |
| Off | Charging complete / Charging case battery has no power |
Power supply ON/OFF
Turning on the product
- Remove the headphones from the charging case.
![]()
The power will turn on automatically, and the indicator lamps will light in white and then flash.
Voice guidance is played.

- It may take several seconds for the indicator lamps to light.
- See "Voice guidance" for more information on voice guidance.
Turning off the product
- Place the headphones in the charging case.
![]()
The power will turn off automatically.

Connecting via Bluetooth
To connect the product to a Bluetooth device, the product needs to pair (register) with the device.
Pairing a Bluetooth device
- Read the user manual for the Bluetooth device.
- Place the Bluetooth device within 1 m (3.3') of the product to perform pairing correctly.
- Wear the headphones to hear voice guidance during pairing.
- Remove the headphones (L (left) and R (right)) from the charging case.
- The indicator lamps will light in white, and then flash. (Depending on the order the L (left) and R (right) side headphones are removed from the charging case, the indicator lamp on one side will flash white quickly, and the other will flash white slowly.)
![]()
- The indicator lamps will light in white, and then flash. (Depending on the order the L (left) and R (right) side headphones are removed from the charging case, the indicator lamp on one side will flash white quickly, and the other will flash white slowly.)
- Use your Bluetooth device to begin the pairing process and search for the product. When your Bluetooth device finds the product, "ATH-SQ1TW" will be displayed on the device.
- For information about using your Bluetooth device, refer to the device's user manual.
- Select "ATH-SQ1TW" to pair the product and your Bluetooth device.
- Some devices may ask for a passkey. In this case, enter "0000". The passkey may also be called a passcode, PIN code, PIN number, or password.
![]()
The voice guidance will play the message "Bluetooth connected" when pairing is complete. The indicator lamps will begin flashing slowly in white.
- Some devices may ask for a passkey. In this case, enter "0000". The passkey may also be called a passcode, PIN code, PIN number, or password.


Pairing with Fast Pair

In one touch, the product enables quick, effortless Bluetooth pairing with your Android devices. You can even check to see where you last placed it.
- Turn on the Bluetooth function on an Android device configured with a Google account.
- Remove the headphones (L (left) and R (right)) from the charging case and bring them close to the Android device.
- Be sure to remove both headphones (L (left) and R (right)) from the charging case. No notification will appear on the Android device if only one headphone is removed.
![]()
- Be sure to remove both headphones (L (left) and R (right)) from the charging case. No notification will appear on the Android device if only one headphone is removed.
- Touch the pairing notification that appears on your Android device.
- The voice guidance will play the message "Bluetooth connected" when pairing is complete. The indicator lamps will begin flashing slowly in white.
About pairing
When connecting a new Bluetooth device, you need to pair it with the product. Once the Bluetooth device and the product are paired, you do not need to pair them again. The product supports multipairing, in which a connection history is saved. However, in the following cases you will need to pair again even if the Bluetooth device was paired once:
- If the product is deleted from the Bluetooth device's connection history.
- If the product is sent out for repair.
- If the product is reset.
Wearing the product
Insert the side of the product marked "L" (left) into the left ear and the side marked "R" (right) into the right ear.
- If you have difficulty inserting the headphones, adjust the position as desired by rotating the headphones backward.


Touch sensors
The product has touch sensors. When performing operations, touch the sensors using the pad of your finger, not the fingertip.

- Operate the touch sensor with one finger. Operating with a sharp-tipped object, such as a ballpoint pen or pencil, may result not only in incorrect operation, but also damage to the touch sensor.
- Do not touch the touch sensor with your fingertips. Doing so may cause your fingernail to break.
- If the product does not operate at all or as intended when touched, check to make sure that your other fingers, parts of your hand, or clothing items are not in contact when touching. Also, the product may not operate correctly if you are wearing gloves or if your fingertips are too dry.
- The product may not operate correctly if the touch sensor is dirty from sweat. Remove the dirt before operating the product.
Unlocking
When you take the headphones out of the charging case, the touch sensor is locked to prevent erroneous operations. Touch the touch sensors once to unlock the sensors, signaled by the confirmation tone.

The sensor is automatically unlocked during calls on the Bluetooth device (for both outgoing and incoming calls).
Using the product
The product can use Bluetooth wireless technology to connect to your device and play music, receive phone calls, etc. Use the product for whichever of these purposes suits your needs.
Note that Audio-Technica cannot guarantee the operation of displays, such as the battery level display, or applications via Bluetooth devices.
Listening to music
- To connect for the first time, pair the product and your device via Bluetooth wireless technology. If you have already paired the product and your Bluetooth device, turn on the Bluetooth device's Bluetooth connection before turning on the product.
- Use your Bluetooth device to start playback, referring to the device's user manual as necessary.
- Remove the headphones from the charging case and place them in your ears.
- Touch the touch sensors on the L (left) and R (right) headphones once to unlock.
- Start playback on your Bluetooth device.
- Touch the touch sensor on the L (left) side headphone once or twice in a row to adjust the volume (up or down).
![]()
- To pause music, touch the touch sensor on the R (right) side headphone.
- Playback will be started or paused with every touch.

Listening to music is also possible with only one headphone by removing only one side from the charging case and putting it in your ear. When you use only one headphone, some functions are not available depending on which side is worn. Use the Bluetooth device for operation in such cases.
R (right) side headphone touch sensor operations

 : Touch sensor
| Operation | Function |
| Touch | Starts or pauses playback. |
| Touch (twice) | Plays the next track. |
| Touch (three times) | Plays the previous track / returns to the start of the track. |
- The controls explained above may not be available on some smartphones.
L (left) side headphone touch sensor operations

 : Touch sensor
| Operation | Function |
| Touch | Increases the volume by 1 level. [1][2] |
| Touch (twice) | Decreases the volume by 1 level. [1][2] |
[1] A beep is heard each time the volume is increased/decreased by 1 level.
[2] The volume control of some Bluetooth devices may not work well with the product.
- The controls explained above may not be available on some smartphones.
Talking on the phone
If your Bluetooth device supports telephone features, you can use the product to talk on the phone.
- Remove the headphones from the charging case and place them in your ears.
- Make/receive calls with your Bluetooth device.
- When your Bluetooth device receives a phone call, the product sounds a ringtone.
- If a call is received while you are listening to music, music playback is paused.
- Touch the touch sensor on the headphones (L (left) or R (right) side) to answer incoming calls.
- Calls can be answered from either the L (left) or R (right) side headphone.
- Touch the touch sensor on the L (left) side headphone once or twice in a row to adjust the volume (up or down).
![]()
- To end a call, touch and hold (about 2 seconds) the touch sensor on the L (left) or R (right) side headphone.
- Calls can be ended from either the L (left) or R (right) side headphone.
- If the call was received while listening to music, playback is resumed.
- Music playback may not be resumed on some Bluetooth devices. In this case, music playback must be started manually.

Making/receiving calls is also possible with only one headphone by removing only one side from the charging case and putting it in your ear. When you use only one headphone, some functions are not available depending on which side is worn. Use the Bluetooth device for operation in such cases.
R (right) side headphone touch sensor operations

 : Touch sensor
| Operation | Function |
| Touch | Receiving a call: Answers the call. |
| Touch and hold (about 2 seconds) | Receiving a call: Rejects the call. During a call: Ends the call. |
- The controls explained above may not be available on some smartphones.
L (left) side headphone touch sensor operations

 : Touch sensor
| Operation | Function |
| Touch | Receiving a call: Answers the call. During a call: Increases the call volume by 1 level. |
| Touch (twice) | During a call: Decreases the call volume by 1 level. |
| Touch and hold (about 2 seconds) | Receiving a call: Rejects the call. During a call: Ends the call. |
- The controls explained above may not be available on some smartphones.
Hear-through mode
This function allows you to hear surrounding sound via the built-in microphone while you listen to music.
- Touch and hold (about 2 seconds) the touch sensor on the R (right) side headphone.
With every long touch (about 2 seconds), the voice guidance will play the message "Hear-through" or "Hear-through off", and hear-through mode will be switched ON/OFF.
- Occasionally it may be difficult to hear surrounding sound depending on the volume of the music, etc. that you are playing. In this case, turn down the volume of the music.
- Even when using hear-through mode with this product, surrounding sounds may be difficult to hear depending on the surrounding situation, etc. Do not use the product in places that are dangerous if you cannot hear the surrounding sounds, such as places with heavy traffic.
- When hear-through mode is turned ON, do not cover the microphone part with your hand. If you do so, a loud sound (howling) will be emitted, and it may adversely affect your hearing ability.
Low latency mode
Low latency mode reduces sound delay when playing games or watching videos.
- Bluetooth communication can be easily affected by obstacles and radio wave conditions. Turn this mode off in such situations.
- Touch and hold (about 3 seconds) the touch sensor on the L (left) side headphone.
With every long touch (about 3 seconds), the voice guidance will play the message "Low latency mode" or "Low latency mode off", and low latency mode will be switched ON/OFF.
Low latency mode cannot be switched ON/OFF during a call.
Auto power off function
The product automatically turns off after 5 minutes of not being connected to a device.
Indicator lamp display
Pairing
| Status | Indicator lamp display pattern |
| Searching for devices |  Flashing white (gradually lighting up) (Depending on the order the L (left) and R (right) side headphones are removed from the charging case, the indicator lamp on one side will flash white quickly, and the other will flash white slowly.) |
Connecting
| Status | Indicator lamp display pattern |
| Waiting to be connected |  Flashing white (gradually lighting up) |
| Connecting |  Flashing white in 5-second intervals |
| Music is playing |  Off |
Battery level
| Status | Indicator lamp display pattern |
| Battery level is low |  Flashing red 3 times in 40-minute intervals |
Voice guidance
The product plays English voice guidance in the following situations.
| Situation | Voice guidance |
| Power is turned on | Voice guidance varies depending on the battery level. Battery level high Battery level high Battery level medium Battery level low |
| Bluetooth is connected | Bluetooth connected |
| Bluetooth is disconnected | Bluetooth disconnected |
| Hear-through mode ON | Hear-through |
| Hear-through mode OFF | Hear-through off |
| Low latency mode ON | Low latency mode |
| Low latency mode OFF | Low latency mode off |
| Music is played | Play |
| Music is paused | Pause |
| Battery level is low | Low battery |
| No power due to dead battery | Please recharge |
Cleaning
Get into the habit of regularly cleaning the product to ensure that it will last for a long time. Do not use alcohol, paint thinners, or other solvents for cleaning purposes.
- Wipe any dirt off the headphones and charging case with a dry cloth. The headphones may not operate correctly if the headphones are wet. Wipe the headphones with a dry cloth, shake them multiple times to remove any excess water, and allow the headphones to dry thoroughly before use.
- Immediately wipe off sweat or any other moisture from the charging case battery jack, the headphone charging terminals, and the touch sensors. Failure to do so may result in a malfunction due to corrosion.
- Natural oils from the skin are particularly likely to build up on the eartip attachment parts (see figure). If these areas are not cleaned, the eartips can become detached. Clean them regularly. Do not touch the areas where sound is produced as they are delicate. Doing so may result in malfunction.
- If any moisture remains in the holes near the microphones (see figure), place the headphones on a dry cloth and shake several times to remove any moisture, and then allow the headphones to dry thoroughly before use.
- Wipe away any perspiration or dirt from the USB charging cable with a dry cloth immediately after use. Failure to clean the cable may cause it to deteriorate and harden over time, resulting in malfunction.
- If the USB terminal of the charging cable is dirty, wipe it off with a dry cloth.
- Clean the eartips by removing them from the headphones and manually cleaning them with a diluted mild detergent. After cleaning, dry before using again.
![]()

- Eartip attachment part
- Sound reproduction part
- Microphone
If the product will not be used for an extended period of time, store it in a well-ventilated place free from high temperatures and humidity.
Eartips
Eartip size
The product includes silicone eartips in 4 sizes (XS, S, M, and L). At the time of purchase, the M-size silicone eartips are attached. To ensure the best sound quality, select the eartip size that is best suited for you, and adjust the eartips inside your ears for a snug fit. It may be difficult to hear bass sounds if the eartips do not fit snugly in your ears.
Replacing the eartips
Remove the old eartip and attach the new eartip by pushing it onto the headphone at an angle. Push firmly on the eartip so that the inside of the eartip expands, and push the eartip onto the post as far as it will go.

Eartips are consumable parts that degrade through storage and use. If the eartips are loose and easily removed or if they appear to have degraded, purchase replacements.
- Periodically remove and clean the eartips as they become dirty easily. Using dirty eartips may cause the headphones themselves to become dirty, resulting in deteriorated sound quality.
- When reattaching eartips that were previously removed, be sure to check that they are securely attached. Injury or illness may occur if the eartips become detached and are left inside the ear.
Resetting
If the product operates abnormally (reset)
Reset the product if it cannot be unpaired, connected, or does not operate as expected.
- About 5 seconds after both headphones (L (left) and R (right) sides) are placed in the charging case (with battery remaining), touch the touch sensor of both headphones twice in a row.
- Verify that the indicator lamps on both headphones flash white, and then touch and hold (about 6 seconds) the touch sensor on both headphones while in the charging case.
- When the indicator lamps on both headphones light in red, reset is complete.
- Remove the product from the list of registered devices on your Bluetooth device.
- Remove the headphones from the charging case again and perform pairing.
If the procedure cannot be completed as expected, remove the headphones again and repeat the procedure from the beginning.
Troubleshooting
Power is not supplied
- Charge the product.
Unable to pair
- Confirm that the Bluetooth device communicates using Ver. 2.1+EDR or higher.
- Place the product and the Bluetooth device within 1 m (3.3') of each other.
- Set the profiles for the Bluetooth device. For procedures on how to set profiles, refer to the Bluetooth device's user manual.
- Remove the pairing information for the Bluetooth device then pair the product with this device again.
- Place the headphones in the charging case and close the cover, then remove the headphones and perform the operation again.
- Make sure you are not connected to any other previously connected Bluetooth device. If so, disconnect the product using the previously connected Bluetooth device, and then select the product on the Bluetooth device being connected to.
- Reset the product if it cannot be unpaired, connected, or does not operate as expected even after trying all other solutions. For details, refer to "Resetting".
No sound is heard / Sound is faint
- Turn on the power of the product and the Bluetooth device.
- Turn up the volume on the product and the Bluetooth device.
- Make sure that the product and Bluetooth device are connected by the A2DP (or audio connection).
- Disable pairing for the product and the Bluetooth device, then pair the product with this device again.
- Move away from obstacles between the product and the Bluetooth device, such as people, metal, or walls, and place the product and device closer together.
- Switch the sound output of the Bluetooth device to the product.
Sound only comes out of one headphone
- Make sure there is battery level remaining.
- Place the headphones in the charging case and close the cover, then remove the headphones and perform the operation again.
Sound is distorted / Noise is heard / Sound cuts out
- Turn down the volume on the product and the Bluetooth device.
- Keep the product away from devices that emit radio waves such as microwaves and wireless routers.
- Keep the product away from TVs, radios, and devices with built-in tuners. These devices can also be affected by the product.
- Turn off the equalizer settings of the Bluetooth device.
- Remove obstacles between the product and the Bluetooth device and place them closer together. For details, refer to "For a more comfortable Bluetooth communication experience".
Cannot hear the voice of the caller / Voice of the caller is too quiet
- Turn on the power of the product and the Bluetooth device.
- Turn up the volume on the product and the Bluetooth device.
- Confirm that the product and Bluetooth device are connected via HFP/HSP (or phone connection).
- Disable pairing for the product and the Bluetooth device, then pair the product with this device again.
- Switch the sound output of the Bluetooth device to the product.
Charging case cannot be charged
- Securely connect the included USB charging cable and charge the product.
- Charge the product in a well-ventilated place (10 to 35°C (50 to 95°F)) away from direct sunlight.
Headphones cannot be charged
- Make sure that the product is placed in the charging case correctly.
- Make sure to close the charging case cover when charging.
- Charge the charging case.
- Wipe dirt off the charging terminal with a dry cloth.
For details about how to operate your Bluetooth device, refer to the device's user manual.
Specifications
Headphones
| Type | Dynamic |
| Driver | 5.8 mm |
| Sensitivity | 100 dB/mW |
| Frequency response | 20 to 20,000 Hz |
| Impedance | 16 ohms |
Microphone
| Type | MEMS type |
| Polar pattern | Omnidirectional |
| Sensitivity | -38 dB (1 V/Pa, at 1 kHz) |
| Frequency response | 100 to 10,000 Hz |
Communication specifications
| Communication system | Bluetooth version 5.0 |
| Maximum RF output | 10 mW EIRP |
| Maximum communication range | Line of sight - approx. 10 m (33') |
| Frequency band | 2.402 GHz to 2.480 GHz |
| Modulation method | FHSS |
| Compatible Bluetooth profiles | A2DP, AVRCP, HFP, HSP |
| Supported codec | SBC |
| Supported content protection method | SCMS-T |
| Transmission band | 20 to 20,000 Hz |
Other
| Power supply | Headphones: DC 3.7 V lithium ion battery Charging case: DC 3.7 V lithium ion battery |
| Charging time | Headphones: Approx. 1.5 hours[1] Charging case: Approx. 2 hours[1] |
| Operating time | Continuous transmission time (music playback): Max. approx. 6.5 hours[1] (headphones) Max. approx. 19.5 hours[1] (if charging case is used in combination) |
| Weight | Headphones: Approx. 5.2 g (0.18 oz) (L side), approx. 5.2 g (0.18 oz) (R side) Charging case: Approx. 34.2 g (1.2 oz) |
| Water-resistant (drip-proof) performance | IPX4[2] |
| Operating temperature | 5°C to 40°C (41°F to 104°F) |
| Accessories | USB charging cable (30 cm (12"), USB Type-A / USB Type-C), Eartips (XS, S, M, L) |
| Sold separately | Eartips |
[1] The figures above depend on operating conditions.
[2] Headphones only.
- For product improvement, the product is subject to modification without notice.
Notes on use
- Be sure to read the connected device's user manual before use.
- Audio-Technica will not be liable in any way for any loss of data in the unlikely event that such losses should occur while using the product.
- On public transportation or in other public places, keep the volume low so as not to disturb other people.
- Minimize the volume on your device before connecting the product.
- When using the product in a dry environment, you may feel a tingling sensation in your ears. This is caused by static electricity accumulated on your body, not by product malfunction.
- Do not subject the product to strong impact.
- Do not store the product in direct sunlight, near heating devices, or in hot, humid, or dusty places. Additionally, do not allow the product to get wet.
- When the product is used for a long time, the product may become discolored due to ultraviolet light (especially direct sunlight) and wear.
- If the charging case is placed in a bag while the USB charging cable is still connected, the USB charging cable may become caught, severed, or broken.
- Make sure to hold the plug when connecting and disconnecting the USB charging cable. The USB charging cable may become severed or an accident may occur if you pull on the cable itself.
- When you are not using the USB charging cable, disconnect it from the charging case.
- Do not charge the battery if the terminal of the USB charging cable is bent, loose, or damaged. Doing so may cause heat generation, smoke emission, fire or electric shock.
- When charging the headphones, close the cover of the charging case before charging.
- When you are not using the product, store it in the included charging case.
- If you use eartips other than those included, the headphones may not fit into the charging case, or may not charge. Be sure to use the included eartips.
- When using the product, select the eartips that fit your ears best, and wear the product securely.
- This product can be used to talk on the phone only when using a mobile telephone network. Support for telephony apps that use a mobile data network is not guaranteed.
- If you use the product near an electronic device or transmitter (such as a mobile phone), unwanted noise may be heard. In this case, move the product away from the electronic device or transmitter.
- If you use the product near a TV or radio antenna, noise may be seen or heard in the television or radio signal. In this case, move the product away from the TV or radio antenna.
- To protect the built-in rechargeable battery, charge it at least once every 6 months. If too much time passes between charges, the life of the rechargeable battery may be reduced, or the rechargeable battery may no longer be able to be charged.
- Do not charge the product if water or foreign matter is inside the battery jack or USB charging cable. Doing so may cause corrosion, heat generation, smoke, fire, or other malfunction or electric shock in the battery jack or USB charging cable.
- Charge the product in a well-ventilated place (10 to 35°C (50 to 95°F)) away from direct sunlight. Otherwise, the battery may deteriorate, possibly resulting in shorter periods of continuous use or may fail to charge.
- If the headphones are wet, wipe them with a dry cloth before placing them in the charging case. The charging case is not water-resistant (drip-proof). Do not charge the product if the headphones are wet.
- The hear-through mode of the product allows you to hear the sounds around you through the built-in microphone. Depending on the volume of the music being played back, the surrounding sounds may be difficult to hear. In this case, turn down the volume of the music.
- Depending on your surroundings, the ambient sounds may be difficult to hear even when using the product's hearthrough mode. Do not use the product in places that are dangerous if you cannot hear the surrounding sounds, such as places with heavy traffic.
- Operate the touch sensor with one finger. Operating with a sharp-tipped object, such as a ballpoint pen or pencil, may result not only in incorrect operation, but also damage to the touch sensor.
- Do not touch the touch sensor with your fingertips. Doing so may cause your fingernail to break.
- If the product does not operate at all or as intended when touched, check to make sure that your other fingers, parts of your hand, or clothing items are not in contact when touching. Also, the product may not operate correctly if you are wearing gloves or if your fingertips are too dry.
- The product may not operate correctly if the touch sensor is dirty from sweat. Remove the dirt before operating the product.

Documents / ResourcesDownload manual
Here you can download full pdf version of manual, it may contain additional safety instructions, warranty information, FCC rules, etc.
Download Audio-Techica ATH-SQ1TW - Wireless Headphones Manual
Advertisement


Need help?
Do you have a question about the ATH-SQ1TW and is the answer not in the manual?
Questions and answers