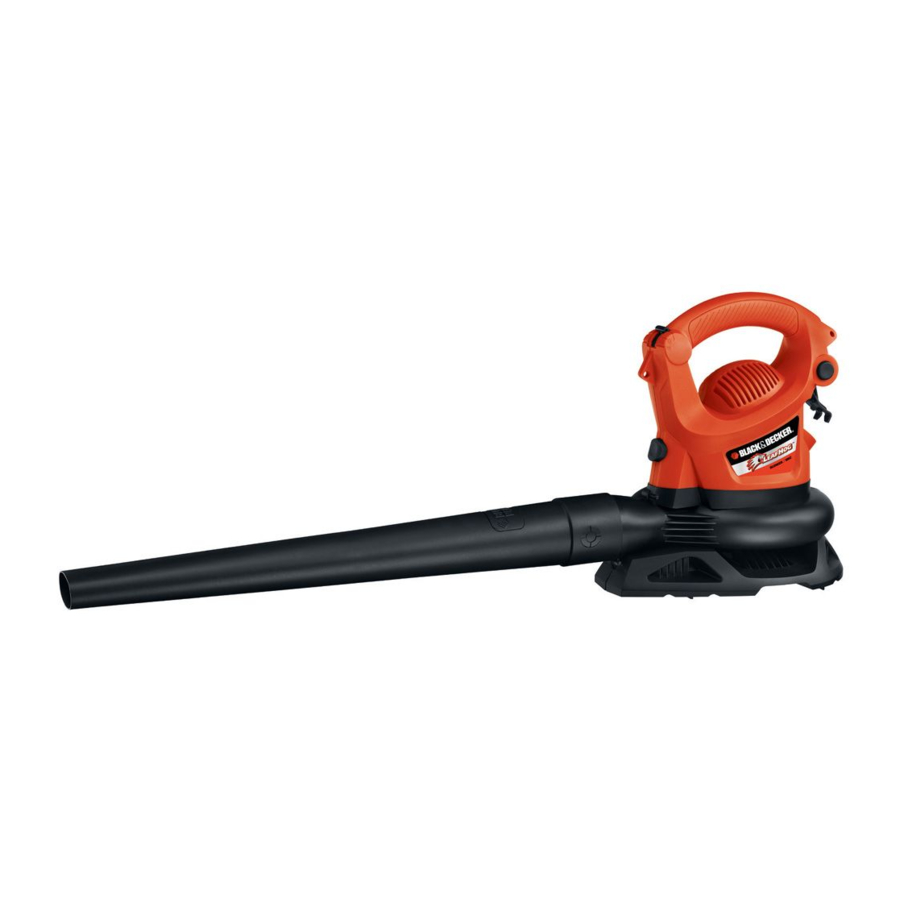
Black & Decker LEAF HOG BV4000 - Electric Leaf Blower Manual
- Instruction manual (5 pages) ,
- Instruction manual (5 pages) ,
- Instruction manual (5 pages)
Advertisement
- 1 KEY INFORMATION YOU SHOULD KNOW
- 2 General Safety Warnings and Instructions for all Tools
- 3 Before Operating
- 4 Switch
- 5 Assembly
- 6 Vacuum Tube Assembly
- 7 Blow Tube Assembly
- 8 Cord Retainer
- 9 Using Your Product
- 10 Blow Mode
- 11 Removing Blow/Vacuum Tube
- 12 Carrying Strap Assembly
- 13 Vacuum Mode
- 14 Operation
- 15 Documents / Resources
KEY INFORMATION YOU SHOULD KNOW
- Before operating, make sure that either the blower or vacuum tube assembly is locked in place.
- The power switch must be OFF in order to depress the release button for changing blower and vacuum tube assemblies.
SAVE THIS MANUAL FOR FUTURE REFERENCE.

Important Safety Warnings and Instructions
PLEASE READ AND UNDERSTAND ALL INSTRUCTIONS CAREFULLY BEFORE USING THE UNIT.
To Reduce Risk of Injury:
- Before any use, be sure everyone using this tool reads and understands all safety instructions and other information contained in this manual.
- Save these instructions and review frequently prior to use and in instructing others.
When using electrical appliances, basic safety precautions should always be followed, including the following:
Some dust created by this product contains chemicals known to the State of California to cause cancer, birth defects or other reproductive harm. Some examples of these chemicals are:
- compounds in fertilizers
- compounds in insecticides, herbicides and pesticides
- arsenic and chromium from chemically treated lumber
To reduce your exposure to these chemicals, wear approved safety equipment such as dust masks that are specially designed to filter out microscopic particles.
This product contains chemicals, including lead, known to the State of California to cause cancer, and birth defects or other reproductive harm. Wash hands after handling.

Wear appropriate personal hearing protection during use. Under some conditions and duration of use, noise from this product may contribute to hearing loss.
READ ALL INSTRUCTIONS BEFORE USING BLOWER.
General Safety Warnings and Instructions for all Tools
- READ and follow all instructions.
- DO NOT place inlet or outlet of vacuum near eyes or ears when operating.
- THIS APPLIANCE IS PROVIDED WITH DOUBLE INSULATION. Use only identical replacement parts. See instructions for servicing of double insulated appliances.
- STORE IDLE TOOLS. When not in use, the unit should be stored in a dry, high or locked-up place - out of reach of children.
- DON'T OVERREACH. Keep proper footing and balance at all times.
- DO NOT pick up anything that is burning or smoking, such as cigarettes, matches or hot ashes.
- MAINTAIN TOOL WITH CARE. Keep fan area clean for best and safest performance. Follow instructions for proper maintenance.
- DO NOT attempt to repair the blower/vac. To assure product safety and reliability, repairs, maintenance, and adjustments should be performed by Black & Decker service centers or authorized service stations, always using Black & Decker replacement parts.
- DO NOT operate blower/vac in a gaseous or explosive atmosphere. Motors in these tools normally spark, and the sparks might ignite fumes.
- DO NOT use to pick up flammable or combustible liquids such as gasoline or use in areas where they may be present.
- USE EXTRA CARE when cleaning on stairs.
- DO NOT leave appliance when plugged in. Unplug from outlet when not in use and before servicing.
- DO NOT allow to be used as a toy. Close attention is necessary when used by or near children. Not recommended for use by children.
- DO NOT attempt to clear clogs from tool without first unplugging it.
- USE ONLY as described in this manual. Use only manufacturer's recommended attachments.
- DO NOT use with damaged cord or plug. If appliance is not working as it should, has been dropped, damaged, left outdoors, or dropped into water, return it to a service center.
- DO NOT pull or carry by cord, use cord as a handle, or pull cord around sharp edges or corners. Keep cord away from heated surfaces.
- DO NOT unplug by pulling on cord. To unplug, grasp the plug, not the cord.
- DO NOT put any objects into openings. Do not use with any opening blocked; keep free of dust, lint, hair and everything that may reduce air flow.
- KEEP hair, loose clothing, fingers, and all parts of body away from openings and moving parts.
- TURN OFF all controls before unplugging.
- DO NOT vacuum water, other liquids, or wet objects such as leaves. Never immerse any part of the tool in liquid.
- DO NOT handle plug or appliance with wet hands.
- KEEP CHILDREN, BYSTANDERS AND ANIMALS AWAY from the work area a minimum of 30 feet (10 meters) when starting or operating the tool.
- INSPECT THE AREA before using the tool. Remove all debris and hard objects such as rocks, glass, wire, etc. that can ricochet, be thrown, or otherwise cause injury or damage during operation. As a vacuum, the tool is designed to pick up dry material such as leaves, grass, small twigs, and bits of paper. Do not vacuum stones, gravel, metal, broken glass, etc.

To reduce the risk of electrical shock; do not expose to rain, do not use on wet surfaces. Store indoors.
Turn off and unplug unit, then wait until fan stops or at least 10 seconds before removing the blower or vacuum tube assemblies.
SAVE THESE INSTRUCTIONS
Servicing of Double Insulated Appliances
Your Blower/Vac is double-insulated to give you added safety. In a double insulated appliance, two systems of insulation are provided instead of grounding. No grounding means is provided on a double insulated appliance, nor should a means for grounding be added to the appliance. Servicing a double insulated appliance requires extreme care and knowledge of the system and should be done only by qualified service personnel. Replacement parts for a double insulated appliance must be identical to the parts they replace. A double insulated appliance is marked with the words double insulated or "double insulation". The symbol (square within a square) may also be marked on the appliance.
Safety Rules and Instructions: Extension Cords
 Double insulated tools have 2-wire cords and can be used with 2-wire or 3-wire extension cords. Only round jacketed extension cords should be used, and we recommend that they be listed by Underwriters Laboratories (U.L.) (C.S.A. in Canada). If the extension will be used outside, the cord must be suitable for outdoor use. Any cord marked as outdoor can also be used for indoor work.
An extension cord must have adequate wire size (AWG or American Wire Gauge) for safety, and to prevent loss of power and overheating. The smaller the gauge number of the wire, the greater the capacity of the cable, that is 16 gauge has more capacity than 18 gauge. When using more than one extension to make up the total length, be sure each individual extension contains at least the minimum wire size. Before using an extension cord, inspect it for loose or exposed wires, damaged insulation, and defective fittings. Make any needed repairs or replace the cord if necessary.
To determine the minimum wire size required, refer to the chart below:
| Minimum Gage for Cord Sets | |||||
| Volts | Total Length of Cord in Feet | ||||
| 120V | 0-25 | 26-50 | 51-100 | 101-150 | |
| 240V | 0-50 | 51-100 | 101-200 | 201-300 | |
| Ampere Rating | |||||
| More Than | Not more Than | American Wire Gage | |||
| 0 - | 6 | 18 | 16 | 16 | 14 |
| 6 - | 10 | 18 | 16 | 14 | 12 |
| 10 - | 12 | 16 | 16 | 14 | 12 |
| 12 - | 16 | 14 | 12 | Not Recommended | |
Safety Rules and Instructions: Polarized Plug
To reduce the risk of electric shock, this equipment has a polarized plug (one blade is wider than the other). This equipment must be used with a suitable polarized 2 wire or 3 wire extension cord. Polarized connections will fit together only one way. Make sure that the receptacle end of the extension cord has large and small blade slot widths. If the plug does not fit fully into the extension cord, reverse the plug. If it still does not fit, obtain a suitable extension cord. If the extension cord does not fit fully into the outlet, contact a qualified electrician to install the proper outlet. Do not change the tool plug or extension cord in any way.
Before Operating
SECURING POWER SUPPLY CORD - Secure the extension cord in the tool's built-in cord retainer as shown in Figure 7:

Switch
On/Off Switch (Fig. 1):

For extra control, your blow vac is fitted with a two speed switch located on the handle of the powerhead.
The switch has a central off. Position 0.
To use in low speed, move the switch fully to the rear. Position I.
To change to high speed push the switch back to the off position and then fully forward. Position II.
NOTE: The switch will not operate if the release button, shown in Figure 1, is depressed. To turn the tool ON, slide the switch forward, as shown in Figure 1. To turn tool OFF, slide switch to the middle position.
Assembly
USE AS A BLOWER: ALWAYS WEAR SAFETY GLASSES, WEAR A FILTER MASK IF THE OPERATION IS DUSTY. USE OF RUBBER GLOVES AND SUBSTANTIAL FOOTWEAR IS RECOMMENDED WHEN WORKING OUTDOORS. FOR HOUSEHOLD USE ONLY.
When turning the tool off for tube installation or any other reason, wait 10 seconds for the fan to stop rotating before disassembly.
Vacuum Tube Assembly
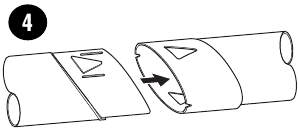
(Fig. 4)
- Vacuum tubes must be assembled together before use.
- To ease assembly apply soapy water solution to joint area.
- Align the notches and the triangles on upper and lower tubes. (Fig. 4)
- Push the lower tube firmly into the upper tube, until the triangles click into place. (Never operate apart).
- In the interests of safety, it is not intended for the tubes to be separated once assembled.
Blow Tube Assembly
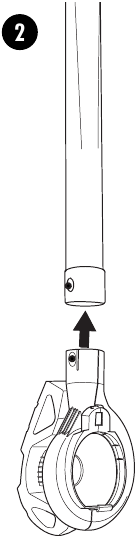
(Fig. 2)
- Blow tube must be assembled to the blow clamshell before use.
- Align the circles on the clamshell and the tube.
- Push the tube firmly onto the clamshell until the circles click into place.
Cord Retainer
- A cord retainer is incorporated into the rear of the powerhead. (Fig 7)
- Insert the cord into the powerhead and flip the cord retainer lever against the plug to hold it in position.
- To release, depress the side button and then pull up lever.
Using Your Product

(Fig. 8)
When using as a blower or vacuum, always wear safety glasses. If using in dusty conditions, wear a filter mask as well.
Blow Mode
- Ensure your product is switched off and disconnected from the main power supply.
- Attach the blow clamshell and tube to the powerhead (Fig. 3) by locating the blower as indicated by arrow, then pivot about this point until the locking/release catch is fully engaged.

- Hold the blow tube approximately 180mm (7") above the ground, switch your product on and using a sweeping motion from side to side, advance slowly keeping the accumulated debris/leaves in front of you (Fig. 9).

- Once you have blown the debris/leaves into a pile, you can convert to vacuum mode to collect the debris.
- Installing the concentrator will help remove matted debris and leaves (Fig. 12).


Removing Blow/Vacuum Tube
- Switch off your product and disconnect from power supply.
- To disconnect the blow clamshell or vacuum tube from the powerhead, depress the release button, ensuring the tube does not fall to the ground.
- The release button will not depress if the power switch is in the "on" position. (Fig. 1)
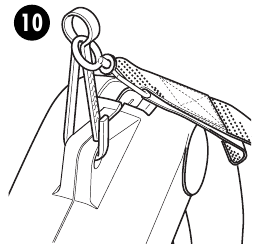
Carrying Strap Assembly
- Fit the carrying strap to the powerhead, if required, and adjust to suit the user. For your comfort, the shoulder strap is designed to be used in vacuum mode.
- Dual Point Attachment
- Clip the hook through the eyelet on the powerhead (Fig. 10)
![]()
- Clip the hook through the eyelet on the rear of the power head(Fig. 11)
![]()
- Clip the hook through the eyelet on the powerhead (Fig. 10)

Vacuum Mode
- Switch off your product and disconnect from power supply.
To fit the bag assembly to your product:
Locate the bag rim into the bag holder channel ensuring that the front of the bag is placed over the vacuum outlet as shown in Fig. 5.

Slide the bag fully into the channel and depress the latch to lock the handle into the bag top. (Fig. 6)

Position the tube slightly above the debris/leaves. Switch your product on, then using a sweeping motion the debris/leaves will be sucked up the tube, mulched and deposited into the collection bag. (Fig 8)
For matted debris/leaves your vacuum tube is incorporated with a scraper. Use this scraper to loosen the debris and continue to vacuum as normal.
As the bag fills the power of the suction will decrease, switch off your product and unplug from power supply.
To remove the bag, depress the latch to disengage from the bag holder and slide the bag out.
To empty, hold the plastic handle and grab the nylon handle on the underside of the bag. Turn the bag upside down and shake out any debris and leaves. (Fig. 5C)
- For easier use in vac mode, the tool should be fitted to the user using shoulder strap (Fig. 8)
NEVER REMOVE THE COLLECTION BAG WITHOUT FIRST TURNING OFF AND UNPLUGGING THE VACUUM.
NOTE: If the suction decreases and the bag is not full, the vacuum tube is probably clogged with debris. Turn off and unplug the vacuum and clear the tube before continuing.
Operation
- Do not use in vacuum mode without the vacuum tubes and collection bag in place.
- Always switch off and remove the plug from the electrical supply when:
- Changing from blower to vacuum.
- The supply cable has become damaged or entangled.
- You leave your product unattended.
- Clearing a blockage.
- Checking, adjusting, cleaning or working on your product.
- Use your product only in daylight or good artificial light.
Maintenance
- CLEANING AND STORAGE
TURN OFF AND UNPLUG TOOL! (Unplug extension cord at power source.)
Use only mild soap and a damp cloth to clean the tool. Clean out any clippings which may have accumulated in the Blower/Vac. When used properly with dry leaves the fan chamber of your Blower/Vac should remain clean. If damp earth and debris are ingested some of the particles may build up on the inside of the fan chamber. If this happens the performance of the unit will decrease. This area can be cleaned out by gently wiping out with a damp rag after disconnecting from the power source. Your Blower/Vac should be stored in a dry place.
DO NOT POUR OR SPRAY WATER ON THE TOOL IN AN ATTEMPT TO CLEAN.
Do not store the tool on or adjacent to fertilizers or chemicals. Such storage can cause rapid corrosion of the metal parts.
Use only mild soap and a damp cloth to clean the tool. Never let any liquid get inside the tool; never immerse any part of the tool into a liquid.

To assure product SAFETY and RELIABILITY; repairs, maintenance and adjustments (other than those listed in this manual) should be performed by authorized service centers or other qualified service organizations, always using identical replacement parts.
Service Information
Black & Decker offers a full network of company-owned and authorized service locations throughout North America. All Black & Decker Service Centers are staffed with trained personnel to provide customers with efficient and reliable power tool service. Whether you need technical advice, repair, or genuine factory replacement parts, contact the Black & Decker location nearest you. To find your local service location, refer to the yellow page directory under "Tools—Electric" or call: 1-800-54-HOW-TO (1-800-544-6986).

Documents / ResourcesDownload manual
Here you can download full pdf version of manual, it may contain additional safety instructions, warranty information, FCC rules, etc.
Download Black & Decker LEAF HOG BV4000 - Electric Leaf Blower Manual
Advertisement


Need help?
Do you have a question about the LEAF HOG BV4000 and is the answer not in the manual?
Questions and answers