
Related Manuals for Trinity TRO6010SS


Summary of Contents for Trinity TRO6010SS
- Page 1 User Manual 60 cm Built-in Electric Oven Model Code: TRO6010SS; TRO6010BK Please read this manual carefully before using, and keep it for future reference.
- Page 2 P a g e INSTRUCTION MANUAL 60cm Built-in Electric Oven Models: TRO6010SS; TRO6010BK ONLINE: TRINITYAPPLIANCES.COM.AU...
-
Page 3: Table Of Contents
P a g e CONTENTS PACKAGE ............................. 4 IMPORTANT - CHECK FOR ANY DAMAGE OR MARKS ............. 4 HANDLING..........................4 BEFORE USING YOUR NEW APPLIANCE ................4 SAFETY WARNINGS ........................5 IMPORTANT INFORMATION ....................5 GENERAL WARNINGS ......................5 INSTALLATION ADVICE ......................5 USAGE CONDITIONS AND RESTRICTIONS................ -
Page 4: Package
P a g e PACKAGE 1.1 IMPORTANT - CHECK FOR ANY DAMAGE OR MARKS Please thoroughly inspect your goods at the delivery time, if you notice any damage to your goods: Please notify the delivery team at the time of delivery and do NOT accept damaged product. -
Page 5: Safety Warnings
P a g e 2 SAFETY WARNINGS 2.1 IMPORTANT INFORMATION Read this manual thoroughly before you start using the appliance. The safety precautions instructions reduce the risk of fire, electric shock and injury when correctly complied to. Please take notice of all warnings, follow the instructions, basic precautions and accident prevention measures when using this appliance. -
Page 6: Usage Conditions And Restrictions
P a g e 2.4 USAGE CONDITIONS AND RESTRICTIONS Supervision over children is to ensure that they do not play with the appliance. Never allow them to use, play with or crawl inside the appliance. Cleaning and maintenance must not be done by children. ... -
Page 7: Electrical Safety
P a g e Do not use aluminium anywhere within the oven grills or to cover the grill pan or wrap heated items under the grill. Aluminium foil is highly reflective and can cause damage to the grill element. ... - Page 8 P a g e If the power supply cable is damaged, it must be replaced by its manufacturer or authorized technical service or any other personnel qualified at the same level. Appliance is equipped with a type ‘’Y’’ cord cable. ...
-
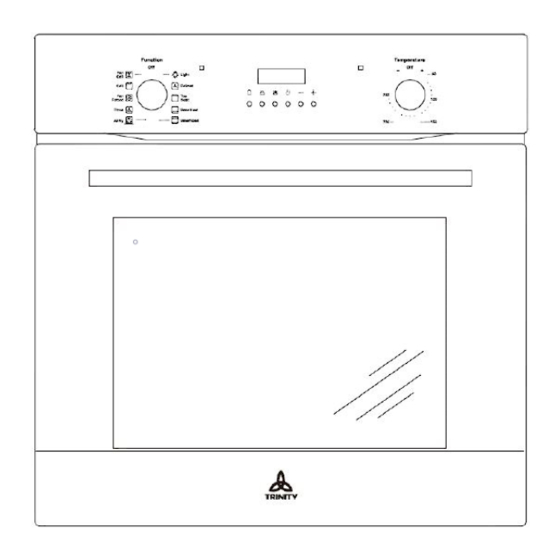
Page 9: Product Overview
P a g e 3 PRODUCT OVERVIEW 3.1 INTRODUCING THE OVEN The oven large capacity offers the option of cooking on multi shelves at the same time and cooking large meals which would not be possible in a traditional oven. ... - Page 10 P a g e | 10 OPTIONAL ACCESSORIES: Deep Tray Tray Big Shelf Telescopic Rail Grill Rack Tray Handle OVEN PROGRAMMER/TIMER DISPLAY 10 - Auto Function Symbol 11 - Minute Minder Symbol 12 - Manual Operation Symbol CONTROL PANEL: 1. Oven Function Selector 6.
- Page 11 P a g e | 11 FUNCTION SELECTOR There are 10 options when deciding what to use: TEMPERATURE SELECTOR Turn the temperature regulator knob clockwise to set the required temperature. The oven function must be set alongside temperature selection. ONLINE: TRINITYAPPLIANCES.COM.AU...
-
Page 12: Installation
P a g e | 12 4 INSTALLATION WARNING: Check damage product before installing Do not have product installed if it's damaged. Damaged products pose danger for your safety. The power supply to the appliance must be cut off before any adjustments or maintenance work is done on it. -
Page 13: Fastening The Oven
P a g e | 13 Product Dimensions Aperture Dimensions Height: 595mm 600mm Width: 595mm 560mm Depth: 530mm 560mm (min) 4.2 FASTENING THE OVEN Do not use door and/or handle to carry or move the product. Place the oven into the cabinet with two or more people. Ensure that oven's frame and front edge of the furniture match uniformly. -
Page 14: Electrical Connection
P a g e | 14 Open the oven door and fasten the oven to the cabinet using four screws “A” as shown in below diagram. Screws mustn't be over tightened. Otherwise, screw sockets might be worn. Check that oven doesn't move after mounting. If oven isn't mounted in accordance with instructions, there is a risk of tilt over during operation. - Page 15 P a g e | 15 The hard wiring connection: Remove terminal cover plate from rear panel of the oven. Fit wires through and connect to the appropriate terminals. Engage wires into plastic clip. Secure plastic clip. ...
-
Page 16: Operation
P a g e | 16 5 OPERATION 5.1 OVEN FUNCTIONS AND OPERATION Operation of the oven is controlled by the function knobs, temperature controller and a timer. To set required function turn the knob to the selected position. ... - Page 17 P a g e | 17 OVEN FUNCTIONS Function Description Separate light control allows the light to be switched on, even Oven light when the oven is not in cooking function, Iilluminates cavity, useful when cleaning. Select this function to thaw more delicate foods. In this mode the room temperature air used.
- Page 18 P a g e | 18 and appearance. The ventilated mode can also be used to thaw white or red meat, fish and bread by setting the desired temperature. This setting heats from the bottom but with heat distributed Fan and more evenly.
-
Page 19: Programmable Timer / Display
P a g e | 19 5.2 PROGRAMMABLE TIMER / DISPLAY 5.2.1 SELECTING MANUAL OPERATION MODE When your appliance is connected to your mains supply for the first time, the numbers on the timer display will flash. Before you can select a cooking function or set a temperature, you must set the appliance into “Manual Operation Mode”. -
Page 20: Settings The Cooking Duration Time
P a g e | 20 5.3 SETTINGS THE COOKING DURATION TIME This function will allow you to set a countdown time similar to the minute minder function. However, the oven will no longer continue to heat, once the countdown period has elapsed. -
Page 21: First Time Use Oven
P a g e | 21 will disappear. The alarm can be silenced by pressing the “end of cooking” or “cooking duration” button. You will need to return the oven to manual operation mode, once the start and end time function has been used. -
Page 22: Energy Saving Tips
P a g e | 22 5.7 ENERGY SAVING TIPS Following details will help use your product ecologically and economically: Use dark coloured and enamel containers that conduct the heat better in the oven. Do not open the oven door frequently while cooking. The oven will not lose heat. ... -
Page 23: Cooking Guidelines
P a g e | 23 6 COOKING GUIDELINES 6.1 SELECTION RECOMMENDATIONS The following table shows the information of food types and identified their cooking values. Cooking times can vary depending on the network voltage, quality of raw food to be cooked, quantity and temperature. - Page 24 P a g e | 24 Pastry is too dark on top Place it on a lower rack, lower the temperature, and increase the cooking time. Cooked well on the inside but Use less liquid, lower the temperature, and increase sticky on the outside the cooking time.
- Page 25 P a g e | 25 Cooking in oven tips: Fault Cause Solution Use the natural convection position Not enough The upper crust is dark and Use deeper baking tins heat from the the lower part too pale bottom Lower the temperature Put the food on a lower shelf Use the natural convection position...
-
Page 26: Cleaning And Maintenance
P a g e | 26 7 CLEANING AND MAINTENANCE 7.1 KEEP YOUR OVEN IN SHAPE Don’t clean the appliance when it still hot! The inside and external surface of the oven should preferably be cleaned by damp cloth when it is cooled down. ... -
Page 27: Replacing Oven Lamp
P a g e | 27 7.3 REPLACING OVEN LAMP WARNING: First disconnect the power of appliance and ensure that appliance is cold. Remove the power plug from electrical socket or disconnect the power supply by tripping off circuit breaker (opening circuit) or removing fuse. To avoid the possibility of an electric shock ensure that the appliance is switched off before replacing the bulb. -
Page 28: Cleaning Oven Glass
P a g e | 28 Gently close the oven door until you hear the sound of engagement, once they reach a clamping position, with both hands holding the door and continue to push, pull up at the same time so that the hinge bolt removed from the oven. After cleaning, the hinge needs to be aligned with the oven door latch;... -
Page 29: Troubleshooting
P a g e | 29 8 TROUBLESHOOTING You may solve the problems you may encounter with your product by checking the following points. Check the table below and try out the suggestions. Problem Possible Cause What to Do Check for power supply. Power supply not Check household fuse box. - Page 30 P a g e | 30 Electric shock when Ungrounded wall Make sure power supply is grounded touching the oven socket is used properly. Water dripping Water or steam may generate under Steam coming out Let the oven cool down and then wipe certain conditions from a gaps of the dry with a cloth.
-
Page 31: Technical Specifications
P a g e | 31 9 TECHNICAL SPECIFICATIONS Electric oven size 73 Iitres Oven size 595mm x 595mm x 530mm (WxDxH) Weight Approx. 28kg Voltage rating 220-240V~ 50/60 Hz Power rating max.2.9kw Energy rating Note: The values provided with the appliance or its accompanying documents are laboratory readings in accordance with the respective standards. -
Page 32: Disposal
P a g e | 32 10 DISPOSAL This appliance requires special waste disposal. For further information regarding the treatment, recovery and recycling of this product please contact your local council, household waste disposal service or the store where you purchased it. The packaging materials are recyclable. -
Page 33: Customer Care
P a g e | 33 11 CUSTOMER CARE Please be advised that without the proof of purchase, your warranty may not be valid, keep the receipt. For your convenience, please record: STORE NAME/CONTACT DETAILS: ..........PURCHASE DATE: ................PRODUCT MODEL N: …..............
Need help?
Do you have a question about the TRO6010SS and is the answer not in the manual?
Questions and answers