
Subscribe to Our Youtube Channel
Related Manuals for Costway HV10473


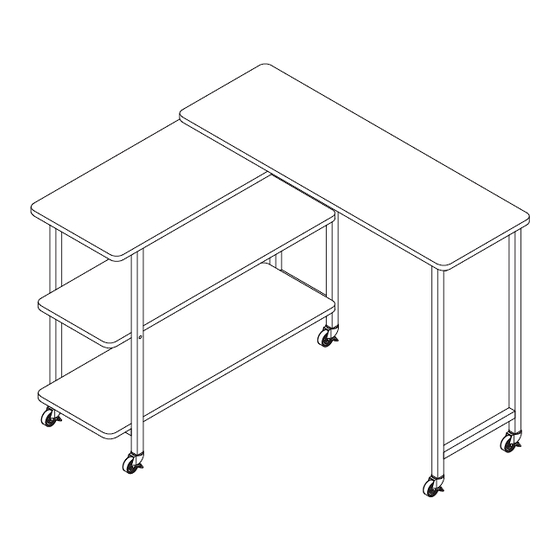
Summary of Contents for Costway HV10473
- Page 1 Sofa Side Table Table d’Appoint HV10473 USA office: Fontana AUS office: Truganina GBR office: Ipswich FRA office: Saint Vigor d'Ymonville THIS INSTRUCTION BOOKLET CONTAINS IMPORTANT SAFETY INFORMATION. PLEASE READ AND KEEP FOR FUTURE REFERENCE.
- Page 2 Before You Start Please read all instructions carefully. Retain instructions for future reference. Separate and count all parts and hardware. Read through each step carefully and follow the proper order. We recommend that, where possible, all items are assembled near to the area in which they will be placed in use, to avoid moving the product unnecessarily once assembled.
- Page 3 Before You Start/Avant de Commencer Helpful Hints/Conseils Utiles PEOPLE NEEDED FOR ASSEMBLY: 1-2 Read through each step carefully and follow - Open your item in the area you plan to keep it to avoid the proper order. excessive heavy lifting. Separate and count all your parts and - Identify, sort and count the parts before attempting assembly.
- Page 4 Board Identification/Identification des Panneaux Part List/Liste des Pièces Not actual size/Taille non réelle Ø6.3X50mm M6X30mm M6X35mm SCREW spare:1 SCREW spare:1 SCREW spare:1 /VIS rechange :1 /VIS rechange :1 /VIS rechange :1 A x1 Ø204mm Ø3.5X14mm TURNTABLE SCREW spare:1 UNIVERSAL /PLATINE /VIS rechange :1 WHEELS /ROUES...
- Page 5 STEP 1/ÉTAPE 1 Board Identification/Identification des Panneaux Not actual size/Taille non réelle Ø204mm Ø3.5*14mm Place Part 4 on Part B. Make its large hole align with the large hole, align the small hole with the small hole, and lock it with a No. 5 screw. /Placez la pièce 4 sur la pièce B.
- Page 6 Rotate Part B so that the two large holes on Part B align with the two small holes on Part A. /Tournez la pièce B de manière à ce que les deux grands trous de la M6*30mm Ø4*65(25)mm pièce B soient alignés avec les deux petits trous de la pièce A. STEP 3/ÉTAPE 3 STEP 2/ÉTAPE 2 Ø4*65(25)mm...
- Page 7 STEP 4/ÉTAPE 4 Ø6.3*50mm Ø4*65(25)mm Ø4*65(25)mm M6*30mm Ø4*65(25)mm M6*12mm...
- Page 8 STEP 5/ÉTAPE 5 STEP 6/ÉTAPE 6 Place one item underneath the product to make the 14*70mm product stable and easy to install. /Placez un objet sous le produit pour le rendre stable et facile à installer.
- Page 9 Return / Damage Claim Instructions DO NOT discard the box / original packaging. In case a return is required, the item must be returned in original box. Without this your return will not be accepted. Take a photo of the box markings. A photo of the markings (text) on the side of the box is required in case a part is needed for replacement.
Need help?
Do you have a question about the HV10473 and is the answer not in the manual?
Questions and answers