Advertisement
Available languages
Available languages
Quick Links
Lincoln with 3' x 6'
Decorative Screen Panels
Installation Instructions
English Instructions...............................1
Español Instructions .............................7
Read all instructions prior to installing product.
Refer to manufacturers safety instructions when operating any tools.
To register your product, please visit:
freedomproduct.com
WEB REV 04.23
Advertisement

Related Manuals for Freedom Lincoln


Summary of Contents for Freedom Lincoln
- Page 1 WEB REV 04.23 Lincoln with 3' x 6' Decorative Screen Panels Installation Instructions English Instructions.......1 Español Instructions ......7 Read all instructions prior to installing product. Refer to manufacturers safety instructions when operating any tools. freedomproduct.com To register your product, please visit:...
-
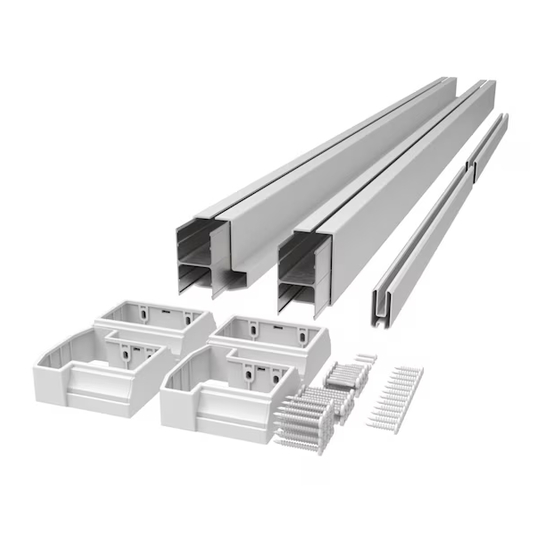
Page 2: Components List
WARNING: • Improper installation of this product can result in personal injury. Always wear safety goggles when cutting, drilling and assembling the product. • Incorrect installation may cause harm to the product or individual. • Refer to local building codes for installation requirements; failure to install this product in accordance with building codes may affect safety of the product and void product warranty. -
Page 3: Post Installation
POST INSTALLATION Closely follow Post Install Kit installation instructions or use a Post Sleeve over an existing wood 4x4. LEVEL RAIL INSTALLATION Measure distance between posts (Fig. 1) and Fig. 1 subtract ¼". Cut top and bottom rails to this dimension. - Page 4 Attach uprights to both sides of the Decorative Fig. 4 Screen Panels. The bottom of the upright should meet the bottom rail. Secure with #6 x 3/4" screws. 2 per upright (Fig. 4 & 5). Fig. 5 DETAIL A SCALE 1.5 : 1 INSTALLING BOTTOM RAIL DETAIL A SCALE 1.5 : 1...
-
Page 5: Installing Brackets
INSTALLING BRACKETS a. Make sure rails centered to post sleeve. Then, Fig. 8 using 1⁄ " drill bit, pre-drill first top bracket screw hole (Fig. 8). Drill through bracket hole, vinyl post sleeve and vinyl insert and loosely install first #10 x 1½"... -
Page 7: Instrucciones De Instalación
WEB REV 04.23 Lincoln con Paneles Decorativos de 3' X 6' Instrucciones de instalación English Instructions.......1 Español Instructions ......7 Lea todas las instrucciones antes de la instalación del producto. Consulte las instrucciones de seguridad del fabricante cuando se vaya a utilizar alguna herramienta. - Page 8 ADVERTENCIA: • La instalación incorrecta de este producto puede resultar en lesiones corporales. Utilizar siempre gafas de seguridad al momento de cortar, taladrar y ensamblar el producto. • La instalación incorrecta puede causar daños al producto o a personas. • Consulte los códigos de construcción locales para conocer los requisitos de instalación; el hecho de no instalar este producto de acuerdo con los códigos de construcción puede afectar a la seguridad del producto y anular la garantía del mismo.
- Page 9 INSTALACIÓN DEL POSTE Siga atentamente las instrucciones de instalación del kit de instalación de postes o utilice una funda de poste sobre un poste de madera existente de 4x4. INSTALACIÓN DE BARANDAL PLANO Mida la distancia entre los postes (Fig. 1) y reste Fig.
- Page 10 Fije los montantes a ambos lados de los paneles Fig. 4 decorativos. La parte inferior del montante debe coincidir con el travesaño inferior. Fije con tres tornillos #6 de 3/4", dos por montante (Fig. 4 y 5). Fig. 5 DETAIL A SCALE 1.5 : 1 INSTALACAIÓN DEL TRAVESAÑO INFERIOR DETAIL A...
- Page 11 INSTALACIÓN DE LOS SOPORTES a. Asegúrese de que los travesaños estén Fig. 8 centrados respecto a la funda del poste. Con una broca de 1/8", taladre el primer agujero para tornillo del soporte superior (Fig. 8). Taladre a través del agujero del soporte, la funda del poste de vinilo y el inserto de vinilo, e instale el primer tornillo #10 de 1½"...
- Page 12 Barrette Outdoor Living 7830 Freeway Circle, Middleburg Heights, OH 44130 freedomproduct.com • (888) 418-4400...
Need help?
Do you have a question about the Lincoln and is the answer not in the manual?
Questions and answers