Table of Contents
Advertisement
Quick Links
Advertisement
Table of Contents

Summary of Contents for SAMIX BR200
- Page 1 Instruction Manual SAMIX BR200 ®...
- Page 2 SAMIX GmbH. Offenders will be held liable for the payment of damages. All rights reserved in the event of the grant of a patent, utility...
-
Page 3: Table Of Contents
Inhaltsverzeichnis Basic comments .................5 1.1 General specifications ............5 1.2 Intended use .................5 1.3 Foreseeable misuse ..............5 1.4 Limits of operating range ............5 1.5 Manufacturer's warranty ............6 1.6 Scope of delivery ..............6 1.7 Manufacturer's Customer Service .........6 Safety ...................7 2.1 Structure of safety notices .............7 2.2 General safety notices ............8 2.3 Safety devices ...............9 Technical description ...............10... - Page 4 Initial operation .................18 5.1 Site selection ...............18 5.2 Initial operation ..............19 5.3 Function check ..............19 Operation ...................21 6.1 Preparation of mixing unit ...........21 6.2 Preparation of mixing process ..........23 6.3 Mixing process ..............24 6.3.1 Switching on and mixing process ......24 6.3.2 Switching off and removing the mixing unit .....26 6.3.3 Free spin motion ............27 6.4 Final operations ..............29...
-
Page 5: Basic Comments
SAMIX GmbH Basic comments General specifications The SAMIX BR200 is manufactured by SAMIX GmbH, and its safety has been che- ® cked by the TÜV Rhineland. For safe operation, and to avoid personal injuries and material damage, • the instruction manual must be read carefully and understood, •... -
Page 6: Manufacturer's Warranty
SAMIX BR200 ® Manufacturer's warranty As a customer, you also receive explicit warranty rights from the manufacturer with the enclosed manufacturer's warranty. Please note the details in the enclosed docu- mentation. Scope of delivery Check your purchase for completeness immediately upon receipt. The scope of de- livery includes: •... -
Page 7: Safety
SAMIX GmbH Safety Structure of safety notices The safety notices in this document are marked with safety symbols and designed in accordance with the SAFE principle. They contain information on the type and source of danger, possible consequences, as well as measures to prevent the danger. -
Page 8: General Safety Notices
Do not touch rotating parts and keep long hair, ties, scarves, etc., away from rotating parts. Only use mixing blades with the SAMIX BR200 in jars which have been firmly screwed in. ® In the event of an emergency, set the adjusting knob to "0" or pull out the plug! -
Page 9: Safety Devices
SAMIX BR200. The possible working time of the device increases if substances with ® a lower viscosity or lower quantities are used. NOTICE In the event of an overload, a thermal safety element shuts down the SAMIX BR200. ® Safety... -
Page 10: Technical Description
• Standard mixing blade (SMB) • Disposable blade (DSP) • Jars • Dosing aids (vario nozzles, applicators and ExactDose) • Removal or filling aids (spindle, applicator jar coupling and the SAMIX jar pump ® with a nominal volume from 300 ml) All SAMIX products are compatible with each other. -
Page 11: Mixing Blade
SAMIX GmbH 3.2.1 Mixing blade Due to the even upward and downward movement of the SAMIX jar (see section ® „3.2.2 Jars“), a consistent mix of the substances is achieved with use of the mixing blade (SMB or DSP). NOTICE Do not use mixing blades which are bent or defective in any other way. - Page 12 SAMIX BR200 ® Before use, check whether • the mixing blade is the right length and size • the mixing blade is clean. If necessary, disinfect the mixing blade (for e.g. with 70% isopropyl alcohol). Disposable blade (DSP) NOTICE In the case of substances with strong colors, it is recommended to use the disposable blade.
-
Page 13: Jars
SAMIX GmbH After the mixing process, the shaft of the DSP is disconnected from the mixing blade of the DSP by turning in a clockwise direction (see Fig. 3). Fig. 3: Disposable blade (DSP): Assembly (left) and disassembly (right) DSP shaft... - Page 14 200 (280) ml 1000 (1250) ml Tab. 2: Jar sizes NOTICE Only use jars with a nominal volume up to 200 ml for the SAMIX BR200. ® Jars are supplied sealed in a film sleeve. NOTICE Also after the beginning of the film sleeve it is recommended to store non-used jars in the film sleeve to protect against possible dust contamination.
-
Page 15: Assignment Of Mixing Blades To The Jars
SAMIX GmbH 3.2.3 Assignment of mixing blades to the jars Standard mixing blade (SMB) Ensure correct assignment of the mixing blades to the corresponding jars. The SMB for jars with a nominal volume of 100 and 200 ml have the same diameter of the mi- xing blade, but differ in the length of the shaft (see Fig. - Page 16 SAMIX BR200 ® Fig. 5: Assignment of the standard mixing blade with different shaft lengths...
-
Page 17: Transportation, Packaging And Storage
Storage Protect the SAMIX BR200 against direct sunlight, extreme humidity and huge tem- ® perature fluctuations. Store the SAMIX BR200 at an ambient temperature between +15 °C and +30 °C and ® relative humidity below 80%. Transportation, packaging and storage... -
Page 18: Initial Operation
BR200. Observe the following information: ® • Position the SAMIX BR200 on steady, even ground. ® • Ensure that there is enough space for the operation of the SAMIX BR200. The ® adjusting knob and mains connector must be easily accessible. • SAMIX devices satisfy the safety standards for laboratory equipment. -
Page 19: Initial Operation
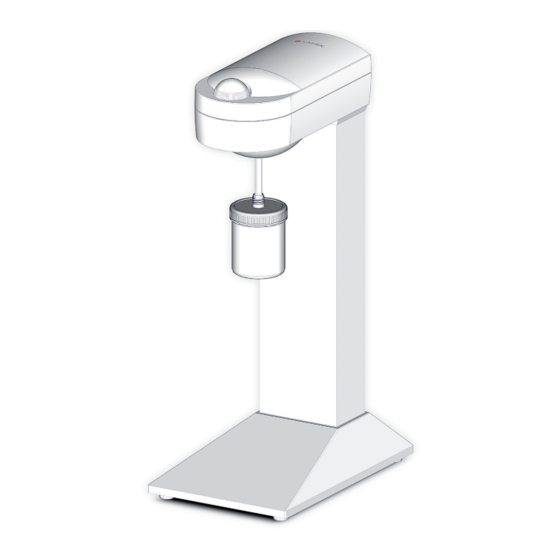
Initial operation NOTICE Acclimatize the SAMIX BR200 to room temperature for roughly 30 minutes before the initial ® operation or after a prolonged storage time in cold rooms. 1. Check the supply connections. Observe the information in the enclosed document "Installation Qualification (IQ)". - Page 20 SAMIX BR200 ® Fig. 6: SAMIX BR200 ® Drive head Power cord Adjusting knob Mixing unit...
-
Page 21: Operation
SAMIX GmbH Operation Preparation of mixing unit A SAMIX mixing unit consists of ® • jar, • mixing blade, • the components to be mixed. Prepare the mixing unit for the mixing process as follows: Fig. 7: Unscrew jar cap and jar lid NOTICE Observe the correct assignment of the mixing blades to the jars (see section „3.2.3 Assign-... - Page 22 SAMIX BR200 ® Fig. 8: Insert mixing blade and press down jar base NOTICE Press down the base of the jar before weighing in ingredients or filling as far as the stop. Otherwise, you cannot necessarily place elements (especially particularly light components) in the jar.
-
Page 23: Preparation Of Mixing Process
SAMIX GmbH Preparation of mixing process Proceed as follows after weighing in the recipe components: 1. Gently screw the mixing blade and the jar lid on the jar housing. 2. Push the jar base upwards using your thumbs so that air escapes between the jar lid and jar housing. -
Page 24: Mixing Process
ATTENTION Risk of material damage! In order to avoid a destruction of the hollow shaft, the SAMIX mixing blade shaft must be ® inserted fully in the device. The bayonet noses can no longer be visible, only the gold-colored coating. - Page 25 NOTICE The number of revolutions per minute (rpm) of the mixing blade can be infinitely set using the adjusting knob. After the mixing process is complete, you can switch off the SAMIX BR200 and re- ® move the mixing unit (see section 6.3.2).
-
Page 26: Switching Off And Removing The Mixing Unit
6.3.2 Switching off and removing the mixing unit CAUTION Risk of injury as a result of unstable holding of the mixing unit when switching off the device! Upon actuation of the adjusting knob the SAMIX BR200 switches off without delay. Firmly ®... -
Page 27: Free Spin Motion
Fig. 13: Open the jar lid slightly and push down the base with mixing blade ATTENTION Risk of material damage! In order to avoid a destruction of the hollow shaft, the SAMIX mixing blade shaft must be ® inserted fully in the device. The bayonet noses can no longer be visible, only the gold-colored coating. - Page 28 Upon actuation of the adjusting knob, the bayonet holder engages. This status remains until the end of the free spin motion. Switch off the SAMIX BR200 after the free spin motion and remove the mixing unit ® (see section „6.3.2 Switching off and removing the mixing unit“).
-
Page 29: Final Operations
SAMIX GmbH Final operations Proceed as follows after the removal of the mixing unit: Fig. 16: Unscrew jar lid and set down mixing blade with jar lid Check the surface of the ointment. If the surface of the ointment looks smooth and consistent, it has been proved in practice that the consistency of the ointment was also achieved in the inside of the jar. - Page 30 Fig. 17: Push the mixing blade from the jar lid and scrape off ointment using a spatula Fig. 18: Screw back on the jar lid tightly and the jar cap gently NOTICE You can also have the jar lid with a SAMIX vario nozzle. ®...
- Page 31 SAMIX GmbH Fig. 19: Reduce air and firmly screw on jar cap NOTICE The air reduction before the discharge of the jar serves to remove any air-filled areas arising during the mixing process. If no air reduction is performed, during the first withdrawal the ope- rator first pushes the air and then the ointment from the jar opening in a gushing movement.
-
Page 32: Maintenance, Repair And Cleaning
Repairs carried out under warranty are only performed by SAMIX GmbH. NOTICE In the case of warranty claims and services undertaken by SAMIX GmbH, only send in the drive head of the SAMIX BR200. Unscrew the drive head by slackening the wing bolt on the ®... -
Page 33: Maintenance
QM system can be obtained from customer service upon request. NOTICE In the case of services undertaken by SAMIX GmbH, only send in the drive head of the SA- BR200. Unscrew the drive head by slackening the wing bolt on the bottom of the device ®... -
Page 34: Cleaning
BR200 without authorization. ® Do not use any aggressive cleaning substances or abrasive cleaners for cleaning. Ensure that no liquid enters the device. If liquid ends up in the inside of the SAMIX BR200, ® disconnect the device from the power supply and inform customer service. -
Page 35: Fault Causes/Troubleshooting
Qualification (IQ)". In the case of serious faults, note the device type and contact the manufacturer. NOTICE In the case of serious faults, only send in the drive head of the SAMIX BR200 to SAMIX ® GmbH. Unscrew the drive head by slackening the wing bolt on the bottom of the device foot (see Fig. -
Page 36: Possible Fault Sources To Avoid
Risk of injury upon contact with the Only use mixing blades with the rated without a jar with rotating mixing blade. SAMIX BR200 in jars which have ® the device. been firmly screwed in. Jars with a nominal volu- The device switches off as a result Only use jars with a nominal volume me from 300 ml are used. - Page 37 SAMIX GmbH Potential faults Possible consequences Troubleshooting Following an automatic Risk of injury from unexpected In the event of an overload of the shutdown of the device startup of the device upon return to device, set the adjusting knob to "0".
-
Page 38: Waste Disposal
SAMIX BR200 ® Waste disposal NOTICE SAMIX devices cannot be disposed of with general household waste. At the end of their ser- ® vice life, send SAMIX devices to the available return and collection systems. ®... - Page 40 Contact SAMIX GmbH Am Köhlersgehäu 50 98544 Zella-Mehlis Germany www.samix.com info@samix.com Tel.: +49 3682 455 0 Fax: +49 3682 455 200...
Need help?
Do you have a question about the BR200 and is the answer not in the manual?
Questions and answers