Table of Contents
Advertisement
Quick Links
Advertisement
Table of Contents

Related Manuals for Camouflage SM4-PRO

Summary of Contents for Camouflage SM4-PRO
- Page 1 Digital Wildlife Camera SM4-PRO...
-
Page 2: Table Of Contents
TABLE OF CONTENTS PREFACE ......................... 2 GENERAL INFORMATION ..................3 Introduction ........................3 Application ........................4 Illustration ......................... 4 QUICK START......................7 Batteries ..........................7 Insert TF card ........................7 Enter the "SET"-mode ..................... 8 Enter Live Mode ........................9 ADVANCED SETTINGS ...................9 Parameter settings ......................9 File format ........................ -
Page 3: Preface
PREFACE Thank you for purchasing the SM4-PRO Camouflage Digital Wildlife Camera. This product is a digital camera for wildlife recording and observation. To make our product easy to use and have a general understanding, we have created this guide specifically for you. -
Page 4: General Information
1. GENERAL INFORMATION 1.1 Introduction The Wildlife Camera (also called Scouting/Hunting Camera) is a reconnaissance device that can be activated by a sudden change in ambient temperature caused by any movement of human (or animal) in a particular Region Of Interest (ROI), which is detected by a highly sensitive passive infrared (PIR) sensor and then automatically records high-quality photos or HD video clips. -
Page 5: Application
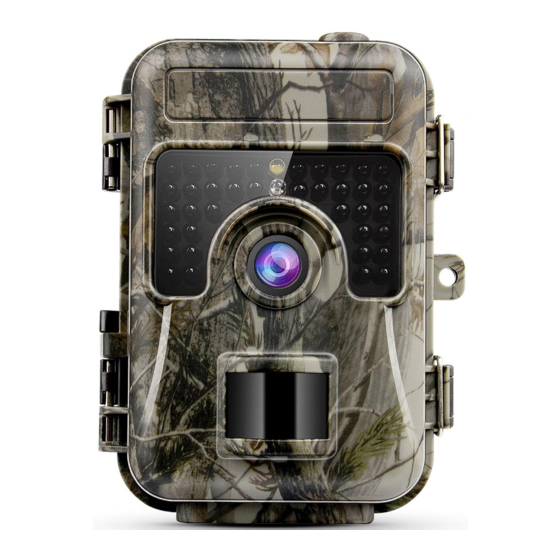
flowering, birds building nests, or when monitoring unattended properties such as parking lots/yards. This feature can be used together with the Timer feature to meet your timetable 12) Auto power off in 10 minutes while no keypad controlling. 13) Extremely long in-field battery life (in standby mode, up to 6 months with 8*AA batteries). - Page 6 IR-LED Lock hole Lens PIR-sensor Figure 1-1: Front View TF-card slot USB port Battery compartment DC-port Tripod nut Figure 1-2: Bottom and Side View - 5 -...
- Page 7 Strap hole Lock buckle Figure 1-3: Back View TFT screen Keypad Figure 1-4: Inside View - 6 -...
-
Page 8: Quick Start
Note: 1) The camera provides the following connections for external devices: USB port, SD card slot, and external DC power in jack. The 3-way Power/Mode Switch is used to select the main operation modes: OFF, ON, and SET. 2) LED lights Indicator: red light for PIR monitoring; green light for taking photos or videos. -
Page 9: Enter The "Set"-Mode
2.3 Enter the "SET"-mode Switch to the “SET” position to enter the Set mode. In this mode, you can take pictures or video clips like a regular digital camera or enter the Menu to set up parameters. On the keypad there are four “shortcut” functional keys (see Figure 2-1) working as below: Figure 2-1: Keypad View ... -
Page 10: Enter Live Mode
2.4 Enter Live Mode Switch to the ON position to enter the live mode. The Motion Indicator will flash green for about 15 seconds and the camera starts working by itself without any manual handling. It will at once shoot pictures or record videos when animals or other objects enter the PIR area of the sensor. - Page 11 Settings Parameter Description (Bold=default) Camera Select whether still photos or video clips are Mode taken. In Cam+Video mode, can first take Video Camera+Video photos and then shoot videos afterward. English/Chinese/French/Norwegian/Deutsch/ Language Enter Spanish/Portuguese/Japanese/Russian/Finnish/ Italian/Czech/Romanian/Svenska/Slovak Select the desired resolution for photos from 1 to 16MP 16 megapixels.
- Page 12 Select the shortest length of time that the camera will wait until it responds to any subsequent 1 min, triggers from the PIR sensor after a game is first Interval optional from detected. During the selected interval, the 5s tot 60min camera will not take pictures/videos.
- Page 13 If set On, the camera will automatically take photos/videos according to the set interval, regardless of whether the PIR sensor has Time Lapse detected any game. This is helpful when observing cold-blooded animals like snakes, or the process of flowering, etc. Password Set up a password to protect your camera from unauthorized users.
-
Page 14: File Format
3.2 File format The camera stores photos and videos in the folder \DCIM\100MEDIA in the TF card. Photos are saved with filenames like DSCF0001.JPG and videos like DSCF0001.AVI. In the ON mode, you can use the provided USB cable to download the files to a computer. -
Page 15: Appendix I: Technical Specification
5. Appendix I: TECHNICAL SPECIFICATION Model Parameters Image Sensor 3 Mega Pixels Color CMOS Max. 4608 x 3456 Pixel Size Lens F=1.8; FOV=90°; Auto IR-Cut IR Flash 940 nm IR LED LCD screen 2.36-inch TFT color screen Keypad 6 Keys, 1 Switch Memory TF Card (8 MB~32 GB) Picture... - Page 16 Trigger Time 0.6 Seconds (When using the 2GB TF card) Trigger 5 sec - 60 min Interval Shooting Numbers Video Length 3-30 sec Camera + First, take Picture then Video Video Playback 1-8 times Zoom In Time Stamp On/Off Time On/Off;...
- Page 17 Standby Time 4-8 months (4xAA - 8xAA) Auto Power Auto power off in 10 minutes while no Keypad controlling Power 150 mA (+800 mA when IR LED lights up); at 6 V DC Consumption Low Battery 4.5 V Alarm Interface USB;...
-
Page 18: Appendix Ii: Package Contents
6. Appendix II: PACKAGE CONTENTS Digital camera: 1 piece USB cable: 1 piece Camera belt: 1 piece User manual: 1 piece - 17 -... -
Page 19: Appendix Iii: Faq
7. Appendix III: FAQ Question Answer Press the “MENU” + “OK” key and hold, then turn it on, Forgot Password/ toggle the switch to SET position, and turn it off. The Factory Reset camera is restored to the factory defaults, all previous parameter settings made including any password will be cleared. - Page 20 Document version: 2022-11-16 © 2022 Camouflage - 19 -...
Need help?
Do you have a question about the SM4-PRO and is the answer not in the manual?
Questions and answers