
Related Manuals for Rehatec Nele

Summary of Contents for Rehatec Nele
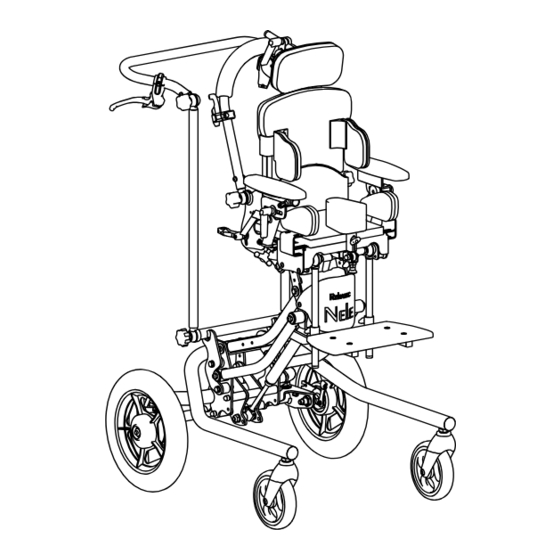
- Page 1 Therapy chair Nele and Nele Classic 2020 I N S T R U C T I O N S FO R USE S E R I A L N U M B E R : English...
- Page 2 Rehatec® GmbH In den Kreuzwiesen 35 69250 Schönau Deutschland Tel.: +49 6228 91 36 0 Fax: +49 6228 91 36 99 www.rehatec.com © 2021 Rehatec® GmbH Technical changes and printing errors reserved 07/2021...
- Page 3 We are pleased that you have chosen a Rehatec® GmbH top quality product and thank you for your trust. This guide should help you to familiarise yourself with your Nele therapy chair and show you its quick and easy operation for everyday use with various options. You only need to finalise your personal settings on your therapy chair and you are all set to go.
-
Page 4: Table Of Contents
Adjusting the unit 4.1. Nele Classic – Adjusting the seat unit 4.2. Nele with gas spring height adjustment – Adjusting the seat unit 4.3. Nele with electrical height adjustment – Adjusting the seat unit 4.4. Nele with hydraulic height adjustment – Adjusting the seat unit... - Page 5 Adjusting the unit 4.5. Adjusting the tipping guard (optional) 4.6. Adjusting the castors / wheels 4.8. Adjusting the back 4.9. Adjusting the push bar 4.10. Adjusting push bar on outdoor base-frame 4.11. Adjusting push bar, height adjustable (optional) 4.12. Adjusting the arm rests 4.13.
-
Page 6: Safety
1. Safety 1.1. Safety information Please follow all precautions in this manual. Important functions may be affected by erroneous operation. All safety and other regulations should always be observed both by the user, as well as the carer / supervisor. General DANGER The operation of the therapy chair may only be conducted by a trained user, who has read... - Page 7 The device may not be further used, if unusual smells or noises occur during charging or operation of the the electrical drive. The device must be withdrawn from service! CAUTION Repair and inspection work may only be carried out by Rehatec® GmbH and by authorized deal- ers/carers! CAUTION...
- Page 8 1. Safety Environment / Operation WARNING Only for operation in confined spaces WARNING The use of the therapy chair is only possible at an ambient temperature of 15°C to 35°C!. WARNING The therapy chair must not be used in wet areas, outdoors or in a high humidity environment CAUTION Protect the therapy chair against wetness DANGER...
-
Page 9: Intended Use
2.1. Specific function / Area of application Specific function The Nele therapy chair is designed for patients with a sitting disability to provide the best possible physio- logical sitting position and maintain a stabilised sitting position, enabling the attainment of positive effects of a seated body position. -
Page 10: Responsibility
The corresponding Declaration of Conformity can be found at www.rehatec.com in the download section. The CE mark must be removed if the Rehatec® product is rebuilt, changed or used in combination with unau- thorised products from other manufacturers. The CE mark is also invalid if no original Rehatec® spare parts / accessories are used. -
Page 11: Care And Maintenance
2.4. Care and maintenance The operator is responsible for the proper use, maintenance and care of the product. 2.4.1 Cleaning in private, domestic facilities Do not use abrasive cleaners or cloths for cleaning. • For cleaning the entire product, any conventional cleaning agent can be used. Note the safety and care infor- mation on the respective cleaning product! •... -
Page 12: Maintenance
• It is important that all components are undamaged during use. You should therefore check them regularly and have them repaired or replaced if necessary. The Nele therapy chair must be serviced every 12 months, bearing in mind any earlier maintenance intervals according to the following servicing plan! -
Page 13: Servicing Plan
Some screw connections are secured with thread-locking compound. If loose, they must be secured again with adhesive! Use high-strength locking compound. Page 1 13 of 48 12.05.21 Rehatec® GmbH, In den Kreuzwiesen 35, D-69250 Schönau, Tel. (06228) 9136-0, Fax. (06228) 9136-99, info@rehatec.com, www.rehatec.com Technical changes and printing errors reserved. - Page 14 Pelvi.Loc. - pelvic harness Seat pants Therapy table Foldable with recess Foldable without recess Page 2 12.05.21 Rehatec® GmbH, In den Kreuzwiesen 35, D-69250 Schönau, Tel. (06228) 9136-0, Fax. (06228) 9136-99, info@rehatec.com, www.rehatec.com Download service plan at: www.rehatec.com/download 14 of 48...
- Page 15 Servicing carried out on Servicing carried out by Signature Page 3 12.05.21 Rehatec® GmbH, In den Kreuzwiesen 35, D-69250 Schönau, Tel. (06228) 9136-0, Fax. (06228) 9136-99, info@rehatec.com, www.rehatec.com Service plan for download at: www.rehatec.com 15 of 48 Technical changes and printing errors reserved.
- Page 16 Side guidance pads Upholstery and covers Back adjustment Push bar standard Push bar on seat plate, height & angular adjustment Page 1 12.05.21 Rehatec® GmbH, In den Kreuzwiesen 35, D-69250 Schönau, Tel. (06228) 9136-0, Fax. (06228) 9136-99, info@rehatec.com, www.rehatec.com 16 of 48...
- Page 17 Foot shell, including foot straps Calf cushion, continuous Calf cushion, divided Headrests Straight Shell shaped Adjustable Page 2 12.05.21 Rehatec® GmbH, In den Kreuzwiesen 35, D-69250 Schönau, Tel. (06228) 9136-0, Fax. (06228) 9136-99, info@rehatec.com, www.rehatec.com 17 of 48 Technical changes and printing errors reserved.
- Page 18 Notes for any further repairs and maintenance: Servicing carried out on Servicing carried out by Signature Page 3 12.05.21 Rehatec® GmbH, In den Kreuzwiesen 35, D-69250 Schönau, Tel. (06228) 9136-0, Fax. (06228) 9136-99, info@rehatec.com, www.rehatec.com Service plan for download at: www.rehatec.com 18 of 48...
-
Page 19: Re-Use
The supplier/caregiver is responsible for re-use and having it prepared for re-use. The Nele therapy chair is suitable for re-use. Products being re-used are subject to particular strain. When re-using the product, it is important that all documentation belonging to the device is passed to the next user / persons / carers. -
Page 20: Warranty And Service
2.6. Warranty and service Warranty refers to defects of the product that are proved to be material or manufacturing defects. Nele therapy chair, For the we offer a warranty of 3 years on the frame parts. Any such defects will be cor- rected free of charge by Rehatec®... -
Page 21: Product And Delivery Overview
3. Product and delivery overview 3.1. Scope of delivery The Nele therapy chair is available in various sizes and with different base frames. See technical data on the size and permissible weight in the table in Chapter “7. Technical specifications”. The Nele therapy chair is generally delivered fully assembled and in the basic configuration. -
Page 22: Accessories
• Tip protection • Additional gas springs for gas spring adjustment • Push bar on chassis For further information and data, please visit: www.rehatec.com or simply request by e-mail, fax or post. 3.3. Checking the delivery Please check your delivery for completeness and no damage. In case of damage or incomplete delivery,... -
Page 23: Adjusting The Unit
Before use, ascertain how long the patient will stay in the ther- apy chair, to avoid any contraindications! 4.1. Nele Classic – Adjusting the seat unit The seat unit can be adjusted in height and angle in two positions. The height is adjusted mechanically and the angle adjusted using a gas spring. -
Page 24: Nele With Gas Spring Height Adjustment - Adjusting The Seat Unit
Seat height can be adjusted via the electrical drive and the seat tilt via gas spring. For a very low position, accessories (e.g. foot rest) should be removed. To adjust seat tilt, see Chapter "4.2 Nele with gas spring height adjustment". Adjusting the seat height Observe the risk of jamming and crushing fingers! -
Page 25: Nele With Hydraulic Height Adjustment - Adjusting The Seat Unit
For a very low position, accessories (e.g. foot rest) should be removed. To adjust seat tilt, see Chapter "4.2 Nele with gas spring height adjustment". Adjusting the seat height Observe the risk of jamming and crushing fingers! Adjust seat height upwards: With the foot, press down the pedal several times until the required height is reached. -
Page 26: Adjusting The Unit
To release castors, flip the locking brake upwards Wheels for outdoor base-frame The Nele with the outdoor base-frame is equipped with two drive and two steering wheels. Brake levers are on the push bar. The therapy chair must only be used on a firm, level, stable and horizontal surface. -
Page 27: Adjusting The Back
position and allow the brake lever to engage in this position. Heavy braking: Firmly pull the brake lever to the second cog tooth position and allow the brake lever to engage in this position. Parking position: Firmly pull the brake lever to the third cog tooth position and allow the brake lever to engage in this position. -
Page 28: Adjusting The Push Bar
4. Adjusting the unit Back, height adjustment Undo wing bolts anti clockwise. Adjust back to the required height. Tighten wing bolts clockwise again. Back, removal Undo wing bolts anti clockwise. Pull out the back from the holder. If the unit is used without the back, the wing bolts should be securely fastened, so that they are not lost. -
Page 29: Adjusting Push Bar On Outdoor Base-Frame
4.10. Adjusting push bar on outdoor base-frame The push bar of the outdoor base frame is secured lower down the frame and can be individually adjusted up an down. Angle adjustment downwards Undo bolts anti clockwise on both sides, until all ratchet elements move freely. -
Page 30: Adjusting The Arm Rests
4. Adjusting the unit 4.12. Adjusting the arm rests Arm rests can be adjusted in height, width, depth and tilt angle. Take care to avoid jamming and crushing the fingers! Maximum pull out lengths are reached, when the markings are visible. -
Page 31: Adjusting The Therapy Table (Optional)
4.13. Adjusting the therapy table (optional) The therapy table can be steplessly adjusted for the needs of the user in width, depth as well as height and angle. It can be folded away to the side to make it easier for the user when entering or leaving the therapy chair. -
Page 32: Adjusting The Lateral Trunk Supports
4. Adjusting the unit Depth adjustment Maximum adjustment is reached, when the end of the tube juts out 1 cm. Release clamping lever anti clockwise. Adjust the head rest to the required depth by pulling up or pushing down. Tighten clamping lever clockwise again. -
Page 33: Pelvic Supports (Optional)
4.17. Pelvic supports (optional) Pelvic supports guide the position of the pelvic area. They can be ad- justed both in height and width Take care to avoid jamming and crushing the fingers! Width adjustment Undo wing bolts anti clockwise. Set the required width of the pelvic support to the left or right, then tighten wing bolts clockwise again. -
Page 34: Adjusting The Abduction Wedge (Optional)
4. Adjusting the unit 4.19. Adjusting the abduction wedge (optional) The abduction wedge is designed for spreading the legs/knees. It can be adjusted both in height and depth and can also be folded away Take care to avoid jamming and crushing the fingers! Height adjustment Maximum adjustment is reached, when the washer of the wing bolts are flush with the edge. -
Page 35: Adjusting The Foot Rest, Divided (Optional)
Tilt angle adjustment Release both clamping levers anti clockwise, until all tooth cogs move freely. Now you can set foot rest to the angle required. Tighten clamping levers clockwise again, so that all tooth cogs mesh togeth- 4.21. Adjusting the foot rest, divided (optional) In addition to the standard adjustment possibilities of the continuous foot rest, the divided foot rest can also be sideways adjusted for angle. -
Page 36: Setting The Foot Angle Adjustable And The Fold-Up Mechanism (Optional)
4. Adjusting the unit 4.23. Setting the foot angle adjustable and the fold-up mechanism (optional) Take care to avoid jamming and crushing the fingers! Foot angle, adjustable Undo both hexagonal bolts anti clockwise and adjust foot rest to the required angle position. Then tighten both hexagonal bolts clockwise again. -
Page 37: Adjusting The Chest-Shoulder Straps/Vest (Optional)
4.26. Adjusting the chest-shoulder straps/vest (optional) Assembling the chest-shoulder straps/vest The chest-shoulder straps/vest are secured by means of the shoulder straps to the outside of the back, in that you feed the straps (through the guide brackets )and securing them with the 4 clamping buckles on the back. -
Page 38: Adjusting The 4-Point Pelvic Belt (Optional)
4. Adjusting the unit 4.28. Adjusting the 4-point pelvic belt (optional) Assembling the 4-point pelvic belt The 4-point pelvic belt is secured by means of the straps the clamping buckles by inserting the straps and appropri- ately fixing them. Adjusting the 4-point pelvic belt Adjusting the 4-point pelvic belt is carried out by adjusting the straps at the clamping buckles. -
Page 39: Setting The Pelvi.loc (Optional)
4.30. Setting the Pelvi.Loc (optional) Assembly of the Pelvi.Loc In order to secure the Pelvi.Loc, it is necessary that you insert the re- spective strap into the clip buckles and then lock accordingly. Adjusting the Pelvi.Locs The belt is adjusted first by adjusting the belt straps via the clip buckles. You can make fine adjustments using the raster lock. -
Page 40: Technical Specifications
5. Technical specifications Nele Classic Nele Nele with outdoor base-frame 40 of 48... -
Page 41: Product Dimensions
5.1. Product dimensions Model dimensions Nele and Nele Outdoor Seat depth Calf length Size Seat width Chest width standard shortened extended 14 – 23 cm 17 – 27 cm 12 – 22 cm — 14.5 – 20 cm 10 – 29.5 cm 15 –... -
Page 42: Product Description / Materials
5. Technical specifications 5.2. Product description / materials Construction Height-adjustable base frame, transport castors, height-adjustable back section, depth and width adjustable seat section, width adjustable pelvic supports, width adjustable lateral guide supports, seat section that can be abducted, step-less back adjustment, seat tilt and covers. The basic system consists of aluminium, steel and laminated wood. -
Page 43: International Protection (Ip) Evaluation
5.4. International Protection (IP) evaluation IP 5 1 Protection against foreign objects and contact No protection Protected against solid foreign objects with a diameter of ≥ 50 mm Protected against solid foreign objects with a diameter of ≥ 12.5 mm Protected against solid foreign objects with a diameter ≥... -
Page 44: Electromagnetic Compatibility (Emc)
The use of accessories, converters or cables that have not been specified or provided by Rehatec GmbH can lead to higher EM emissions or decreased electromagnetic immunity of this device and result in its improper opera- tion. - Page 45 Test operation for immunity tests 1. Battery mode, standby activated / ready. 2. Charging mode, drive does not run Electromagnetic IEC 60601-1-2 Additional disturbances norms test level test level Electrostatic discharge ± 8 kV Contact ± 6 kV Contact IEC61000-4-2 ±...
-
Page 46: Product Identification
Serial number Instructions for use must Warning notices be followed Conformity mark Only for indoor use Protect from dampness Therapy chair Nele Classic Manufacturer's address Product description Product size Nele Classic Gr. 0 1 2 Maximum load Year of manufacture... - Page 47 The Rehatec® product designated below is of impeccable quality and purpose-built construction. Rehatec® GmbH warrants to fix damages free of charge, which have been incurred as a result of material defects, within a three-year period from the date of purchase.
- Page 48 Rehatec® GmbH | In den Kreuzwiesen 35 | 69250 Schönau | Germany Tel.: +49 6228 / 91 36 0 | Fax: +49 6228 / 91 36 99 | www.rehatec.com © 2020 Rehatec® GmbH | All rights reserves | 07 / 2021...
Need help?
Do you have a question about the Nele and is the answer not in the manual?
Questions and answers