
Related Manuals for ADLINK Technology MXN-4100


Summary of Contents for ADLINK Technology MXN-4100
- Page 1 MXN-4100 Switch Sled with Intel® Ethernet Multi-Host Controller User’s Manual Manual Revision: Revision Date: March 28, 2019 Part No.: 50-1Z270-1000 Leading EDGE COMPUTING...
-
Page 2: Preface
MXN-4100 Preface Copyright 2019 ADLINK Technology, Inc. This document contains proprietary information protected by copyright. All rights are reserved. No part of this manual may be reproduced by any mechanical, electronic, or other means in any form without prior written permission of the manufacturer. - Page 3 MXN-4100 Revision History Revision Release Date Description of Change(s) 2019-03-28 Initial release...
-
Page 4: Table Of Contents
MXN-4100 Table of Contents Preface ..........................2 1 Overview .......................... 5 Introduction ..........................5 Specifications .......................... 6 Switch Sled Front Panel......................7 Switch Sled Layout ......................... 8 IO Expansion Module......................9 ADLINK PacketManager....................... 10 2 Getting Started........................11 Preparing the Switch Sled......................11 2.1.1... -
Page 5: Overview
The ADLINK MXN-4100 is a high-throughput high IO density switch sled that functions as an interconnect for four compute nodes on the CSA-7400 Network Appliance and provides up to 4x 100G ports on front panel. The MXN-4100 is a building block used in the construction of next generation high-performance firewalls and virtualized telecom elements. -
Page 6: Specifications
MXN-4100 1.2 Specifications Core System Switch Intel® Ethernet Multi-host Controller FM10840 (formerly Red Rock Canyon) with 900Mbps bandwidth & 4x PCIe x8 Gen3 Chassis management module (AST-1250) COM Express COM Express module with Type 6 interface as local management Module (optional) Intel®... -
Page 7: Switch Sled Front Panel
MXN-4100 1.3 Switch Sled Front Panel PWR: Power LED A/S: CMM Active/Standby ATN: Hotswap Status CMM Warning LEDs Serial Console 4x QSFP28 2x 1 GbE RJ-45 USB... -
Page 8: Switch Sled Layout
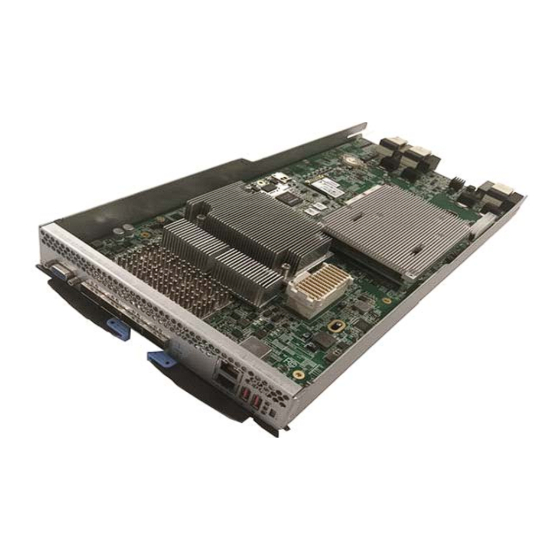
MXN-4100 1.4 Switch Sled Layout... -
Page 9: Io Expansion Module
MXN-4100 1.5 IO Expansion Module NIM-1610 16x 10G SFP+ NIM-0440 4x 40G QSFP+ (optional) -
Page 10: Adlink Packetmanager
MXN-4100 1.6 ADLINK PacketManager ADLINK PacketManager runs on the COM Express (COMe) module in the MXN-4100, it includes the most commonly used Layer2/3 stacks and switch management features, including Port Manager, VLAN, LACP, IGMP, RSTP, LLDP, route protocols (RIP, OSPF, BGP), VRRP, ACL and QoS. -
Page 11: Getting Started
2.1 Preparing the Switch Sled 2.1.1 Installing a COMe Module 1. Carefully align and press the COMe module onto the connectors on the MXN-4100 board. 2. Secure the COMe module with 5 screws on bottom side. Do NOT over tighten the... -
Page 12: Installing An Msata Module
MXN-4100 2.1.2 Installing an mSATA Module 1. Insert an mSATA module into the onboard slot as shown. 2. Secure it to the board with 2 screws. -
Page 13: Installing A Cmm Module
MXN-4100 2.1.3 Installing a CMM Module Insert a chassis management (CMM) module into the onboard slot as shown. -
Page 14: Installing An I/O Expansion Module
MXN-4100 2.1.4 Installing an I/O Expansion Module 1. Press the I/O expansion module onto the board-to-board connectors on the MXN- 4100 as shown. 2. Secure the I/O expansion module with 4 screws as shown. -
Page 15: Front Panel
MXN-4100 2.2 Front Panel The MXN-4100 provides I/O connections from the front panel. There are two 1GbE RJ-45 LAN ports (top: COMe module, bottom: CMM), a total of 4x 100GbE QSFP28 ports, one USB 2.0 port and one USB serial port, as shown below. -
Page 16: Inserting And Removing The Switch Sled
MXN-4100 2.3 Inserting and Removing the Switch Sled Refer to the chapter Assembling the CSA-7400 of the CSA-7400 User’s Manual for instructions on inserting and removing the MXN-4100 Switch Sled. -
Page 17: Powering Up The Switch Sled
MXN-4100 3 Powering Up the Switch Sled 3.1 Power-Up Behavior When power is supplied to the CSA-7400, all components will power up automatically. The behavior of the system when powered up is described below. 1. Cooling fans start speeding up as soon as power is applied to the system. -
Page 18: Health/Status Indicators And Buttons
MXN-4100 3.2 Health/Status Indicators and Buttons This section covers all of the LEDs on the MXN-4100 as show below. See the table below for LED descriptions. LED # Description MXN-4100 Alarm LED: indicates CMM alarm level Power LED (power on: Green) -
Page 19: Using The Switch Sled
Users can login to the system through the following modes. • Via USB Serial Port • Local login • Via Network Port 4.1.1 Login Via Serial Port Step 1 Connect a PC to the USB port labeled “SER” on the front panel of the MXN-4100 with a USB-to-USB cable. - Page 20 MXN-4100 Step 2 Install the USB-serial chip driver “CDM v2.12.06 WHQL Certified.zip” or “CDM v2.12.06 WHQL Certified_64.zip” on the PC. Check the COM number in the Device Manager.
-
Page 21: Local Login
Local Login The MXN-4100 COMe BIOS default setting does not enable the VGA display. Therefore, the first login to the MXN-4100 must be via the serial port: To enable local login using the VGA display: 1. Perform steps 1 to 3 of 4.1.1 Login Via Serial Port above. In step 3, click the “Open”... - Page 22 “Do not launch” to “Legacy Only”. Save the settings and restart the system. Connect the MXN-4100 to a monitor using the VGA connector on the front panel. Login to the system on the COMe module with the user name “root” and password “adlink”.
-
Page 23: Via Network Port
MXN-4100 4.1.3 Via Network Port Step 1 Connect the LAN port (“A”)of the COMe module to the DHCP server. Step 2 Open an SSH tool (such as PuTTY) and input the host name “172.20.2.23” (you can login to the system on COMe module via serial port to confirm the IP address). -
Page 24: Switch System Ip Setup
MXN-4100 4.2 Switch System IP Setup Users can set the network to “DHCP” or “Static” mode by logging into the switch system via serial console and editing “/etc/sysconfig/network-scripts/ifcfg-enp2s0”. The default mode is “DHCP”. After editing, save the change, and run “reboot” for the change to take effect. -
Page 25: Come Os Version Check
MXN-4100 4.3 COMe OS Version Check After logging in to the switch system, you can check OS version by using the following command: uname –a or cat /proc/version The shipped system version is CentOS 7 (Linux kernel 3.10.0-229.e17.x86_64), as shown... -
Page 26: Packetmanager On The Switch Sled
MXN-4100 PacketManager on the Switch Sled ADLINK PacketManager runs on the switch system COMe module under Linux OS. It includes the most commonly used Layer2/3 stacks and switch management features. The following sub-sections describe how to check the version, enter Configure Mode and get help. -
Page 27: Command Line Interface And Configure Mode
MXN-4100 4.4.2 Command Line Interface and Configure Mode Step 1 After logging into the switch system, you can input the following command to enter the command line interface (CLI): telnet localhost 9896 Step 2 To enter Configure Mode, use the enable command “en” or “enable” and default password “adlink”. -
Page 28: Get Help And Check Version
MXN-4100 4.4.3 Get Help and Check Version Entering a question mark “?” at the system prompt will display a list of commands or sub commands available for the current command mode. You can also type a “?” in the middle of a command line to view the list of valid arguments or parameters needed to complete the command. - Page 29 MXN-4100 Use the “show version” command to check the OS and SDK versions.
-
Page 30: Fabric Mode
MXN-4100 4.5 Fabric Mode At the system prompt, enter the command “fabric” to enter fabric mode:... - Page 31 MXN-4100 In fabric mode, you can configure the switch. An example command is “show port” which can be used to check the port list. For detailed information about configuration commands, please refer to the ADLINK PacketManager Configuration Guide.
-
Page 32: Maintenance
MXN-4100 5 Maintenance 5.1 Hot-Swapping the Switch Sled When hot-swapping the switch sled, the user must first push the hot-swap (H/S) button at the lower right of the front panel, and wait until the ATN LED turns on before removing the switch sled from the chassis. -
Page 33: Updating The Switch System Bios
MXN-4100 5.2 Updating the Switch System BIOS Users can use the Intel Flash Programming Tool (FPT) to update the system BIOS on the COMe module, including Intel Management Engine (ME), while preserving the MAC address of the internal NIC on the PCH of the COMe module. -
Page 34: Safety Instructions
MXN-4100 Safety Instructions For user safety, please read and follow all instructions, WARNINGS, CAUTIONS, and NOTES marked in this manual and on the associated equipment before handling/operating the equipment. 1. Read these safety instructions carefully. 2. Keep this user’s manual for future reference. - Page 35 MXN-4100 • Restricted to qualified service personnel or users familiar with restrictions applied to the location, reasons therefor, and any precautions required; • Only afforded by the use of a tool or lock and key, or other means of security, and is...
-
Page 36: Consignes De Sécurité Importantes
MXN-4100 Consignes de Sécurité Importantes Pour assurer la sécurité de l’utilisateur, veuillez lire et suivre toutes les directives, ainsi que les AVERTISSEMENTS, MISES EN GARDE et REMARQUES de ce manuel et indiqués sur l’équipement associé avant de manipuler ou utiliser l’équipement. - Page 37 MXN-4100 11. ATTENTION! L’équipement peut avoir plus d’une entrée d’alimentation. Pour réduire le` risque d’électrocution, le personnel qualifié devrait déconnecter toutes les entrées d’alimentation avant de procéder à l’entretien. 12. Il est recommandé que l'équipement soit installé que dans une salle de serveur ou de la salle informatique où:...
-
Page 38: Getting Service
5215 Hellyer Avenue, #110, San Jose, CA 95138, USA Tel: +1-408-360-0200 Toll Free: +1-800-966-5200 (USA only) Fax: +1-408-360-0222 Email: info@adlinktech.com ADLINK Technology (China) Co., Ltd. 上海市浦东新区张江高科技园区芳春路 300 号 (201203) Address: 300 Fang Chun Rd., Zhangjiang Hi-Tech Park, Pudong New Area Shanghai, 201203 China Tel: +86-21-5132-8988 Fax: +86-21-5132-3588 Email: market@adlinktech.com...
Need help?
Do you have a question about the MXN-4100 and is the answer not in the manual?
Questions and answers