Table of Contents
Advertisement
Quick Links
Advertisement
Table of Contents

Related Manuals for Gigo TERRAIN WALKERS 7427


Summary of Contents for Gigo TERRAIN WALKERS 7427
- Page 1 EXPERIMENTS # 7427 MODELS AGES PIECES MODELS AGES PIECES...
-
Page 2: Table Of Contents
TABLE OF CONTENTS Table of Contents ......1 Safety Information ......2 Kit Contents ........3 Tips for Assembly ......4 Overview .........5 Check It Out: Legged Robots ..7 Check It Out: Intro to Gears ..8 1. Terrain Walker ......9 Check It Out: Gear Ratios ....15 2. -
Page 3: Safety Information
Warning! Not suitable for children under 3 SAFETY INFORMATION years. Choking hazard — small parts may be swallowed or inhaled. Strangulation hazard — long string may become Dear Parents and Adults, wrapped around the neck. Before starting the experiments, Keep the packaging and the instructions as read through the instruction manual they contain important information. -
Page 4: Kit Contents
KIT CONTENTS What’s inside your experiment kit: Checklist: Find – Inspect – Check off Description Qty. Item No. Description Qty. Item No. B-SHORT PEG 7344-W10-C2D C-6 HOLE ARCH ROD 7427-W10-D2S C-20mm AXLE CONNECTOR 7413-W10-T1P2 C-5 HOLE PROLATE ROD 7443-W10-C1S C-30mm AXLE CONNECTOR 7413-W10-U1S C-5X5 FRAME 7413-W10-Q1S2... -
Page 5: Tips For Assembly
TIPS FOR ASSEMBLY PEG REMOVER Side A of the peg remover can be used to easily remove pegs. Side B can be used to loosen firmly inserted parts, such as axle. BATTERIES How to insert and remove the batteries Insert: Insert three new AA batteries. Make sure you fit the positive and negative ends into the compartment in the direction indicated (with the correct polarity). -
Page 6: Overview
OVERVIEW... - Page 7 OVERVIEW...
-
Page 8: Check It Out: Legged Robots
CHECK IT OUT LEGGED ROBOTS Legged robots are robots that These old wind-up walk on mechanical limbs. While toy robots walked on two legs. many robots roll around on wheels — which are mechanically very efficient — legged robots have the ability to walk over obstacles and surfaces that wheeled robots cannot move over. -
Page 9: Check It Out: Intro To Gears
CHECK IT OUT GEAR WHEELS AND GEAR TRAINS If you look at the complicated machines that exist today, it’s hard to imagine that gears and gear trains have been around for such a long time. In fact, they have been in use for thousands of years. -
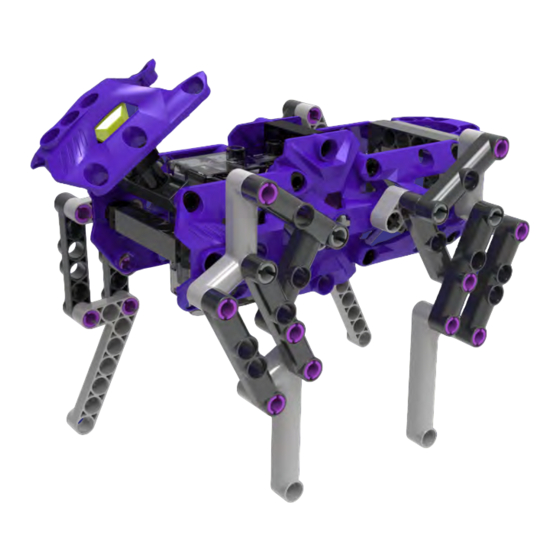
Page 10: Terrain Walker
Terrain Walker Model Important! Check both sides and make sure the parts are oriented exactly as shown: 1. The gears must mesh together. Turn one of the gears all the way around and make sure all of the gears turn smoothly. 2. - Page 11 Model Terrain Walker Important! Check both sides and make sure the parts are oriented exactly as shown: 1. The gears must mesh together. Turn one of the gears all the way around and make sure all of the gears turn smoothly. 2.
- Page 12 Terrain Walker Model Important! Check both sides again. The middle tooth of the middle gear is The middle tooth of the middle gear is pointing straight down. pointing straight up. The 2 hole round rods for axle are The 2 hole round rods for axle are aligned with the green arrows as shown.
- Page 13 Model Terrain Walker side view...
- Page 14 Terrain Walker Model side view...
- Page 15 Model Terrain Walker ››› Use the string to make a leash for Done! your model and take it for a walk! • The model walks best on a smooth tabletop or hard floor, but if the surface is too smooth, it might slip. Switch the motor to turn clockwise Test different surfaces and see what works! The for forward motion.
-
Page 16: Check It Out: Gear Ratios
CHECK IT OUT UNDERSTANDING GEAR RATIOS DIRECTION OF MOTION When two gear wheels are placed next to each 10 teeth 40 teeth Driven gear other, their teeth mesh together. When one of Driver gear the gears turns, the other gear will turn as well, automatically moving along with the first gear. -
Page 17: Roboar
Model RoBoar Important! Make sure the parts are oriented exactly as shown: 1. The gears must mesh together. Turn one of the gears all the way around and make sure all of the gears turn smoothly. 2. The middle tooth of the middle gear must be pointing straight down. - Page 18 RoBoar Model Make sure there are batteries in the 100X motor with switch first. Important! Check both sides again. The middle tooth of the middle gear is The middle tooth of the middle gear is pointing straight up. pointing straight down. The 2 hole round rods for axle are The 2 hole round rods for axle are aligned with the green arrows as shown.
- Page 19 Model RoBoar...
- Page 20 RoBoar Model...
- Page 21 Model RoBoar Switch the motor to turn clockwise for forward motion. Done!
-
Page 22: Robomouse
RobMouse Model ×2 Repeat steps 1 and 2 twice. Right Align the 2 hole round rod for axle with the green arrow as shown. Important! Make sure the parts are oriented exactly as shown: 1. The gears must mesh together. Turn one of the gears all the way around and make sure left... - Page 23 Model RobMouse side view Side view side view...
- Page 24 RobMouse Model Done! Switch the motor to turn counterclockwise for forward motion.
-
Page 25: Check It Out: Special Gears
CHECK IT OUT INTERMITTENT GEARS AND NON-CIRCULAR GEARS Imagine a set of gears in Now, take a close look at the which the driver gear (the gear gears in this kit. What do you connected to the motor axle) is notice? The gears are not perfectly circular like missing some of its teeth. -
Page 26: Leopard Crawler
Important! Check both sides: Leopard Crawler Model 1. The gears must mesh together. left Turn one of the gears all the way around and make sure both gears turn Inner side Inner side smoothly. ×2 2. The middle tooth of the upper Outer side Right gear must be... - Page 27 Model Leopard Crawler...
- Page 28 Leopard Crawler Model Second First Switch the motor to turn counter- clockwise for forward motion. Done!
-
Page 29: Water Bear Robot
Model Water Bear Robot Important! Make sure the parts are oriented exactly as shown: 1. The gears must mesh together. Turn one of the gears all the way around and make sure all of the gears turn smoothly. 2. The middle tooth of the middle gear must be pointing straight down. - Page 30 Water Bear Robot Model Make sure there are batteries in the 100X motor with switch first. Important! Check both sides again. The middle tooth of the middle gear is The middle tooth of the middle gear is pointing straight up. pointing straight down.
- Page 31 Model Water Bear Robot...
- Page 32 Water Bear Robot Model...
- Page 33 Model Water Bear Robot Switch the motor to turn clockwise for forward motion. Done!
-
Page 34: Fairy Shrimp Bot
Fairy Shrimp Bot Model Important! Make sure the parts are oriented exactly as shown: 1. The gears must mesh together. Turn one of the gears all the way around and make sure all of the gears turn smoothly. 2. The middle tooth of the middle gear must be pointing straight down. - Page 35 Model Fairy Shrimp Bot Make sure there are batteries in the 100X motor with switch first. Important! Check both sides again. The middle tooth of the middle gear is The middle tooth of the middle gear is pointing straight up. pointing straight down.
- Page 36 Fairy Shrimp Bot Model...
- Page 37 Model Fairy Shrimp Bot Done! Switch the motor to turn clockwise for forward motion.
-
Page 38: Kangaroo Bot
Kangaroo Bot Model Important! Check the orientation: Inner side Outer side 1. The gears must mesh together. Turn one of the gears all the way around and make sure both gears Make sure there are turn smoothly. batteries in the 100X 2. - Page 39 Model Kangaroo Bot Align the 2 hole round rod for axle with the green arrow as shown.
- Page 40 Kangaroo Bot Model...
- Page 41 Model Kangaroo Bot Done! Switch the motor to turn Second clockwise for First forward motion.
-
Page 42: Monkey Bot
Monkey Bot Model Make sure there are batteries in the 100X motor with switch first. Important! Make sure the parts are oriented exactly as shown: 1. The gears must mesh together. Turn one of the gears all the way around and make sure both gears turn smoothly. - Page 43 Model Monkey Bot Important! Check both sides again. Align the 2 hole round rod for axle with the green arrows as shown.
- Page 44 Monkey Bot Model Outer side Outer side Outer side...
- Page 45 Model Monkey Bot Stretch the string taut between two stable points. The monkey will move hand over hand along the string. Done! Switch the motor to turn counterclockwise for forward motion.
-
Page 46: Check It Out: Linkages
CHECK IT OUT Pivot LINKAGES All of the models in this kit make use of Fixed Pivot Point mechanisms called linkages. Pivot A linkage is a mechanical assembly of rigid links (or rods) connected at movable joints. Picture the rigid rods in this kit linked together with the rotating joint pins: that is a linkage! Linkages can be open or closed chains, in which each link is connected to at least one other link. - Page 47 Welcome to our newly redesigned Gigo website! We now offer four language options (English, Traditional Chinese, Simplified Chinese, Russian). Many brilliant videos for product introduction. Online product brochures to facilitate timely browse. 繁體中文 簡體中文 Русский Please browse website Gigo website...
- Page 48 © 2020 Genius Toy Taiwan Co., Ltd. ALL RIGHTS RESERVED R21#7427-1...
Need help?
Do you have a question about the TERRAIN WALKERS 7427 and is the answer not in the manual?
Questions and answers