
Related Manuals for Electrolux Professional 400 LT


Summary of Contents for Electrolux Professional 400 LT
- Page 1 Vertical refrigerators 400 LT Installation and operating manual * 595R77500- 2023.02 *Original instructions...
- Page 2 Installation diagram High feet model...
- Page 3 Installation diagram Low feet model...
- Page 4 Installation diagram High wheels model 91.5 91.5...
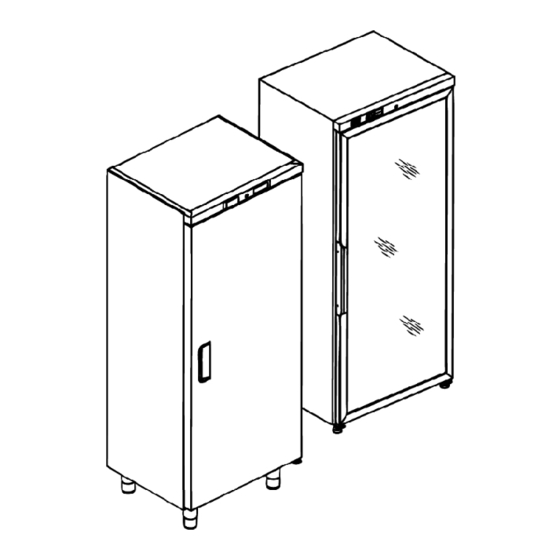
- Page 5 Installation diagram High feet glass door model...
- Page 6 Installation diagram Low feet glass door model...
- Page 7 EI = Power cable...
- Page 8 Foreword Read the following instructions, including the warranty terms before installing and using the appliance. Visit our website www.electroluxprofessional.com and open the Support section to: Register your product Get hints & tips of your product, service and repair information The installation, use and maintenance manual (hereinafter Manual) provides the user with information necessary for correct and safe use of the appliance.
-
Page 9: Table Of Contents
Contents A WARNING AND SAFETY INFORMATION....................11 General information ........................11 Description of type reference......................11 Personal protection equipment ...................... 12 Protection devices installed on the appliance ..................12 Safety signs to be placed on the appliance or near its area ..............12 Reasonably foreseeable improper use .................... - Page 10 J.1.3 Periods of non-use ......................25 K TROUBLESHOOTING .......................... 25 Introduction ..........................25 Troubleshooting ......................... 25 L MACHINE DISPOSAL........................... 26 Procedure regarding appliance disposal ..................26...
-
Page 11: Awarning And Safety Information
WARNING AND SAFETY INFORMATION General information To ensure safe use of the appliance and a proper understanding of the manual it is necessary to be familiar with the terms and typographical conventions used in the documentation. The following symbols are used in the manual to indicate and identify the various types of hazards: WARNING Danger for the health and safety of operators. -
Page 12: Personal Protection Equipment
Personal protection equipment Summary table of the Personal Protection Equipment (PPE) to be used during the various stages of the appliance's service life. Stage Protective Safety footwear Gloves Glasses Safety helmet garments ● ○ ○ — — Transport ● ○ —... -
Page 13: Reasonably Foreseeable Improper Use
Reasonably foreseeable improper use Improper use is any use different from that specified in this manual. During appliance operation, other types of work or activities deemed improper and that in general can involve risks for the safety of operators and damage to the appliance are not allowed. Reasonably foreseeable improper use includes: •... -
Page 14: Transport, Handling And Storage
• Glass door refrigerated model: Climatic Class 5: – 43℃ (IEC/EN 60335-2-89) Climatic Class 3 (not given in the data plate): – 25℃ room with 60% relative humidity (EN 16825/EN ISO 22041). • Glass door freezer model: Climatic Class 5: –... -
Page 15: Electrical Connection For Appliances With Cable Without Plug
A.14 Electrical connection for appliances with cable without plug • The connection point has an efficient earth contact and the mains voltage and frequency match that given on the data plate. In case of doubts regarding the efficiency of the earth wire, have the system checked by specialised personnel. •... -
Page 16: Preventive Maintenance
In order to ensure the safety and performance of your equipment, it is recommended that service is undertaken by Electrolux Professional authorised engineers every 12 months, in accordance with Electrolux Professional Service Manuals. Please contact your local Electrolux Professional Service Centre for further details. -
Page 17: Appliance Disposal
Volt xxxx Total Current xxxx Potenza Sbrinamento / Defrost Power Classe / Class CO2-eq xxxxx Resistenza Evaporazione / Evaporation Heater El. Refrigerante / Refrigerant Illuminazione / Lighting Cap. IPxx Electrolux Professional SPA - Viale Treviso, 15 - 33170 Pordenone (Italy) -
Page 18: Dgeneral Information
(the fitting and use of non-original Manufacturer Electrolux Professional SpA or any other spare parts and accessories can negatively affect appliance service centre authorised by Electrolux operation and invalidates the original manufacturer Professional SpA. -
Page 19: Customer Packaging Checks
The Manufacturer declines any liability for damage caused by • The driver must sign the dispatch note: the forwarder can arbitrary modifications and conversions carried out by the user reject the claim if the dispatch note is not signed (the or the Customer. -
Page 20: Finstallation And Assembly
Fish models Fish models (cont'd.) Temp. range. in – 7℃ / + 6℃ Trays H = 210 compartment Trays H= 200 Refrigeration ventilated system INSTALLATION AND ASSEMBLY Introduction • for appliances with stainless steel surfaces, remove the protective film very slowly without tearing it, to avoid leaving WARNING glue stuck to the surface;... -
Page 21: Reversing Opening Of Models With Fully Insulated Doors
1. undo the two Phillips screws positioned on the top of the 4. retighten the screw complete with the cable on the roof of appliance as shown in the figure; the appliance; 5. the cable must then be fixed to the wall with a plug, to 2. -
Page 22: Reversing Opening For High Feet Models
• turn off the main switch and disconnect the plug; • remove the upper cover; • arrange a support (not supplied) for placing at the bottom part of the door; • undo screws “H“, remove the lower bracket “E“ and fit it on the left, in the holes provided;... -
Page 23: Gnormal Machine Use
NORMAL MACHINE USE Characteristics of personnel enabled to Basic requirements for appliance use operate on the appliance • Knowledge of the technology and specific experience in operating the appliance. The Customer must make sure the personnel for normal appliance use are adequately trained and skilled in their duties. •... -
Page 24: Setting The Temperature
Setting the temperature Manual activation of defrost • Touch Program button for 3 seconds to unlock the display; • Touch Program button for 3 seconds to unlock the display; • Press the temperature button. • Press defrost button to start a manual defrost cycle. The display shows the SET POINT. -
Page 25: Jmachine Cleaning And Maintenance
MACHINE CLEANING AND MAINTENANCE WARNING J.1.3 Periods of non-use Refer to “Warning and Safety If the appliance is not going to be used for some time, take the following precautions: Information“. • disconnect the power supply or remove the plug from the power socket, if present;... - Page 26 • Make sure the plug is prop- erly inserted in power socket. • Make sure the socket is powered. • check (if present) the suit- The appli- ability of the fuse on the — — — — — — — — ance does •...
- Page 28 Electrolux Professional SPA Viale Treviso 15 33170 Pordenone www.electroluxprofessional.com...
Need help?
Do you have a question about the 400 LT and is the answer not in the manual?
Questions and answers