Table of Contents
Advertisement
Quick Links
nodeG5
IIOT GATEWAY
Build intelligent network nodes with
an IIoT gateway that supports python,
docker & services like AWS Sitewise
& TensorFlow to manage OPC UA,
CAN Bus J1939/OBD2, Serial RS485
Modbus TCP/RTU, WiFi & BLE data.
EDITION / October 2023 /
FIRMWARE VERSION 2.1
DESIGNED IN AUSTRALIA.
ASSEMBLED IN SINGAPORE.
Page 1/25
Advertisement
Table of Contents

Subscribe to Our Youtube Channel
Related Manuals for AMPLIFIED ENGINEERING nodeG5


Summary of Contents for AMPLIFIED ENGINEERING nodeG5
- Page 1 IIOT GATEWAY EDITION / October 2023 / Build intelligent network nodes with FIRMWARE VERSION 2.1 an IIoT gateway that supports python, docker & services like AWS Sitewise DESIGNED IN AUSTRALIA. & TensorFlow to manage OPC UA, ASSEMBLED IN SINGAPORE.
-
Page 2: Table Of Contents
The addition of a Real Time data mode allow users to make a split between SECTION 1: ABOUT data sets which require instant status updates & those that require a log. nodeG5 Specifications Hardware Board Interface SECTION 2: SETTING UP... -
Page 3: Safety Of Use
SAFETY OF USE All specialist electronic devices must be operated with due care to avoid damage or injuries and should be installed and ALL CONDITIONS operated by a trained personnel. DO NOT OPERATE THIS EQUIPMENT IN ENVIRONMENTS CONTAINING POTENTIALLY EXPLOSIVE GASES OR LIQUIDS, EXAMPLE, GAS STATIONS AND CHEMICAL PLANTS AND EXPLOSIVE STORES. -
Page 4: Section 1: About
· NetMgr WWAN connect timeouts AI/ML Neural Processing Unit, up to 1. 1 NPU (optional) · End-to-End PING connectivity testing with 2.3 TOPS reboot nodeG5 SPECIFICATIONS ARM Cortex-M7, 800Mhz REAL TIME CO- NETWORKING · Dynamic DNS PROCESSOR CLOUD · Azure IoT Hub / IoT Central Client MANAGEMENT ·... -
Page 5: Hardware
ABOUT With the nodeG5 you have the option to install it using a PHYSICAL SPECIFICATIONS mounting plate onto different surfaces. The orientation and dimensions are as below: DIMENSION 132mm 1. 2 84mm HARDWARE 25mm 132mm 550g WEIGHT POWER · 8 to 26 VDC PERIPHERALS INCLUDED ·... -
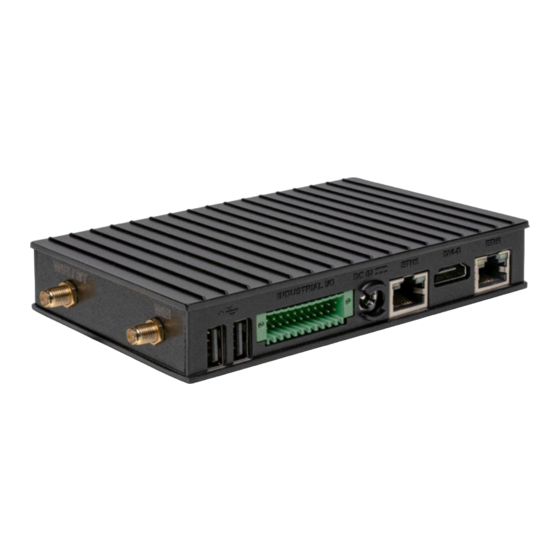
Page 6: Board Interface
ABOUT SMA Antenna Connectors 1. 3 BOARD INTERFACE For models with WiFi & BLE only USB2.0 port1 DC Power HDMI USB2.0 port2 Second LAN Port ETH2 Main LAN Port ETH1 (default: 10.1.1.1) (default: 192.168.1.1) See Section 3.6 Industrial I/O (page 14) for wiring terminal block P8 diagram Serial Console... -
Page 7: Section 2: Setting Up
SETTING UP INSERTING THE SIM CARD 2. 1 STEP 1 of 5 - Unscrew the SIM cover and insert the micro SIM card into the slot. SIM INSTALLATION WHAT YOU’LL NEED 1. 4G Data Enabled micro SIM Card 2. PC/Laptop with an Ethernet port 3. -
Page 8: Logging In
SETTING UP STEP 3 of 5 - Plug in the Ethernet cable from ETH1 to your pc and power up the nodeG5. STEP 4 of 5 - Launch your browser and enter address as 192.168.1.1 2. 2 LOGGING IN STEP 5 of 5 - Log in. -
Page 9: Quickstart Guide
CONFIGURATION nodeG5 You can find resource PDF links in our web config to help guide you through the different MENU OPTIONS Basic settings for nodeG5 Gateway for Cellular Internet Access 3. 1 setups. QUICK Quick Start G5 Quick Start Guide.pdf... -
Page 10: Wan & Cellular Settings
CELLULAR Cellular WAN SETTINGS Dynamic DNS Ethernet Cellular SIM Settings Wireless To connect the nodeG5 to a Serial / CAN cellular network the following telstra.internet information is required. You will IoT Hardware be able to get them from your Dial Number... -
Page 11: Dynamic Dns
Serial / CAN domain name pointed to Username your_username Enter in the FQDN (fully the nodeG5 even if it is IoT Hardware qualified domain name) of your Password ******** assigned IP changes during IoT Client host at DDNS provider. -
Page 12: Ethernet Settings
CONFIGURATION nodeG5 Set up the IP Address of your LAN port. MENU OPTIONS Ethernet Settings 3. 4 Enable the nodeG5 to ETHERNET automatically assign IP Quick Start eth1 (LAN) IP Address 192.168.1.1 addresses to your connected SETTINGS Cellular WAN LAN devices. -
Page 13: Wireless Settings
SSID IoT Hardware Key in the IP address for your WPA-PSK IoT Client Security Type nodeG5, or leave this blank to IoT Data let it be assigned via DHCP. Password ********* Management IP Address 192.168.1.1... -
Page 14: Serial & Can Settings
CONFIGURATION The industrial I/O signals are routed to terminal block P8. Pin-out is determined by the I/O modules configuration below: 3. 6 SERIAL & CAN SETTINGS Serial (RTU) · PIN 1 (RS485_POS) Port A · PIN 3 (RS495_NEG) · PIN 5 (ISO_GND_1) Note: for RS485 2-wire, Serial (RTU) ·... - Page 15 CONFIGURATION nodeG5 Serial / CAN Settings MENU OPTIONS 3. 6 SERIAL & CAN Serial Port A Parameters Quick Start SETTINGS Cellular WAN Speed 9600 E.g. 9600, 19200, 38400, 57600, 115200 Dynamic DNS Data Bits E.g. 7, 8 Ethernet Wireless Parity...
-
Page 16: Iot Hardware
If you require a pause between separate poll queries, set it here. Set your local timezone for event timestamp. Enable the Bluetooth option here. Note that this feature is model dependant. Update and reboot the nodeG5 Page 16/25... - Page 17 CONFIGURATION nodeG5 Show a snapshot of the current data MENU OPTIONS IOT Hardware Setup 3. 7 IOT HARDWARE Quick Start Cellular WAN DELETE ALL JSON DATA Dynamic DNS Ethernet Wireless Serial / CAN Ensure that the gateway HTTPS IoT Hardware...
-
Page 18: Iot Client
IoT Hub or IoT Central. Quick Start Cellular WAN Client Setup :: Azure IoT Enter the endpoint/host for sending Dynamic DNS the data. By default this is set to nodeG5 Azure IoT Quick Start Guide web pdf Ethernet 'global.azure-devices- Wireless provisioning.net' YourAzureDeviceID... - Page 19 Broker/ to describe your data Host Port 1883 Username for port 1883 And the Broker Port details as per the settings in your MQTT Broker Password for port 1883 Enable Client Enabled Enable the nodeG5 as a MQTT IoT Gateway Page 19/25...
-
Page 20: Iot Data
Broker/ to describe your data Host Port 1883 Username for port 1883 And the Broker Port details as per the settings in your MQTT Broker Password for port 1883 Enable Client Enabled Enable the nodeG5 as a MQTT IoT Gateway Page 19/25... -
Page 21: Management
Note that from the internet, will provide root access using Enable Secure Shell (SSH) Serial / CAN Enabled the default login details on page the nodeG5 can only be Enable System Log Disabled accessed via HTTPS (secure) IoT Hardware System Time reference... - Page 22 1. Format a USB thumb-drive (e.g. MENU OPTIONS System Management 3. 10 NODE32) and label it ‘nodeG5’ MANAGEMENT 2. After the nodeG5 is powered up insert Quick Start the thumb-drive into an available USB Cellular WAN port. Dynamic DNS Ethernet 3.
- Page 23 If the update failed, check that the connection to the gateway is stable. Or else please contact Factory Settings Reboot System support@amplified.com.au Click ‘Reboot’ to soft reset the nodeG5 device. Click ‘Factory Settings’ to revert all parameters to factory default. Page 23/25...
-
Page 24: System Status
CONFIGURATION nodeG5 MENU OPTIONS System Status 3. 11 SYSTEM STATUS Main Quick Start Cellular WAN Firmware Version 5.15.32+gb917e043c529 Dynamic DNS System Date & Time Thur Aug 10 02:41:16 UTC 2023 Ethernet Wireless Upload and CPU Load (1,5,15m) 02:41:16 up 16 min, 1 user, load average: 0.25, 0.22, 0.13... -
Page 25: Contact Us
CONTACT US TECHNICAL SUPPORT: SUPPORT@AMPLIFIED.COM.AU SALES: SALES@AMPLIFIED.COM.AU WEBSITE AMPLIFIED.COM.AU ADDRESS Amplified Engineering Pty Ltd Unit 3, 2A Brodie Hall Drive Bentley WA 6102, Australia ABN 44127163035 Page 25/25...
Need help?
Do you have a question about the nodeG5 and is the answer not in the manual?
Questions and answers