
Related Manuals for NYMAS BPLBOX

Summary of Contents for NYMAS BPLBOX
- Page 1 Installation, Operation, and Maintenance Manual BPLBOX Product code: Description: BACK BOX FOR BACK TO WALL PAN, WITH FIXINGS IOM-BPLBOX Rev 1...
- Page 2 NYMAS Group accepts no liability whatsoever for personal injury or damage to product(s) or property that has been caused by incorrect assembly, installation, or use of this product. Failure to install/use this product in line with the instructions in this manual will invalidate any warranty and may affect product safety.
- Page 3 DO NOT use cleaning components containing iron (e.g., scour sponge, steel wool). DO NOT expose to excessive amounts of water. Disposal: Dispose of this product and packaging in line with local authority regulations. Page 3 of 12 IOM-BPLBOX Rev 1...
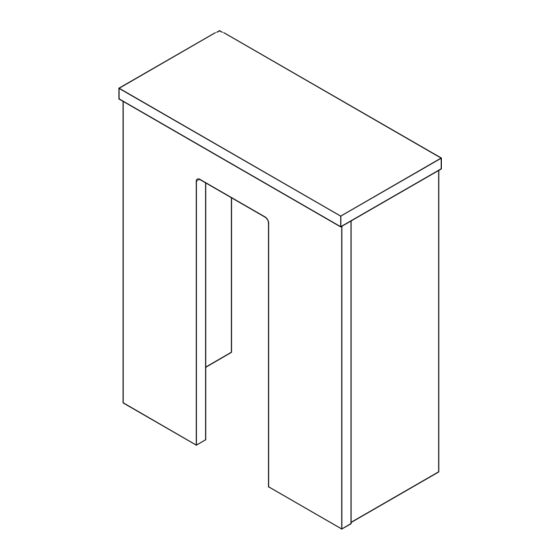
- Page 4 Product dimensions: (mm) Page 4 of 12 IOM-BPLBOX Rev 1...
- Page 5 Tools required: Exploded view: Page 5 of 12 IOM-BPLBOX Rev 1...
- Page 6 The right hand side panel is shown. Locate 2 x 19mm x 19mm angle brackets as shown; fix both brackets to the panel using 4.8mm X 13mm PZ2 Pan Head screw. Do not fully tighten! Page 6 of 12 IOM-BPLBOX Rev 1...
- Page 7 Apply a small amount of PVA glue to the 4 x dowel holes on the brace. Place all dowels into the glued holes. Knock in gently with hammer, ensuring they have a strong hold. Page 7 of 12 IOM-BPLBOX Rev 1...
- Page 8 The 4 x fixing holes are intended for the secondary part of the fasteners set (right-angled component).. Fix the right angled fastener using 2 x Countersink Wood Screws - 3.5mm x 16mm per bracket. All elements should now be assembled as pictured. Page 8 of 12 IOM-BPLBOX Rev 1...
- Page 9 Do not fully tighten. Using the right handed side panel, repeat step 10. Wipe any excess glue away from surfaces. Caution - Excess glue may spill out, do not construct on soft furnishings / non-washable surfaces. Page 9 of 12 IOM-BPLBOX Rev 1...
- Page 10 Position the front panel and align with the dowels. Apply pressure and ensure panels align squarely. Secure the front panel using 4 x L brackets, using 4.8mm X 13mm PZ2 Pan Head screws. Page 10 of 12 IOM-BPLBOX Rev 1...
- Page 11 Align the lid, lining up the black right angled fasteners. Push down gently - the lid will snap on and sit flush on top. Visually check the fastener engagement. The fasteners should appear as pictured and engage fully. Page 11 of 12 IOM-BPLBOX Rev 1...
- Page 12 When drilling through the brace, start with small pilot holes to avoid damage to the chipboard material. Replace lid once fixed to wall. The BPLBOX is now fully assembled. No wall fixings are supplied with the product due to varying wall structures.
Need help?
Do you have a question about the BPLBOX and is the answer not in the manual?
Questions and answers