Table of Contents
Advertisement
Quick Links
Portable Automatic Welding Carriage for fillet welding
BUS01A06
WEL-HANDY
MINI STRONG
OPERATION MANUAL
For every person who will be engaged in
operation and maintenance supervision, I t is
recommended to read through this manual
before
any
operations,
so
as
to
permit
optimum operation of this machine.
KOIKE SANSO KOGYO CO.,LTD.
Advertisement
Table of Contents

Related Manuals for Koike Sanso Kogyo WEL-HANDY MINI STRONG

Summary of Contents for Koike Sanso Kogyo WEL-HANDY MINI STRONG
- Page 1 Portable Automatic Welding Carriage for fillet welding BUS01A06 WEL-HANDY MINI STRONG OPERATION MANUAL For every person who will be engaged in operation and maintenance supervision, I t is recommended to read through this manual before operations, permit optimum operation of this machine. KOIKE SANSO KOGYO CO.,LTD.
- Page 2 WEL-HANDY MINI STRONG INTRODUCTION Thank you very much for purchasing this product. Read this instruction manual thoroughly to ensure correct, safe and effective use of the machine. Read the manual first to understand how to operate and maintain the machine. Cooperation between colleagues in the workplace is essential for safe, smooth operation.
- Page 3 WEL-HANDY MINI STRONG Symbol Title Meaning General General caution, warning, and danger. Be careful not to get your Possible injury to fingers if caught in the insertion fingers caught. part. Caution: Electric shock! Possible electric shock under special conditions. Ground this equipment.
-
Page 4: Table Of Contents
7.2 Assembly drawing of circuit board ······························································ 25 7.2.1 L-DSP-A circuit board ······································································ 25 7.2.2 L-MD-A circuit board ········································································ 26 8. Assembly drawing of WEL-HANDY MINI STRONG ··············································· 27 9. Parts list ········································································································ 28 9.1 Main body and inside parts ········································································ 28 9.2 Outside parts ··························································································... -
Page 5: Safety Information
WEL-HANDY MINI STRONG 1 Safety information Most accidents are caused by negligence of basic safety regulations during operation, inspection, and maintenance. Carefully read, understand, and master the safety precautions and preventive measures written in this manual or on the machine before operation, inspection, and maintenance of the machine. -
Page 6: Safety Precautions
WEL-HANDY MINI STRONG 2 Safety precautions WARNING Strictly observe the following to prevent accidents resulting in serious injury or death. ■This welding machine is designed and manufactured by taking safety into consideration. However, never fail to observe the warning and precautions described in this instruction manual, otherwise accidents leading to serious injuly or death can result. - Page 7 WEL-HANDY MINI STRONG conductors are exposed. ■firmly tighten and insulate cable connections. ■Firmly connect the welding cable on the base metal side at a location as close as possible to the base metal. ■Do not use the machine with the welding machine case or coser removed.
- Page 8 WEL-HANDY MINI STRONG CAUTION Use protective gear to protect you and others from fumes and gas generated by welding. ■Welding generates fumes and gas. Inhalation of such fumes and gas can damage your health. ■Welding operation in a smell space causes deficiency of oxygen, which is very likely to cause suffocation.
- Page 9 WEL-HANDY MINI STRONG CAUTION Strictly observe the following to prevent injury due to rotary section. ■Do not bring your hands, hair, or clothes close to the cooling fan of the welding power supply or the feeder roller of the wire feeder; otherwise you can be caught in them.
-
Page 10: Locations Of Safety Labels
WEL-HANDY MINI STRONG 3 Location of Safety labels Safety labels and labels for correct operations are stuck to the machine. ■Carefully read labels before operation and follow the instructions decried on them. ■Never peel off the labels. Keep them clean and legible at all times. -
Page 11: Features And Specifications
4 Features and specifications 4.1 Features This carriage "WEL-HANDY MINI STRONG" was developed to make it available even for a non-skilled welding operator, to carry out horizontal fillet welding (down laid welding), vertical fillet welding and overhead welding by easy operations. -
Page 12: Specifications
WEL-HANDY MINI STRONG 4.3 Specifications Item Specifications Model WEL-HANDY MINI STRONG Rubber roller 4 wheeler driving (permanent magnet absorption Driving method type) (Lower plate traveling system, traveling surface is steel plate) Traveling speed 100~800mm/min /3.9~31.5inch/min Horizontal angle: 40~55° Swept forward angle/sweep back Torch adjustable range angle : 5°... -
Page 13: Method Of Operation
WEL-HANDY MINI STRONG 5 Method of operation Kindly take care about following things to avoid getting an electric shock. WARNING ⚫ Kindly remove input plug from outlet while checking, dis-assembling or repairing and turn OFF the control source while leaving. If it is necessary to... -
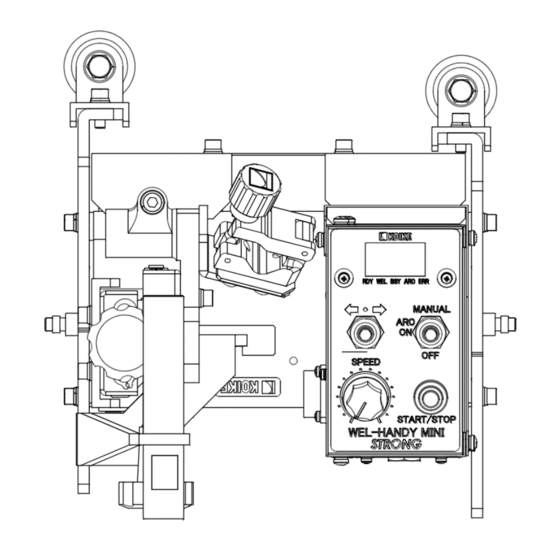
Page 14: Name Of Each Part
WEL-HANDY MINI STRONG CAUTION Set the welding power switch in the "No Self-Holding (or No Crater Treatment)" position. ■When the switch ot the welding power supply, which is to be connected to the welding machine, is set in the “Self.Holding (or Crater Treatment)” position, the welding arc will not stop even if the welding operation is stopped. - Page 15 WEL-HANDY MINI STRONG (2) Torch holder Insert the exclusive use torch mounting section into the torch holder to secure it. WARNING Secure the insulated section of the torch when mounting it. ■When the conductive section is secured, a short circuit and/or electric shock can result.
- Page 16 WEL-HANDY MINI STRONG The height of the guide rollers can be adjusted by changing the attaching method. The height can be adjusted in the range of -18mm(0.709inch) ~ 16mm(0.630inch) and 66mm(2.599inch) ~ 101mm(3.976inch) from the contact patch of a tire.
- Page 17 WEL-HANDY MINI STRONG WARNING Never fail to ground the clip. ■ The grounded clip prevents short circuits or electtic shock which results from a short circuit in the carriage, etc. (7) Driving wheel (Rubber roller) (8) Torch angle adjusting bolt Used to set the torch angle.
-
Page 18: Operation Panel
WEL-HANDY MINI STRONG 5.1.2 Operation panel V3.32 WARNING Kindly take care about following things to avoid getting an electric shock. ■ Kindly remove input plug from outlet while checking, dis-assembling or repairing and turn OFF the control source while leaving. If it is necessary... - Page 19 WEL-HANDY MINI STRONG (1) Traveling direction changing over switch It is possible to select traveling direction of carriage. When switch position is neutral, carriage cannot travel or move. (2) Traveling speed adjustment switch Kindly turn carriage in clockwise direction to increase speed of carriage and turn it in anti-clock wise direction to reduce speed of carriage.
-
Page 20: Preparation And Procedure For Welding
WEL-HANDY MINI STRONG (5) Arc mode changing over switch There can be 3 modes of changing over in 3 point changing over switch as shown below. MANUAL : Kindly use it in wire inching and arc test. Wire comes out only while switch is on MANUAL. - Page 21 WEL-HANDY MINI STRONG (5) Turn ON the power switch of the welding power supply and insert the wire into the torch. (Insert the torch cable straightly.) CAUTION When inserting the wire, do not bring your head near the wire that comes out of the tip.
-
Page 22: System Connection Diagram
WEL-HANDY MINI STRONG 5.3 System connection diagram * Welding torch Wire feeder Convenience outlet Carriage * Do not connect the signal cable on the torch to the wire feeder. Fig.6 System connection diagram 5.4 Applicable welding machine and signal adaptor This welding machine is to be used in combination with a semi-automatic (CO2, MAG) welding machine (power supply and feeder) available on the market. -
Page 23: Maintenance
WEL-HANDY MINI STRONG 6 Maintenance For correct operation of the machine for an extended period of time without trouble, the daily maintenance is indispensable. (Refer to 6.1 "Maintenance and inspection.") When trouble occurs, refer to 6.3 "Trouble and corrective measures."... -
Page 24: Monthly Inspection
WEL-HANDY MINI STRONG 6.1.2 Monthly inspection (1) Check the locking screws of the torch holder, tracing arm, handle, carriage bottom plate, etc. for looseness. (2) Check cables (torch and control) for twisting or broken sheathing. (3) Confirmation of the operation of auto stop limit switch. - Page 25 WEL-HANDY MINI STRONG 1) Defect, disconnection of traveling speed adjustment switch * Kindly verify conduction between Variable resister and L- DSP-A board by tester when power supply is turned OFF. ・When it is conducting Kindly verify whether resistance value between variable resister terminals is changed by tester.
- Page 26 WEL-HANDY MINI STRONG 1)ARC OFF option is selected in Arc mode changing over switch. 2) No welding current. 3) The signal cable for the torch switch is not connected to the welding power supply. 4) Check for a short circuit between the 2pins of the 2-pin metal outlet for the torch switch (see figure below) on our cable.
-
Page 27: Warranty
This is thoroughly inspected and tested before leaving the factory, and guaranteed for 12 months from the date of purchase against defective workmanship and material. Should any trouble develop, return the complete equipment prepaid to KOIKE Sanso Kogyo Co., Ltd. Authorized KOIKE Distributor. -
Page 28: Wiring Diagram
WEL-HANDY MINI STRONG 7 Wiring diagram 7.1 Electrical diagram - 24 -... -
Page 29: Assembly Drawing Of Circuit Board
WEL-HANDY MINI STRONG 7.2 Assembly drawing of circuit board 7.2.1 L-DSP-A circuit board - 25 -... -
Page 30: L-Md-A Circuit Board
WEL-HANDY MINI STRONG 7.2.2 L-MD-A circuit board - 26 -... -
Page 31: Assembly Drawing Of Wel-Handy Mini Strong
WEL-HANDY MINI STRONG WEL-HANDY MINI STRONG Assembly drawing of 1.5mm =0.059inch 5.5mm =0.217inch 194mm =7.638inch 232mm =9.134inch 260mm =10.236inch 265mm =10.433inch 272mm =10.709inch 284mm =11.121inch 300mm =11.811inch 305mm =12.008inch - 27 -... -
Page 32: Parts List
WEL-HANDY MINI STRONG Parts list 9.1 Main body and inside parts - 28 -... - Page 33 WEL-HANDY MINI STRONG Main body and inside parts ITEM STOCK ITEM STOCK PART NAME REMARKS PART NAME REMARKS Motor 6P010014 34 Screw (SUS) 6C730412 M4×12 d=6 ★ Gear head 61007166 35 Side panel (R) 61006960 with spring pin right side...
-
Page 34: Outside Parts
WEL-HANDY MINI STRONG 9.2 Outside parts 61-5 61-6 61-7 - 30 -... - Page 35 WEL-HANDY MINI STRONG Outside parts ITEM STOCK ITEM STOCK PART NAME REMARKS PART NAME REMARKS Torch holder assembly 61007168 61-8 Guide roller shaft 61006967 M5×16(WS,WF) 51-1 Clamp knob 60038166 62 Hexagon bolt 6C450516 ★ 51-2 Holder body 61003323 63 Heat shield...
-
Page 36: Electrical Parts
WEL-HANDY MINI STRONG 9.3 Electrical parts - 32 -... - Page 37 WEL-HANDY MINI STRONG Electrical parts ITEM STOCK ITEM STOCK PART NAME REMARKS PART NAME REMARKS Operation panel ass’y 61007692 81-1 Operation plate 61006987 81-2 Operation box C 61006971 81-3 Glass pressing 61006450 81-4 Dustproof nut 60032480 81-5 Water proof cap...
- Page 38 <MEMO>...
- Page 40 WEL-HANDY MINI STRONG OPERATION MANUAL Date of issue: Aug.2016 Dec.2016 Mar.2017 Jun.2018 Aug.2018 Feb.2020 Nov.2020 KOIKE SANSO KOGYO CO.,LTD. Printed in Japan...
Need help?
Do you have a question about the WEL-HANDY MINI STRONG and is the answer not in the manual?
Questions and answers