
Subscribe to Our Youtube Channel
Related Manuals for Pelgrim PCS27178L


Summary of Contents for Pelgrim PCS27178L
- Page 1 PCS27178L PCD28178L Gebruiksaanwijzing Koelkast met vriezer Instructions for use Refrigerator with freezer...
-
Page 2: Table Of Contents
INHOUDSOPGAVE Uw koelkast met vriezer Inleiding Link naar de EPREL-database van de EU Veiligheidsvoorschriften Installeren en aansluiten De keuze van de ruimte Toestel aansluiten Draairichting deur wijzigen / toestel inbouwen in een kast Voor het eerste gebruik Voordat u het toestel de eerste keer gebruikt Advies om energie te besparen Toestelbeschrijving Toestel... - Page 3 INHOUDSOPGAVE Voedsel bewaren en invriezen Aanbevolen indeling Voorkom het bederven van voedsel Vers voedsel bewaren in de koelkast Invriezen en bewaren van voedsel in de vriezer Bevroren voedsel ontdooien Onderhoud Het toestel ontdooien Het toestel reinigen Storingen Storingstabel Milieuaspecten Verpakking en toestel afdanken Gebruikte pictogrammen Belangrijk om te weten Waarschuwing;...
-
Page 4: Uw Koelkast Met Vriezer
UW KOELKAST MET VRIEZER Inleiding Gefeliciteerd met uw keuze voor deze koelkast. In het ontwerp van dit product heeft eenvoudige bediening en optimale gebruiksvriendelijkheid centraal gestaan. In deze handleiding leest u hoe u dit toestel het best kunt gebruiken. Naast informatie over de bediening, vindt u hier ook achtergrondinformatie die u tijdens het gebruik van het toestel van pas kan komen. -
Page 5: Veiligheidsvoorschriften
VEILIGHEIDSVOORSCHRIFTEN Lees zorgvuldig de meegeleverde instructies voor installatie en gebruik van het apparaat. De fabrikant is niet verantwoordelijk voor letsel en schade veroorzaakt door een foutieve installatie. Bewaar de instructies van het apparaat voor toekomstig gebruik. Veiligheid van kinderen en kwetsbare mensen •... - Page 6 VEILIGHEIDSVOORSCHRIFTEN Algemene veiligheid • De lamp in dit huishoudelijke apparaat is uitsluitend bedoeld voor verlichting van dit apparaat. De lamp is niet geschikt voor de verlichting van een huishoudelijke ruimte. • WAARSCHUWING! Dit apparaat is bestemd voor huishoudelijk of daarmee vergelijkbaar gebruik, zoals: –...
- Page 7 VEILIGHEIDSVOORSCHRIFTEN Installatie • WAARSCHUWING! Dit apparaat mag uitsluitend door een erkende monteur worden geïnstalleerd. • Verwijder alle verpakkingsmaterialen. • Controleer het apparaat op transportschade. Sluit het apparaat niet aan als het beschadigd is. • Volg altijd de installatie-instructies in de bijgeleverde installatiehandleiding.
- Page 8 VEILIGHEIDSVOORSCHRIFTEN Elektrische aansluiting • WAARSCHUWING! Gevaar voor brand en elektrische schokken. • Dit apparaat moet worden aangesloten op een geaard stopcontact. • Alle elektrische aansluitingen moeten door een gediplomeerd elektromonteur worden gemaakt. • Controleer of de elektrische informatie op het typeplaatje overeenkomt met de stroomvoorziening.
- Page 9 VEILIGHEIDSVOORSCHRIFTEN Gebruik • WAARSCHUWING! Gevaar voor letsel, brandwonden, elektrische schokken of brand. • De specificatie van het apparaat mag niet worden veranderd. • Plaats geen elektrische apparaten (bijv. ijsmachines) in het apparaat tenzij uitdrukkelijk geschikt verklaard door de fabrikant. • Zorg ervoor dat u het koelcircuit niet beschadigt. Het bevat isobutaan (R600a), aardgas met een hoge ecologische compatibiliteit.
- Page 10 VEILIGHEIDSVOORSCHRIFTEN Verwijdering • WAARSCHUWING! Gevaar voor letsel of verstikking. • Haal de stekker uit het stopcontact. • Snij het netsnoer van het apparaat af en gooi dit weg. • Verwijder de deur om te voorkomen dat kinderen en huisdieren opgesloten raken in het apparaat. •...
-
Page 11: Installeren En Aansluiten
INSTALLEREN EN AANSLUITEN De keuze van de ruimte • Plaats het toestel niet in de buurt van warmtebronnen, bijvoorbeeld een gasfornuis, verwarming, boiler enz. en stel het niet bloot aan directe zonnestraling. • Plaats het toestel in een droge en regelmatig geventileerde ruimte. De toegestane temperatuur van de omgeving voor de juiste werking van het toestel is afhankelijk van de uitvoering (klasse) van het toestel, die op het typeplaatje van het toestel vermeld is. -
Page 12: Toestel Aansluiten
INSTALLEREN EN AANSLUITEN • Voor goede luchtcirculatie moet aan de onderkant van de keukeneenheid voor inbouw van het geïntegreerde toestel ten minste 200 cm vrije ruimte zijn. • De luchtuitlaat van het toestel bevindt zich bovenaan aan het toestel; voorkom blokkering van de luchtstroom. -
Page 13: Draairichting Deur Wijzigen / Toestel Inbouwen In Een Kast
INSTALLEREN EN AANSLUITEN Draairichting deur wijzigen / toestel inbouwen in een kast Het proces voor aanpassing van de draairichting van de deur en inbouw van het toestel wordt beschreven in een afzonderlijk installatievoorschrift. NL 13... -
Page 14: Voor Het Eerste Gebruik
VOOR HET EERSTE GEBRUIK Voordat u het toestel de eerste keer gebruikt Sluit het toestel pas aan op het elektriciteitsnet nadat u de aanwijzingen over een correct en veilig gebruik van het toestel zorgvuldig hebt doorgelezen. De aanwijzingen zijn van toepassing op verschillende types en modellen;... -
Page 15: Toestelbeschrijving
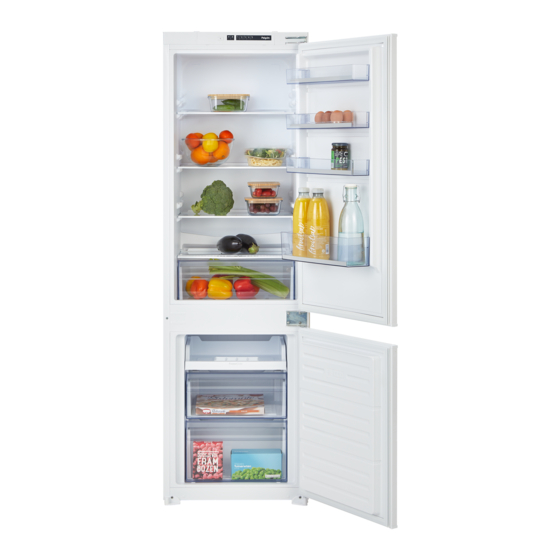
TOESTELBESCHRIJVING Toestel Koelkast 1. Bedieningspaneel 2. Schappen 3. Groentelade 4. Deurvakken Vriezer 5. Vriesladen Beste locatie voor het invriezen van vers voedsel. Bedieningspaneel 1. Aan-/Uitknop, instellen temperatuur en functieknop 2. Indicatielampje ‘Intensief vriezen’ 3. Alarmindicator voor hoge temperatuur 4. Indicatielampjes temperatuur Hoe hoger het cijfer, des te lager is de temperatuur (5 is het koudste) NL 15... -
Page 16: Bediening Van Het Toestel
BEDIENING VAN HET TOESTEL Het toestel inschakelen Druk op de Aan-/Uitknop en houd deze 5 seconden in gedrukt om het toestel in te schakelen. De temperatuur wordt ingesteld op het kleinste symbool; het bijbehorende indicatielampje gaat branden. Let op; elke keer als het toestel opnieuw wordt ingeschakeld, duurt het een tijdje totdat de juiste temperatuur wordt bereikt. -
Page 17: Intensief Vriezen
BEDIENING VAN HET TOESTEL Intensief vriezen Dit toestel beschikt over een intensieve vriesfunctie. Deze functie zorgt ervoor dat de temperatuur in het vriescompartiment zo snel mogelijk daalt. Schakel deze functie 24 uur van tevoren in voordat u een grote hoeveelheid vers voedsel in het toestel legt. Als de intensieve vriesfunctie actief is, werkt het toestel met maximaal vermogen. -
Page 18: Lades Met Handmatige Vochtregeling
BEDIENING VAN HET TOESTEL Lades met handmatige vochtregeling De twee lades aan de onderzijde van het koelcompartiment hebben een geïntegreerde vochtregelaar waarmee u de luchtvochtigheid kunt regelen. Zo wordt voorkomen dat het voedsel uitdroogt. • Schuif naar rechts: ventilatieopening sluiten voor een hogere luchtvochtigheid in de lade. -
Page 19: Voedsel Bewaren En Invriezen
VOEDSEL BEWAREN EN INVRIEZEN Aanbevolen indeling Delen van het koelcompartiment • Bovenste deel: voedsel in blik, brood, wijn, deegwaren etc. • Middelste deel: zuivel, kant-en-klaarmaaltijden, toetjes, frisdrank, bier, gekookt voedsel etc. • Onderste deel: vlees, vleeswaren, delicatessen. • Groentelade: groenten en vers fruit. Bewaar snel bedervend voedsel achteraan op een draagplateau of achter in een lade waar de temperatuur het laagst is. -
Page 20: Voorkom Het Bederven Van Voedsel
VOEDSEL BEWAREN EN INVRIEZEN Voorkom het bederven van voedsel Volg de onderstaande instructies om het bederven van voedsel te voorkomen: • Als u de deur gedurende lange tijd opent, kan de temperatuur in de compartimenten van het toestel aanzienlijk stijgen. •... -
Page 21: Invriezen En Bewaren Van Voedsel In De Vriezer
VOEDSEL BEWAREN EN INVRIEZEN Invriezen en bewaren van voedsel in de vriezer Belangrijke aanwijzingen bij het invriezen van vers voedsel • De maximale hoeveelheid vers voedsel die u in een keer in de vriezer kunt plaatsen, is op het typeplaatje aangegeven. Wanneer de hoeveelheid in te vriezen voedsel groter is dan de aangegeven hoeveelheid, neemt de kwaliteit van het invriezen af. -
Page 22: Bevroren Voedsel Ontdooien
VOEDSEL BEWAREN EN INVRIEZEN Aanbevolen bewaartijd van ingevroren voedsel in de vriezer Soort voedsel Bewaartijd Fruit, rundvlees 10 tot 12 maanden Groenten, kalfsvlees, gevogelte 8 tot 10 maanden Hert 6 tot 8 maanden Varkensvlees 4 tot 6 maanden Fijngesneden of gemalen vlees 4 maanden Brood, deegwaren, gekookte gerechten, magere vis 3 maanden... -
Page 23: Onderhoud
ONDERHOUD Het toestel ontdooien Automatisch ontdooien van het koelcompartiment Het koelcompartiment ontdooit van tijd tot tijd geheel automatisch. De aanwezigheid van waterdruppels op de achterwand aan de binnenkant van het koelgedeelte duidt erop dat het apparaat bezig is automatisch te ontdooien. Het dooiwater loopt via het afvoergootje naar een opvangbakje waar het verdampt. -
Page 24: Het Toestel Reinigen
ONDERHOUD • Maak het vriesvak schoon met een normaal, niet agressief schoonmaakmiddel en handwarm water. Gebruik geen agressieve- of schurende middelen. • Droog het interieur van het vriesvak. Schakel het toestel in en zet de thermostaat op de laagste temperatuurstand. Na 24 uur kunt u de thermostaat terug op de normale stand zetten. Let op Verwijder ijsaanslag nooit met scherpe voorwerpen, ontdooisprays, een föhn, een straalkacheltje of iets dergelijks. -
Page 25: Storingen
STORINGEN Storingstabel Wanneer u twijfelt over de goede werking van uw toestel betekent dit niet automatisch dat er een defect is. Controleer in elk geval de volgende punten in onderstaande tabel. Probleem Mogelijk oorzaak Oplossing Het toestel geeft bij het eerste Nieuw toestel. - Page 26 STORINGEN Probleem Mogelijk oorzaak Oplossing IJsvorming. Deur vriescompartiment niet Zorg dat de deur goed goed gesloten. gesloten is. Vriescompartiment niet Ontdooi het periodiek ontdooid. vriescompartiment om de ijslaag te verwijderen Deurrubbers vervuild of Reinig de deurrubbers. beschadigd. Neem contact op met het servicecentrum als de deurrubbers beschadigd zijn.
-
Page 27: Milieuaspecten
MILIEUASPECTEN Verpakking en toestel afdanken Dit toestel is gemaakt van duurzame materialen. Het toestel moet aan het einde van zijn levensduur op verantwoorde wijze worden afgedankt. Informeer bij de plaatselijke autoriteiten hoe u dit kunt doen. Zie ook het hoofdstuk ‘Verwijdering’ in de veiligheidsvoorschriften. De verpakking van het toestel is recyclebaar. - Page 28 CONTENTS Your refrigerator with freezer Introduction Link to the EU EPREL database Safety instructions Installation and connection Selecting the location Connecting the appliance Changing the side on which the door opens / building the appliance into a cupboard Before using the appliance for the first time Before you use the appliance for the first time Energy-saving advice Description of the appliance...
- Page 29 CONTENTS Storing and freezing food Recommended distribution Avoid contamination of food Storing fresh food in the refrigerator Freezing and storing foods in the freezer Thawing frozen food Maintenance Defrosting the appliance Cleaning the appliance Faults Faults table Environmental aspects Disposal of packaging and appliance Pictograms used Important information Warning;...
-
Page 30: Your Refrigerator With Freezer
YOUR REFRIGERATOR WITH FREEZER Introduction Congratulations on choosing this refrigerator with freezer. This product is designed with simple operation and optimum comfort in mind. These instructions for use explain how you can make best use of this appliance. These instructions contain information about the operation of the appliance and background information that may be of help to you during its use. -
Page 31: Safety Instructions
SAFETY INSTRUCTIONS Before the installation and use of the appliance, carefully read the supplied instructions. The manufacturer is not responsible if an incorrect installation and use causes injuries and damages. Always keep the instructions with the appliance for future reference. Safety of children and vulnerable people •... - Page 32 SAFETY INSTRUCTIONS General safety • The lamp in this household appliance is only suitable for illumination of this appliance. The lamp is not suitable for household room illumination. • WARNING! This appliance is intended to be used in household and similar applications such as –...
- Page 33 SAFETY INSTRUCTIONS Installation • WARNING! This appliance should only be connected by a registered installer. • Remove all the packaging. • Do not install or use a damaged appliance. • Obey the installation instruction supplied with the appliance. • Always be careful when you move the appliance because it is heavy.
- Page 34 SAFETY INSTRUCTIONS Electrical connection • WARNING! Risk of fire and electrical shock. • The appliance must be earthed. • All electrical connections should be made by a qualified electrician. • Make sure that the electrical information on the rating plate agrees with the power supply.
- Page 35 SAFETY INSTRUCTIONS • WARNING! Risk of injury, burns, electrical shock or fire. • Do not change the specification of this appliance. • Do not put electrical appliances (e.g. ice cream makers) in the appliance unless they are stated applicable by the manufacturer.
- Page 36 SAFETY INSTRUCTIONS Disposal • WARNING! Risk of injury or suffocation • Disconnect the appliance from the mains supply. • Cut off the mains cable and discard it. • Remove the door to prevent children and pets to be closed inside of the appliance. •...
-
Page 37: Installation And Connection
INSTALLATION AND CONNECTION Selecting the location • Do not place the appliance near a source of heat, such as a gas cooker, radiator or boiler, etc., and do not expose it to direct sunlight. • Place the appliance in a dry and well aired room. The permitted ambient temperature range for the appliance depends on the appliance’s climate class, which is shown on the type plate. -
Page 38: Connecting The Appliance
INSTALLATION AND CONNECTION • The kitchen unit in which the appliance is to be built in must have an opening of at least 200 cm in its base to allow sufficient air to circulate. • The appliance’s air outlet is at the top. Make sure that the outlet is not blocked. Blocking the outlet can result in damage to the appliance. -
Page 39: Changing The Side On Which The Door Opens / Building The Appliance Into A Cupboard
INSTALLATION AND CONNECTION Changing the side on which the door opens / building the appliance into a cupboard Information about changing the side on which the door opens and building the appliance into a cupboard is enclosed in separate installation instructions. EN 13... -
Page 40: Before Using The Appliance For The First Time
BEFORE USING THE APPLIANCE FOR THE FIRST TIME Before you use the appliance for the first time Do not connect the appliance to the mains until you have carefully read the instructions for the correct and safe use of the appliance. As these instructions are for various types and models, it is possible that the instructions for use refer to settings or parts that are not available on your appliance. -
Page 41: Description Of The Appliance
DESCRIPTION OF THE APPLIANCE Appliance Refrigerator 1. Control panel 2. Shelves 3. Vegetable drawer 4. Door compartments Freezer 5. Freezer drawers The best location for freezing fresh food. Control panel 1. On/Off button, setting the temperature and function button 2. ‘Intensive freezing’ indicator light 3. -
Page 42: Operating The Appliance
OPERATING THE APPLIANCE Switching on the appliance Push and hold the On/Off button for 5 seconds to switch the appliance on. The temperature is set to the smallest symbol; the corresponding indicator light comes on. Attention; each time the appliance is switched on again, it takes a while to reach the correct temperature. -
Page 43: Intensive Freezing
OPERATING THE APPLIANCE Intensive freezing This appliance has an intensive freezing function. This function decreases the temperature in the freezer compartment as quickly as possible. Activate this function 24 hours before you put a large quantity of fresh food in the appliance. When the intensive freezing function is selected, the appliance works at maximum capacity. -
Page 44: Drawers With Manual Humidity Control
OPERATING THE APPLIANCE Drawers with manual humidity control The two drawers at the bottom of the refrigerator compartment do have an integrated humidity regulator which allows regulating the humidity level. This prevents the food from drying out. • Slider posotion to the right: close the vent to increase the humidity in the drawer. -
Page 45: Storing And Freezing Food
STORING AND FREEZING FOOD Recommended distribution Sections of the refrigeration compartment • Upper section: canned food, bread, wine and pastas, etc. • Middle section: dairy products, ready-to-cook meals, desserts, soft drinks, beer and cooked food, etc. • Lower section: meat, meat products, delicatessen products. •... -
Page 46: Avoid Contamination Of Food
STORING AND FREEZING FOOD Avoid contamination of food To avoid contamination of food, please respect the following instructions: • Opening the door for long periods can cause a significant increase of the temperature in the compartments of the appliance. • Regularly clean surfaces that can come in contact with food and accessible drainage systems. -
Page 47: Freezing And Storing Foods In The Freezer
STORING AND FREEZING FOOD Freezing and storing foods in the freezer Important recommendations for freezing fresh food • The maximum quantity of food that you can put in the freezer in one go is stated on the type plate. Putting more than this maximum quantity of food into the freezer will slow the freezing process and reduce the quality. -
Page 48: Thawing Frozen Food
STORING AND FREEZING FOOD Recommended storage times of frozen food in the freezer Type of food Storage life Fruit, beef 10 to 12 months Vegetables, veal, poultry 8 to 10 months Venison 6 to 8 months Pork 4 to 6 months Finely chopped or minced meat 4 months Bread, pastas, cooked dishes, whitefish... -
Page 49: Maintenance
MAINTENANCE Defrosting the appliance Automatic defrost of the refrigeration compartment The refrigeration compartment defrosts automatically from time to time. The presence of water drops on the back wall at the inside of the refrigerator indicates that the appliance is busy defrosting automatically. -
Page 50: Cleaning The Appliance
MAINTENANCE • Clean the interior by hand with lukewarm water and a little detergent. Never use abrasive products or aggressive cleaning agents. • Dry the inside of the unit, plug in the mains, and set the thermostat to the lowest temperature setting. -
Page 51: Faults
FAULTS Faults table When you have any doubts about whether your appliance is working properly you should not immediately assume that it is defective. We recommend that you should in any case check the points in the following table. Symptom Possible cause Solution The refrigerator emits a slight... - Page 52 FAULTS Symptom Possible cause Solution Ice building up. Freezer compartment door not Make sure that the door is closed properly. closed properly. Freezer compartment is not Defrost the freezer periodically defrosted. compartment to remove the ice. The door seals are dirty or the Clean the door seals.
-
Page 53: Environmental Aspects
ENVIRONMENTAL ASPECTS Disposal of packaging and appliance This appliance is made from sustainable materials. This appliance must be disposed of in a responsible manner at the end of its service life. Contact the local authorities for information about the method. See also the chapter ‘Disposal’... - Page 54 EN 28...
- Page 55 EN 29...
- Page 56 De gebruiksaanwijzing is ook te vinden op onze website: The instructions for use can also be found on our website: www.pelgrim.nl www.pelgrim.be 915859...
Need help?
Do you have a question about the PCS27178L and is the answer not in the manual?
Questions and answers