Luminite GRAVITON M1 User Manual
Hide thumbs
Also See for GRAVITON M1:
- User manual (33 pages) ,
- User manual (72 pages) ,
- User manual (75 pages)
Advertisement
Quick Links
Advertisement

Related Manuals for Luminite GRAVITON M1


Summary of Contents for Luminite GRAVITON M1
- Page 1 User Manual For use with Graviton M1 Software 3.0.0 www.luminitefx.com...
- Page 2 Contents Basic Introduction Features The Hardware: XY Controller The Hardware: Graviton M1 The Software: Overview The Software: Glossary Preset Mode Getting Started MIDI Editor Screen Preset Library Screen Footswitch Pedals Screen Expression Pedals Screen MIDI In Screen Live Screen...
- Page 3 Setlist Mode Getting Started Setlist Library Screen Song Library Screen XY Controllers Screen Footswitch Pedals Screen Expression Pedals Screen MIDI In Screen Live Screen External Pedals Setup Wired Footswitch Pedals Setup Wireless Footswitch Pedals Setup Expression Pedals Settings Display Editor MIDI Clock Bank...
- Page 4 Manual...
- Page 5 Basic Introduction Graviton M1 is the next-generation MIDI controller pedal designed for guitarists and bassists who want to incorporate the full power of MIDI into their live or studio rigs with total wireless freedom, effortless usability, compatibility and expandability in an ultra compact package.
- Page 6 ● Ultra Compact Footprint: Graviton M1 is smaller than an overdrive pedal, with the full control of a large 10-switch MIDI controller, saving pedalboards space and weight. Or use Graviton M1 to turn compact multi-effects pedals / amp modelers / computers / iPhones / iPads into portable and powerful gigging machines.
- Page 7 ● Send Program Change, Control Change, Note On / Off, Scrolling PC / CC, SysEx, MIDI Clock / Start / Stop / Continue, Tap Tempo, Expression CC / PC / Clock BPM, Expression Toe / Heel Down triggered Preset, Preset triggered Expression etc. ●...
- Page 8 Here are some good starting points: The XY Controller and Graviton M1 usually come paired out of the box, but if for any reason they haven't, go to Settings > XY > Pair and follow the on-screen instructions to get them paired.
- Page 9 ● Simple operation: With no power button to worry about, it always works like a pickup selector switch. ● Fully programmable: With 10 switches that can be assigned to send MIDI, switch banks or songs, and more. ● Advanced wireless: 650ft (200m) range; encrypted signal; strong interference resistance.
- Page 10 Graviton M1 Graviton M1 MIDI Interfaces Graviton M1 can send MIDI to six devices at once over four different MIDI interfaces: ● 1 x Standard MIDI ● 3 x MIDI over TRS (2 x 1/4" and 1 x 1/8" jacks): each configurable with four output modes, compatible with all TRS MIDI devices.
- Page 11 Graviton M1 input / output jacks: ● 9VDC: Power Adapter in (9V center-negative, 250mA minimum). ● TRS 1 and TRS 2: MIDI out or Footswitch / Expression Pedals in with 1/4-inch (6.35mm) stereo cables ● TRS 3: MIDI out with 1/8-inch (3.5mm) stereo cable.
- Page 12 ● Width x Depth x Height: 3.74" x 3" x 1.38" (95mm x 76mm x 35mm). ● Weight: 9oz (250g). The Software: Overview Graviton M1's User Interface has a "Select a Screen" page at the top, which organizes multiple Screens into three groups: Preset Mode, Setlist Mode, and Settings. The basic difference is:...
- Page 13 ● Preset Mode: Run Presets directly from the Preset Library. ● Setlist Mode: Group Presets into Songs, and group Songs into Setlists, and scroll through them while playing (next / last Preset, next / last Song etc) Screens display information in different ways while you are playing. For examples in Preset Mode: ●...
- Page 14 ● Playing Mode: Can be Preset Mode or Setlist Mode. ● Toggle MIDI Off Messages: Are PC and CC messages in the active Preset, but with their Value changed to 0. Useful for using Graviton M1 to control DAW like Ableton Live.
- Page 15 ● <, >, ⌃, ⌄: Scroll left, right, up, down while in Song Screen. ● Song Preset: Run the Preset in the designated position (1st to 10th) in the playing Song. This Preset will change accordingly when switching to another Song.
- Page 16 ○ Clock: Start sending MIDI Beat Clock message stream with the fixed BPM (Beat Per Minute). (Settings > MIDI > Clock option needs to be On for the Graviton M1 to output MIDI Beat Clock). ○ Start: Send the MIDI Clock Start message. Not to be confused with the MIDI Beat Clock messages which are sent continuously.
- Page 17 ● Toe / Heel: ○ Toe Down / Heel Down CC: Send a CC message when the Expression Pedal is fully pressed toe down / heel down. ○ Toe Down / Heel Down PC: Send a PC message when the Expression Pedal is fully pressed toe down / heel down.
-
Page 18: Preset Mode
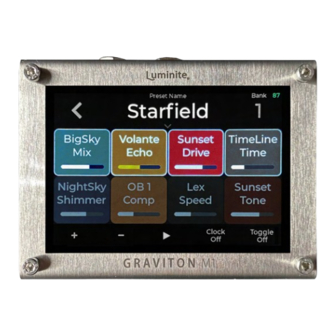
● Moving an connected Expression Pedal will run its assigned Expression Preset as shown in Expression Pedals Screen. ● Sending a MIDI message to the Graviton M1 over MIDI In Jack will run its assigned Preset / Action as shown in the MIDI In Screen. - Page 19 > Block Layout From the top: ● Preset Name: Shows the active Preset name. Tap to rename. ● Bank: Shows current Bank number. Tap to switch to another Bank. ● MIDI Blocks x 8: Each block displays a MIDI Message and its parameters. MIDI Messages in the currently active Preset have white borders, while semi-transparent blocks are Tracking Blocks.
- Page 20 ○ Channel Name: Tap to rename the current MIDI Channel. ○ Channel: Tap to change to another MIDI Channel (1 to 16). In the same screen, tap on the “···” button for 2 more options: Rename MIDI Channel (same as above) or Change MIDI Channel Color. ○...
- Page 21 ○ Value / Velocity: Tap to input a value number by keypad. If the values are CC / PC / Scroll or CC / Clock Expression values, their colors will be yellow (changing values) instead of white (fixed values). ○ Slider: If the Type is CC, a slider control will be shown, allowing you to drag and change the value by touch.
- Page 22 ○ If multiple MIDI Messages of the same Type are sent to the same MIDI Channel, only the last message is shown for that MIDI Channel (e.g., patch changes). ○ If multiple CC / Scroll messages are sent to the same MIDI Channel, the last message for each CC Number is shown for that MIDI Channel (e.g., parameter changes).
- Page 23 > List Layout Everything is the same as with Block Layout, except: ● Each MIDI Message is displayed as a line, allowing up to 3 MIDI Messages per page. ● The parameters are displayed as columns of Type / Number / Value / Channel. Tap to change each value respectively.
- Page 24 > SysEx Messages Screen When adding SysEx Messages to a Preset in MIDI Editor Screen, tapping on its SysEx Message / Value button will display this Screen for the selection of 120 SysEx Messages available to choose from, organized across 12 Pages. From the top: ●...
- Page 25 and the last message ends with F7) and adding them into a Preset in the same order. ○ Long Tap: open the context menu for Edit / Rename / Copy / Swap / Delete the selected SysEx Message.
-
Page 26: Preset Library
Preset Library Screen This screen is for managing the collective pool of 120 Presets (grouped into 12 Banks), shared between Preset Mode and Setlist Mode. You can assign XY Controllers, Footswitch Pedals, and MIDI In to run these Presets from their respective screens. - Page 27 ○ Double Tap: Edit the Preset in MIDI Editor Screen. ○ Long Tap: Open the context menu for Edit / Rename / Move / Copy / Swap Preset / Change Preset Color. ● Block / List: Show the current display layout. Tap to switch between Block and List layout.
- Page 28 XY Controllers Screen This Screen is for mapping the XY Controllers switches to the designated Presets / Actions. The last activated switch is highlighted. As up to 10 XY Controllers can be mapped individually, the menu button (on the bottom) shows which controller is the current one.
- Page 29 ● XY Switch Blocks: Show the assigned Preset / Action for each switch: ○ Single Tap: Run the assigned Preset / Action (same as hitting the physical switch on your controller). ○ Double Tap: Edit the assigned Preset in MIDI Editor Screen (if the switch is assigned to one).
- Page 30 Footswitch Pedals Screen This Screen is for mapping the Footswitch Pedals to the designated Presets / Actions. The last tapped footswitch is highlighted. If a Lumnite F Series Footswitch is used, the Block layout will match with their physical layout automatically. As up to 2 wired and 10 wireless Footswitch Pedals can be mapped individually, the menu button (on the bottom) shows which pedal is the current one.
- Page 31 Glossary section for the list of available Actions). ● TRS / WL (menu) : Shows the current Footswitch Pedals. Tap to open the menu: ○ Footswitch Type: Tap to select between Wired (TRS) or Wireless (Luminite F10W or F6W). ○ TRS / Wireless: Tap to select the pedal you want to map. You can map an empty pedal slot first (None) and connect a pedal later.
-
Page 32: Expression Pedals
Expression Pedals Screen This Screen is for: ● Managing / programming the collective pool of 10 Expression Presets (shared by all expression pedals, in both Preset Mode and Setlist Mode). ● Assigning the selected Expression Preset to the current Expression Pedal (the assigned preset is highlighted). - Page 33 From the top: ● Name: Shows the assigned Expression Preset name. Tap to rename. ● Expression Preset Blocks: Shows the Expression Preset numbers and name: ○ Single Tap: Assign the selected preset to the current Expression Pedal. ○ Double Tap: Edit the selected preset in Expression MIDI Editor Screen. ○...
- Page 34 > Expression MIDI Editor Screen This screen shows the selected Expression Preset and its Expression Messages (see Glossary for the complete list). Editing Expression Presets is exactly the same as with Presets. If you enable Tracking (Settings > Editor > Tracking), MIDI Messages in active Preset will be displayed as semi-transparent blocks here as well.
- Page 35 ● Double Tap: Edit the assigned Preset in MIDI Editor Screen (if the footswitch is assigned to one). ● Long Tap: Open context menu for Edit Preset / Assign Action / Trigger: program the MIDI Message that will activate the assigned Preset / Action (accepted types are PC and CC messages).
- Page 36 Live Screen Live screen is optimized for live performance with the super-sized Preset name that can be read across the stage. All touch screen buttons are disabled except the < (back) button to prevent accidental changes while performing.
-
Page 37: Setlist Mode
Setlist Mode Getting Started ● Setlist Mode is useful when you want to organize up to 10 Presets (picked from the Preset Library) into a Song, and up to 10 Songs (picked from the Song Library) into a Setlist (there are 120 Setlists in total), and scroll through them while playing. ●... - Page 38 Setlist Library Screen This Screen allows you to: ● Manage and program the list of 120 Setlists, organized into 12 Pages. ● Pick a Setlist to start performing in Setlist Mode. From the top: ● Setlist Name: Show the selected Setlist name, tap to rename. ●...
- Page 39 ○ Long Tap: Open context menu for Open / Rename / Copy / Swap / Delete the selected Setlist. > Setlist Screen This screen shows the playing Setlist and a list of its 10 Songs (added from the Song Library). From the top: ●...
- Page 40 ○ Long Tap: Open context menu for Add / Change / Remove Song (from Song Library Screen). > Song Screen This screen shows the playing Song and a list of its 10 Song Presets (added from the Preset Library), with the active Preset highlighted. From the top: ●...
- Page 41 Song Library Screen This Screen shows a list of all 120 Songs available, organized into 12 Pages. This Screen is for: ● Manage and program all your Songs here and add them to your Setlists in the Setlist Library Screen later. ●...
- Page 42 ○ Double Tap: Open the Song for editing. ○ Long Tap: Open the context menu for Edit / Rename / Copy / Swap / Delete selected Song. XY Controllers Screen Setlist Mode, you can scroll through Presets within a Song with the additional Actions: move up, down, left, and right.
- Page 43 Expression Pedals Screen The same as with Preset Mode, but with the Actions available for Setlist Mode (see Glossary) MIDI In Screen The same as with Preset Mode, but with the Actions available for Setlist Mode (see Glossary) Live Screen Same as with Live Screen in Preset Mode, except the playing Song and the current active Preset in that Song are displayed.
- Page 44 Graviton M1 works with any type of Footswitch Pedal (momentary / latch / resistor ladder etc) over TRS Jacks with its "Learn" function (or just plug and play with Luminite F Series Pedal). Up to two pedals can be connected (over TRS 1 and 2 Jack), with support up to 10 switches per pedal.
- Page 45 Luminite F10W and F6W Footswitch Pedals can be paired with Graviton M1 wirelessly, just like with XY Controllers. They can also work in Wired Mode when connecting over TRS Jacks using a ¼ inch cable , just like with the Luminite F10 and F6 pedals (see Wired Mode above).
- Page 46 ○ A Preset contains an Expression Preset Message is active, which specifies which Expression Preset is assigned to which Expression Pedal. Expression Pedals require calibration before using. Calibration data won’t be reset when switching that TRS Jack to another mode: ●...
- Page 47 Settings Display ● Display Brightness: Adjust LCD display brightness (from 1 to 10). Default: 8 ● Touch Calibration: If you are experiencing issues with the accuracy of the touch screen, you can easily recalibrate it by tapping on the two red squares a few times until they turn white.
- Page 48 Editor MIDI Editor Layout: ● Block Layout: Displays all MIDI Messages as blocks, with up to 8 blocks per page. Extra options: Tracking and Sliders. (default) ● List Layout: Displays all MIDI Messages as a list, with 4 parameter columns. Up to 3 per page.
- Page 49 ■ Universal Footswitch: For use with any Footswitch Pedal, using the “Learn” function. (See Setup Footswitch Pedals section) ■ Luminite F10 Footswitch: For use with the Luminite F10 or F10W in Wired Mode over a ¼ inch cable (plug n play, no “Learn” needed).
- Page 50 ■ Luminite F6 Footswitch: For use with the Luminite F6 or F6W in Wired Mode over a ¼ inch cable (plug n play, no “Learn” needed). ■ Sensitivity: Adjusts the debounce time for footswitch pedals. Increase the value if the footswitches are responding inconsistently or glitchy (Default 5).
- Page 51 ● Device (to Computers): When connected to a computer using the USB MIDI port (USB Type-C). (Default) ● Host (to MIDI Devices): When connected to other MIDI devices using the USB Host MIDI port (USB Type-A). USB MIDI does not work with both USB MIDI and USB Host MIDI port plugged in. Make sure to only have one port connected at a time and set the USB MIDI mode accordingly.
- Page 52 Wireless ● Pairing > XY Controllers: A Graviton M1 can pair with up to 10 XY Controllers. This is useful if you have more than one instrument, each can have their own XY Controller attached. ● Pairing > Wireless Footswitch: A Graviton M1 can pair with up to 10 Luminite Wireless Pedals.
- Page 53 Data All of your Presets, Songs, Setlists, Settings etc data in Graviton M1 can be saved into a Backup. You can have up to 10 Backups (useful if you have different setups / rigs) and switch between them. ● Backup: Shows the Backup screen with 10 backup file slots, where you can: ●...
- Page 54 Manual Graviton M1 has a built-in manual in Settings > Manual, conveniently accessible anytime and always up-to-date with the current software version.
Need help?
Do you have a question about the GRAVITON M1 and is the answer not in the manual?
Questions and answers