
Subscribe to Our Youtube Channel
Related Manuals for Ferguson FS2TH

Summary of Contents for Ferguson FS2TH
- Page 1 Programowalny Termostat Wi-Fi Programmable Wi-Fi Thermostat Instrukcja obsługi Users Manual ferguson-digital.eu...
-
Page 2: Zawartość Opakowania
Zawartość opakowania: Termostat Wi-Fi 1 sztuka Zestaw śrub 2 sztuki Wkrętak płaski 1 sztuka Etykiety przewodów 1 sztuka Przewód połączeniowy 1 sztuka Instrukcja obsługi 1 sztuka Możesz potrzebować także tych narzędzi: śrubokręt poziomica ołówek hasło sieci Wi-Fi... - Page 3 Kompatybilność Do systemów konwencjonalnych (gaz/olej/propan/elektryczny), pomp ciepła i systemów dwupaliwowych. > 2-ogrzewanie i 2-chłodzenie > 1-ogrzewanie i 1-chłodzenie > tylko grzanie > tylko chłodzenie > Pompa ciepła z ogrzewaniem pomocniczym i awaryjnym Instalacja Termostat FS2HT jest przeznaczony do pracy z większością standardowych niskonapięciowych systemów ogrzewania i chłodzenia 12-24 AC/DC, takich jak piece gazowe i olejowe, pompy ciepła oraz systemy jedno- lub dwustopniowe.
- Page 4 Krok 2 - sprawdź, czy system jest wyłączony Potwierdź, że system jest wyłączony, włączając ogrzewanie (zimą) lub klimatyzację (latem). Poczekaj kilka minut — nie powinieneś czuć powietrza wydobywającego się z otworów wentylacyjnych. Krok 3 - zdejmij stary termostat z podstawki ściennej Większość...
- Page 5 Krok 4 - zrób zdjęcie okablowania Zrób wyraźne zdjęcie okablowania istniejącej płytki ściennej i upewnij się, że etykiety zacisków przewodów są wystarczająco wyraźne, aby można je było odczytać. Będzie to ważne odniesienie do następnego kroku. Krok 5 - oznacz przewody Oznacz przewody starej płytki ściennej etykietami z naszego pudełka z termostatem.
- Page 6 Krok 6 - odłącz przewody i zdejmij starą podstawkę ścienną Odłącz przewody od starego termostatu jeden po drugim, może być potrzebny śrubokręt do odłączenia przewodów od zacisków. UWAGA: Owiń przewody wokół długopisu lub ołówka, aby nie wpadły z powrotem do otworu w ścianie. Krok 7 - zamontuj nową...
- Page 7 Użyj zrobionego wcześniej zdjęcia jako odniesienia do przewodów, poniższa tabela jest schematem połączeń dla popularnych systemów, upewnij się, że w starym systemie termostatu istnieje przewód C. Terminal System konwencjonalny Układ pompy ciepła Zasilanie dla chłodzenia Zasilanie dla chłodzenia Zasilanie dla ogrzewania Zasilanie dla ogrzewania Zasilanie GND Zasilanie GND...
- Page 8 7 A – ciepło jednostopniowe / piec dwustopniowy / kocioł z przewodem C termostat 1 stopień 2 stopień grzania grzania 7 B – połączone jednostopniowe ogrzewanie i jednostopniowe chłodzenie z przewodem C (usunąć wstępnie zainstalowaną zworkę) / piec chłodniczy i klimatyzator termostat 7 C –...
- Page 9 7 D – chłodzenie jednostopniowe / chłodzenie dwustopniowe – klimatyzator termostat 2 stopień 1 stopień grzania grzania 7 E – system połączonego zasilania – jednostopniowa pompa ciepła i piec jednostopniowy z przewodem C termostat...
- Page 10 7 F – konwencjonalny system bez przewodu C Podłącz system grzewczy lub grzewczo- chłodzący zgodnie ze schematem. UWAGA: Termostat posiada wyjścia sterujące NO (Normalnie Otwarte), czyli styki sterujące podczas normalnej pracy są w urządzeniu rozwarte.
- Page 11 Krok 8 – podłącz przewody do nowej podstawki ściennej Odnosząc się do powyższego schematu okablowania, włóż wszystkie przewody pionowo z otwartego gniazda do odpowiedniego zacisku. Upewnij się, że każdy przewód jest włożony do odpowiedniego zacisku (w razie potrzeby zapoznaj się z wcześniej zrobionym zdjęciem). Delikatnie pociągnij za przewody, aby upewnić...
- Page 12 Jeśli masz problemy z instalacją urządzenia lub aplikacji, zapoznaj się z poniższymi informacjami, aby uzyskać pomoc, lub po prostu odwiedź nasze strony internetowe, aby skorzystać z formularza kontaktowego. przełącznik skrzynka bezpieczników Pomoc WWW: ferguson-digital.eu EMAIL: expert@ferguson.pl TELEFON: +48 517 653 343...
- Page 13 Panel główny urządzenia Wi-Fi wskaźnik lampki nocnej bieżąca data i godzina bieżąca wilgotność bieżąca temperatura pokrętło kontrolne okres harmonogramu zmniejsz temperaturę zwiększ temperaturę menu bieżący tryb pracy nastawa chłodzenia nastawa ogrzewania bieżący tryb pracy lampka nocna wentylatora...
- Page 14 Początkowa konfiguracja urządzenia Aby szybko i łatwo rozpocząć korzystanie z nowego termostatu, urządzenie automatycznie przekieruje Cię do procesu konfiguracji po pierwszym włączeniu. Rodzaj wyposażenia Wybierz typ urządzenia grzewczego w swoim domu z dostępnych opcji: Gaz/olej/piec, grzejnik elektryczny, pompa ciepła, dwupaliwowy lub bez ogrzewania. Wybierz zgodnie z systemem grzewczym.
- Page 15 Poniżej znajduje się lista przykładów, które mogą pomóc w prawidłowym wyborze: UWAGA: Jeśli nie masz pewności, którą opcję wybrać, zadzwoń pod numer +48 517 653 343. Jeśli masz piec lub kocioł: 1. Wybierz „Gaz/Olej/Piec” i dotknij „Ustawienia”. 2. Następnie wybierz „Ustawienia wentylatora” lub „Poziom”...
- Page 16 Jeśli masz podwójny system paliwowy: 1. Wybierz opcję „Dual Fuel” i wejdź w „Ustawienia”. 2. Następnie postępuj zgodnie z instrukcjami wyświetlanymi na ekranie, aby skonfigurować ustawienia urządzenia grzewczego na paliwo kopalne. 3. Stuknij „Dalej” u dołu ekranu, aby kontynuować. 4. Następnie postępuj zgodnie z instrukcjami wyświetlanymi na ekranie, aby skonfigurować...
- Page 17 Harmonogram Data i godzina Tylko 2 harmonogramy (Dom i Wakacje) NA URZĄDZENIU: Wprowadź aktualną będą dostępne podczas pracy w trybie datę i godzinę w swojej lokalizacji; po offline. Listę tę można jednak rozszerzyć zarejestrowaniu lub powiązaniu urządzenia do maksymalnie 4 harmonogramów z kontem użytkownika data i godzina po nawiązaniu połączenia Wi-Fi.
- Page 18 Konfiguracja sieci Wi-Fi Niezawodne i stabilne połączenie Wi-Fi jest wymagane do korzystania z inteligentnych funkcji, takich jak zdalne sterowanie. Postępuj zgodnie z instrukcjami wyświetlanymi na ekranie, aby zakończyć konfigurację Wi-Fi. Po prawidłowym podłączeniu do sieci Wi-Fi na ekranie rejestracji zostanie wyświetlone powiadomienie o powodzeniu.
- Page 19 SKANUJ | Stuknij ikonę Wi-Fi, aby przejść do ekranu konfiguracji sieci Wi-Fi, a następnie stuknij ikonę Skanuj, aby wyświetlić listę dostępnych sieci Wi-Fi. Postępuj zgodnie z instrukcjami wyświetlanymi na ekranie, aby zakończyć konfigurację sieci Wi-Fi. WPISYWANIE RĘCZNE | Jeśli sieć jest ukryta, naciśnij przycisk SSID na stronie skanowania, aby wyświetlić...
- Page 20 Postępuj zgodnie z instrukcjami na kolejnych stronach, aby dodać urządzenie do swojego konta. Możliwe przyczyny niepowodzenia połączenia Wi-Fi: 1. Sygnał Wi-Fi jest zbyt słaby lub sieć Wi-Fi 5G; 2. Identyfikator SSID zawiera znaki inne niż ASCII; 3. Niepoprawne hasło; 4. Wi-Fi działa, ale Twój internet jest nieaktywny; 5.
- Page 21 Automatyczne wznawianie połączenia Jeśli urządzenie utraci połączenie z siecią bezprzewodową, co dwie minuty będzie automatycznie próbowało ponownie nawiązać połączenie, dopóki nie zostanie nawiązane. Każda ręczna rekonfiguracja sieciowa termostatu zatrzyma automatyczne próby ponownego połączenia. Wi-Fi można ręcznie wyłączyć lub włączyć. Wyłączenie Wi-Fi spowoduje również wyłączenie połączenia internetowego i wszystkich inteligentnych funkcji, w tym zdalnego dostępu do urządzenia z aplikacji mobilnej.
- Page 22 Konfiguracja trybu pracy Ustawienia systemu HVAC zależą od rodzaju używanego systemu, typowe opcje przedstawiono poniżej: Włącz chłodzenie, gdy aktualna Włącz ogrzewanie, gdy aktualna temperatura temperatura wzrośnie powyżej spadnie poniżej wartości zadanej. wartości zadanej. Do utrzymania nastawy ogrzewania należy W razie potrzeby aktywuj system używać...
- Page 23 Na termostacie: Stuknij ikonę trybu systemowego na ekranie głównym, aby wybrać tryb systemowy termostatu spośród: Chłodzenie (Cool), Ogrzewanie (Heat), Auto, Ogrzewanie awaryjne (Emergenacy Heat) lub Wyłącz (Off ). Tryb Ogrzewanie awaryjne (Em. Heat) jest dostępny tylko wtedy, gdy jako typ ogrzewania wybrano Pompę...
- Page 24 Konfiguracja wentylatora Na termostacie: Menu Wentylator wyświetla aktualne Wybierz Menu główne > Wentylator, stuknij ustawienie wentylatora pieca. W zależności ikonę Tryb wentylatora na ekranie głównym, od systemu wyświetlana jest jedna aby wybrać tryb systemu termostatu lub więcej z następujących opcji: spośród Auto, Włącz i Cyrkulacja.
- Page 25 Dostosowywanie temperatury: Możesz zmienić zaplanowaną temperaturę, dotykając „+” i „-”, aby zmienić niebieską/ czerwoną liczbę reprezentującą nastawę chłodzenia/ogrzewania. Gdy termostat jest w trybie automatycznym, należy najpierw ustawić nastawę ogrzewania i chłodzenia, aby tryb działał w trybie ogrzewania lub chłodzenia.
- Page 26 Tymczasowe wstrzymanie i utrzymanie jednej temperatury Aby tymczasowo zmienić nastawę, użyj przycisków „+” i „-” na termostacie lub pokrętła, termostat wyświetli czas, który będzie utrzymywał obok nastawy, a nową nastawę utrzyma do następnej zaplanowanej nastawy. Jeśli chcesz utrzymać jedną temperaturę, wyreguluj nastawę...
- Page 27 Menu Ustawienia EZ Komfort Menu Ustawienia zawiera wszystkie Tutaj ustawisz zadane wartości opcje ustawień dla termostatu. temperatury niezależnie od ustawionego programu.
- Page 28 Programowanie harmonogramów Istnieją tylko dwa domyślne harmonogramy: Dom i Urlop - dostępne do wyboru, gdy urządzenie jest w trybie offline. Jeśli połączenie internetowe jest nawiązane, możesz mieć do 4 harmonogramów, wykonaj poniższe czynności, aby zaprogramować: Wybierz „Harmonogram”. Wybierz typ dnia, który chcesz edytować: dni powszednie lub weekend. Wybierz nastawę, którą...
- Page 29 Ustawienia Data i godzina Ustaw datę i godzinę termostatu. Ekran Wybierz jasność i czas poza ekranem. Nocne światło Wybierz jasność nocnego światła. Temperatura Postępuj zgodnie z instrukcjami wyświetlanymi na ekranie, aby ustawić jednostkę wyświetlania temperatury (C/F) i funkcje bezpieczeństwa temperatury. Ustawienia zaawansowane Zaprojektowany dla profesjonalistów z branży HVAC, którzy chcą...
- Page 30 Ustawienia zaawansowane Aby uzyskać dostęp do konfiguracji sprzętu, kliknij Ustawienia (Settings) i użyj kółka przewijania, aby zmodyfikować wartość domyślną, wykonując następujące czynności: Menu > Ustawienia > Ustawienia zaawansowane. Terminal Domyślnie Opis Zakres temperatur między bieżącą temperaturą Martwa strefa 1° F 2°...
- Page 31 Dostęp instalatora Aby uzyskać dostęp do opcji Dostęp instalatora (Installer Access), kliknij opcję Ustawienia zaawansowane (Advanced Settings), wprowadź kod dostępu profesjonalnego i kod akcji (w nawiasie), aby uzyskać dostęp do poniższych ustawień. Konfiguracja początkowa (IS) Użyj tego kodu, aby powtórzyć proces wstępnej konfiguracji.
- Page 32 O urządzeniu (About) Wyświetla podgląd informacji o termostacie. Obejmuje numer modelu, identyfikator MAC (jednoznacznie identyfikuje termostat), datę produkcji, wersję oprogramowania sprzętowego oraz dane kontaktowe pomocy technicznej.
- Page 33 1. Wyszukaj „Ferguson Home” w Googleplay/Appstore, aby pobrać; 2. Zeskanuj kod QR poniżej, aby pobrać; 3. Odwiedź naszą oficjalną stronę internetową ferguson-digital.eu i kliknij opcję Aplikacja, aby pobrać. Pobierz aplikację Ferguson Home dla urządzenia Pobierz aplikację Ferguson Home dla urządzenia z systemem Android.
- Page 34 (3 minuty). Jeśli wygaśnie wygeneruj nowy kod. 6. Wpisz numer MAC ID oraz 4-cyfrowy kod rys. 1 rys. 2 potwierdzający w odpowiednie okna aplikacji lub zeskanuj kod QR. Następnie wpisz nazwę swojego urządzenia i kliknij Potwierdź. (rys. 2) 7. Termostat został dodany do aplikacji Ferguson Home.
- Page 35 Aplikacja Ferguson Home - szczegóły termostatu...
- Page 36 Aplikacja Ferguson Home - Programy Termostat posiada domyślnie 2 Programy. Użytkownik może posiadać zdefiniowane maksymalnie 4 Programy. 1. Aby dodać Program kliknij Dodaj Program w oknie widoku programów, wpisz nazwę programu i kliknij Potwierdź. 2. Aby ustawić Program jako włączony wybierz odpowiedni program i kliknij ikonę...
- Page 37 4. Edytuj zakres czasowy Programu poprzez kliknięcie przycisku ołówka przy danym zakresie czasowym. Zmiany potwierdź przyciskiem Zapisz. 5. Usuwanie zakresu czasowego wymaga kliknięcia ikony kosza znajdującego się obok wybranego zakresu do usunięcia. Skopiuj zakres Programu do innego dnia: 1. Wybierz dzień, który chcesz kopiować na inne dni. 2.
- Page 38 Aplikacja Ferguson Home - ustawienia termostatu Sprawdź w aplikacji, jakie parametry możesz ustawić w sekcji Ustawienia. Ustawienia ogólne pozwolą Ci m.in. wybrać tryb pracy termostatu, określić tryb działania wentylacji i zdefiniować program jej działania, włączyć podświetlenie nocne oraz określić program jego działania.
- Page 39 Ustawienia powiadomień pozwala włączyć/wyłączyć powiadomienia, które mogą przychodzić na telefon dotyczące temperatur, wilgotności oraz stanu termostatu. Uproszczona deklaracja zgodności Importer: Ferguson Sp. z o.o. ul. Dworska 1, 61-619 Poznań Nazwa: Ferguson FS2TH ustawianie powiadomień ustawianie powiadomień Typ urządzenia: Termostat Wi-Fi W/w produkt jest zgodny z dyrektywą...
- Page 40 Notatki...
-
Page 41: Contents Of The Package
Contents of the package: Wi-Fi Thermostat 1 piece A set of screws 2 pieces Flat screwdriver 1 piece Wire labels 1 piece Connecting wire 1 piece User manual 1 piece You may also need these tools: screwdriver spirit level pencil Wi-Fi password... -
Page 42: Installation
Compatibility For conventional systems (gas/oil/propane/electric), heat pumps and dual fuel systems. > 2-heating and 2-cooling > 1-heating and 1-cooling > heating only > cooling only > Heat pump with auxiliary and emergency heating Installation The FS2HT thermostat is designed to work with most standard low voltage 12-24 AC/DC heating and cooling systems, such as gas and oil furnaces, heat pumps and one or two stage systems. - Page 43 Step 2 - check if the system is turned off Confirm that the system is off by turning on the heating (winter) or air conditioning (summer). Wait a few minutes - you shouldn’t feel air coming out of the vents. Step 3 - Remove the old thermostat from the wall stand Most thermostats allow you to remove the main unit and provide access to the wall plate where the cable clamps are located.
- Page 44 Step 4 - take a photo of the wiring Take a clear photo of the existing wall plate wiring and make sure the wire terminal labels are clear enough to be read. This will be an important reference for the next step. Step 5 - mark the wires Label the wires of the old wall plate with the labels from our thermostat box.
- Page 45 Step 6 - Disconnect the wires and remove the old wall stand Disconnect the wires from the old thermostat one by one, you may need a screwdriver to disconnect the wires from the terminals. NOTE: Wrap the cords around a pen or pencil to prevent them from falling back into the hole in the wall.
-
Page 46: Conventional System
Use the photo you took earlier as a wire reference, the table below is a wiring diagram for common systems, make sure there is a C wire in your old thermostat system. Terminal Conventional system Heat pump system Power for cooling Power for cooling Power for heating Power for heating... - Page 47 7 A - single-stage heat / two-stage furnace / C-duct boiler thermostat 1st heating 2nd heating level level 7 B - Combined single stage heating and single stage cooling with C wire (remove pre-installed jumper) / refrigeration furnace and air conditioner thermostat 7 C - single stage / two stage heat pump with emergency heating and auxiliary heating with C wire...
- Page 48 7 D - single-stage cooling / two-stage cooling - air conditioner thermostat 2nd heating 1st heating level level 7 E - Combined power system - single stage heat pump and single stage furnace with C wire thermostat...
- Page 49 7 F - Conventional system without C wire Connect the heating or heating and cooling system according to the diagram. NOTE: The thermostat has NO (Normally Open) control outputs, i.e. the control contacts are open during normal operation.
- Page 50 Step 8 - Connect the wires to the new wall stand Referring to the wiring diagram above, insert all wires vertically from the open socket to the appropriate terminal. Make sure each wire is inserted into the correct terminal (refer to the photo taken earlier if necessary). Gently tug on the wires to make sure they are securely fastened.
- Page 51 If you’re having trouble installing your device or app, see the information below for help, or simply visit our websites to use the contact form. switch fuse box Help WWW: ferguson-digital.eu EMAIL: expert@ferguson.pl PHONE: +48 517 653 343...
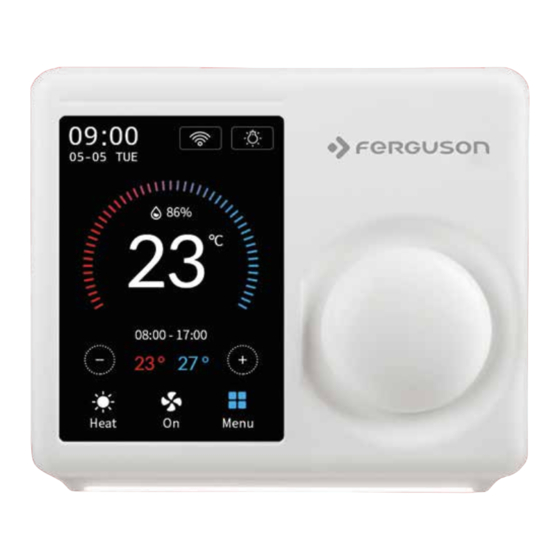
- Page 52 Main panel of the device Wi-Fi night light indicator current date and time current humidity current temperature control knob schedule period reduce the temperature increase the temperature menu current operating mode cooling setpoint heating setpoint the current operating night light mode of the fan...
- Page 53 Initial setup of the device To get started with your new thermostat quickly and easily, the device will automatically guide you to the setup process when you turn it on for the first time. Type of equipment Select the type of heating device in your home from the available options: Gas/oil/stove, electric heater, heat pump, dual fuel or no heating.
- Page 54 Below is a list of examples that can help you make the right choice: NOTE: If you are not sure which option to choose, call +48 517 653 343. If you have a stove or boiler: 1. Select „Gas/Oil/Stove” and tap „Settings”. 2.
- Page 55 If you have a dual fuel system: 1. Select the „Dual Fuel” option and enter „Settings”. 2. Then follow the on-screen instructions to configure your fossil fuel heater settings. 3. Tap „Next” at the bottom of the screen to continue. 4.
- Page 56 Schedule Date and time Only 2 schedules (Home and Vacation) will be ON DEVICE: Enter the current date and available when working offline. However, this list time in your location; once a device can be expanded to a maximum of 4 schedules is registered or associated with a user when a Wi-Fi connection is established.
- Page 57 Wi-Fi network configuration A reliable and stable Wi-Fi connection is required to use smart features such as remote control. Follow the on-screen instructions to complete the Wi-Fi setup. When successfully connected to the Wi-Fi network, a success notification will be displayed on the registration screen.
- Page 58 SCAN | Tap the Wi-Fi icon to go to the Wi-Fi setup screen, then tap the Scan icon to view a list of available Wi-Fi networks. Follow the on-screen instructions to complete the Wi-Fi setup. MANUAL ENTRY | If the network is hidden, press the SSID button on the scan page to bring up an interface to enter your own SSID.
- Page 59 Follow the instructions on the following pages to add the device to your account. Possible causes of Wi-Fi connection failure: 1. Wi-Fi signal is too weak or Wi-Fi is a 5G network; 2. The SSID contains non-ASCII characters; 3. Incorrect password; 4.
-
Page 60: Automatic Reconnection
Automatic reconnection If the device loses its connection to the wireless network, it will automatically try to reconnect every two minutes until a connection is established. Any manual thermostat network reconfiguration will stop automatic reconnect attempts. Wi-Fi can be manually turned off or on. Disabling Wi-Fi will also disable your internet connection and all smart features, including remote access to your device from the mobile app. -
Page 61: Operating Mode Configuration
Operating mode configuration HVAC system settings depend on the type of system you are using, typical options are shown below: Turn on cooling when the current Turn on the heating when the current temperature rises above the set point. temperature drops below the set value. ONLY use emergency or backup heat to Activate the heating or cooling system maintain the heating setpoint. - Page 62 On the thermostat: Tap the system mode icon on the home screen to select the thermostat system mode from Cool, Heat, Auto, Emergency Heat, or Off. Emergency Heat mode is only available when Heat Pump is selected as the heating type and Emergency Heat is enabled in the settings menu.
-
Page 63: Fan Configuration
Fan configuration On the thermostat: The Fan menu displays the current setting of the Go to Main Menu > Fan, tap the Fan Mode icon furnace fan. Depending on your system, one or on the home screen to select the thermostat more of the following options are displayed: system mode from Auto, On, and Circulation. -
Page 64: Adjusting The Temperature
Adjusting the temperature: You can change the scheduled temperature by touching „+” and „-” to change the blue/ red number representing the cooling/heating set point. When the thermostat is in auto mode, you need to set the heating and cooling setpoint first for the mode to operate in either heating or cooling mode. - Page 65 Temporarily hold and maintain one temperature To temporarily change a setpoint, use the „+” and „-” buttons on the thermostat or the dial, the thermostat will display the time it will hold next to the setpoint, and it will hold the new setpoint until the next scheduled setpoint. If you want to maintain one temperature, adjust the set point using the „+”...
- Page 66 Settings menu EZ Comfort The Settings menu contains all Here you will set the temperature setting options for the thermostat. values regardless of the program.
-
Page 67: Schedule Programming
Schedule programming There are only two default schedules: Home and Vacation - available for selection when the device is offline. If internet connection is established, you can have up to 4 schedules, please follow below steps to program: Select „Schedule”. Select the type of day you want to edit: weekdays or weekend. - Page 68 Settings Date and time Set the date and time of the thermostat. Screen Choose brightness and off-screen time. Night light Select the brightness of the night light. Temperature Follow the on-screen instructions to set the temperature display unit (C/F) and temperature safety features. Advanced settings Designed for HVAC professionals who want to modify advanced features for better unit control.
- Page 69 Advanced settings To access hardware configuration, click on Settings and use the scroll wheel to modify the default value as follows: Menu > Settings > Advanced Settings. Terminal Default Description The temperature range between the current Dead zone 1° F 2°...
-
Page 70: Installer Access
Installer access To access Installer Access, click Advanced Settings, enter Professional Access Code and Action Code (in parentheses) to access the following settings. Initial Settings (IS) Use this code to repeat the initial setup process. Sensor Calibration (SC) Ability to adjust temperature readings to improve sensor accuracy as the thermostat approaches the end of its life after years of use. - Page 71 About Displays a preview of the thermostat information. Includes model number, MAC ID (uniquely identifies the thermostat), manufacturing date, firmware version, and support contact information.
- Page 72 Download the Ferguson Home app First, after making sure your hardware is compatible, let’s first download the app for your Android/iOS device. There are three ways to download the Ferguson Home app on your Android/iOS device: 1. Search „Ferguson Home” in Googleplay/Appstore to download;...
- Page 73 6. Enter the MAC ID number and the 4-digit confirmation code fig. 1 fig. 2 in the appropriate application windows or scan the QR code. Then enter your device name and click Confirm. (fig.2) 7. The thermostat has been added to the Ferguson Home app.
- Page 74 Ferguson Home app - thermostat details...
- Page 75 Ferguson Home app - Programs The thermostat has 2 programs by default. The user can have up to 4 Programs defined. 1. To add a Program, click Add Program in the program view window, enter a program name, and click Confirm.
- Page 76 4. Edit the time range of the Program by clicking the pencil button next to the given time range. Confirm the changes with the Save button. 5. Deleting a time range requires clicking the trash can icon next to the selected range to be deleted. Copy the scope of the Program to another day: 1.
- Page 77 Ferguson Home app - thermostat settings Check in the application what parameters you can set in the Settings section. General settings will allow you to select the thermostat operating mode, specify the ventilation operating mode and define its operating program, turn on the night light and define its operating program.
- Page 78 Notification settings allows you to enable/disable notifications that may come to your phone regarding temperatures, humidity and thermostat status. Simplified declaration of conformity Importer: Ferguson Sp. z o.o. Dworska 1, 61-619 Poznań Name: Ferguson FS2TH Device type: Wi-Fi Thermostat setting notifications...
- Page 79 Notes...
- Page 80 ferguson-digital.eu...
Need help?
Do you have a question about the FS2TH and is the answer not in the manual?
Questions and answers