Table of Contents
Advertisement
Quick Links
Advertisement
Table of Contents

Subscribe to Our Youtube Channel
Related Manuals for CHCNAV LT60H

Summary of Contents for CHCNAV LT60H
- Page 1 CHCNAV LT60H RTK SMARTPHONE User Guide Make your work more efficient...
-
Page 2: Table Of Contents
4 Getting Start with LandStar 8................22 4.1 Connect the LT60H to internet................ 22 4.2 Create a project....................22 4.3 Connect to the LT60H GNSS Module............... 26 4.4 CORS / RTK Network Correction Login............27 4.5 Survey......................29 4.6 Sky Plot......................30... -
Page 3: Table Of Contents
Table of Content Copyright Copyright 2023 CHCNAV | Shanghai Huace Navigation Technology Ltd. All rights reserved. The CHCNAV and CHC Navigation are trademark of Shanghai Huace Navigation Technology Limited. All other trademarks are the property of their respective owners. Trademarks All product and brand names mentioned in this publication are trademarks of their respective holders. -
Page 4: Ce Interference Statement
These frequencies can be used in Europe without restriction. LT60H RTK SMARTPHONE USER GUIDE | 2023-11 P a g e | 4... -
Page 5: Introduction
CAUTION - A Caution alerts you to a possible risk of serious injury to your person and/or damage to the equipment. 1.5 Use and Care The LT60H is designed to withstand the rough environment that typically occurs in the field. However, the LT60H is high-precision electronic equipment and should be treated with reasonable care. -
Page 6: Overview
IP67 and it can survive 1.2 m fall onto concrete. With 9000 mAh Li-ion battery, it can continuously work up to 12 h. The LT60H tracks GPS + GLONASS + GALILEO + BDS + QZSS (for details refer to 3.10.2 Select the Constellation Combination.) - Page 7 8 h ( 25℃ continuous data collection, 100% Battery Life brightness.) 4.0 h Charging Time Fast charging: QC 3.0 Front Camera 8 megapixels 16 megapixels Back Camera Flashlight Integrated LT60H RTK SMARTPHONE USER GUIDE | 2023-11 P a g e | 7...
-
Page 8: Specifications
▪ Storage temperature: -40 °C to +70 °C(-40°F to +158°F) Sensors ▪ NFC: Support ▪ G-sensor: Support ▪ Light sensor: Support ▪ E-compass: Support ▪ Gyroscope: Support LT60H RTK SMARTPHONE USER GUIDE | 2023-11 P a g e | 8... -
Page 9: Front View
Overview 2.3 Front View 2.4 Back View LT60H RTK SMARTPHONE USER GUIDE | 2023-11 P a g e | 9... -
Page 10: Top And Bottom
Do not insert any object into the charging port, it can result in damage to the charging port. To prevent injury or damage: • Charge the battery only in CHCNAV authorized equipment. Be sure to follow all instructions that are provided with the battery charger. 2.6 Left/Right Side... -
Page 11: Installation
Refer to 2.7 Installation to find the SIM card and TF card slot, and then insert the cards into slots correctly. Before powering on LT60H, please make sure to fully charge the battery. Then long press the power button to turn on LT60H and enter its home screen. - Page 12 Basic Operation After powering on LT60H, click Settings— Network & Internet —SIMS to turn on the SIM cards. LT60H RTK SMARTPHONE USER GUIDE | 2023-11 P a g e | 12...
-
Page 13: Language & Input
[Add a language] to find the target language. 3.3 Set Date & Time Click [Settings] – [System]- [Date & time] and enter [Date & time] interface. LT60H RTK SMARTPHONE USER GUIDE | 2023-11 P a g e | 13... -
Page 14: Display
You can also customize your time zone and choose whether to use the 24-hour format in this interface. 3.4 Display Click [Settings] – [Display] to enter Display interface. LT60H RTK SMARTPHONE USER GUIDE | 2023-11 P a g e | 14... - Page 15 Brightness adjusting: Click Brightness level to adjust it according to your preference. Lock display: Click to optimize the inactivity time LT60H needs to close the screen. Font size: Click Font size to enter Font size interface and then Slide the green dot to change the font size.
-
Page 16: Wi-Fi
Click [Settings] – [Network & Internet] – [Internet] – [Wi-Fi] to switch on the button. After connecting Wi-Fi, the Network info Select Wi-Fi and type in its password to connect. can be checked. LT60H RTK SMARTPHONE USER GUIDE | 2023-11 P a g e | 16... -
Page 17: Bluetooth
Basic Operation 3.6 Bluetooth Click [Settings] – [Connected device] – [Bluetooth] to find nearby devices and pair with it. LT60H RTK SMARTPHONE USER GUIDE | 2023-11 P a g e | 17... -
Page 18: Usb Connection
After USB data cable connecting with PC, the computer will recognize the storage space of the LT60. You can also use third party software to manage the documents and data stored in LT60H and install software like GNSS Tool into it. -
Page 19: Use Camera
Basic Operation 3.8 Use Camera Click to select recording the video or panorama mode. Click to take a photo. Camera Settings LT60H RTK SMARTPHONE USER GUIDE | 2023-11 P a g e | 19... -
Page 20: Log In 4G
After inserting your SIM card, click [Settings] – [Network & Internet] – [SIMS] – [Preferred network type] and select corresponding network type of your SIM card. Then turn on Mobile data and click Data usage to see data usage. LT60H RTK SMARTPHONE USER GUIDE | 2023-11 P a g e | 20... - Page 21 Basic Operation LT60H RTK SMARTPHONE USER GUIDE | 2023-11 P a g e | 21...
-
Page 22: Location
Click [Settings] – [Location] – [Use location] to switch on location service. 3.11 Checking the IMEI Number of The Device Turn the LT60H on and enter the dialing panel, tap ‘*#06#’, the IMEI numbers show up automatically. LT60H RTK SMARTPHONE USER GUIDE... -
Page 23: Getting Start With Landstar 8
RTK Corrections Service provider. 4.2 Create a project Power on the LT60H: Long press the power button for 3-5 seconds. Launch the LandStar 8 software. Click New to create a new project, users should set coordinate, codeList and other survey parameters. - Page 24 Users can create a new coordinate system or use the template of existing projects. Click User defined to create a new coordinate system. Set the right parameters according to the surveying area, and then click Save to finish CRS configuration. LT60H RTK SMARTPHONE USER GUIDE | 2023-11 P a g e | 24...
- Page 25 Users can view the parameters of ellipsoid, projection, datum transformation, Horz. adjustment and Vert. adjustment. Click OK, it'll return to Coordinate System interface, and then click Select to finish CRS configuration. LT60H RTK SMARTPHONE USER GUIDE | 2023-11 P a g e | 25...
- Page 26 B needs the transformation parameters the same as project A. Then users can select project A in the project template while creating project B. LT60H RTK SMARTPHONE USER GUIDE | 2023-11 P a g e | 26...
-
Page 27: Connect To The Lt60H Gnss Module
Getting Start with LandStar 8 4.3 Connect to the LT60H GNSS Module Tap [Config] - [Connect instruments]. Select Brand as [CHC], Type as [Android location], Model as [LT60H], Antenna Type as [CHCLT60H]. When connected to the LT60H GNSS, the message “Connect successfully. Check antenna height!”... -
Page 28: Cors / Rtk Network Correction Login
4.4 CORS / RTK Network Correction Login Click [Config] - [GNSS rover] to create or accept a work mode. Click New to create a work mode and choose NTRIP table. LT60H RTK SMARTPHONE USER GUIDE | 2023-11 P a g e | 28... - Page 29 Domain/IP: input the corresponding NTRIP IP. Port: input the corresponding Port. Select a server: you could add a server and save it. Next time you can choose it in this interface. LT60H RTK SMARTPHONE USER GUIDE | 2023-11 P a g e | 29...
- Page 30 Username: The name of user’s NTRIP account. Password: The password of user’s NTRIP account. Save: just save this work mode. Save&Accept: save and apply this work mode. LT60H RTK SMARTPHONE USER GUIDE | 2023-11 P a g e | 30...
-
Page 31: Survey
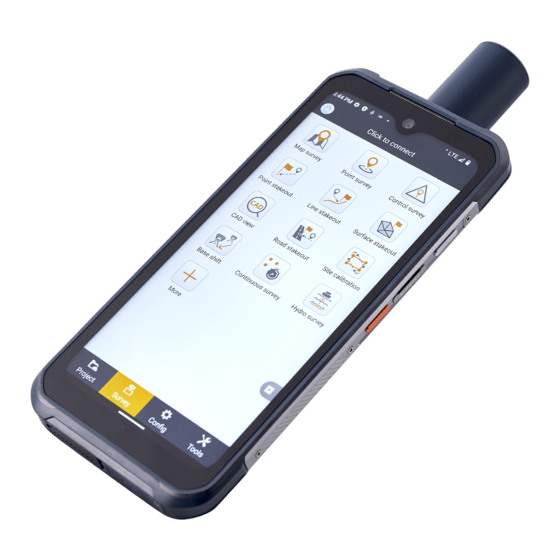
Getting Start with LandStar 8 4.5 Survey Wait until the software shows [RTD], [Float] or [Fix], which means the LT60H is using the GNSS correction data from RTK Network. Click the [Survey] - [Map survey] to start your work. Tap [Survey] icon to collect the points. -
Page 32: Sky Plot
Getting Start with LandStar 8 4.6 Sky Plot Click Sky Plot and see how many satellites (including GPS, GLONASS, BDS, GALILEO and QZSS) the device is currently tracking. LT60H RTK SMARTPHONE USER GUIDE | 2023-11 P a g e | 32... - Page 33 CHC Navigation 577 Songying Road, Qingpu District, 201703 Shanghai, China Tel: +86 21 542 60 273 | Fax: +86 21 649 50 963 Email: sales@chcnav.com | support@chcnav.com Make your work more efficient...
- Page 34 Skype: chc_support Website: www.chcnav.com Make your work more efficient...
Need help?
Do you have a question about the LT60H and is the answer not in the manual?
Questions and answers