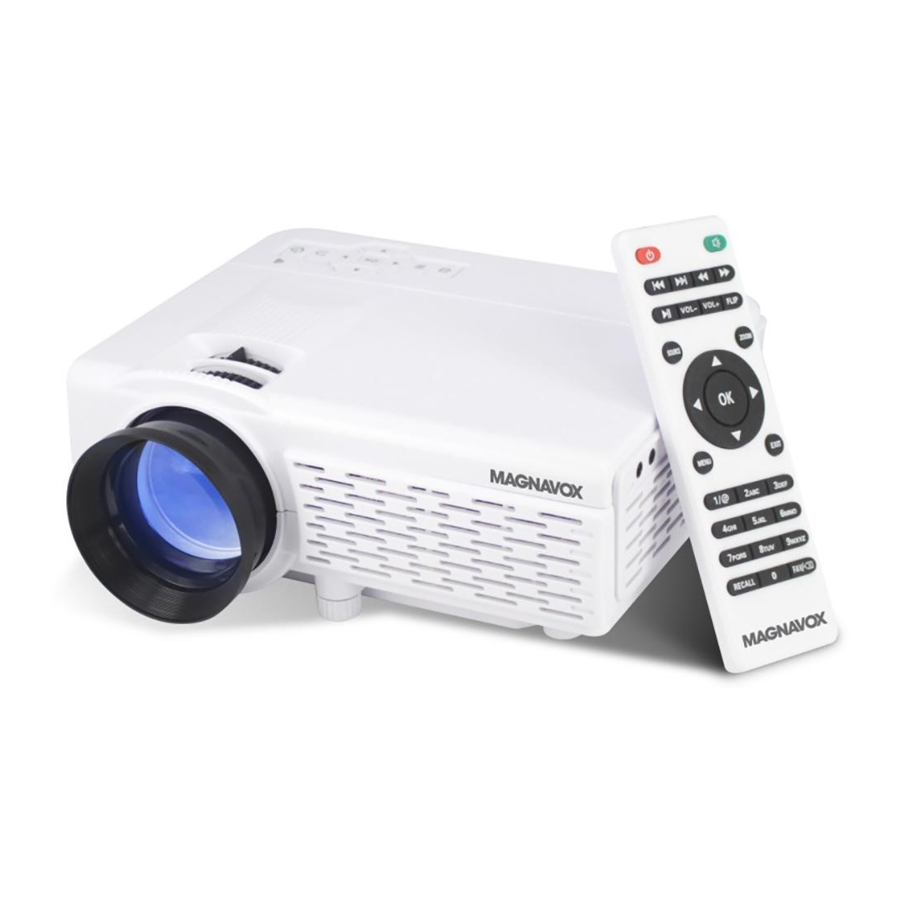
Magnavox MP601 - Home Theater Projector with Bluetooth Manual
- Owner's manual (20 pages)
Advertisement
- 1 Remove & Close The Lens Cover
- 2 Placing Your Projector
- 3 To Reduce Image Distortion
- 4 Distance Between The Projector And Screen
- 5 Installing your Projector in the Ceiling
- 6 Adjust the Vertical Location
- 7 Adjust The Focus And Keystone
- 8 Controls Of Remote
- 9 Install / Replace Battery Of Remote
- 10 Controls Of Projector
- 11 Power Source
- 12 Main Button Operation
- 13 Connect HDMI Show The Image On Projector Screen
- 14 Connect AV Show The Image On Projector Screen
- 15 Connect VGA Show The Image On Projector Screen
- 16 Connect Audio Output (Aux Out / Line Out / Earphones)
- 17 Install USB Device And TF (Micro SD) Card
- 18 Using TF Card And USB Playback (Media Player)
- 19 Using Bluetooth Playback Audio
- 20 Using Projector Menu (Main Menu)
- 21 Using Projector Menu (Sound Menu)
- 22 Using Projector Menu (Option Menu)
- 23 General Specification
- 24 Package Includes
- 25 Additional Warnings and Precautions
- 26 Documents / Resources
Remove & Close The Lens Cover

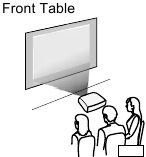
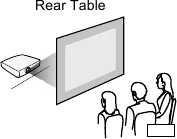
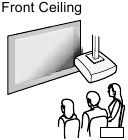
Placing Your Projector
Your projector can be installed in four different configurations (see picture below):
Front Table:
Select this location with the projector placed near the floor in front of the screen. This is the most common way to position the projector for quick setup and portability.
Rear Table:
Select this location with the projector placed near the floor behind the screen.
NOTE: A special rear projection screen is required.
Front Ceiling:
Select this location with the projector suspended upside-down from the ceiling in front of the screen.
NOTE: A projector mount is required to install the projector on a ceiling.
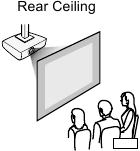
Rear Ceiling:
Select this location with the projector suspended upside-down from the ceiling behind the screen.
NOTE: A projector mount is required to install the projector in a ceiling.
A special rear projection screen is required.
To Reduce Image Distortion
- Move the projector as close to the center of the screen as possible.
- The light beam from the projector should be perpendicular to the screen for a rectangular or square image.


Distance Between The Projector And Screen
Measure the distance between the projector and where you want to position the screen. This is the projection distance.
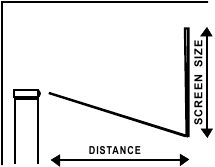
| Distance | Screen Size |
| 45.7 inch | 37 inch |
| 53.1 inch | 45 inch |
| 59.4 inch | 50 inch |
| 71.2 inch | 60 inch |
| 84.6 inch | 72 inch |
Installing your Projector in the Ceiling
When installing the projector in the ceiling, please purchase a projector mount recommended by an installation professional and follow the instructions that come with the mount.
Before installing the projector in the ceiling, please check to make sure the ceiling structure can support the weight of the projector and the mount. If in doubt, please ask the advice from an installation professional.
NOTE: Projector mount and screw(s) not included

Adjust the Vertical Location
Follow below picture to adjust the vertical location.

Adjust The Focus And Keystone
Follow the below picture to adjust the focus and trapezoidal screen.

Adjust the focus by turning the knob while observing the image pixels near the center of the screen. Optimal focus is obtained when the pixels are clearly visible. Depending on the projected screen size, the focus near the screen edges may be less sharp than the screen center.
Keystone image is created when the projector lens is projected from above or below the center of the screen. Keystone correction restores the distorted image to a rectangular or square shape.
Controls Of Remote

Install / Replace Battery Of Remote

BATTERY PRECAUTIONS:
Follow these precautions when using a battery in this device:
- Use only the size and type of battery specified.
- Be sure to follow the correct polarity when installing the battery as indicated in the battery compartment. A reversed battery may cause damage to the device.
- Do not mix different types of batteries together (e.g. Alkaline and Carbon-zinc) or old batteries with fresh ones.
- If the batteries in the device are consumed or the device is not to be used for a long period of time, remove the batteries to prevent damage or injury from possible battery leakage.
- Do not try to recharge the battery not intended to be recharged; it can overheat and rupture. (Follow battery manufacturer's instructions.)
- Do not dispose of battery in fire. Battery may explode or leak.
- Clean the battery contacts and also those of the device prior to battery installation.
Controls Of Projector

- LENS
- ANGEL ADJ. Knob
- VGA IN Port
- IR Sensor
- FOCUS ADJ. Knob
- TRAPEZOIDAL ADJ. Knob
![]() Buttons
Buttons![]() Button
Button- POWER Indicator
- POWER
![]() Button
Button - RETURN
![]() Button
Button ![]() Buttons
Buttons- MENU
![]() Button
Button - SOURCE
![]() Button
Button - EAR PHONE Jack
- AV IN Jack
- TF Card Slot
- HDMI 1 & 2 Ports
- USB Port
- DC IN Jack
 Button
 Button
 Button
 Button
Power Source
Connect the small plug from supplied AC/DC Adaptor to the DC IN Jack on the rear of unit then plug the AC/DC Adaptor to a wall outlet having AC 100-240V~; 50/60Hz.

NOTES:
- If you will not use the unit for an extended period of time, unplug the AC/DC Adaptor from wall outlet.
- The AC/DC Adaptor is intended to be correctly orientated in a vertical or floor mount position.
Main Button Operation
 - Press the button to turn on unit, press again to turn off.
 / SOURCE - Press the button to select input source.
 / MENU - Press the button to enter projector menu.
 - Press the buttons to navigate and select screen item of menu.
 / EXIT - Press the button to return to previous status or exit the menu.
 - Press the buttons to fast search forward and rewind on USB / TF.
 - Press the buttons to search next or previous file on USB / TF.
VOL+ / VOL - Press the buttons to select the sound level.
![]() - Press the button to play/pause the playback of file on USB / TF card.
- Press the button to play/pause the playback of file on USB / TF card.
FLIP - Press the button to rotate / mirror projector screen
ZOOM - Press the button to select image scale.
![]() - Press to mute the audio. Press again to resume.
- Press to mute the audio. Press again to resume.
Connect HDMI Show The Image On Projector Screen
Refer to the following picture to connect a set top box, a BD/DVD player or a streaming player to the HDMI input.

- Turn off the unit before connecting HDMI cable.
- After connecting, press the
![]() button to turn on unit, the power indicator power indicator will turn GREEN.
button to turn on unit, the power indicator power indicator will turn GREEN. - Press the
![]() / SOURCE button to select HDMI 1 or HDMI 2 and the video from the connected device will be shown on projector screen.
/ SOURCE button to select HDMI 1 or HDMI 2 and the video from the connected device will be shown on projector screen. - Press the
![]() button to turn off unit power.
button to turn off unit power.

If there is no sound from the internal speakers when playing media contents from a set top box, BD/DVD or streaming players connecting to the HDMI input, please check the set top box or the player's digital audio settings and make sure it is set to "PCM Stereo" mode.
Connect AV Show The Image On Projector Screen
Follow below picture to connect AV cable and device.

- Turn off the unit before connecting AV cable.
- Use AV cable to connect following the below figure.
- After connecting, press the
![]() button to turn on unit, power indicator will turn GREEN.
button to turn on unit, power indicator will turn GREEN. - Press the
![]() / SOURCE button to select AV mode and the video of AV device will be shown on projector screen.
/ SOURCE button to select AV mode and the video of AV device will be shown on projector screen. - Press the
![]() button to turn off unit power.
button to turn off unit power.
Connect VGA Show The Image On Projector Screen
Follow below picture to connect VGA cable and device.

- Turn off the unit before connect VGA cable.
- Press the
![]() button to turn off power of your projector before connection.
button to turn off power of your projector before connection. - After connect, press the
![]() button to turn on unit, power indicator will turn GREEN.
button to turn on unit, power indicator will turn GREEN. - Press the
![]() / SOURCE button to select VGA mode and the video of VGA device will show on projector screen.
/ SOURCE button to select VGA mode and the video of VGA device will show on projector screen. - Press the
![]() button to turn off unit power.
button to turn off unit power.
Please refer to the following table to adjust the output signal from computer.
| Type | Resolution | Frequency | Field Frequency | |
| PC | VGA | 640x480 | 31.5 | 60 |
| 34.7 | 70 | |||
| 37.9 | 72 | |||
| 37.5 | 75 | |||
| SVGA | 800x600 | 31.4 | 50 | |
| 35.1 | 56 | |||
| 37.9 | 60 | |||
| 46.6 | 70 | |||
| 48.1 | 72 | |||
| 46.9 | 75 | |||
| XGA | 1024x768 | 40.3 | 50 | |
| 48.4 | 60 | |||
| 56.5 | 70 | |||
NOTE: In order to get the sound from the unit, please connect AV IN cable when you connect VGA input.
Connect Audio Output (Aux Out / Line Out / Earphones)
Follow below picture to connect audio cable and device.
")
- Press the
![]() button to turn off power of your projector before connection.
button to turn off power of your projector before connection. - Use audio cable to connect follow below figure.
- After connect and turn on both units. Your projector sound from external device now.
- After use, turn off both units.
If there is no sound from the stereo audio output when playing media contents from a set top box, BD/DVD or streaming players connecting to the HDMI input, please check the set top box or the player's digital audio settings and make sure it is set to "PCM Stereo" mode.
Install USB Device And TF (Micro SD) Card
Follow below picture to install USB and TF card.
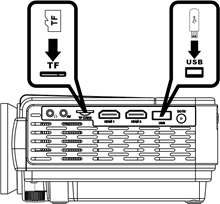
Turn off the unit before install USB / TF card.
Using TF Card And USB Playback (Media Player)
Install USB / TF device:
- Turn off the unit before installing USB / TF card.
- Install the USB device into USB port / Install the TF device into TF slot.
- After connecting, press the
![]() button to turn on unit and the power indicator light GREEN.
button to turn on unit and the power indicator light GREEN. - Press the
![]() / SOURCE button to enter and use
/ SOURCE button to enter and use ![]() buttons to search the USB or TF.
buttons to search the USB or TF. - After connecting, use
![]() buttons to search the PHOTO / MUSIC / MOVIE / TEXT icon and press the
buttons to search the PHOTO / MUSIC / MOVIE / TEXT icon and press the ![]() button to enter.
button to enter. - Use the
![]() button to select C and press
button to select C and press ![]() button to enter.
button to enter. - Use
![]() buttons to search the correct file and press the
buttons to search the correct file and press the ![]() button to preview playback file and press
button to preview playback file and press ![]() button of remote to start playback.
button of remote to start playback. - Press
![]() button to fast search forward and rewind.
button to fast search forward and rewind. - Press
![]() button to search next or previous file.
button to search next or previous file. - During playback, press the
![]() button to pause and press again to resume.
button to pause and press again to resume.
 button to enter.
 button of remote to start playback.
 button to fast search forward and rewind.
NOTE: Remove USB / TF device, press the  button twice to turn off power FIRST.
")
Using Bluetooth Playback Audio
Pairing is the term used when two Bluetooth devices are connected wirelessly for the first time. This allows the devices to see each other and sets up a one to one communication channel between both devices.
Bluetooth Connection
- Press the
![]() button to turn on unit.
button to turn on unit. - Press the
![]() / MENU button to enter the menu screen.
/ MENU button to enter the menu screen.
![]()
- Use the
![]() button to select right side menu.
button to select right side menu. - Use the
![]() button to select Bluetooth speaker column.
button to select Bluetooth speaker column. - Press the
![]() button to select "Bluetooth Speaker On".
button to select "Bluetooth Speaker On". - Turn on your External Bluetooth Speaker and select to Bluetooth pairing mode.
- After a few seconds, near the BT logo will show the connected External Bluetooth Speaker name in the main function page.
- After connection is completed, the unit will sound through to External Bluetooth speaker.
Disconnect the Bluetooth
- Press the
![]() / MENU button to enter the menu screen.
/ MENU button to enter the menu screen. - Use the
![]() button to select above menu.
button to select above menu. - Use the
![]() button to select Bluetooth speaker column.
button to select Bluetooth speaker column. - Press the
![]() button to select "Bluetooth Speaker Off" then the Bluetooth will disconnect.
button to select "Bluetooth Speaker Off" then the Bluetooth will disconnect.
Using Projector Menu (Main Menu)
Press  / MENU button to enter projector menu.
 | This Picture menu is shown on right upper of view screen. | ||
 | Use  to select different picture effect to Standard / Soft / User / Vivid. Use or to select different picture effect to Standard / Soft / User / Vivid. Use or  to select Contrast / Brightness / Color / Sharpness digit If chose User item. Follow below figure. to select Contrast / Brightness / Color / Sharpness digit If chose User item. Follow below figure. | ||
 | Use buttons to select different color temperature to Cool / Medium / Warm / User. Use or to select Red / Green / Blue digit If chose User item. Follow below figure. | ||
 | Use buttons to select screen ratio AUTO / 4:3 / 16:9. Follow below figure. | ||
 | Use buttons to select Off / Low / Middle / High / Default. | ||
 | Use buttons to select 75% - 100%. | ||
| Picture Mode | |||
| Customer define | Parameter | ||
| Contrast | 0-100 | ||
| Brightness | 0-100 | ||
| Color | 0-100 | ||
| Sharpness | 0-100 | ||
| Color Temperature | |||
| Customer define | Parameter | ||
| RED | 0-100 | ||
| GREEN | 0-100 | ||
| BLUE | 0-100 | ||
| Aspect Ratio | |||
| 4:3 | The signal in a 4:3 aspect ratio projection image | ||
| 16:9 | The signal in a 16:9 aspect ratio projection image | ||
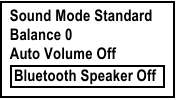
Using Projector Menu (Sound Menu)
Press / MENU button to enter projector menu, press buttons to select SOUND menu.
 | This SOUND menu showed on right upper of view screen. |
 | Use Use |
 | Use buttons to select Balance level to -50 to +50. |
 | To select On / Off. |
 | To select On / Off. |
| Sound Mode - User | Parameter |
| Treble | 0-100 |
| Bass | 0-100 |
Using Projector Menu (Option Menu)
Press / MENU button to enter projector menu, press buttons to select OPTION menu.
 | This OPTION menu showed on right upper of view screen. | ||
 | Use  button to select different language. Follow below figure. button to select different language. Follow below figure. | ||
 | Use buttons to select Y or N. If choose "Y" that your unit will go to factory default setting. | ||
 | To select different project direction Normal / left-right mirror / up-down mirror / left-right and up-down mirror. | ||
 | To select 5S, 10S, 15S, 20S, 25S, 30S, Never. | ||
 | For service center use only. | ||
| Available Languages | |||
| Czech | English | French | Hungarian |
| Danish | Spanish | Croatian | Dutch |
| German | Greek | Italian | Norwegian |
| Polish | Romanian | Slovak | Portuguese |
| Serbian | Finnish | Simplified Chinese | |
General Specification
| Bluetooth Version | 4.1 |
| Light Source Type | LED |
| Brightness Level | 2000 lumens |
| Display Native Resolution | 800 x 480 RGB |
| HDMI Input Supported Video Resolution | 1080p, 1080i, 720p, 576i, 480p, and 480i |
| Power Consumption | 30W Maximum |
| Power Source | DC  12V, 2.5A, 12V, 2.5A,  |
| Display Color | 16.7M |
| Projection Size | 37-100 inch |
| Input Ports | AV/ VGA / HDMI X 2 |
| USB Port | Support USB device up to 32GB Support formats: Mpeg1, Mpeg2, Mpeg4, mp3, Jpeg |
| TF (Micro SD) Card | Support TF (Micro SD) card up to 32GB Support formats: Mpeg1, Mpeg2, Mpeg4, mp3, Jpeg |
Package Includes
1 x Owner's Manual
1 x AC/DC Adaptor (Input: AC 100-240V~, 50/60Hz, 0.8A; Output: DC 12V, 2.5A, )
1 x Remote Control (Uses 2 x "AAA" Batteries, not included)
1 x Lens Cover
1 x Lens Hood
SPECIFICATIONS AND ACCESSORIES ARE SUBJECT TO CHANGE WITHOUT NOTICE
Additional Warnings and Precautions
- Do not look directly into the projector light.
- Don't touch the projector lens.
- Use of this unit near fluorescent lighting may cause interference regarding use of the remote. If the unit is displaying erratic behavior move away from any fluorescent lighting, as it may be the cause.

Documents / ResourcesDownload manual
Here you can download full pdf version of manual, it may contain additional safety instructions, warranty information, FCC rules, etc.
Download Magnavox MP601 - Home Theater Projector with Bluetooth Manual
Advertisement

Need help?
Do you have a question about the MP601 and is the answer not in the manual?
Questions and answers