Advertisement
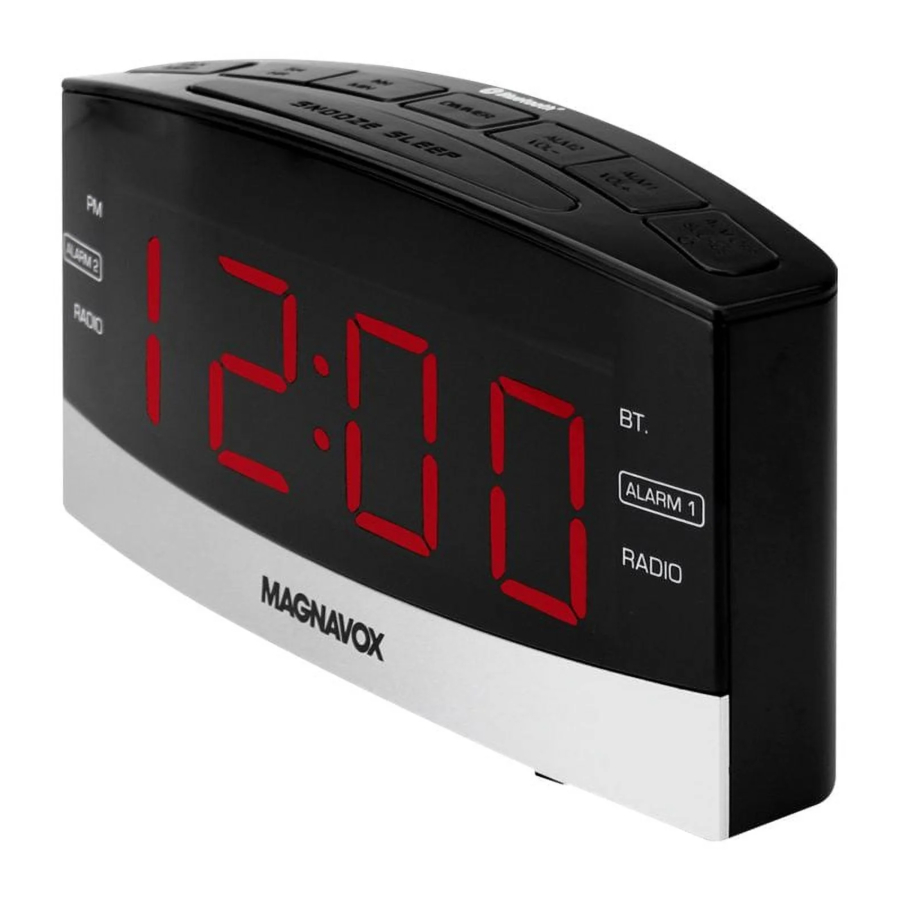
LOCATION OF CONTROLS

- CLK/MEM/
![]() (Clock set/Memory/BT Play-Pause) Button
(Clock set/Memory/BT Play-Pause) Button ![]() /HR ( Skip-Search Backward/Hour set) Button
/HR ( Skip-Search Backward/Hour set) Button![]() /MIN ( Skip-Search Forward/Minute set) Button
/MIN ( Skip-Search Forward/Minute set) Button- DIMMER Button
- ALM 2/VOL- ( Alarm 2 set/Volume down) Button
- ALM 1/VOL+ ( Alarm 1 set/Volume up) Button
- ALM OFF/SOURCE/
![]() ( Alarm off/Source selection/Power on-off) Button
( Alarm off/Source selection/Power on-off) Button - SNOOZE/SLEEP Button
- LED Display
- AUX IN Jack
- Battery Door
- AC Power Cord
 (Clock set/Memory/BT Play-Pause) Button
 /HR ( Skip-Search Backward/Hour set) Button
 /MIN ( Skip-Search Forward/Minute set) Button
POWER SOURCE
Unwind the AC power cord and extend it to its full length. Insert the AC plug into any convenient 120V 60Hz household outlet as the illustrated below:

NOTES:
- This unit is equipped with a polarized AC plug which has one blade wider than the other. This is a safety feature to reduce the likelihood of electric shock. This polarized AC plug will only fit in a polarized AC outlet. If you find that you cannot insert this plug into your outlet, you may have an obsolete non-polarized outlet. Please do not try to defeat this safety feature by using a non-polarized adaptor or by filling the wider blade to make it fit into your outlet. If this plug does not fit into your outlet, you should contact a qualified licensed electrician to replace your obsolete outlet
- If the AC power failure, this electronic clock is designed to continue operating internally (without showing the time on the Clock Display) with two (2) AAA size batteries (not included). Install the batteries as follows:
- Open the battery door on the rear of the unit by sliding it out and then lifting it.
- Insert two (2) AAA size batteries (not included) according to the polarity diagram inside the battery compartment. (Alkaline batteries are recommended.)
- Replace the battery door.
BATTERY PRECAUTIONS:
Follow these precautions when using a battery in this device:
- Use only the size and type of battery specified.
- Be sure to follow the correct polarity when installing the battery as indicated in the battery compartment. A reversed battery may cause damage to the device.
- Do not mix different types of batteries together (e.g. Alkaline and Carbon-zinc) or old batteries with fresh ones.
- If the batteries in the device are consumed or the device is not to be used for a long period of time, remove the batteries to prevent damage or injury from possible battery leakage.
- Do not try to recharge the battery not intended to be recharged; it can overheat and rupture. (Follow battery manufacturer's instructions.)
- Do not dispose of battery in fire. Battery may explodes or leak.
- Clean the battery contacts and also those of the device prior to battery installation.
OPERATION
ACTUAL TIME SETTINGS:
To set or reset the actual time at first time use:
- Connect the unit to AC power as previous procedure. The Display will illuminate and blink.
- Press the
![]() /HR Button to set hour. (Make sure the PM Indicator on the display is light if the time is PM and not light if the time is AM).
/HR Button to set hour. (Make sure the PM Indicator on the display is light if the time is PM and not light if the time is AM). - Press the
![]() /MIN Button to set minute.
/MIN Button to set minute. - When finished, press the CLK/MEM/
![]() Button to save the settings and exit. The display will stop blinking.
Button to save the settings and exit. The display will stop blinking.
 /HR Button to set hour. (Make sure the PM Indicator on the display is light if the time is PM and not light if the time is AM).
 /MIN Button to set minute.
 Button to save the settings and exit. The display will stop blinking.
To set or reset the actual time at normal operation:
- In standby mode, press and hold the CLK/MEM/
![]() Button until the display start blinking.
Button until the display start blinking. - Press the
![]() /HR Button to set hour. (Make sure the PM Indicator on the display is light if the time is PM and not light if the time is AM).
/HR Button to set hour. (Make sure the PM Indicator on the display is light if the time is PM and not light if the time is AM). - Press the
![]() /MIN Button to set minute.
/MIN Button to set minute. - When finished, press the CLK/MEM/
![]() Button to save the settings and exit. The display will stop blinking.
Button to save the settings and exit. The display will stop blinking.
BT (BLUE TOOTH):
In first time use or re-pairing to a new BT Device, pairing it as below:
- In standby mode, press the ALM OFF/SOURCE/
![]() Button to power on the unit.
Button to power on the unit. - Press the ALM OFF/SOURCE/
![]() Button repeatedly until "bt" appears on the display.
Button repeatedly until "bt" appears on the display.
The "BT." Indicator on the display will illuminate and blink. - Power on the external BT Device and enter to BT searching mode. Start pairing as the on screen instructions on the external BT Device. After paired, the "BT." Indicator will stop blinking. (For details pairing procedures, please refer to the user's manual of your BT device.).
Notes:
- When the external BT Device searched the unit, our model number "MR41806BT" will appear on the display of external BT Device.
- Pairing code "0000" or "1234" may need to enter.
Normal operation after paired:
- Turn on the BT function of the external BT Device.
- In Standby mode, press the ALM OFF/SOURCE/
![]() Button to power on the unit.
Button to power on the unit. - Press the ALM OFF/SOURCE/
![]() Button repeatedly until "bt" appears on the display.
Button repeatedly until "bt" appears on the display.
The "BT." Indicator on the display will illuminate and blink. - Wait a few seconds until the unit paired to the external BT Device automatically. (The Indicator stop blinking).
- Play the music on the connected BT Device as usual.
- During playback:
- Press and release the CLK/MEM/
![]() Button to pause; press again to resume normal playback.
Button to pause; press again to resume normal playback. - Press the
![]() /HR or
/HR or ![]() /MIN Button repeatedly to skip tracks.
/MIN Button repeatedly to skip tracks.
- Press and release the CLK/MEM/
- To shut off, press and hold the ALM OFF/SOURCE/
![]() Button until "OFF" appear on the display then release the button.
Button until "OFF" appear on the display then release the button.
RADIO:
FM Band:
- In standby mode, press the ALM OFF/SOURCE/
![]() Button to power on the unit.
Button to power on the unit. - Press the ALM OFF/SOURCE/
![]() Button repeatedly until the FM Frequency (87.5 –108) appear on the display.
Button repeatedly until the FM Frequency (87.5 –108) appear on the display. - Press and hold the
![]() /HR or
/HR or ![]() /MIN Button to auto search the pervious or next available FM station. Repeat the same procedure until the desired FM Station is found.
/MIN Button to auto search the pervious or next available FM station. Repeat the same procedure until the desired FM Station is found. - If the reception is not good, press the
![]() /HR or
/HR or ![]() /MIN Button repeatedly to fine tune.
/MIN Button repeatedly to fine tune. - Adjust the volume to the desired level by pressing the ALM 2/VOL – or ALM 1/VOL + Button.
- When finished listening, press and hold the ALM OFF/SOURCE/
![]() Button until "OFF" appears on the display to shut off the radio (standby mode).
Button until "OFF" appears on the display to shut off the radio (standby mode).
AM Band:
- In standby mode, press the ALM OFF/SOURCE/
![]() Button to power on the unit.
Button to power on the unit. - Press the ALM OFF/SOURCE/
![]() Button repeatedly until the AM Frequency (520 -1710) appear on the display.
Button repeatedly until the AM Frequency (520 -1710) appear on the display. - Press and hold the
![]() /HR or
/HR or ![]() /MIN Button to auto search the pervious or next available AM station. Repeated the same procedures until the desired FM Station is searched and play.
/MIN Button to auto search the pervious or next available AM station. Repeated the same procedures until the desired FM Station is searched and play. - If the reception is not good, press the
![]() /HR or
/HR or ![]() /MIN Button repeatedly to fine tune.
/MIN Button repeatedly to fine tune. - Adjust the volume to the desired level by press the ALM 2/VOL – or ALM 1/VOL + Button.
- When finished listening, press and hold the ALM OFF/SOURCE/
![]() Button until "OFF" appear on the display to shut off the radio (standby mode).
Button until "OFF" appear on the display to shut off the radio (standby mode).
Radio stations preset:
- Power on the radio and receive the desired radio station as previously instructed.
- Press and hold the CLK/MEM/
![]() Button until "P XX" appears on the display and blink. Press the
Button until "P XX" appears on the display and blink. Press the ![]() /HR or
/HR or ![]() /MIN Button repeatedly to select the program number (P01 – P10) you want it stored to. Press the CLK/MEM/
/MIN Button repeatedly to select the program number (P01 – P10) you want it stored to. Press the CLK/MEM/![]() Button again to store it.
Button again to store it. - Repeat the same procedures until all the desired radio stations were stored into the program list.
- After setting, in radio AM or FM band. Press the CLK/MEM/
![]() Button repeatedly to select and play the desired stored radio station.
Button repeatedly to select and play the desired stored radio station.
Notes:
- If the backup batteries are not installed when the power goes out presets may be erased.
- Preset stations can only be removed by storing another station over it.
- A total of 20 radio stations can be stored (10 AM / 10 FM ).
Antenna:
The unit has built-in AM/FM antennas. If reception is not clear, turn or relocate the unit to improve the radio reception.
AUX IN
Listen to music from an external Audio Player as follows:
- Connect the external Audio Player with a 3.5mm AUX cable (Cable not included).
- Insert one end to the AUX IN Jack on the rear of unit.
- Insert the other end to the Phones Jack; Line Out Jack or AUX Out Jack on the external Audio Player.
- Press the ALM OFF/SOURCE/
![]() Button to power on the unit.
Button to power on the unit. - Press the ALM OFF/SOURCE/
![]() Button repeatedly until "AUX" appear on the display.
Button repeatedly until "AUX" appear on the display. - Play the music on the external Audio Player as usual.
- Adjust the volume to the desired level by pressing the ALM 2/VOL – or ALM 1/VOL + Button.
(Make sure the volume level of the connected external player is set to high.) - When no longer in use, press and hold the ALM OFF/SOURCE/
![]() Button until "OFF" appear on the display to shut off the unit (standby mode).
Button until "OFF" appear on the display to shut off the unit (standby mode).
 Button to power on the unit.
ALARM:
Alarm 1 setting:
- Make sure the unit is in standby mode before setting.
- Press and hold the ALM 1/VOL + Button until alarm 1 time appears on the display and blinks. (One of AL 1 Indicator will light).
- Press the
![]() /HR Button to set hour. (Make sure the PM Indicator on the display is lit if the alarm 1 time is PM and not lit if the alarm 1 time is AM).
/HR Button to set hour. (Make sure the PM Indicator on the display is lit if the alarm 1 time is PM and not lit if the alarm 1 time is AM). - Press the
![]() /MIN Button to set minute.
/MIN Button to set minute. - Press the ALM 1/VOL + Button again to save the settings and exit. The display will stop blinking.
- Press the ALM 1/VOL + Button repeatedly to set or reset the weak up mode to Buzz (ALARM 1 Indicator will light) or Radio (RADIO Indicator under ALARM 1 Indicator will light) or turn it off (Both indicators will not light).
Alarm 2 setting:
Same as the settings of Alarm 1. But, press the ALM 2/VOL - Button instead of ALM 1/VOL +Button.

If radio was selected as weak up mode, received the desired radio station as previous procedure before activate alarm. Otherwise, when alarm goes off, no sound output from the speaker or sound weak.
Shut off alarm:
- When alarm goes off, press the ALM OFF/SOURCE/
![]() Button to turn off alarm, the alarm will be reset for next day. (The correspondence alarm indicator will keep illuminate).
Button to turn off alarm, the alarm will be reset for next day. (The correspondence alarm indicator will keep illuminate). - To turn off the alarm completely (not reset for next day). Press the ALM 1/VOL + and/or ALM 2/VOL - Button repeatedly until all the alarm indicators not light.
SNOOZE:
The alarm can be temporarily turned off manually by pressing the SNOOZE/SLEEP Button. After pressing the button the alarm will stop sounding, the correspondence alarm indicator will blink and the alarm will turn back on automatically nine (9) minutes later. This feature can be repeated until the ALM OFF/SOURCE/![]() Button was pressed (The correspondence alarm indicator will stop blinking and the alarm will reset for next day).
Button was pressed (The correspondence alarm indicator will stop blinking and the alarm will reset for next day).
SLEEP TIMER:
In BT (Blue Tooth), Radio or Aux (in) mode, press the SNOOZE/SLEEP Button to activate the sleep function, sleep timer will appear on the display. Press the SNOOZE/SLEEP Button repeatedly to set the sleep timer to 10 – 90 minutes as desire. To turn off the sleep timer before the time is up, press theSNOOZE/SLEEP Button repeatedly until "OFF" appear on the display.
DIMMER:
Press the DIMMER Button repeatedly to set the brightness level of the display as desired.
TROUBLE SHOOTING GUIDE
| Symptom | Possible Cause | Solution |
| Power | ||
No power | Plug from AC Power Cord had not inserted to AC wall outlet. | Insert the plug to wall outlet having AC 120V~, 60 Hz. |
| Radio | ||
Noise or sound distorted on radio broadcasts | Station not tuned properly. | Retune the radio station. |
| The location not good for radio reception. | Turn or relocation the unit. | |
| Volume at minimum. | Increase Volume level by press the ALM 1/VOL + Button. | |
| BT | ||
BT not functioning | The BT Device had not paired to the unit. | Paired the BT Device to the unit |
Sound weak or distortion | The BT Device too far from the unit. | Place the BT Device close to the unit. |
GENERAL SPECIFICATIONS
| Power Source: | AC 120V~, 60 Hz, 5W |
| Clock back up: | DC  3V, 2 x AAA size batteries; Not included 3V, 2 x AAA size batteries; Not included |
| Audio Power: | 1 Watts |
| Impendence of Speakers: | 8 Ohm; 2W |
| Radio Band Coverage: | AM 520 - 1710 kHz FM 87.5 - 108 MHz |
| BT Version: | 2.0 |
| BT Effective Range: | 32 feet in open area |
ACCESSORY
1 x User's Manual
SPECIFICATIONS ARE SUBJECT TO CHANGE WITHOUT NOTICE

Documents / ResourcesDownload manual
Here you can download full pdf version of manual, it may contain additional safety instructions, warranty information, FCC rules, etc.
Advertisement


Need help?
Do you have a question about the MR41806BT and is the answer not in the manual?
Questions and answers