Focusrite iTrack Dock - USB Audio Dock Professional Recording for iPad Manual
- User manual (16 pages)
Advertisement
OVERVIEW
Introduction
Thank you for downloading this User Guide for the iTrack Dock; we presume you have just become the proud owner of one. The iTrack Dock is one of the family of Focusrite professional digital audio interfaces incorporating high quality Focusrite analogue pre-amplifiers. You now have a simple and compact solution for routing high quality audio - at up to 96 kHz sample rate and 24-bit resolution - to and from a compatible iPad® device.
This User Guide provides a detailed explanation of the iTrack Dock to help you achieve a thorough understanding of its operational features. We recommend that both users who are new to digital recording, as well as more experienced users, take the time to read through the user guide so that you are fully aware of all the possibilities that the iTrack Dock has to offer. If you can't find the information you need in the User Guide, be sure to consult http://www.focusrite.com/answerbase, which contains a comprehensive collection of solutions to common technical support queries.
Product Compatibility
The iTrack Dock is compatible with all Apple® iPads fitted with a Lightning connector. At the present time, these are as follows:
- iPad (4th. generation)
- iPad Air
- iPad mini
- iPad mini with Retina display
Features
Fundamentally, the iTrack Dock provides a means of connecting microphones, musical instruments or line level audio signals to your compatible iPad device. The signals at the physical inputs can be routed to your audio recording app; similarly, the app's monitor or recorded output will appear at the iTrack Dock's physical outputs.
Audio sources – mics, instruments, etc. - connected to the physical inputs can be recorded in your audio recording app. The app's outputs are routed to the physical outputs, so you can overdub additional tracks by listening to what you've already recorded while playing or singing. The physical outputs can be connected to an amplifier and speakers, powered monitors, headphones, analogue mixer or any other analogue audio equipment that you wish to use. The iTrack Dock's Direct Monitor feature lets you hear yourself in real-time while recording – with no delay, or "latency".
Although all inputs and outputs on the iTrack Dock are routed directly to and from your recording app for recording and playback, you can configure the routing within the app itself in order to meet your needs.
The iTrack Dock uses renowned Focusrite analogue mic pre-amps, with over 105 dB of dynamic range. 48 V phantom power lets you use studio quality condenser microphones. The dedicated instrument input allows direct connection of an electric guitar or bass, including those with highoutput pickups.
iTrack Dock is fundamentally a two-channel device, so stereo line level sources such as synths, drum machines and CD players can be connected, whether they have balanced or unbalanced outputs. iTrack Dock is also equipped with a USB MIDI port, allowing you to connect it to Class Compliant USB MIDI controllers of various kinds. This permits other music apps – such as sample libraries and synthesisers – to be played by a MIDI-equipped keyboard or pad-based controller. Novation's Launchkey and Launchpad apps are available to you to download and use once you have registered the product.
Box Contents
Along with the iTrack Dock itself you should have:
- 12 V DC Universal power supply (PSU), with UK EU and US adaptors
- Rubber mat for use with thin-profile iPad devices
- Fold-out "Getting Started Guide"
- Product registration card, providing download access to the following Focusrite and Novation apps:
- Launchkey
- Launchpad
- Tape
Docking your iPad
The iTrack Dock's bay is designed to accept both "full-size" iPads and smaller form-factor devices such as iPad minis. The only electrical connection between the dock and the iPad is the male Lightning™ connector on the left-hand side of the bay. You will note that this connector can be moved vertically up and down a slot; this is because of the different sizes of iPads supported, and the consequent difference in mating connector location.
iPads and iPad minis also differ in thickness; for this reason we have supplied a rubber mat to support the thin-profile devices (iPad mini, iPad mini with retina display, iPad Air).
To connect your iPad to the iPad Dock, simply place it in the docking recess – with or without the mat as necessary - and align the Lightning connector with the socket on the left-hand side of the iPad. Gently engage the iPad's socket with the connector – don't force it!
Power considerations
The iTrack Dock is powered by the separate 12 V DC PSU supplied with the unit. While your iPad is docked, it will be both powered and charged from the iTrack Dock, provided the iTrack Dock is switched on.
Note that it is not possible to power the dock from the iPad; the dock will only work if its external PSU is connected and the unit switched on at the rear panel.
The iTrack Dock is also able to provide power to a Class Compliant USB MIDI controller connected to the USB MIDI port, subject to current limitations – please consult the manual for your MIDI controller to check its power requirements. Some MIDI controllers will require a separate PSU.
GETTING STARTED
Audio Setup in your app
iTrack Dock is currently compatible with all Core Audio iPad apps, including the following:
Supplied with the Dock:
- Tape by Focusrite (our own recording app)
- Novation Launchpad (audio outputs only, plus USB MIDI)
- Novation Launchkey (audio outputs only, plus USB MIDI)
Third-party apps:
- Garageband
- Cubasis
- Auria
- Tracktor
- AudioBus
Whichever recording app you're using, its input signals – the signals you're recording – will be derived from the iTrack Dock once your iPad is correctly docked. This is entirely automatic; unlike computer-based DAW applications, no set-up procedure is necessary. Similarly, the outputs of the app are immediately available at the iTrack Dock's outputs.
Examples of Use
With the iTrack Dock, you can you use your iPad in several different recording and monitoring applications. Some typical configurations are shown below.
Recording from a microphone and/or instrument

This setup illustrates the most typical configuration for using a recording app. Here, you might record guitar through Input 1 and vocals through Input 2 into your preferred app, while monitoring the playback – anything you've already recorded - via headphones or loudspeakers.
The rear panel has inputs for three types of source: microphones, line level sources (i.e., other audio equipment) or instruments. Mics connect via 3-pin XLR sockets (you will probably have an XLR plug on the end of your microphone cable), while line level sources and instruments use a ¼" (6.35 mm) jack plug. The iTrack Dock has two channels so, for example, you can record from a microphone and instrument simultaneously, with the two sources going to separate tracks in the recording app. If you are connecting a musical instrument (a guitar in the example), use the INSTRUMENT input via an ordinary 2-pole guitar jack. The LINE input is suitable for connecting a source such as the balanced output of an external audio mixer via a 3-pole (TRS) jack.
Input Selection
Selection of input source between Mic, Line and Instrument (Ch. 1) and Mic and Line (Ch.2) is accomplished automatically on the iTrack Dock – there are no extra switches. The LINE and INSTRUMENT jack sockets on the rear panel have switch contacts that detect the presence of a plug, and route the input connectors accordingly.
Thus, a simple "hierarchy" of input selection applies:
- On Channel 1, the LINE input has priority over the MIC input, and the INSTRUMENT input has priority over both of them.
- On Channel 2, the LINE input has priority over the MIC input.
What this means in practice is that if you want to record from a microphone connected to one of the MIC inputs, you must make sure that nothing is plugged in to the corresponding Line input (either channel) or the INSTRUMENT socket (Channel 1 only).
Similarly, if you want to record from a line level source connected to the LINE input of Channel 1, you must make sure that nothing is plugged in to the INSTRUMENT input. (This obviously doesn't apply to Channel 2, which has no INSTRUMENT input.)
Using Direct Monitoring
You will frequently hear the term "latency" used in connection with digital audio systems. In the case of the simple recording application described above, latency will be the time it takes for your input signals to pass through your iPad and audio recording app. Latency can be a problem for a performer who wishes to record while monitoring their input signals.
The iTrack Dock is fitted with a "Direct Monitoring" option, which completely overcomes this problem. Selecting DIRECT MONITOR will route your input signals directly to the iTrack Dock's monitor and headphone outputs. This enables you to hear yourself with zero latency – i.e., in "real time" – along with the recording app playback. The input signals to the recording app are not affected in any way by this setting.
When Direct Monitoring is set ON, ensure that your recording app is not set to route its input (what you are currently recording) to its output. If it is, you will hear yourself "twice", with one signal audibly delayed as an echo.
Connecting loudspeakers
The two MONITOR OUTPUTS (1/4" jacks) on the rear panel can be used to connect monitoring speakers. Self-powered monitors (i.e., typical computer speakers) incorporate internal amplifiers, and may be connected directly. Larger, passive loudspeakers will require a separate stereo amplifier; in this case, the rear panel outputs should be connected to the amplifier's inputs.

The line output connectors are 3-pole (TRS) ¼" (6.35 mm) jack sockets, and are electronically balanced. Typical consumer (hi-fi) amplifiers and small powered monitors will have unbalanced inputs, either on phono (RCA) sockets, or via a 3.5 mm 3-pole jack plug intended for direct connection to a computer. In either case, use a suitable connecting cable with jack plugs at one end.
Professional power amplifiers will generally have balanced inputs.
Using iTrack Dock with GarageBand
GarageBand is one of the most popular recording apps for iOS devices. It is a useful compositional tool and used on its own, allows you to create music from the range of virtual instruments it provides. With iTrack Dock, you can add vocals and real-world instruments as well.
NOTE: operating instructions for GarageBand are beyond the scope of this User Guide, but the application includes a full set of Help files.
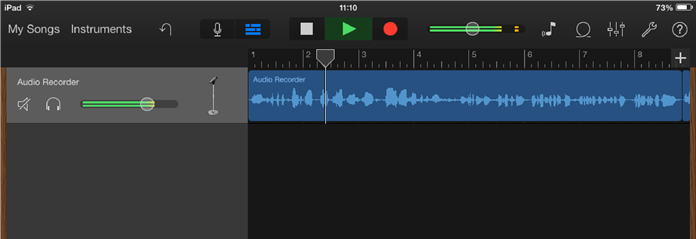
To route an iTrack Dock mic input into GarageBand, follow the procedure below:
- Connect your mic to either INPUT 1 or INPUT 2 of the iTrack Dock
- Open the GarageBand song you want to work on.
- Create a vocal track by tapping the '+' button at the bottom left-hand corner of the screen and select Audio Recorder.
- Tap the jack plug icon to open the Input Settings controls.
- Select Left Channel if using INPUT 1 on the iTrack Dock, or Right Channel if using INPUT 2, to route the mic input to the vocal track.
- Switch Monitor OFF and enable Direct Monitor on the iTrack Dock. See "Using Direct Monitoring" for further details on the benefits of using iTrack Dock's Direct Monitor feature.
- Adjust either GAIN 01 or GAIN 02 (depending on input used) to achieve the desired recording level.
![]()
To record a guitar, follow the procedure below:
- Plug your guitar into the INSTRUMENT socket of INPUT 1 of the iTrack Dock
- Open the GarageBand song you want to work on.
- Create a guitar track by tapping the '+' button on the bottom left-hand corner of the screen, select Guitar Amp Track and scroll to select the desired Amp model to be used.
- Tap the jack plug icon to open the Input Settings controls.
- Select Left Channel to route the instrument input to the guitar track.
- You can use either the internal monitor within GarageBand or the DIRECT MONITOR feature on the iTrack Dock.
![]()

If you are using a different recording app a similar procedure will be necessary; check the app's Help files for information.
Using the USB MIDI port
The iTrack Dock includes a USB port on the rear panel. You can connect this to an external Class Compliant MIDI controller and use it to control music apps of various kinds on your iPad. These can, of course, run alongside your recording app, and sounds they generate can be routed to the recording app within the iPad. However, you will be able to monitor their sounds through speakers and/or headphones via the iPad Dock, along with the live instruments and vocals you're recording. Please read the "Power considerations" section of this User Guide before connecting a MIDI controller.
Two great Novation apps – Launchkey and Launchpad – are available from the Apple app store in the usual way. Launchkey is a powerful software synthesiser, while Launchpad is a software version of Novation's popular Launchpad controller and can be used to trigger samples. You can run and control these from your iPad itself if you wish, but adding an external hardware keyboard or pad controller will greatly increase the ease and flexibility of operation.
Please check the Focusrite website www.focusrite.com for the latest list of MIDI controllers supported by iTrack Dock.
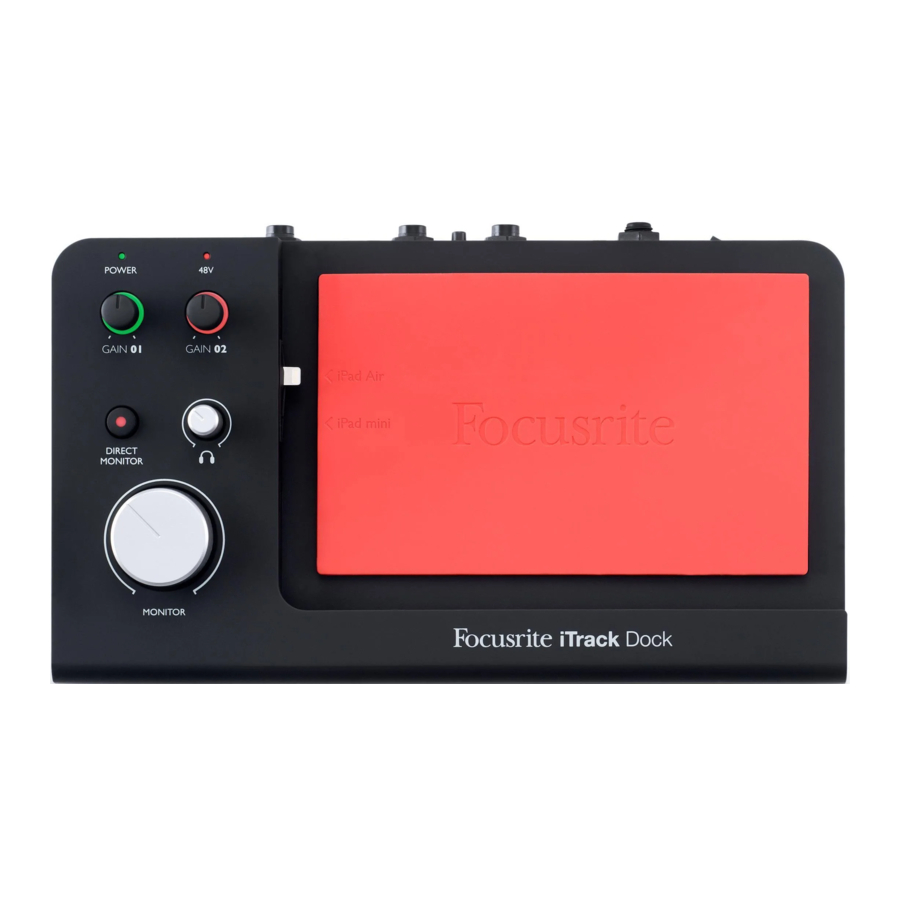
HARDWARE FEATURES
Top Panel

The Top Panel includes the input gain and monitoring controls.
- GAIN 01 and GAIN 02 - adjust the input gain for the input signals connected at INPUT 1 and INPUT 2 respectively. The gain controls have concentric bi-colour LED 'rings' to confirm signal level: green indicates an input level of at least -24 dBFS (i.e. 'signal present'), the ring then turns red (and stays red for one second) when the signal level reaches 0 dBFS.
- POWER LED – this illuminates green while the iTrack Dock is on (see [7] on the rear panel). You will notice that it flashes for a few seconds when the Dock is switched on with an iPad already connected, or when an iPad is connected if the Dock is already on. This confirms that data communications between the Dock and the iPad are being established, and the Dock is ready to use once the LED stops flashing. The LED will also flash when an iPad is disconnected, and also blinks (in a different manner) when a USB MIDI device is connected or disconnected.
- 48V LED – this illuminates red if phantom power is turned on (see [3] on the rear panel).
- MONITOR - main stereo monitor output level control - sets the output level at the rear panel MONITOR OUTPUTS connectors.
- DIRECT MONITOR – when pressed (internal red LED on), selects monitoring of the input signals to be directly from the inputs without latency (delay). When off, all monitoring will be via the iPad recording app, and thus live signals will be subject to a time delay (or latency).
![]() Headphone level - adjusts the output level at the side panel stereo headphone output.
Headphone level - adjusts the output level at the side panel stereo headphone output.- (at side) Headphone socket - ¼" TRS output jack - connect your stereo headphones here.
- iPad docking area
- Lightning connector
Back Panel

- INPUT 1 – three connectors: MIC - an XLR socket for microphones, LINE – a ¼" (6.35 mm) TRS jack socket for connecting balanced (or unbalanced) line level sources and INSTRUMENT – a ¼" (6.35 mm) TS jack socket for connecting an electric instrument such as a guitar.
- INPUT 2 – as [1], but only two connectors – MIC and LINE.
- 48V - phantom power switch for mic inputs - enables +48 V phantom power at the XLR sockets for both inputs. Use to power condenser (capacitor) mics; do not turn phantom power on if connecting any other type of signal source to the MIC inputs.
- MONITOR OUTPUTS 1 and 2 - 2 x ¼" TRS jack sockets; +10 dBu max. output level (balanced).
- USB MIDI port – Type A connector; you can connect a hardware Class Compliant MIDI controller (e.g., Novation Launchkey Mini) here, and control iPad apps such as Launchkey and Launchpad. The port also supplies 5 V DC (500 mA max); many MIDI controllers can be powered in this way (please check your controller's power requirements first).
- DC input connector – plug the supplied Universal Power Supply (PSU) in here.
- POWER – on/off switch
- Kensington security lock – secure your iTrack Dock to a suitable structure if desired.
PERFORMANCE SPECIFICATIONS
| ADC Dynamic Range | 105 dB 'A-weighted' (all inputs). Converter chipset A/D dynamic range 114 dB |
| DAC Dynamic Range | 104 dB 'A-weighted' (all outputs). Converter chipset D/A dynamic range 114 dB |
| Supported sample rates | 44.1 kHz, 48 kHz and 96 kHz: 24 bit |
| Clock source | Internal clock only |
| Microphone Inputs (Chs 1 & 2) | |
| Frequency Response | 20 Hz – 20 kHz +/-0.2 dB (minimum gain) |
| Gain Range | -4 dB to +46 dB (dBFS / dBu) +/-1 dB |
| Max input level | >+4 dBu |
| THD+N | <-99 dB (minimum gain, -1 dBFS input with 20 Hz/20 kHz bandpass filter) |
| Noise EIN | <-125 dBu CCIR-RMS (measured at maximum gain with 150 ohm termination) |
| Line Inputs (Chs 1 & 2) | |
| Frequency Response | 20 Hz – 20 kHz +/-0.2 dB (minimum gain) |
| Gain Range | -22 dB to +28 dB (dBFS / dBu) +/-1 dB |
| Max input level | >+21 dBu (@ 1% THD+N) |
| THD+N | <-98 dB (minimum gain, -1 dBFS output with 20 Hz/20 kHz bandpass filter) |
| Noise (NiPoS) | <-104 dBFS CCIR-RMS (min. gain with 50 ohm termination) |
| Instrument Input (Ch 1 only) | |
| Frequency Response | 20 Hz – 20 kHz +/-0.2 dB (minimum gain) |
| Gain Range | -16 dB to +34 dB (dBFS / dBu) +/-1 dB |
| Max input level | >+14 dBu |
| THD+N | <-90 dB (minimum gain, -1 dB below max. input level with 20 Hz/20 kHz bandpass filter) |
| Noise | <-104 dB CCIR-RMS (minimum gain) |
| Monitor Outputs 1 & 2 | |
| Frequency Response | 20 Hz to 20 kHz +/-0.2 dB |
| Nominal Output Level (0 dBFS) | >+10 dBu, balanced; >+4 dBu unbalanced |
| THD+N | <-100 dB balanced (0 dBFS input, 22 Hz/20 kHz bandpass filter) |
PHYSICAL AND ELECTRICAL CHARACTERISTICS
| Inputs 1 & 2 | |
| Connectors | XLR x 2 (Mic); ¼" TRS jack x 2 (Line); ¼" TS jack x 1 (Inst) on rear panel |
| Mic/Line switching | Automatic |
| Line/Instrument switching (Ch 1 only) | Automatic |
| Phantom power | Shared +48 V phantom power switch for Inputs 1 & 2 |
| Outputs | |
| Monitor outputs | 2 x balanced ¼" TRS jacks on rear panel |
| Stereo headphone output | ¼" TRS jack on side panel |
| Main output level control | On top panel |
| Headphones level control | |
| Other I/O | |
| USB | 1 x USB MIDI 2.0 Type A connector |
| Top Panel Indicators | |
| Power/data comms | Green LED |
| Phantom power | Red LED |
| Gain controls | Colour-coded LED rings Green = signal present (-24 dBFS) Red = signal overload (0 dBFS with approx. 1 sec. peak hold) |
| Weight and Dimensions | |
| W x H x D | 280 mm x 64 mm x 168 mm |
| Weight | 0.7 kg |
TROUBLESHOOTING
For all troubleshooting queries, please visit the Focusrite Answerbase at http://www.focusrite.com/answerbase where you will find additional information about common operational problems.
IMPORTANT SAFETY INSTRUCTIONS
- Read these instructions.
- Keep these instructions.
- Heed all warnings.
- Follow all instructions.
- Do not use this apparatus with water.
- Clean only with dry cloth.
- Do not block any ventilation openings. Install in accordance with the manufacturer's instructions.
- Do not install near any heat sources such as radiators, heat registers, stoves, or other apparatus (including amplifiers) that produce heat.
- Do not defeat the safety purpose of the polarized or grounding-type plug. A polarized plug has two blades with one wider than the other. A grounding type plug has two blades and a third grounding prong. The wide blade or the third prong are provided for your safety. If the provided plug does not fit into your outlet, consult an electrician for replacement of the obsolete outlet.
- Protect the power cord from being walked on or pinched particularly at plugs, convenience receptacles, and the point where they exit from the apparatus.
- Only use attachments/accessories specified by the manufacturer.
![]() Use only with the cart, stand, tripod, bracket, or table specified by the manufacturer, or sold with the apparatus. When a cart is used, use caution when moving the cart/ apparatus combination to avoid injury from tip-over.
Use only with the cart, stand, tripod, bracket, or table specified by the manufacturer, or sold with the apparatus. When a cart is used, use caution when moving the cart/ apparatus combination to avoid injury from tip-over.- Unplug this apparatus during lightning storms or when unused for long periods of time.
- Refer all servicing to qualified service personnel. Servicing is required when the apparatus has been damaged in any way, such as power-supply cord or plug is damaged, liquid has been spilled or objects have fallen into the apparatus, the apparatus has been exposed to rain or moisture, does not operate normally, or has been dropped.
- No naked flames, such as lighted candles, should be placed on the apparatus.
 Use only with the cart, stand, tripod, bracket, or table specified by the manufacturer, or sold with the apparatus. When a cart is used, use caution when moving the cart/ apparatus combination to avoid injury from tip-over.
The appliance coupler is used as the disconnect device, the disconnect device shall remain readily operable.
Do not use a damaged or frayed power cord.
If the mains plug supplying the apparatus incorporates a fuse then it should only be replaced with a fuse of identical or lower rupture value.
The apparatus shall be connected to a mains socket outlet with a protective earthing connection.

TO REDUCE THE RISK OF ELECTRIC SHOCK, DO NOT REMOVE COVER (OR BACK). NO USER-SERVICEABLE PARTS INSIDE. REFER SERVICING TO QUALIFIED SERVICE PERSONNEL.
 The lightning flash with arrowhead symbol, within equilateral triangle, is intended to alert the user to the presence of uninsulated "dangerous voltage" within the product's enclosure that may be of sufficient magnitude to constitute a risk of electric shock to persons.
 The exclamation point within an equilateral triangle is intended to alert the user to the presence of important operating and maintenance (servicing) instructions in the literature accompanying the appliance.

TO REDUCE THE RISK OF FIRE OR ELECTRIC SHOCK, DO NOT EXPOSE THIS APPARATUS TO RAIN OR MOISTURE AND OBJECTS FILLED WITH LIQUIDS SUCH AS VASES, SHOULD NOT BE PLACED ON THIS APPARATUS.

Documents / Resources
References
Download manual
Here you can download full pdf version of manual, it may contain additional safety instructions, warranty information, FCC rules, etc.
Download Focusrite iTrack Dock - USB Audio Dock Professional Recording for iPad Manual
Advertisement

Need help?
Do you have a question about the iTrack Dock and is the answer not in the manual?
Questions and answers