Table of Contents
Advertisement
Quick Links
Advertisement
Table of Contents

Related Manuals for JVC RM-LP450G


Summary of Contents for JVC RM-LP450G
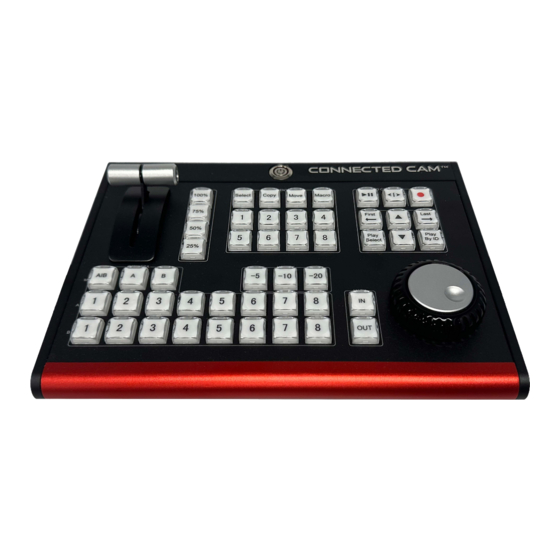
- Page 1 Slow Motion Playback Control Panel RM-LP450G User Manual...
-
Page 2: Table Of Contents
Contents Slow Motion Playback Control Panel ......................1 Product and Service Disclaimer ........................2 Product Warranty Guidelines ........................... 5 1. Product Introduction ............................7 2. Package ................................7 3. Instructions for Use............................8 4. Instructions for the Buttons ........................14 1) Power Button............................ -
Page 3: Product And Service Disclaimer
Foreword: Thank you for choosing our products! Before you use this product for the first time, please be sure to read this instruction manual and the relevant documents supplied with the product carefully, and use, install, and maintain it according to the instruction manual. We have strictly and carefully collated and checked this manual, but we cannot guarantee that the manual is completely free of any errors and omissions in the text description. - Page 4 Installation Precautions 1. Please read this manual carefully before using the product, and please keep this manual properly. 2. Please follow the warning signs and instructions marked on the product. 3. Before cleaning the machine, please disconnect the power first. Do not use liquid or corrosive cleaners, just use a general damp cloth to clean.
- Page 5 removal of covers marked "DO NOT MOVE" will expose you to voltage or other hazards. Please consult service personnel for all service matters. 13. If the following situations occur, please unplug the product and consult with qualified dealers or service personnel: a.
-
Page 6: Product Warranty Guidelines
Product Warranty Guidelines The product has a one-year warranty against production defects from the date of purchase. Any maintenance within the warranty period must provide the original purchase invoice or other relevant documents. The warranty period of the product starts from the date of purchase. ... -
Page 8: Product Introduction
1. Product Introduction The slow motion playback control panel is an external director control switcher designed for our company's vMix system and virtual studio system. It has a fully modern appearance and MIDI communication protocol interface. All buttons can be customized according to user needs, which can greatly speed up the workflow of playback control in live streaming. -
Page 9: Instructions For Use
3. Instructions for Use 1). Connect the panel to a computer installed with vMix via a USB cable, press the power button, and you can see the buttons appear pink and light green, as shown in the figure below. After about 3 seconds, the button color will changes to white. As shown below. - Page 10 2). Open vMix software and click the Settings button in the upper right corner. Click the Shortcut key → Template → Import → Find the downloaded config file template (TY_Reply 580.vMixShortcutTemplate). import the file into vMix software. Choose Shortcut key, click Template Click Import...
- Page 11 Choose “TY_Repaly 580.vMixShortcutTemplate”config file...
- Page 12 After opening, you can see that the template has been imported into the template library, and then click Apply. Next, import the prompt color template corresponding to the button. Open vMix software and click the Settings button in the upper right corner. Choose Activators→Import...
- Page 13 Find the button prompt light template, import and confirm The config file name is“TY_Repaly 580.vMixActivators” After completing the above steps, please restart the vMix software, press the buttons on the panel, and you can see the corresponding button display, as shown in the figure below.
- Page 14 Note: If your computer system is Windows 10, and the vMix software version is the latest 22 version, after you complete the above operations, the panel can be used. But if the system is Windows 7 or Windows 8, or vMix software is not the latest 22 version.
-
Page 15: Instructions For The Buttons
4. Instructions for the Buttons 1) Power Button Press the power button to turn on the panel. Note: The following operations need to create real-time playback in vMix and ensure there is at least one video signal source, then it is effective. -
Page 16: Recording
2) Recording When the record button is pressed, the red light is on. And the camera screen starts to be recorded. The number of recorded screens is recorded according to the number of screens selected when creating playback. And a maximum of 4 channels can be recorded at the same time. -
Page 17: Video Control
3) Video Control Play button to play the playback video segment that has been marked in the preview window. Play forward or backward for the selected video playback segment. It can be the playback video of the preview window (PVW), or the video of the program window (PGM). 4) Hot Key Quick replay mark selection hotkey, in the event, the highlights are fleeting. -
Page 18: Camera
Select the last playback video in the event. Play the selected playback video in the preview window (PVW). Select playback video down in the event. Play the selected playback video in the preview window (PGM). 6) Camera When performing playback preview (PVW) or program (PGM), you can use CAMERA to select 1-8, the pictures of 8 camera positions. - Page 19 video played in the EVENT. When the playback video is previewed or programed, the video playback speed can be controlled through the T-Bar, and the speed can be manually controlled from 0-100%.
-
Page 20: Speed
8) Speed SPEED is the speed control button. We prefabricated 4 speed buttons, corresponding to 25%, 50%, 75% and 100%. 25% corresponds to 1/4 second, and 50% corresponds to 1/2 second. The rest can be done in the same manner When playing back the preview or program, select the corresponding speed key to control the speed of the playback video. -
Page 21: Precise Playback Search Knob
10) Precise Playback Search Knob For sports events, there are often some wonderful shots or illegal shots that need to be played back or arbitrated. At this time, it is necessary to perform frame-level playback operations on the playback video. At this time, we can use the precise playback search knob to search and select. - Page 22 Select Move Copy Macro:no definition yet Steps: Use the ▲▼ or First, Last buttons in EVENT to select the video segment to be moved or copied, and then select the folder to be stored in. Sample:...
- Page 23 As shown in the picture above, you can see that there are 4 playback skews in the time, and we move the last video clip into the Event 2 folder. Use the "▲▼" or "First, Last" buttons to select the last video clip, and press the Select button first, then press the Move button, and finally press the "2"...
-
Page 24: Interface Description
5. Interface Description V-COM/COM: it is used to upgrade the panel. It needs to be connected to the USB port when upgrading the system. USB: it is used when using the panel, and it is free of drive.
Need help?
Do you have a question about the RM-LP450G and is the answer not in the manual?
Questions and answers