
Related Manuals for FJDynamics Trion

Summary of Contents for FJDynamics Trion
- Page 1 FJD Trion GNSS Receiver User Manual FJD Trion GNSS Alıcısı Kullanıcı Kılavuzu 2022-06-12 | No.SM0001 Rev. 1. 0 en-US ©2022 FJDynamics. All rights reserved.
- Page 2 Before using this product, make sure that you have read and understood this Safety Instructions and all the operation instructions and notes in the FJD Trion GNSS Receiver User Manual . Follow this Safety Instructions and all applicable local regulations.
- Page 3 çıkarın. Fiyatı zorla çekmeyin veya fişi çevirmeyin, bu pinleri kırabilir. 4. Use the regulated power supplies accepted by FJDynamics, and strictly follow the rated voltages, to prevent damaging the radio, the field controller, and the receiver.
- Page 4 1 About This Document / Bu belge hakkında 1.1 Introduction / Giriş The V1t GNSS Receiver developed by FJDynamics has a built-in high-precision IMU (Inertial Measurement Unit) module. With the integration of GNSS and IMU, it supports surveying at any angle, and ensures a positioning accuracy of 3 cm within a tilt angle of 60°. Compared with the V1 GNSS Receiver, the V1t GNSS Receiver has an additional IMU system consisting of a gyroscope and an accelerometer, and is mainly applied in tilt measurement.
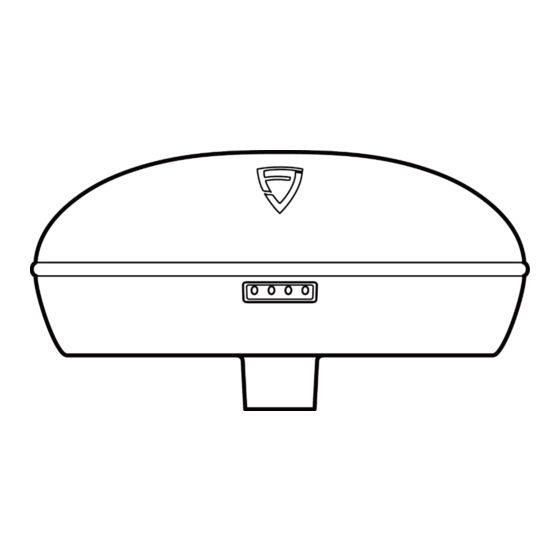
- Page 5 Press and hold for 1 to 3 seconds until the indicator turns solid green, and release the button to turn on the receiver. Press and hold for 3 seconds to turn off the receiver. Press and hold for over 8 seconds to enter the upgrade mode. In this case, the four indicators flash green, blue, green, and blue respectively from Power button left to right.
- Page 6 Name/ İsim Description/ Açıklama Flashes blue: In the static mode, the indicator flashes at the collection interval when the interval ≥ 1s, and flashes at 1s when the interval < 1s. Kapalı: Baz istasyonu diferansiyel veri iletimi yapmaz veya statik toplama başlatılmaz. Sabit yeşil: Ayarlar yapıldıktan sonra veri bağlantısı...
- Page 7 Cihazı yetkisiz bir şekilde sökme işlemi yapmayın. Herhangi bir arıza durumunda, bakım personeliyle iletişime geçin veya satıcınıza başvurun. Stop using the damaged pole. Repair or replace it in time. Zarar görmüş direği kullanmayı durdurun. Zamanında onarın veya değiştirin. Caution/ Dikkat Burn Hazard/ Yanma Tehlikesi Coverings on the surface of the receiver or the external radio may affect heat dissipation.
- Page 8 1.3 Controller field / Alan kontrolcüsü 1.3.1 Product / Ürün ① ⑪ ② ⑤ ③ ⑨ ⑩ ④ ⑥ ⑫ ⑦ ⑬ ⑧ Figure 1.3.1 Controller field Şekil 1.3.1 Alan kontrolcüsü NAME/ İsim Receiver / Alıcı Ambient light and Proximily Sensor Ortam Işığı...
- Page 9 13MP Camera / 13MP kamera Battery Cover / Pil Kapağı Lanyard buckle / Kordon tokası 1.3.2 Installation of SIM card and SD Card / SIM kart ve SD Kart kurulumu To install the SIM card, you need to open the battery cover, remove the battery, and open the SIM card slot.
- Page 10 Holding power button 2 seconds, choose restart. Güç düğmesine 2 saniye basılı tutun ve yeniden başlatmayı seçin. Force Device Restart Cihazı Zorla Yeniden Başlat Holding power button 8 seconds. Güç düğmesine 8 saniye basılı tutun. Charge Şarj Et Charging device before first use is recommended. İlk kullanımdan önce cihazı...
- Page 11 Elektromanyetik radyasyonun maksimum emilim oranı (SAR) ≤ 2,0 W/kg'dır. Kalp pili, işitme cihazı, koklear implant gibi özel durumlarda kullanıcılar, doktorun talimatlarına uymalıdır. Warning / Uyarı Following action may cause battery safety risks, resulting safety problems: Aşağıdaki eylemler, pil güvenliği risklerine yol açarak güvenlik problemlerine neden olabilir: ...
- Page 12 Figure 2.1.1-1 External radio of base station Şekil 2.1.1-1 Baz istasyonunun Harici radyosu Name / İsim Purpose / Amaç Radio antenna External radio antenna. Radyo anteni Harici radyo anteni. Tripod Mount the radio antenna on it. Üç ayaklı sehpa Radyo antenini üzerine monte edin. Receiver Receive satellite signals.
- Page 13 gereksinimlere sahiptir. Figure 2.1.2 Inner radio Şekil 2.1.2 İç radyo 2.1.3 Setting up the Rover / Rover'ı Ayarlama Fix the field controller bracket on the telescopic pole, install the field controller on the bracket, and mount the receiver on the pole. Teleskopik direğe alan kontrolcüsü...
- Page 14 Figure 2.1.3 Rover Şekil 2.1.3 Rover...
Need help?
Do you have a question about the Trion and is the answer not in the manual?
Questions and answers