
Related Manuals for EDA CM4MEDIA


Summary of Contents for EDA CM4MEDIA
- Page 1 User Manual of CM4 Media CM4MEDIA USER MANUAL Shanghai EDA Technology Co.,Ltd 2023-07-11 EDA Technology Co.,LTD– Electronics Development Accelerator...
- Page 2 Disclaimers Shanghai EDA Technology Co., Ltd does not guarantee that the information in this manual is up to date, correct, complete or of high quality. Shanghai EDA Technology Co., Ltd also does not guarantee the further use of this information.
-
Page 3: Table Of Contents
4.6.3 Check The Sound Card ....................24 4.6.4 Recording ........................24 4.6.5 Playback ........................24 Operating System Installation ......................25 Image Download ........................25 SSD Burning Image ....................... 25 5.2.1 Tool Download ......................25 EDA Technology Co.,LTD– Electronics Development Accelerator... - Page 4 User Manual of CM4 Media 5.2.2 Burn ..........................25 FAQ ..............................26 Default Username and Password ..................26 About us ............................26 About EDATEC ........................26 Contact us ..........................26 EDA Technology Co.,LTD– Electronics Development Accelerator...
-
Page 5: Product Overview
User Manual of CM4 Media 1 Product Overview ED-CM4MEDIA is a multimedia computer based on Raspberry Pi Compute Module 4 (CM4 for short). It makes full use of CM4' s structural flexibility to solve the heat dissipation problem of CPU, wireless module and PMU, improves the reliability of wireless communication through external WIFI/BT antenna, adds WM8960 chip, supports dual speaker playback, has microphone, 3.5mm headphone jack and is equipped... -
Page 6: System Diagram
Run at full speed at 0 ~ 60 ℃ ambient temperature. environment temperature compatible with official Raspberry Pi OS, provides BSP software support Operation system package, and supports online installation and update of APT. 1.3 System Diagram EDA Technology Co.,LTD– Electronics Development Accelerator... -
Page 7: Functional Layout
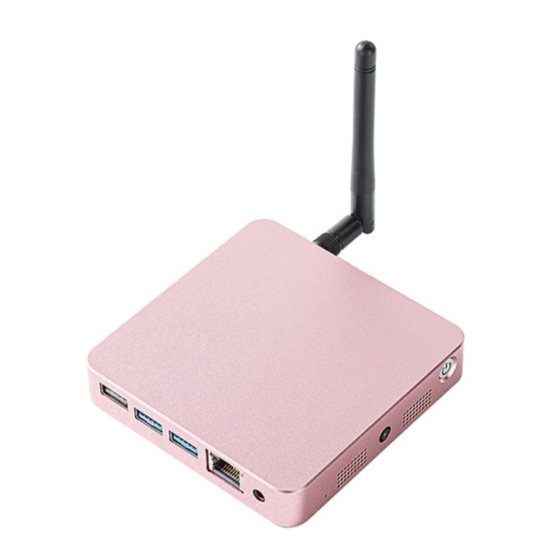
1.4 Functional Layout Item Function Description Item Function Description Standard 3.5mm headphone jack RJ45 Gigabit network port USB 3.0 USB 2.0 Micro-SD card slot Micro-HDMI port Standard HDMI port Type-C power port CM4 slot Power button EDA Technology Co.,LTD– Electronics Development Accelerator... -
Page 8: Packing List
5W speaker 5W speaker CR1220 button cell, powered for RTC. Mini PCIe Micro SIM card slot 1.5 Packing List 1x CM4 Media 1x WIFI/BT antenna [option] 1x 4G antenna 1.6 Order Code EDA Technology Co.,LTD– Electronics Development Accelerator... -
Page 9: Quick Start
4. Power on the monitor 5. Plug in the power cord, press the power switch button, and the system will start. 6. The power switch LED lights up, which means that the power supply is normal. EDA Technology Co.,LTD– Electronics Development Accelerator... -
Page 10: First Start
If you use the official system image, and the image is not configured before burning, the Welcome to Raspberry Pi application will pop up and guide you to complete the initialization setting when you start it for the first time. EDA Technology Co.,LTD– Electronics Development Accelerator... - Page 11 English keyboard layout (our domestic keyboards are generally the American keyboard layout), and some special symbols may not be typed. Input a new password for the default account pi, and click Next. NOTE: Default password is raspberry EDA Technology Co.,LTD– Electronics Development Accelerator...
- Page 12 NOTE: Before upgrading the system, you need to wait for the wifi connection to be normal (the wifi icon appears in the upper right corner). Click Next, and the wizard will automatically check and update Raspberry Pi OS. Click Restart to complete the system update. EDA Technology Co.,LTD– Electronics Development Accelerator...
-
Page 13: Raspberry Pi Os (Lite)
If you use the official system image, and the image is not configured before burning, the configuration window will appear when you start it for the first time. You need to configure the keyboard layout, set the user name and the corresponding password. Set the configuration keyboard layout EDA Technology Co.,LTD– Electronics Development Accelerator... -
Page 14: Wiring Guide
At this point, you can log in with the user name and password you just set. 3 Wiring Guide 3.1 Panel I/O 3.1.1 micro-SD Card There is a micro SD card slot on CM4 Media. Please insert the micro SD card face up into the micro SD card slot. EDA Technology Co.,LTD– Electronics Development Accelerator... -
Page 15: Software Operation Guide
By default, your Raspberry Pi will automatically mount some popular file systems, such as FAT, NTFS and HFS+, in the location of /media/pi/HARD-DRIVE-LABEL. In general, you can directly use the following commands to mount or unmount external storage devices. lsblk EDA Technology Co.,LTD– Electronics Development Accelerator... -
Page 16: Ethernet Configuration
It is recommended to use Cat6 (Category 6) network cable to cooperate with it. By default, the system uses DHCP to automatically obtain IP. 4.2.2 Using The Network Manager Tool To Configure If you use the desktop image, it is recommended to install the NetworkManager plug-in network- EDA Technology Co.,LTD– Electronics Development Accelerator... - Page 17 Switch to the configuration page of IPv4 Settings. If you want to set static IP, the Method selects Manual, and Addresses the IP you want to configure. If you want to set it as dynamic IP acquisition, just configure the Method as Automatic(DHCP) and restart the device. EDA Technology Co.,LTD– Electronics Development Accelerator...
-
Page 18: Configuration With Dhcpcd Tool
If you use the factory image provided by us and want to switch from NetworkManager to dhcpcd network management tool, you need to stop and disable NetworkManager service and enable dhcpcd service first. sudo systemctl stop NetworkManager sudo systemctl disable NetworkManager sudo systemctl enable dhcpcd sudo reboot EDA Technology Co.,LTD– Electronics Development Accelerator... -
Page 19: Wifi
Set up WIFI automatic connection sudo nmcli connection modify <name> connection.autoconnect yes 4.3.1.2 Configure Using The dhcpcd Tool The official system of Raspberry Pi uses dhcpcd as the network management tool by default. sudo raspi-config EDA Technology Co.,LTD– Electronics Development Accelerator... -
Page 20: External Antenna/Internal Pcb Antenna
CM4 Media can choose whether the Bluetooth function is integrated or not. If it has Bluetooth, this function is turned on by default. Bluetoothctl can be used to scan, pair and connect Bluetooth devices. Please refer to the ArchLinux- Wiki-Bluetooth guide to configure and use Bluetooth. 4.4.1 Usage Scan: EDA Technology Co.,LTD– Electronics Development Accelerator... -
Page 21: Example
Device 6A:7F:60:69:8B:79 6A-7F-60-69-8B-79 Device 67:64:5A:A3:2C:A2 67-64-5A-A3-2C-A2 Device 56:6A:59:B0:1C:D1 Lefun Device 34:12:F9:91:FF:68 test Pair device pair 34:12:F9:91:FF:68 Attempting to pair with 34:12:F9:91:FF:68 [CHG] Device 34:12:F9:91:FF:68 ServicesResolved: yes [CHG] Device 34:12:F9:91:FF:68 Paired: yes Pairing successful EDA Technology Co.,LTD– Electronics Development Accelerator... -
Page 22: Rtc
If you don't want to use this service, you can turn it off manually: sudo systemctl disable rtc sudo systemctl stop rtc Re-enable this service: sudo systemctl enable rtc sudo systemctl start rtc Read RTC Time manually: sudo hwclock -r EDA Technology Co.,LTD– Electronics Development Accelerator... -
Page 23: Multimedia Interface
The function of -Dhw:2 is to designate the sound card as sound card 2. The sound card number may change under different configurations. Users can use the following command to find the sound card corresponding to the wm8960 chip. aplay -l EDA Technology Co.,LTD– Electronics Development Accelerator... -
Page 24: Camera
Users can use the following commands to play sounds: aplay test.mp3 it also supports users to specify sound card devices for recording: aplay -Dhw:<sound card label> test.mp3 For more usage of aplay, users can check it with the following command: man aplay EDA Technology Co.,LTD– Electronics Development Accelerator... -
Page 25: Operating System Installation
3. Start the device and use lsusb to check the current disk mounting. The default SSD name should be sda, and the following default SSDs are sda operations. If there are differences, please change them according to the actual situation. 4. execute the command sudo dd if=image of=/dev/sda bs=4MiB sync EDA Technology Co.,LTD– Electronics Development Accelerator... - Page 26 7.2 Contact us Mail – sales@edatec.cn / support@edatec.cn Phone – +86-18621560183 Website – https://www.edatec.cn Address – Room 301, Building 24, No.1661 Jialuo Highway, Jiading District, Shanghai EDA Technology Co.,LTD– Electronics Development Accelerator...
Need help?
Do you have a question about the CM4MEDIA and is the answer not in the manual?
Questions and answers