Table of Contents
Advertisement
Quick Links
Advertisement
Table of Contents

Related Manuals for TAEHA PROCON-100

Summary of Contents for TAEHA PROCON-100
- Page 1 Pro Pump Controller (PROCON-100) Operation Manual...
-
Page 2: Table Of Contents
Appearance and Specifications of ProCon-100 ..................... 12 3.2.1 Appearance of ProCon-100 ..........................12 3.2.2 Specification of ProCon-100 ........................... 13 Name of each part of the Controller (ProCon-100) ..................14 ProCon-100 Detailed Description ......................... 14 Time Chart ..................................20 4.2.1 Time Mode ................................20 4.2.2... - Page 3 Connection guide ..............................55 5.8.2 How to set up the pressure sensor function on controller .............. 56 5.8.3 I/O communication for pressure transducer ................... 58 RS-232 Serial communication ..........................59 3/70 2023/07/17 Copyright © 2023 by TAEHA CORP. All Rights Reserved...
- Page 4 Status check command ............................62 5.9.4 Operation control command .......................... 64 Controller Internal Configuration ......................... 67 Maintenance ................................... 68 Part Replacement ................................. 68 Trouble Shooting................................69 Inspection and Measures ............................70 4/70 2023/07/17 Copyright © 2023 by TAEHA CORP. All Rights Reserved...
-
Page 5: Safety Precautions
Rev3.6 Safety Precautions This manual is applied to products manufactured and sold by Taeha Corp. (here in after referred to as “our company”) and, therefore must not be used in partial or full copy without permission of our company. This manual explains the specifications, installation, wiring, maintenance check, abnormal phenomena and measures to be taken for our products. - Page 6 Failure to do so may result in injury and electric shock. Caution 1. Do not apply main power supply except for that of the voltage specified in this user manual. It may cause malfunction. 6/70 2023/07/17 Copyright © 2023 by TAEHA CORP. All Rights Reserved...
- Page 7 When the equipment of our company is used including robots (multi-joint robot, rectangular coordinate robot, desktop robot), please be sure to install a safety net in the robot operation area, and never approach the operation area during operation. 7/70 2023/07/17 Copyright © 2023 by TAEHA CORP. All Rights Reserved...
- Page 8 There is a danger of electric shock. Precautions for disposal Caution 1. When this equipment is disposed of, treat it as industrial waste. 8/70 2023/07/17 Copyright © 2023 by TAEHA CORP. All Rights Reserved...
-
Page 9: General Information
2. If someone other than the technical support personnel of Taeha Corp. modifies the equipment or repairs the equipment without using the designated parts. 3. If any spare parts other than those specified by Taeha Corp. have been used for the product. 4. In case of intentional damage or damage due to consumer’s fault 5. -
Page 10: Precautions
➢ During the operation, do not turn off the power or shut down the air pressure unless the equipment is in danger/caution. Serious problems may arise with the use of equipment. ➢ Contact us in case of severe errors in the equipment. 10/70 2023/07/17 Copyright © 2023 by TAEHA CORP. All Rights Reserved... -
Page 11: Features Of Pro Pump Controller (Procon-100)
✓ Setting and changing of data are intuitive and easy to operate ◆ Major application examples ✓ Various sensors ✓ Solar cell panels ✓ Epoxy dispensing on auto parts ✓ Application of urethane to various filters 11/70 2023/07/17 Copyright © 2023 by TAEHA CORP. All Rights Reserved... -
Page 12: Appearance And Specifications Of Procon-100
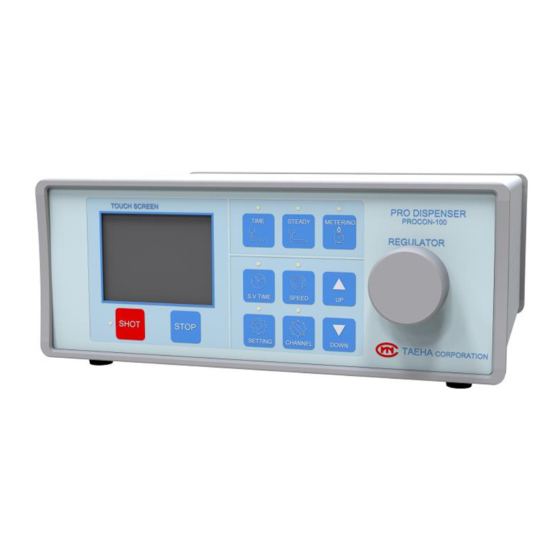
Pro Pump Controller (ProCon-100) Rev3.6 3.2 Appearance and Specifications of ProCon-100 3.2.1 Appearance of ProCon-100 Figure 1. Appearance of Procon-100 12/70 2023/07/17 Copyright © 2023 by TAEHA CORP. All Rights Reserved... -
Page 13: Specification Of Procon-100
Contact us Input/Output Connector STL950/12-5.0-V-GREEN AK950/12-5.0-GREEN Weight 1.8kgf Operating Temperature 5 ~ 40℃ Avoid direct sunlight Operating Humidity 10 ~ 85%RH(without condensation) Vibration Resistant 0.5g or less g:gravity acceleration 13/70 2023/07/17 Copyright © 2023 by TAEHA CORP. All Rights Reserved... -
Page 14: Name Of Each Part Of The Controller (Procon-100)
Rev3.6 Name of each part of the Controller (ProCon-100) 4.1 ProCon-100 Detailed Description Figure 2. Front / Rear of Procon-100 Table 2. Name of each part of the Procon-100 Names and Displays Function and Description <Touch Screen> ✽ For one-component fixed volume dispensing, you can set/check mode selection, dispensing condition setting, mixing ratio setting, dis. - Page 15 ✽ When dispensing complete, operational completion signal is output at approximately 30msec on purge. The complete operation signal is output only in time mode. 15/70 2023/07/17 Copyright © 2023 by TAEHA CORP. All Rights Reserved...
- Page 16 Pro Pump Controller (ProCon-100) Rev3.6 <Control Connector Internal Diagram> 16/70 2023/07/17 Copyright © 2023 by TAEHA CORP. All Rights Reserved...
- Page 17 Pro Pump Controller (ProCon-100) Rev3.6 <Connection configuration of Host controller and Controller> <RS 232C> ✽ D_SUB 9pin connector, used as controller firmware upgrade and debugging mode. (Users do not use it.) 17/70 2023/07/17 Copyright © 2023 by TAEHA CORP. All Rights Reserved...
- Page 18 It occurs when the motor cable is 1. Motor Cable disconnected or in the case of faulty MOTOR_ALARM Active Low encoders. 2. Motor Error It occurs when the motor is overloaded. 18/70 2023/07/17 Copyright © 2023 by TAEHA CORP. All Rights Reserved...
- Page 19 It occurs if the pressure rises above the set pressure. Channel ADD4 ADD3 ADD2 ADD1 If there is no ADD1~4 input at the terminals, the existing selected channel will be selected. 19/70 2023/07/17 Copyright © 2023 by TAEHA CORP. All Rights Reserved...
-
Page 20: Time Chart
Pro Pump Controller (ProCon-100) Rev3.6 4.2 Time Chart Table 3. Procon-100 Time Chart Shot Key Check Time (10ms) Shot Time End Time (30ms) 4.2.1 Time Mode Figure 3. 20/70 2023/07/17 Copyright © 2023 by TAEHA CORP. All Rights Reserved... -
Page 21: Steady Mode
Pro Pump Controller (ProCon-100) Rev3.6 4.2.2 Steady Mode Figure 4. Steady Mode 21/70 2023/07/17 Copyright © 2023 by TAEHA CORP. All Rights Reserved... -
Page 22: Functions Of Pro Pump Controller (Procon-100)
If you adjust it randomly, the output will change. ✽ Pressure : Displays the working pressure. 5.1.2 Steady Mode Steady mode is used to dispense continuously at the set shot rate. 22/70 2023/07/17 Copyright © 2023 by TAEHA CORP. All Rights Reserved... -
Page 23: Metering Mode
If you adjust it randomly, the output will change. ✽ Pressure : Display the working pressure. 5.1.3 Metering Mode Metering mode is used if a precision dispensing is required. 23/70 2023/07/17 Copyright © 2023 by TAEHA CORP. All Rights Reserved... - Page 24 ✽ Suck Speed : Display the pump speed shile sucking. (0~120 rpm) ✽ Compensation: The correction rate for the motor speed. If you adjust it randomly, the output will change. ✽ Pressure : Display the working pressure. 24/70 2023/07/17 Copyright © 2023 by TAEHA CORP. All Rights Reserved...
-
Page 25: Setting Button
Pro Pump Controller (ProCon-100) Rev3.6 Setting Button Procon-100 has a total of 9 setup buttons(4~12) at the front. Figure 8. Procon-100 Touch Panel & Setup Buttons Table 7. Function of the Controller Setup Button Category Item Function It is the time mode button, which changes the time mode when pressed. - Page 26 Change the value at the setting screen of each item by using the up/down buttons, or by touching the input window and activating the 10 keypad that is displayed. Press the down button to decrease the setting value. 26/70 2023/07/17 Copyright © 2023 by TAEHA CORP. All Rights Reserved...
-
Page 27: Time Mode Setting
You can set 1.Shot Time, 2. Shot Speed, 3. Suck Back Time, 4. Suck Speed, 5. Compensation by selecting the Setting button in time mode. Setting Button EXIT Shot Time Shot Speed Suck Back Time Suck Speed Compensation NEXT Main Screen 27/70 2023/07/17 Copyright © 2023 by TAEHA CORP. All Rights Reserved... -
Page 28: Shot Time Setting
By selecting the up/down key or data box, you can set the value through the keypad screen. If you want to go to the next setting menu, click ‘Next’ button. If you want to go to the main screen, click ‘Exit’ button. 28/70 2023/07/17 Copyright © 2023 by TAEHA CORP. All Rights Reserved... -
Page 29: Shot Speed Setting
By selecting the up/down key or data box, you can set the value through the keypad screen. If you want to go to the next setting menu, click ‘Next’ button. If you want to go to the main screen, click ‘Next’ button. 29/70 2023/07/17 Copyright © 2023 by TAEHA CORP. All Rights Reserved... -
Page 30: Suck Back Speed Setting
By selecting the up/down key or data box, you can set the value through the key pad screen. If you want to go to the next setting menu, click ‘Next’ button. If you want to go to the main screen, click ‘Exit’ button. 30/70 2023/07/17 Copyright © 2023 by TAEHA CORP. All Rights Reserved... -
Page 31: Compensation Setting
If you want to go to the main screen, click ‘Exit’ button. Caution If compensation value is changed, the amount of shot is changed and not guaranteed to be quantified. 31/70 2023/07/17 Copyright © 2023 by TAEHA CORP. All Rights Reserved... -
Page 32: Steady Mode Setting
You can set 1. Shot Speed, 2. Suck Back Time, 3. Suck Back Speed, 4. Compensation by selecting the Setting button in steady mode. Setting Button EXIT Shot Speed Suck Back Time Suck Speed Compensation NEXT Main Screen 32/70 2023/07/17 Copyright © 2023 by TAEHA CORP. All Rights Reserved... -
Page 33: Shot Speed Setting
By selecting the Up/Down key or Data Box, you can set the value through the key pad screen. If you want to go to the next setting menu, click ‘Next’ button. If you want to go to the main screen, click ‘Next’ button. 33/70 2023/07/17 Copyright © 2023 by TAEHA CORP. All Rights Reserved... -
Page 34: Suck Back Time Setting
By selecting the Up/Down key or Data Box, you can set the value through the key pad screen. If you want to go to the next setting menu, click ‘Next’ button. If you want to go to the main screen, click ‘Exit’ button. 34/70 2023/07/17 Copyright © 2023 by TAEHA CORP. All Rights Reserved... -
Page 35: Suck Back Speed Setting
By selecting the Up/Down key or Data Box, you can set the value through the key pad screen. If you want to go to the next setting menu, click ‘Next’ button. If you want to go to the main screen, click ‘Exit’ button. 35/70 2023/07/17 Copyright © 2023 by TAEHA CORP. All Rights Reserved... -
Page 36: Compensation Setting
If you want to go to the main screen, click ‘Exit’ button. Caution If compensation value is changed, the amount of shot is changed and not guaranteed to be quantified. 36/70 2023/07/17 Copyright © 2023 by TAEHA CORP. All Rights Reserved... -
Page 37: Metering Mode Setting
You can set 1. Volume, 2. Shot Speed, 3. Suck Back(Time), 4. Suck Speed, 5.Compensation by selecting the Setting Button in metering mode. Setting Button EXIT Volume Shot Speed Suck Back Time Suck Speed Compensation NEXT Main Screen 37/70 2023/07/17 Copyright © 2023 by TAEHA CORP. All Rights Reserved... -
Page 38: Volume Setting
By selecting the Up/Down key or Data Box, you can set the value through the key pad screen. If you want to go to the next setting menu, click ‘Next’ button. If you want to go to the main screen, click ‘Exit’ button. 38/70 2023/07/17 Copyright © 2023 by TAEHA CORP. All Rights Reserved... -
Page 39: Shot Speed Setting
By selecting the Up/Down key or Data Box, you can set the value through the key pad screen. If you want to go to the next setting menu, click ‘Next’ button. If you want to go to the main screen, click ‘Exit’ button. 39/70 2023/07/17 Copyright © 2023 by TAEHA CORP. All Rights Reserved... -
Page 40: Suck Back Time Setting
By selecting the Up/Down key or Data Box, you can set the value through the key pad screen. If you want to go to the next setting menu, click ‘Next’ button. If you want to go to the main screen, click ‘Exit’ button. 40/70 2023/07/17 Copyright © 2023 by TAEHA CORP. All Rights Reserved... -
Page 41: Suck Back Speed Setting
By selecting the Up/Down key or Data Box, you can set the value through the key pad screen. If you want to go to the next setting menu, click ‘Next’ button. If you want to go to the main screen, click ‘Exit’ button. 41/70 2023/07/17 Copyright © 2023 by TAEHA CORP. All Rights Reserved... -
Page 42: Compensation Setting
If you want to go to the main screen, click ‘Exit’ button. Caution If compensation value is changed, the amount of shot is changed and not guaranteed to be quantified. 42/70 2023/07/17 Copyright © 2023 by TAEHA CORP. All Rights Reserved... -
Page 43: System Set
Set the Calibration, Pressure, System I/O Check, Parameter Setting, etc. other than the default settings for dispensing in “SYSTEM SET”. Press and hold the Setting button(9) on the front of the Procon-100 for approximately 2 seconds to access the System Setting menu. -
Page 44: Calibration
The output quantity of Procon-100 is set to the theoretical output of each model, and the formula for the program is based on this. - Page 45 10 times recommended) ✽ After making measurements in the Measurement Menu, input the results and save them. ✽ After this, the measured volume is automatically compensated based on this value.. 45/70 2023/07/17 Copyright © 2023 by TAEHA CORP. All Rights Reserved...
-
Page 46: Pressure Set
✽ You can set the pressure value by touching Data Box. ✽ You can set the tolerance of the dispensing pressure value. ✽ You can set the tolerance by touching Data box. 46/70 2023/07/17 Copyright © 2023 by TAEHA CORP. All Rights Reserved... - Page 47 ✽ You can set the pressure value by touching Data Box. ✽ You can set the tolerance of the pressure sensor’s pressure value. ✽ You can set the tolerance by touching Data box. 47/70 2023/07/17 Copyright © 2023 by TAEHA CORP. All Rights Reserved...
-
Page 48: System I/O Check
P_ALR : On when above setting pressure ◼ S_END : On when dispensing is completed in ◼ time mode ✽ If you want to move to the previous screen, select the ‘Exit’ button. 48/70 2023/07/17 Copyright © 2023 by TAEHA CORP. All Rights Reserved... -
Page 49: Parameter Setting
✽ If cal value is changed, the amount of shot is changed and not guaranteed to be quantified. ✽ Displays the model name of the controller in use. Lock Function Setting 49/70 2023/07/17 Copyright © 2023 by TAEHA CORP. All Rights Reserved... -
Page 50: Check Point Before Set-Up The Lock Function
Figure 27. Start-Up Screen - Please check the controller’s version “2.71N” after turn on the power. Figure 28. Main Screen - You can see the main screen after checking the “Start-Up Screen”. 50/70 2023/07/17 Copyright © 2023 by TAEHA CORP. All Rights Reserved... -
Page 51: How To Set-Up The Lock Function
“OK” button. (If you want to change the password, you can also follow up same as setting process.) Figure 31. - You can see the “P” mark after passing 5 seconds, after return to “MAIN SCREEN”. 51/70 2023/07/17 Copyright © 2023 by TAEHA CORP. All Rights Reserved... -
Page 52: How To Operate During Locking
(In case of turn on LED on the button, there is no need to input the password.) Figure 33 Figure 34 - If there is no activity for 5 seconds, after return to main screen, the display should be locked automatically. 52/70 2023/07/17 Copyright © 2023 by TAEHA CORP. All Rights Reserved... -
Page 53: How To Unlock
Please press button “Setting” for 3 seconds, if you want to unlock. Please press the button “Parameter Set” on “System Set” display, then please input the password “0”.The lock function could be removed. 53/70 2023/07/17 Copyright © 2023 by TAEHA CORP. All Rights Reserved... - Page 54 Table 14. Exceptional unlock process, if you forget the password. Exceptional unlock process, if you forget the password Please press the button “Channel” then input the special password “205”. You can see the yellow light above “Channel” button 54/70 2023/07/17 Copyright © 2023 by TAEHA CORP. All Rights Reserved...
-
Page 55: Pressure Sensor For Procon-100 (Option)
When using an external pressure sensor, modify the circuit inside the existing controller and connect the pressure sensor cable to the rear terminal.(option) < std controller > < pressure sensor optional controller > The cable is as above. 55/70 2023/07/17 Copyright © 2023 by TAEHA CORP. All Rights Reserved... -
Page 56: How To Set Up The Pressure Sensor Function On Controller
1) After turning on the power, set using the front display and buttons. < Before setting > < Pressure set > < Over pressure setting > < After setting > 56/70 2023/07/17 Copyright © 2023 by TAEHA CORP. All Rights Reserved... - Page 57 Pro Pump Controller (ProCon-100) Rev3.6 2) After setting, you can check the pressure value on display. < Happen alarm > < Alarm > Pressure relief Maintaining function Cancel 57/70 2023/07/17 Copyright © 2023 by TAEHA CORP. All Rights Reserved...
-
Page 58: I/O Communication For Pressure Transducer
When the pressure sensor make an alarm, you can get the signal by ‘PRE_ALARM’ connection < Alarm > < Error display > Signal to get the pressure sensor by PRE-ALARM. < Back side > 58/70 2023/07/17 Copyright © 2023 by TAEHA CORP. All Rights Reserved... -
Page 59: Rs-232 Serial Communication
Pro Pump Controller (ProCon-100) Rev3.6 5.9 RS-232 Serial communication Instructions such as parameter setting, discharge, and stop can be transmitted via RS-232 communication, and parameter settings and the status of Procon-100 can be checked. Table 15.. RS-232 serial communication and setting Item Description ✽... -
Page 60: Configuration Command
④ Data (RESPONSE) <Abnormal reception condition> - 0 : Busy status - 1 : Data format error - 2 : Data input range error ⑤ # : ETX (Command complete) 60/70 2023/07/17 Copyright © 2023 by TAEHA CORP. All Rights Reserved... - Page 61 - Compensation : 100 (100%) <Abnormal reception condition> - 0 : Busy status - 1 : Data format error - 2 : Data input range error ⑤ # : ETX (Command complete) 61/70 2023/07/17 Copyright © 2023 by TAEHA CORP. All Rights Reserved...
-
Page 62: Status Check Command
Pro Pump Controller (ProCon-100) Rev3.6 5.9.3 Status check command : using COMMAND - G ➔ PROCON-100 status request / C ➔ PROCON-100 status response Table 17. Status check command Command Action Send and receive PROCON-100 status request ex) $,G,# Host controller ➔ Procon-100 $,G,# ①... - Page 63 - Mode : 1 (MODE 1 / STEADY) <Abnormal reception status> - 0 : Busy status - 1 : Data format error - 2 : Data input range error ⑤ # : ETX (Command complete) 63/70 2023/07/17 Copyright © 2023 by TAEHA CORP. All Rights Reserved...
-
Page 64: Operation Control Command
Shot stop command ex) $,O,# Host controller ➔ Procon-100 $,O,# ① $ : STX (command start) (REQUST) ② O : shot stop command ③ # : ETX (command complete) 64/70 2023/07/17 Copyright © 2023 by TAEHA CORP. All Rights Reserved... - Page 65 ④ Data (RESPONSE) <Abnormal reception status> - 0 : Busy status - 1 : Data format error - 2 : Data input range error ⑤ # : ETX (command complete) 65/70 2023/07/17 Copyright © 2023 by TAEHA CORP. All Rights Reserved...
- Page 66 - Tolerance : 10 (10%) <Abnormal reception status> - 0 : Busy status - 1 : Data format error - 2 : Data input range error ⑤ # : ETX (command complete) 66/70 2023/07/17 Copyright © 2023 by TAEHA CORP. All Rights Reserved...
-
Page 67: Controller Internal Configuration
Pro Pump Controller (ProCon-100) Rev3.6 Controller Internal Configuration 67/70 2023/07/17 Copyright © 2023 by TAEHA CORP. All Rights Reserved... -
Page 68: Maintenance
As the functional use time of parts becomes long, aging may occur and it may cause the failure of the equipment. Check regularly for trouble prevention of the equipment, and, in case of abnormality, replace parts. 68/70 2023/07/17 Copyright © 2023 by TAEHA CORP. All Rights Reserved... -
Page 69: Trouble Shooting
1) Check if the bearing in the bearing block has been damaged. occurs while the pump 2) Check the status of abrasion of the rotary seal in the seal block. is operating 3) Check the condition of the motor reducer. 69/70 2023/07/17 Copyright © 2023 by TAEHA CORP. All Rights Reserved... -
Page 70: Inspection And Measures
- Fastening condition of the fixed parts and joints in the equipment Other Checks Periodically - Joined and tightened condition of wiring - Arrangement condition around the equipment. 70/70 2023/07/17 Copyright © 2023 by TAEHA CORP. All Rights Reserved...
Need help?
Do you have a question about the PROCON-100 and is the answer not in the manual?
Questions and answers