Table of Contents
Advertisement
Quick Links
Advertisement
Table of Contents

Related Manuals for yte X580


Summary of Contents for yte X580
- Page 1 Robotic vacuum cleaner Instructions for use...
- Page 3 Table of contents...
- Page 4 Scan QR code of Figure 1 ,then download and install "LIBOS HOME" APP or Search for LIBOS HOME on the App Store or Android App platforms. Then, download and install it. Figure1 Open the "LIBOS HOME" App and log in. There are two ways to log in: by verification code or by password. Figure2 After logging in, click the "+"...
- Page 5 Figure 6: Select the working Wi-Fi of the robot (only support 2.4Ghz Wi-Fi, Wi-Fi name does not support Chinese and full-angle symbol).Input wi-fi password and click“Next”. Turn on the robot power switch, according to the App page prompts to connect the robot. Figure6 Figure7 There are differences between iOS and Android in the following network connection steps.
- Page 6 Figure 12: Jump to home page after successful connection. After the robot is successfully connected, click it to enter the robot control page (Figure 16). Figure11 Figure12 Figure13 Android: Figure 14 pending connection. Wait for the hotspot "Robot##Libos-xxx" or "Robot## xxx-xxx" to pop up for the robot. Choose it and wait for the connection.
- Page 7 Before using this product, please read the following safety instructions and follow all general safety precautions Please read this manual carefully Please keep this manual Any operation inconsistent with this manual may cause damage to the product IMPORTANT SAFETY INSTRUCTIONS precautions related to the host and accessories When using an electrical appliance, basic precautions should always be followed, including the following:...
- Page 8 warn 01. Do not disassemble, repair or modify the machine by yourself, otherwise the product will be damaged and danger will occur. 02. Do not use this product in an environment that may cause fire or explosion. 03. This product can only use the original power cord, otherwise it may cause damage to the product and cause a fire.
- Page 9 12. When the trash box is full, please empty the trash before using the machine. 13. Do not use the machine to clean construction waste. 14. The operating temperature range of this product is 5 degrees Celsius to 40 degrees Celsius, please do not use it in a high or low temperature environment.
- Page 10 warn 01. If the battery leakage touches the skin or clothes, it must be washed immediately with clean water. If it is ignored, it will cause skin inflammation and other problems. 02. Do not use the rechargeable battery of this product on other devices. This battery is only suitable for intelligent sweeping robots.
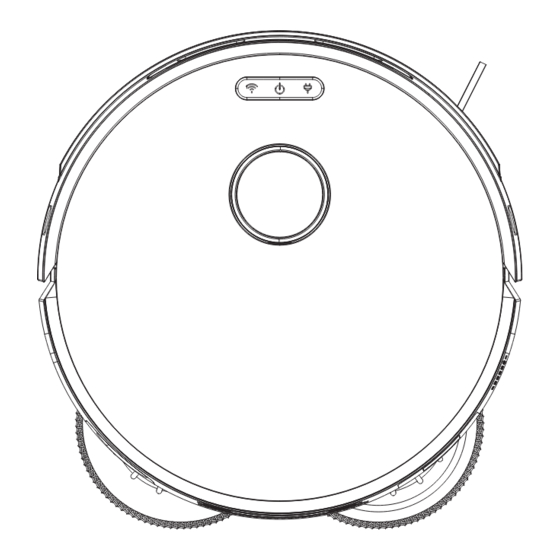
- Page 11 3.1Part name the host clean base station washable tray Bleach Base Station Cleaning Tool Mop holder/mop power cable side brush filter assembly The accessories are slightly different, please refer to the actual product received...
- Page 12 the host 1.WIFI connection button 2.Power button 3.Recharge button 4.Lidar component 5.Bumper 6.Line laser sensor 7.TOF sensor the host 1.Charging pole piece 2.Water injection hole 3.Magnetic panel 4.Vacuum suction port 5.Factory reset button 6.Dust collection box 7.Scrubber cleaning tool...
-
Page 13: Dust Box Assembly
the host 1. Ground detection component 2. Carpet detection component 3. Side brush 4. Roller brush component 5. Side wheel assembly 6. Mop assembly 7. Universal wheel assembly Dust box assembly 1. Dust box flip cover 2. Hypa bracket 3. High efficiency filter 4. -
Page 14: Base Station
Mop component 1.Mop holder 2.Mop base station 1. Lid 2. Dust bag handle 3. Dust bag guide plate 4. Sewage tank 5. Dust bag 6. Fresh water tank 7. Touch button + display 8. Body 9. Washable tray 10. Power cord... -
Page 15: Product Parameters
base station 1. Charging electrode 2. Dust collection port 3. Hot air drying port 4. Water nozzle 5. Sewage suction port 3.2 Product parameters... -
Page 17: Product Features
3.3 Product Features Intelligent cleaning adjustment This product can adjust the cleaning mode through the APP according to different cleaning modes, which greatly improves the cleaning efficiency and can save 30% of the power. humanized design The operation is simple and easy to use. After long pressing the power button to turn on the machine, you only need to press the "control"... - Page 18 4.1Precautions When the host is working, please help and remove unfriendly obstacles in the work. Arrange the tables, chairs and other furniture and home appliances in the home neatly, and the host will clean it smoothly and return you a clean and new home.
- Page 19 Please do not stand in narrow places such as thresholds and aisles, so as to prevent the host from missing scans. When the host is performing work, please ensure that no objects with the lowest edge less than 1.8 cm are placed in the cleaning area to prevent the host from climbing and getting stuck. Power cords, toys and other sundries scattered on the ground may trip or entangle the host, please remove the sundries carefully.
- Page 20 4.2 Operation Guide Assemble the base station Align the washable tray with the installation position of the base station, push it into the base station, and press the buckles on both sides to fix the washable tray. Add water to the and add an appropriate amount of clean water (4500ml is recommended).
- Page 21 place dust place dust Open the top cover, insert the dust bag guide plate into the dust bag stop of the base station, and the dust bag handle should be fully inserted into the dust bag guide plate. Close the top cover. place cleaning solution Peel off the cleaning fluid sealing sticker, open the top cover of the base station and insert the cleaning fluid vertically.
- Page 22 place base station Place the base station flat against the wall, do not place objects within 1M to the left and right and 2M in front, and do not have objects with strong reflective surfaces such as mirrors. Then connect the power. Long press the power button of the machine to turn on the machine, all the lights are on, and enter the waiting command mode.
-
Page 23: Automatic Charging
Power on and charge Press and hold the power button of the sweeper to turn on the machine. In any mode, press the "Recharge" button on the main unit or the "Recall" button on the base station to automatically recharge the sweeper. You can also click the recharge button on the APP to make the machine recharge automatically. - Page 24 Base station touch buttons and display Click the base station self-cleaning button. (If the sweeper is in the base station, it will exit the base station about 50cm to enter the waiting command mode.) The base station will add water to the cleaning tank for self-cleaning, and will automatically drain the sewage after cleaning.
-
Page 25: Key Function
Key Function Long press to switch between power on and off, short press after power on to switch between start cleaning and pause cleaning. Long press to activate host hotspot for network configuration. After powering on, short press the main unit to start recharging. Sleep mode means that the machine is in a stopped state, and the control button lights are off. -
Page 26: Cleaning Mode
cleaning mode For the first time, you can activate the APP to quickly build a Figure function, the machine will independently explore the indoor environment, and the fastest 8 minutes to build a 100 square meter Figure. The machine will perform intelligent multi-zoning according to the room environment. First extend an area and then carry out the bow-shaped planning and cleaning. - Page 27 It is only applicable to APP operation, and the restricted area is divided on the APP, and the sweeper will automatically avoid the area. Location A Location B...
- Page 28 Connect APP to open more modes Single mopping mode: The machine only mops the floor (the side brush and the roller brush are turned on, and the fan is not turned on). Single sweeping mode: raise the mop, turn on the side brush, roller brush and fan. Sweeping and mopping integrated mode: Turn on the fan, side brush, and roller brush, and the mop fits the ground, applying pressure or rotating.
- Page 29 5.1 Side brush cleaning and replacement Check the condition of the side brush from time to time to see if it is damaged or entangled with foreign objects. Clean the side brush with a cleaning tool or a rag. When the side brush is damaged and cannot be used, please replace it in time.