Table of Contents
Advertisement
Quick Links
HDMI Microscope
Model:EDM401 Max/EDM402 Max
User Manual
Please read this user manual carefully and keep it for future reference.
Should you encounter any problem, please contact us by following e-mail.
Most technical questions can be answered through our knowledge base.
Customer service: support@elikliv.com
Advertisement
Table of Contents

Related Manuals for Elikliv EDM401 Max


Summary of Contents for Elikliv EDM401 Max
- Page 1 HDMI Microscope Model:EDM401 Max/EDM402 Max User Manual Please read this user manual carefully and keep it for future reference. Should you encounter any problem, please contact us by following e-mail. Most technical questions can be answered through our knowledge base.
-
Page 2: Table Of Contents
Read Me First Packing List Installation Quick Start Parts Description Detailed Operation 1. Save Photos/Videos With Micro SD Card 2.Howtopowerupthemicroscope? 3. How to Make the LED Lights Work 4. How to Use the Transmitted Light Stage and Slide Kit 5. Switch Different Modes 6. -
Page 3: Read Me First
Also, this product is not intended for medical use. 3. For user’s safety, Elikliv EDM401 Max/EDM402 Max don’t come equipped with battery, they should be plugged into the wall socket with AC adaptor (included ). Or they can be connected with power bank/ computer/laptop to work. -
Page 4: Packing List
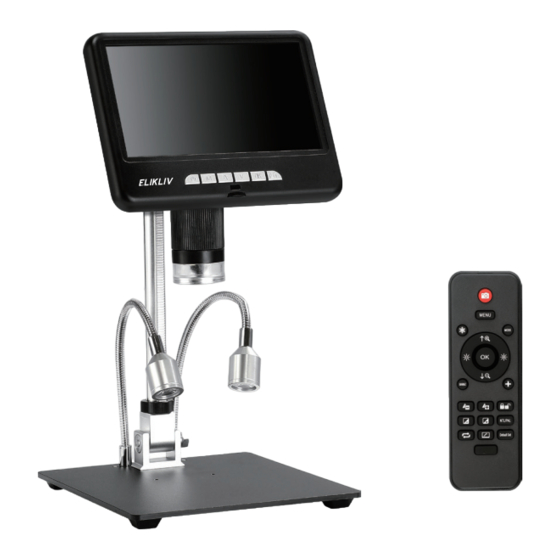
Packing List 1. Packing List (Model: EDM401 Max) 7" Microscope Base Plate 10 inch Stand Power Supply Cable USB Cable for conne Remote Control for supplying power cting to a computer HDMI Cable for conne 32G Micro SD Card 5V 2A Adaptor... - Page 5 Please read this user manual carefully and keep it for future reference. Should you encounter any problem, please contact us by following e-mail. Most technical questions can be answered through our knowledge base. Customer service: support@tomlov.com 64G Micro SD Card UV Lens User Manual E-mail: support@Elikliv.com...
- Page 6 Standard delivery and optional accessories for different models What’s included EDM401 Max EDM402 Max Microscope unit √ √ √ Base Plate (7.9*4.7”) Base Plate (7.9*7”) √ Stand (10 inch ) √ √ Stand (6 inch ) √ Remote Control √...
-
Page 7: Installation
Installation (1) How to Install the Stand Step 1: Screw the stand on the base. Step 2: Rotate the black ring clockwise one or two turns. E-mail: support@Elikliv.com... - Page 8 Step 3: Screw the rod clockwise. Step 4: Screw the black ring clockwise to fix the bracket tightly. (2) How to Install the Monitor Step 1: Insert the monitor and tighten the two little screws. E-mail: support@Elikliv.com...
- Page 9 Fix the clips into the stand base according to your need. The stage doesn’t move smoothly on the base after the clips installed, so if you use button transmitted light stage with DM401 Pro/DM402 Pro microscope,We recommend that you don’t install the clips. E-mail: support@Elikliv.com...
- Page 10 (4) How to Install the Extension Tube (Only available for EDM401 Max ) Step 1: Screw the extension tube on the base. Step 2: Screw and fix the holder on the extension tube. E-mail: support@Elikliv.com...
-
Page 11: Quick Start
4. Adjust to get suitable 5. Rotate the knob to 6. Press to capture distance and clear zoom & focus an image, image press to start and stop a video recording . E-mail: support@Elikliv.com... -
Page 12: Parts Description
Focusing Knob Stand Lens Cover Side Light Metal Base Power ON / OFF Mode / Menu Up / Digital Zoom + Down / Digital Zoom - ① Confirm ② Start/Pause video recording Photo Button for capturing an image -10- E-mail: support@Elikliv.com... - Page 13 Micro USB Slot Micro SD Card Slot HDMI Output Micro USB(to power up the microscope) Main Power Supply Base Light Brightness + Turn On/Off Microscope Base Light Brightness - Base Light Power Slot -11- E-mail: support@Elikliv.com...
- Page 14 Negative Film: Press this button to set negative filter. Black & White: Black and white photo. Rotate Image: Rotate the image vertically. Mode: Switch the modes among photo, video and playback. Up/Zoom +: Zoom out Down/Zoom -: Zoom in Cross Line: Turn on/off cross line -12- E-mail: support@Elikliv.com...
- Page 15 2. The best distance between the remote control and microscope is 10cm-15cm. 3. Please wait a moment so that the microscope can follow and run the instruction after pressing the button on the remote control. Don't press the buttons too quickly. -13- E-mail: support@Elikliv.com...
-
Page 16: Detailed Operation
2. How to power up the microscope For user’s safety, Tomlov DM401/DM401 Pro/DM402 Pro don’t come equipped with battery, they can be plugged into the wall socket with AC adaptor. (1) Connect the power cable to the microscope as the photo below : -14- E-mail: support@Elikliv.com... - Page 17 (2) Connect the microscope to a suitable power socket using the AC adaptor. Please only connect the provided power supply AC adaptor. Using an incorrect voltage can substantially damage the microscope. Or they can be connected with power bank/computer/laptop to work. -15- E-mail: support@Elikliv.com...
-
Page 18: How To Make The Led Lights Work
There are main LED lights (around the camera)and 2 side LED lights (on the base),they are powered and controlled separately. Main LED Lights Two Side Lights (1) How to make main LED lights to work Connect power cable to power supply, the lights are on automatically. -16- E-mail: support@Elikliv.com... - Page 19 Rotate the light control knob to adjust the brightness. (2) How to make the side lights work Press brightness + or brightness - to adjust the brightness of the side lights. -17- E-mail: support@Elikliv.com...
- Page 20 Disconnect the power cable from the base slot to turn off the side lights. Notice : Don't press On/Off button to turn off the lights.The button is used to turn on/off the microscope. -18- E-mail: support@Elikliv.com...
-
Page 21: How To Use The Transmitted Light Stage And Slide Kit
4. How to Use the Transmitted Light Stage and Slide Kit (Available for EDM401 Max /EDM402 Max ) (1) How to power up the buttom light stage ① Disconnect the power cable ② Connect to the cable with the stage. -
Page 22: Switch Different Modes
2. Please turn off main light firstly before use. 5. Switch Different Modes There are 3 modes with the microscope: Photo, Video and Playback. Default setting is video mode. Press M button on the monitor or Mode button on remote control to switch mode. -20- E-mail: support@Elikliv.com... -
Page 23: Capture Photos
There is photo icon on the screen when the image captured. 7. Record Videos Press OK button on the microscope or remote control to start / stop video recording . 00: 00: 13 -21- E-mail: support@Elikliv.com... -
Page 24: Photo/Video Playback And Files Management
Press Up/Down button to choose. Press OK button to confirm. Preee M button to return. Files locked can't be deleted in the microscope. (Please note the locked filed still can be deleted when deleting files in computer.) -22- E-mail: support@Elikliv.com... -
Page 25: Connect With Hdmi Tv
(1) Connect the microscope with the HDMI cable. (2) Connect the power supply via the power cable . (3) The microscope is switched on automatically when connected with the power supply.The image be showed on the HDMI monitor. -23- E-mail: support@Elikliv.com... -
Page 26: Connect With Pc
(2) Connect the power supply via the power cable . The microscope is powered by the computer via USB cable when connected with PC,so the power cable doesn’t need to be connected to the micro USB slot of the microscope. -24- E-mail: support@Elikliv.com... - Page 27 PC mode. Mass Storage: Can download the pictures or video files to the computer. PC Camera: Can show the real time video in the computer. Press Down button to choose PC Camera press OK button to confirm -25- E-mail: support@Elikliv.com...
-
Page 28: Work With Windows
(1) Connect the microscope with computer by the USB cable and the microscope is switched automatically . (2) Press DOWN button to choose PC Camera and press OK button to confirm. (3) Run Windows Camera, it shows the image as below, -26- E-mail: support@Elikliv.com... -
Page 29: Work With Mac
(Mac shows the image is a mirror image) Note: Photo Booth shows a mirror image when connected with Mac/iMac. However,the recorded image or videos are normal.So please view the recorded files in Mac/iMac. Or Connect the microscope with windows PC for normal image view. -27- E-mail: support@Elikliv.com... -
Page 30: Menu Settings
Press M button (Menu button on the remote control ) to exit menu . Press Up / Down key on the monitor to choose setting ,OK button to confirm setting. Resolution: Set video resolution 2880x2160P 24fps/2560x1440P30fps//920x1080P60fps/ 1920x1080P30fps/1280x720P120/1280x720P60/1280x720P30 Exposure: Adjust exposure +0.0,+1/3,+2/3,+1.0,+4/3,+5/3,+2.0,-1/3,-2/3,-1.0,-4/3,-5/3,-2.0 -28- E-mail: support@Elikliv.com... - Page 31 Freeze: Freeze an image on the screen to observe, Set Freeze Off/ On Contrast: Low / Medium / High Color: Normal /Black & White / Sepia/ Negative Color: Normal Color: Black & White Color: Sepia Color: Negative -29- E-mail: support@Elikliv.com...
- Page 32 Default photo resolution is 2MHD with 16:9 aspect ratio. And the microscope screen is 16:9 too. All other resolutions come with 4:3 aspectio ration,so if it set other resolution,the image is display correctly,just with black screen edges as the photo below. -30- E-mail: support@Elikliv.com...
- Page 33 White Balance: Auto / Daylight / Cloudy / Tungsten / Fluorescent Color: Normal /Black & White / Sepia/ Negative ISO: Auto/ 100/200/400 Exposure: Adjust exposure +0.0,+1/3,+2/3,+1.0,+4/3,+5/3,+2.0,-1/3,-2/3,-1.0,-4/3,-5/3,-2.0 System Setting Enter video/photo setting ,press M button again to enter system setting . -31- E-mail: support@Elikliv.com...
- Page 34 4 horizontal lines. 5/6/7/8 are 4 vertical lines. Direction: HOR/VER Show or adjust Line direction. HOR refers to horizontality, VER refers to verticality. Location: Set line postion. Color: Set line color . Red/Black/Orange/Green/White/Yellow/ Transp Art(transparent Color) Wide: Set line width. -32- E-mail: support@Elikliv.com...
- Page 35 Version: Display current firmware version. Save Settings Press power button to save all setting above. If the microscope is switched by pressing the ON/OFF button on the power cable or disconnecting power cable ,setting can’t be saved. -33- E-mail: support@Elikliv.com...
-
Page 36: Specifications
Specification IPS 1024x600(EDM401 Max) Screen Resolution IPS 1280x800(EDM402 Max) 24M 5600x 4200/20M 5200*3900/ 16M 4640*3480/12M 4032x3024/ Photo Resolution 10M 3648x2736/8M 3264x2448/ 5M 2592x1944/3M 2048x1536/ 2MHD 1920x1080/VGA 640*480/1.3M 1280x960 2880x2160P 24fps/2560x1440P30fps/ Video Resolution 1920x1080P60fps/1920x1080P30fps/ 1280x720P120/1280x720P60/1280x720P30 Video Format Zoom 1200x Storage Micro-SD card, 32GB(recommended) or 64GB... -
Page 37: Faq
Enter menu, then choose “SETTING”, find “FORMAT”, then choose “ OK”and press the OK button to confirm the formatting. If it still can’t work ,please connect the microscope with computer and format the Micro SD card in computer. -35- E-mail: support@Elikliv.com... -
Page 38: Get Support
However, content of this manual and/or product specifications are subject to change without prior notice and with no direct or indirect liability on Elikliv Electronics’ part concerning such change. Copyright and registered trademark Elikliv, Elikliv are registered trademarks. - Page 39 All About Details...
Need help?
Do you have a question about the EDM401 Max and is the answer not in the manual?
Questions and answers