Advertisement
Quick Links
Advertisement

Related Manuals for Daily Youth Q3M


Summary of Contents for Daily Youth Q3M
- Page 1 Multi-function Foldable Motorized Treadmill - 1 -...
-
Page 2: Table Of Contents
Thank you very much to choose our products. Before installation and usage, please read the instructions carefully. Contents I. Warning, main technical parameters and features ………………………………………………………1 II. Product introduction ……………………………………………………..…………………………………3 III. Product explosion diagram …………………………………………………………….…………………4 IV. Particular sheet of explosion diagram ………………………………………………...…………………5 V. - Page 3 Main technical parameters Input power voltage: AC220V-240V(50Hz-60Hz) Rated voltage:7.2A Operating ambient temperature:0~40℃ Motor power:1300W Scope of operating speed: 1~12 (km/h) Gradient regulating range: Manual incline, two levels Time display range:0:00~99:59(M:S) Scope of distance display: 0.00~99.90(km) ...
-
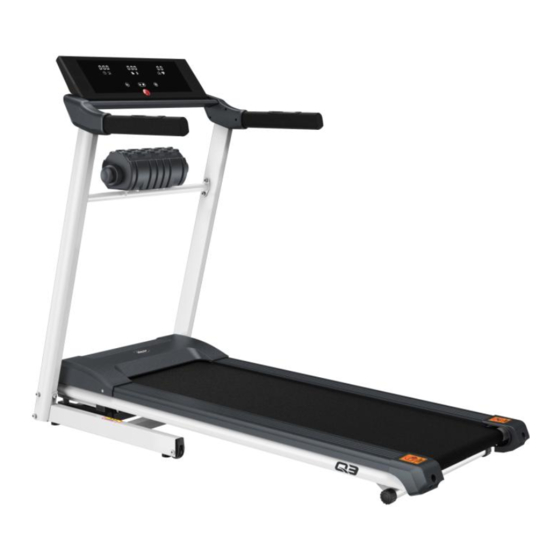
Page 4: Product Introduction
II. Product introductions Screen Safety switch Audio input port Handheld cardiotachograph and speed regulating button Right armrest Handheld cardiotachograph and start-up/stop button Left armrest Right upright pole Massage head Massage tape Motor’s protective cover Left upright pole Upper edge strip Running belt Right regulating box Underframe... -
Page 5: Product Explosion Diagram
III. Product explosion diagram - 5 -... - Page 6 IV. Explosion chart list Part name Qty. Part name Qty. Left upright pole modules Foot pad M6X25 hexagon socket head cap Isolation shim screw M12X45 hexagon socket pan head M6 flat shim screw Header Isolation shim Safety switch Anti-loosing clip M6X10 large crossed flat head Right upright pole modules tapping screw...
- Page 7 V. Installation procedures Each part of the electric treadmill has been strictly assembled and debugged before leaving the factory. As long as they are installed according to the following steps, an electric treadmill will be easily installed. Step I: Installation of upright poles. Lift out the Step II: Installation of electronic meter.
- Page 8 Step III: Installation of massage head fixing Step IV: Installation of massage head. Take out parts. Align the holes at the two ends of the the massage head and put it at the clip of the massage head with the holes on the left and massage module.
- Page 9 Step V: Removal of the anti-loosing clip. Loosen Step VI: Installation of massage belt. Take out and take out the fastening screw on the the massage bet and plug the round buckles at anti-loosing clip and take good care of it. After the two ends of the massage head into the axis you fold the running platform, please loosen the of the massage head as shown in following...
- Page 10 6.1.1 " " Time window: to display the time. It counts time from 0: 00 to 99: 59 forward and when it’s99: 59, the treadmill runs steadily. Slow down the speed to stop first. When it displays "End" and after the treadmill stops running for 5 seconds, the treadmill enters standby state. The time window counts the time from the set time to zero backward.
- Page 11 6.2.3 " "Control key of power amplifier: to control the music switch (on/off). 6.2.4 "+", "-" Speed +/- key: to regulate the set value in the standby state. After the treadmill is started, this key is used to regulate the speed. The speed regulating amplitude value is 0.1 at a time.
- Page 12 treadmill will make a warning tone: Bi-Bi-Bi. The speed will decrease until the treadmill stops running. The window displays "End". 5 seconds later, the treadmill returns to the standby state and the buzzer will make a long warning tone: Bi-Bi. In the manual mode, if the time accumulates and exceeds 99: 59(100minutes), the treadmill will automatically stop running.
- Page 13 6.7 User’s self-defined program: The treadmill consists of 12 built-in programs as well as 3 user’s self-defined programs: U01, U02, U03, which allow the users to set the treadmill by themselves. 6.7.1 Setting of user’s self-defined program: In the standby state, continuously touch the" "...
- Page 14 between 20 and 40. If the FAT is less than 19, it means that the user is too thin. If the FAT is between 25 and 29, it means that the user is overweight. If the FAT is over 30, it means that the This data is for reference only and can’t be used as medical data.
-
Page 15: Use Method And Safety Protection For Treadmill
down until to stop by pulling off the safety lock; put the safety lock in the place again and reset the equipment waiting for entering order. 6.14.3 If you have any questions about the treadmill, please contact the distributor. It is not allowed for laymen to disassemble or maintain the treadmill for fear of damaging the treadmill. -
Page 16: Precautions
pick up the treadmill frame with hands, stamp the air spring casing so that the air spring can retract into the casing, and slowly set the treadmill level in order. The stamping for air spring casing is as shown in the figure. 3. -
Page 17: Daily Servicing And Maintenance Of Electric Treadmill
3.7 The strength should be equal when the hands are on the armrests and run on it straightly to avoid belt deflection. 3.8 When people run in a normal state, the two hands should be moved from the armrests. The arms can be swung boldly so that the exercise result may be better. - Page 18 4.1 Although all treadmills have been adjusted at exworks, the running belt may become loose after the treadmill is used for some time. The maintenance is mainly carried out by the user. If the running belt is too loose, the skidding phenomenon of running belt and drum may occur when you step on the running belt.
- Page 19 X. General fault shooting methods: Fault or phenomenon Possible reasons Handling method A. Power is not plugged or there is no Plug the power lines into the AC power supply. current, or check the AC socket Switch the power to “ON” B.
-
Page 20: Precautions For Exercise
C. The motor is idling Error report of undercurrent; Please assembly and test the machine. A. The torque of the drive is overlarge Adjust the torque potentiometer to the E10-generally proper location moment peak value of the motor is abnormal B.
Need help?
Do you have a question about the Q3M and is the answer not in the manual?
Questions and answers