Table of Contents
Advertisement
Quick Links
Advertisement
Table of Contents

Related Manuals for Daily Youth GT5Ds


Summary of Contents for Daily Youth GT5Ds
- Page 1 GT5Ds DC Commercial Motorized Treadmill...
-
Page 2: Table Of Contents
Thank you very much to choose our products. Before installation and usage, please read the instructions carefully. Contents I. Warning, main technical parameters and features ………………………………………………….…….....1 II. Product introduction ……………………………………………………..…………………………………....3 III. Product explosion diagram …………………………………………………………….………………..…..4 IV. Particular sheet of explosion diagram ………………………………………………...…………………....5 V. - Page 3 Main technical parameters Input power voltage: AC220V-240V (50Hz-60Hz) Rated voltage: 16.7A Operating ambient temperature: 0~40℃ Motor power: 3000W Scope of operating speed: 1~18 (km/h) Gradient regulating range: 0-18% Time display range: 0: 00 ~ 99: 59 (M: S ) ...
-
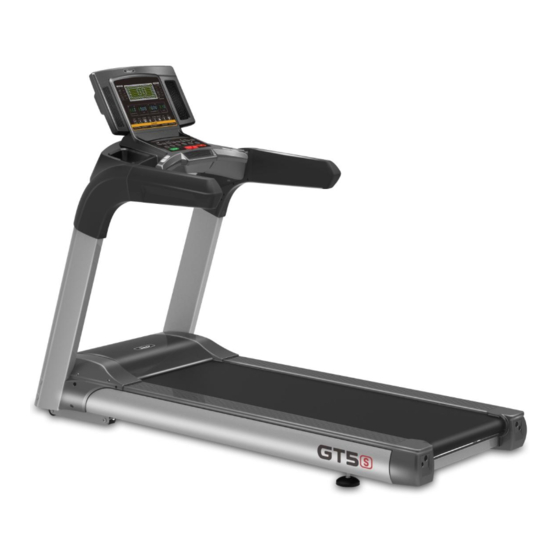
Page 4: Product Introduction
II. Product introduction Screen Safety switch Meter head Right armrest Left armrest Right upright pole Left upright pole Upper protective cover Upper edge strip Running belt Right regulating box Erector Edge strip at Treadmill frame left side Left regulating box... -
Page 5: Product Explosion Diagram
III. Product explosion diagram... -
Page 6: Particular Sheet Of Explosion Diagram
IV. Particular sheet of explosion diagram Part name Qty. Part name Qty. Meter head Welding part of left upright pole M6X25 hexagon socket head cap bolt M10 small flat gasket M6 flat shim Bulkhead of upright pole Screen M10X30 round head hexagon socket screw Safety switch M8X16 hexagon socket pan head screw Decorative element at lower left of the... -
Page 7: Assembly Step
V. Assembly step All parts of electric treadmill have been strictly assembled and debugged before the ex works. An electric treadmill can be easily assembled into if the installation is carried out by observing following steps. Step I: Install upright pole: Open the packing box (box Step II: Install meter head: Open the packing box (box B) and then bring out the treadmill. -
Page 8: Display And Function Operation Of Electronic Meter
Step V: Install bulkhead and power line: Firstly, plug the installing holes below the left and right upright poles and the meter head with 6 bulkhead; finally, connect the power line with one-piece power switch of the treadmill (note: guarantee the power line is off before connecting the power line, so as to avoid personal injury), as shown in the figure below: Step VI: Carefully check if each part of the treadmill is tightened. - Page 9 2. Instructions to display function: 2.1 “Incline /Pulse” Window: Displays the current slope value, with a slope display range of 0-18 segments. The system can automatically detect the heartbeat frequency of the sporter and display the heartbeat value in this window when the sporter holds the heartbeat sensing handle with both hands. The heartbeat value display range is 50-200 beats/minute.
- Page 10 3.5 “Lose weight” key: Under the standby state, press this key to directly select lose weight. 3.6 “Burn fat” key: Under the standby state, press this key to directly select burn fat. 3.7 “Mountain” key: Under the standby state, press this key to directly select Mountain. 3.8 “Half marathon”...
- Page 11 reference of exercise, and cannot be used as medical data) when the sporter holds the heartbeat handle with both hands. 4.3 Manual mode: 4.3.1 Press the "Start" key directly in the standby state, and the treadmill will start running at a speed of 1.0km/h and a slope of 0.
- Page 12 Speed P02- Mountain Incline Speed P03-Warm up Incline Speed 12 12 12 P04- Lose weight Incline Speed 12 12 12 P05- Burn fat Incline Speed P06- Half marathon Incline Speed P07- Relax Incline Speed 10 10 12 P08- Sprint Incline Speed P09- Random Incline...
- Page 13 settings are completed. 4.5.3 Setting description of user defined program: Each program divides operating time into 16 time section. During setting, complete settings of speed, lifting time and operating time of 16 time sections so that start key can be pressed to start the treadmill.
-
Page 14: Use Method And Safety Protection For Treadmill
6.Power saving mode: This system has power saving function. If there is no key command input within 10 minutes in standby state, the system enters power saving mode, automatically turns off the display, and presses any key to wake up the system again. 7.MP3 function: When MP3 or other audio equipment is connected after power is applied, the electronic watch can play music. -
Page 15: Precautions
3. Safety protection for treadmill 3.1. In any emergency, as long as the exerciser takes off the safety lock, the treadmill may be power off. Therefore, when you are exercising, please be sure to clip the safety lock on the appropriate position the on your clothes to ensure the safety. -
Page 16: Daily Servicing And Maintenance Of Electric Treadmill
4. Additional precautions 4.1 The cardiac should not use the electric treadmill alone. 4.2 Determine the running speed according to your physical conditions; and the sick should not use the treadmill or use it under the instruction of a doctor. 4.3 The heart rate sensor is not a medical facility and the detection results are for reference only. -
Page 17: Elimination Methods For Common Faults
Adjust the treadmill speed to 1.5 km/h, grasp the armrest forcefully with both hands and prevent the operating of running belt with feet. At this time, if the running belt stops running, the front drum continues running, but the running belt continues running after being released, indicating that the running belt is excessively loose. - Page 18 Fault or phenomenon Possible reasons Handling method A. power is not plugged or there is Plug the power lines into the AC current, or no power supply. check the AC socket B. The power switch is not on. Switch the power to “ON” C.
-
Page 19: Precautions For Exercise
(with 24C02 actuator place (non-switching power supply) position of lower PIN1 externally) B. Storage IC is damaged or Replace storage IC or actuator relevant lines are poor A. Treadmill is erected or placed Adjust and horizontally place treadmill not horizontally E09- inversion error (with inverted actuator) B.
Need help?
Do you have a question about the GT5Ds and is the answer not in the manual?
Questions and answers