Table of Contents
Advertisement
Quick Links
Advertisement
Table of Contents

Subscribe to Our Youtube Channel
Related Manuals for ESY Sunhome HM6


Summary of Contents for ESY Sunhome HM6
- Page 1 HM6 Household Inverter User Guide & Installation Manual ESY Sunhome Co., Ltd...
-
Page 2: Table Of Contents
5.4 Ground Wire Connection fieldsof technology. After two years of intensive effort, the team successfully developed and Maintenance Personnel tested PV home energy storage products, resulting in the official launch of the HM6 series 5.5 Load Connection 1.3 Important Safety Information storage system products on January 14th, 2023. -
Page 3: Precautions
1.1 General Statement Statement 7. ESYSUNHOME Tool This manual applies to the HM6 residential energy storage system. Please read this manual 7.1 ESYSUNHOME Tool Connection carefully and strictly adhere to all safety instructions during installation, operation, and maintenance. ESY SUNHOME will not be liable for any consequences arising from noncompliance 7.2 ESYSUNHOME Tool Functions... -
Page 4: Important Safety Information
1.3 Important Safety Information Warning! Make sure that the input voltage of the inverter’s PV port never exceeds the maximum value. Exceeding Before device installation, operation and maintenance, please read this manual carefully. the maximum voltage may result in permanent damage to the inverter or other losses, [please Make sure that the product is effectively grounded before operation. -
Page 5: Product Introduction
3.1 Overview PV input backfeed short circuit current 0 Ad.c. ESYSUNHOME HM6 Intelligent Home Inverter is a 6kW power conversion equipment. It can be Grid connected with the battery, and the Internet, allowing connections to the grid, photovoltaic panels, Single-phase (L+N+PE) and the Internet of Things. -
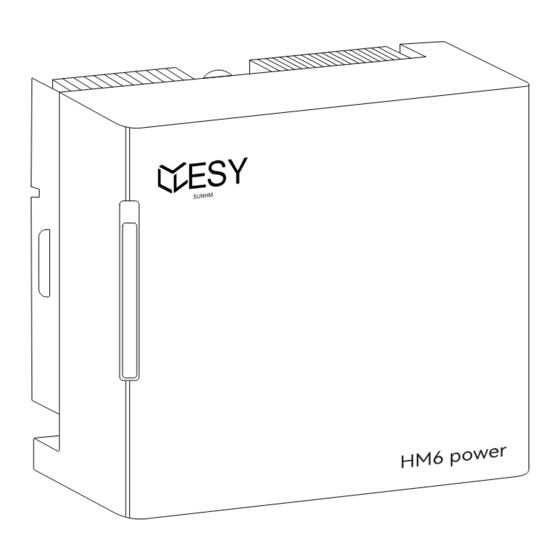
Page 6: Appearance
OVC Il (for PV/Battery); OVC Ill (for AC Gird Mains) Protection Over/under-voltage, over /under-frequency, overload, Purpose of each lateral mark on the HM6 inverter chassis short circuit, over-temperature, reverse polarity of PV module and battery, leakage current, insulation Mark Purpose resistance, anti-island protection. -
Page 7: Nameplate Identification
4. System Installation ESYSUNHOME: brand 4.1 Packing List HM6: model, indicating that the inverter specification is 6 kW. 4.1.1 Packing List of HM6 Residential Energy Storage System Before installation, please carefully check the product and its accessories against the packing list. -
Page 8: Hm6 Inverter Base Packing List
HM6, English WiFi-IOT Pro optional Network cable Open-end wrench Utility knife Crimping pliers crimping pliers S=7mm Safety 4.1.2 HM6 Inverter Base Packing List Name Specifications Quantity Schematic Diagram Bracket 600 mm×305 mm×44.1 mm Safety gloves Dust mask Goggles Silicone, black, matte, Waterproof 4.2.2 Selection of the Installation Environment... -
Page 9: Selection Of Installation Location
The clearances around the inverter must not be less than the following: Front Rear Left Right (door side) 800 mm 1000 mm 40 mm 300 mm 600 mm 800 mm Right (door side) Left 600 mm 300 mm Do not install it in a wet place or in water. Do not install it in areas prone to lightning strikes. -
Page 10: Drilling
Install all cables through the back of the door to avoid safety hazards. 4.3.3 Installation Note: Please use the provided base for installation of the HM6 inverter. Tools: Ruler, screwdriver, angle iron screws (M4x12 mm), inverter angle iron, wall plugs and screws (6x40 mm). -
Page 11: Connection With Battery
The following wiring diagram is applicable to Australia, New Zealand, South Africa, and other Ground wire Reserved interface regions: Ground wire Reserved interface SW-air switch Signal cable for enabling Reserved interface HM6 Inverter Main Panel Emergency loads Solar panels battery discharge Reserved interface SW-air switch Signal cable for enabling Reserved interface... -
Page 12: Ground Wire Connection
The following wiring diagram is applicable to regions other than Australia, New Zealand, and South Africa: HM6 Inverter Main Panel Solar panels Emergency loads RS485 RS485 wifi/Bluetooth wifi/Bluetooth DRMS DRMS PV1+ PV2+ PV1+ PV2+ Be cautious PV1- PV2- PV1- PV2-... -
Page 13: Power Grid Connection
The HM6 inverter does not support parallel operation. Do not connect the load terminals in parallel. -
Page 14: Electricity Meter Connection
5.7 Electricity Meter Connection 5.7.1 Electricity Meter Installation Tools: screwdriver (small cross), network cable, network cable pliers, stripping pliers, tape, electricity meter guide rail, slide rail screws, marker, hammer, electric drill, expansion screws, electricity meter screws RS485 wifi/Bluetooth DRMS PV1+ PV2+ PV1- PV2-... -
Page 15: Electricity Meter Configuration
HA 210510. 5.7.3 Use of Electricity Meter Press “SET” to enter the “LA” setting interface. When the HM6 residential energy storage system is working, the total electricity, the total electricity ▲ ▼ purchased, sold, and other and other information of the power grid can be viewed on the electricity meter. -
Page 16: Pv Connection
Schematic Diagram Symbol Description Symbol Description Schematic Diagram Frequency Ⅲ kWh Energy Sold Ⅲ ▲ ▼ ▲ ▼ 5.8 PV Connection Schematic Diagram Symbol Description Tools: PV+ connector, PV- connector, PV crimping pliers Before wiring, cover the shading plate and ensure that the photovoltaic components are within a safe voltage range. -
Page 17: Communication Interface
Caution (RJ45 Interface) Interface Make sure that the maximum input voltage of the HM6 residential energy storage system does not Electricity meter connection. Description exceed 550 V (since the open circuit voltage of the PV module is higher at low temperature than that at normal temperature;... -
Page 18: Power-On
5.11 Switching Country Code Refer to the table below for DRM mode explanation. This product is only applicable to DRM0 mode. Factory default country code is set to Australia. To switch, authorized personnel from the manufacturer or authorized personnel should use the Mode Requirement upper computer or management platform to change the country code. -
Page 19: Esysunhome App
6. ESYSUNHOME APP ESYSUNHOME APP features include: viewing inverter status and power generation data; real-time viewing and switching of inverter operation modes; scheduling inverter operation modes; turning 6.2.3 Device Network Configuration on/off operations, etc. Open the APP, log in to the account, click “Me” and configure the network User permission: End users of the inverter. -
Page 20: Data Statistics
Users will link their devices on the app and 6.4.3 Revenue Data configure the network. Once the configuration is successful, data from the HM6 inverter will be Click “Revenue” on the home page to enter the revenue display interface. - Page 21 7. ESYSUNHOME Tool ESYSUNHOME Tool is an upper computer software designed for HM6 inverter. It includes functions such as inverter parameter viewing, inverter settings modification, fault alarm viewing, battery T/R+ T/R- parameter and status viewing, etc. User permissions: Read only: User or inspector. These settings can be able to be viewed by the user/inspector.
- Page 22 Number of arguments in a single line: 3 Navigation Bar Name Echo Unit Name Name Settings MCU SW Ver. 1005 DSP SW Ver. 1002 Scene DSP HW Ver. System Current Mode Battery First CONFIG DCDC TEMP. 52.0 ℃ BUS VOLT. 414.2 ALARMS Total E-Generated...
- Page 23 9. System Maintenance 9.1 Shutdown Procedure and Periodic Maintenance To ensure reliable and long-term service of the system, perform the following steps to check and power off the system once a month: Step1﹕ Turn off the device and disconnect the breakers for battery, photovoltaic, grid, and load. Step2﹕...
Need help?
Do you have a question about the HM6 and is the answer not in the manual?
Questions and answers