Table of Contents
Advertisement
Quick Links
i.Am
Refrigerated wine bottle display
cabinets
H2000
INSTRUCTIONS FOR INSTALLATION,
OPERATION AND MAINTENANCE
Read this manual carefully before installing and using the product. Keep this manual with the product for future reference.
International style
with Italian flavour
Code
H2000 FIT
H2000 MIX
Dual Vent
EN (USA)
H1600
Advertisement
Table of Contents

Related Manuals for Enofrigo H2000

Summary of Contents for Enofrigo H2000
- Page 1 EN (USA) Refrigerated wine bottle display cabinets H2000 H2000 FIT H2000 MIX H1600 Dual Vent INSTRUCTIONS FOR INSTALLATION, OPERATION AND MAINTENANCE Read this manual carefully before installing and using the product. Keep this manual with the product for future reference.
- Page 2 H2000 VT L1V3SN* i.Am H2000 VT L1V3DN* i.Am H2000 VT L1V3LN* i.Am H2000 VT L1V3MN* i.Am H2000 VT TROPICAL L1W3SN* i.Am H2000 VT TROPICAL L1W3DN* i.Am H2000 VT TROPICAL L1W3LN* i.Am H2000 DUAL VENT L2V3SN* i.Am H2000 DUAL VENT L2V3DN* i.Am H2000 DUAL VENT...
-
Page 3: Table Of Contents
– The product must only be used for the purpose for which it has been expressly designed and made by Enofrigo . Enofrigo cannot accept any responsibility, contractual or otherwise, for injury to per- sons or animals or damage to property deriving from incorrect installation, operation, settings or... -
Page 4: General
General warnings and safety precautions IMPORTANT! – This manual is the intellectual property of Enofrigo . Copying its contents or transmitting them to others is strictly forbidden. All rights reserved. This manual is an integral part of the appliance. It must accompany the appliance at all times, even if the appliance is sold or transferred to another owner, so that it can be consulted by the user or person responsible for servicing or repair. -
Page 5: Stop
STOP! STOP! – Do not modify or attempt to repair the appliance yourself. All repairs must be referred to a qualified technician. – Store flammable or explosive materials (e.g. aerosol cans containing flammable propellants) in or near the appliance. – Do not use electrical equipment of any kind inside the cabinet. –... -
Page 6: Description Of The Appliance
A wide range of models is available to satisfy different space requirements, and to display different quantities of wine in different ways. Two ranges are available: H1600 and H2000. H2000 models are also available in a DUAL VENT version incorporating two separate and independent compartments that can operate at different temperatures as needed. -
Page 7: Structure
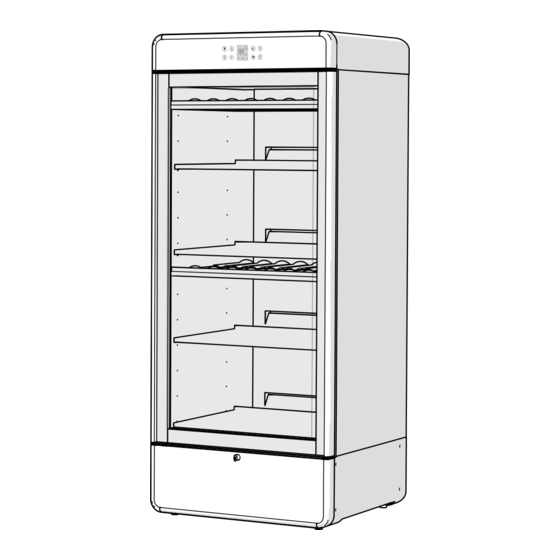
Structure Dual Vent Door Roll bond evaporator protection panel Glass Lock Fan protection grille Shelves Removable drawers Roll bond evaporator Structure i.Am i.Am LED light 1600 2000 Control panel Adjustable feet Condensate collection tank Power cable and plug Motor protection grille Top compartment (*) Bottom compartment (*) Only for DUAL VENT models... -
Page 8: Safety Devices
– Motor protection grille – Fan protection grille Technical specifications i.Am DESCRIPTION H1600 H2000 Capacity US gal (l) 125,5 (460) 158,5 (600) T.A. 86°F (30°C) - U.R. 55% °F (°C) 36 (+2) / 68 (+20) -
Page 9: Control Panel
Control panel FUNCTION KEYS DISPLAY LIGHT ON / LIGHT OFF: switches cabinet lighting on/off. Lock ON: keypad lock on. OFF: keypad lock off. ON/STAND BY: hold down for over 3s to switch from ON to STAND BY or vice-versa Compressor ON: on. -
Page 10: Installation
Dispose of packing materials in accordance with applicable legislation. Dimensions and weight i.Am 2000 i.Am 1600 Fig. 5 Description H1600 H2000 L (in-mm) 32 1/4 - 820 32 1/4 - 820 32 1/4 - 820 D (in-mm) 30 - 760 30 - 760 22 - 554... -
Page 11: Place Of Installation
Place of installation The place of installation must conform to all applicable technical and health standards. Position the appliance in a dry, well ventilated place. In particular: – Do not position the appliance near sources of heat (radiators, ovens, cookers, etc.) or in draughts. –... - Page 12 FORBIDDEN positions Back against wall Narrow niche Fig. 6 PERMITTED positions ✓ Fig. 7 Description H1600 H2000 A (in-mm) 8 - 200 8 - 200 B (in-mm) 8 - 200 8 - 200 C (in-mm) 8 - 200 8 - 200...
-
Page 13: Installation
Installation 2.4.1 Moving Proceed as follows to remove the packaging from the appliance – Move the appliance near the place of installation – Steer the forks (1) of the pallet transporter under the appliance and lift it just clear of the floor –... -
Page 14: Positioning And Levelling
2.4.2 Positioning and levelling – Move the appliance into its final installation position, proceeding in small steps at a time – Very carefully tilt the appliance and adjust the feet (8) – Make sure that the door of the cabinet opens properly. Fig. -
Page 15: Operation
3 OPERATION Preliminary steps 3.1.1 Checks Before switching the appliance on, perform the following checks: – Check that the electrical power supply has been installed by a qualified electrician in conformity to applicable standards – Check that the voltage of the appliance, as stated on the nameplate, corresponds to the voltage of the power socket –... -
Page 16: Putting Into Service
Putting into service BOOST mode Press the key to switch the refrigeration system to BOOST Once you have completed the operations listed in the section " Preliminary steps", the appliance can be put into service. mode (the symbol lights up). In BOOST mode, the cabinet To do so, proceed as follows: cools more quickly, though the temperature setpoint remains –... -
Page 17: Keypad Lock
3.2.3 Keypad lock Proceed as follows to remove a drawer: – Pull out the drawer (3) To activate the keypad lock: – Unscrew the screws (4) holding the drawer runners in place – Press and hold the keys for a few seconds –... -
Page 18: Switching Off
Switching off 3.5.1 Switching off temporarily To switch the appliance off for a short time (e.g. for cleaning or maintenance) proceed as follows: – Press the key. The refrigeration system and the display switch off – pull the plug (1) out of the power socket (2) and turn the supply off at the double pole switch. Fig. -
Page 19: Maintenance
4 MAINTENANCE Good practice It is good practice to clean the outside and inside surfaces of the cabinet at regular intervals. This guarantees correct functioning and an extended working life. External cleaning Clean the outside of the cabinet and the inside of the door every day. Apart from keeping the cabinet looking attractive, this also helps to ensure an extended working life. -
Page 20: Cleaning The Interior Of The Cabinet
4.3.1 Cleaning the interior of the cabinet Switch off the refrigerated cabinet and remove all contents, then: – Clean all internal surfaces using only a cloth damped in a solution of warm water and neutral detergent – Rinse and dry thoroughly with a soft cloth –... -
Page 21: Regular Checks
Regular checks Regular checks are extremely important to keep your refrigerated cabinet fully efficient and to prevent malfunctions. See the table below for a list of checks and check frequencies. Type of check Frequency Precautions Before performing any checks, switch the appliance off as instructed in "Switching off temporarily". -
Page 22: Problems - Possible Causes - Solutions
Problems - Possible causes - Solutions The following table lists the most common problems and solutions. Problem Possible cause Solution The plug has not been correctly inserted in the power Insert the plug correctly socket Check the condition of the power cable. If the cable The appliance does not The power cable is damaged is damaged, contact a qualified electrician to have it... -
Page 23: Technical Assistance And Spare Parts
Problem Possible cause Solution Water inside the refrigerat- Clean the condensate drain as instructed in "Cleaning The condensate drain slot is blocked ed compartment the interior of the cabinet" on page 20 Noise or vibration Feet badly adjusted Adjust the feet correctly Odours inside the refriger- Clean the refrigerated compartment as instructed in "... -
Page 24: Appendices
5 APPENDICES Functional electrical diagram i.Am VENTILATED... - Page 25 i.Am VENTILATED DUAL VENT...
-
Page 26: Declaration Of Conformity
DICHIARAZIONE DI CONFORMITA’ GELIJKVORMIGHEIDS VERKLARING DECLARATION OF CONFORMITY OVERENSSTEMMELSESERKLÆRING KONFORMITÄTSERKLÄRUNG FÖRSÄKRAN OM ÖVERENSSTÄMMELSE DÉCLARATION DE CONFORMITÉ YHDENMUKAISUUSVAKUUTUS ∆ ∆ ∆ ∆ Η Η Η Η Λ Λ Λ Λ Ω Ω Ω Ω Σ Σ Σ Σ Η Η Η Η Σ Σ Σ Σ Υ Υ Υ Υ Μ Μ Μ Μ Μ Μ Μ Μ Ο Ο Ο Ο Ρ Ρ Ρ Ρ Φ Φ Φ Φ Ω Ω Ω Ω Σ Σ Σ Σ Η Η Η Η Σ Σ Σ Σ DECLARACION DE CONFORMIDAD DECLARACÃO DE CONFORMIDADE Rev 05 03/17... - Page 28 3705 William Richardson drive 46628 South Bend – Indiana, USA P : 001 574 2433672 F: 001 5742433672 info@enofrigoamerica.com www.enofrigoamerica.com Enofrigo reserves the right to make improvements to products at any time and without prior notice, without altering their essential characteristics.
Need help?
Do you have a question about the H2000 and is the answer not in the manual?
Questions and answers