Table of Contents
Advertisement
Quick Links
Advertisement
Table of Contents

Related Manuals for Boardcon Embedded Design EM3568-AV CAM


Summary of Contents for Boardcon Embedded Design EM3568-AV CAM
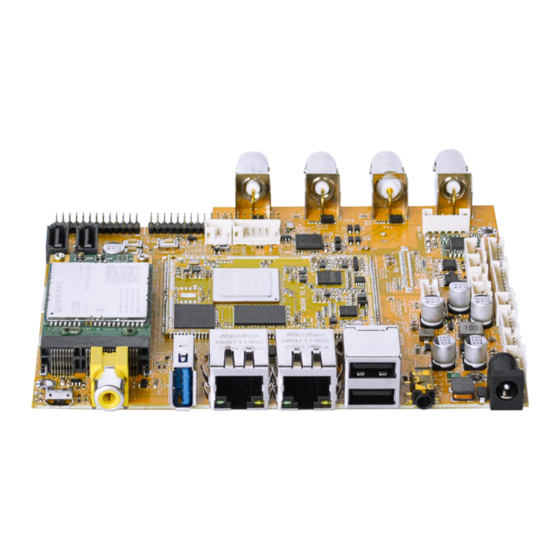
- Page 1 EM3568-AV CAM User Manual V1.0 Boardcon Embedded Design www.armdesigner.com...
- Page 2 Customize the embedded system based on Preface Overview The content of this document is only described for the development board EM3568-AV CAM, aiming to help users quickly understand, apply and develop the EM3568-AV CAM development board. System Support Development Board...
-
Page 3: Table Of Contents
Your Idea Customize the embedded system based on Content Introduction ............................3 1.Overview ............................. 3 2.Product Parameters ........................3 3. Hardware Interface ........................5 Install Drivers and Tool .......................... 7 1.Install RK Driver Assitant ......................7 2.Install CP210X Driver ........................8 2.1 How to connect the serial port tool .................. -
Page 4: Introduction
Introduction 1.Overview EM3568-AV CAM is a development board designed based on Boardcon CM3568 system on module. The CM3568 SOM is powered by Rockchip RK3568 which is a quad-core ARM Cortex-A55 processor with low power consumption and high performance, support almost full-format H.264 decoder by 4K@60fps, H.265 decoder by 4K@60fps, also H.264/H.265 encoder by 1080p@60fps, high-quality... - Page 5 Your Idea Customize the embedded system based on • Support INT8/INT16/FP16/BFP16 MAC hybrid operation • Support 4096x2304@60fps H.265/H.264/VP9 video decoding Decoder • Support 1920x1088@60fps VP8/VC1/MPEG-4,2,1 video decoding • Support 720x576@60fps H.263 video decoding Video • Support 1920x1080@60fps H.265/H.264 video encoding Encoder •...
-
Page 6: Hardware Interface
Your Idea Customize the embedded system based on Power supply input voltage 12V/3A RTC input voltage Operating temperature 0~70º Storage temperature -40~85º Structural Parameters Core board dimensions 60mm x 45mm Motherboard dimensions 135mm x 113mm 3. Hardware Interface Interface parameters Power in 12V DC power input interface USB2.0 Host... - Page 7 Your Idea Customize the embedded system based on Headset Earphone output 2xUSB2.0 Host Dual-layer USB2.0 HOST interface RTC coin cell connector 2x Gigabit Ethernet Gigabit Ethernet RJ45 interface, via Realtek RTL8211F-CG controller USB3.0 Host USB3.0 Host interface CVBS OUT CVBS display interface USB OTG OTG download interface mPCIe 4G...
-
Page 8: Install Drivers And Tool
Your Idea Customize the embedded system based on 2x SATA Power SATA power interface • UART5, TTL level interface 2xUART • UART4, TTL level interface 12V input 12V DC power input gpio interface Power in 12V DC power input interface Install Drivers and Tool To download firmware and debug in the terminal, the following drivers and software need to be installed(for Windows computers):... -
Page 9: Install Cp210X Driver
Your Idea Customize the embedded system based on Step 4, after the installation is complete, connect the board and PC with Micro USB cable and press the Recovery key and hold then power the board, the following information is displayed in the Computer Device Manager, indicating that the USB driver was successfully installed. -
Page 10: Install Driver
Your Idea Customize the embedded system based on Receive, connect to RX pin of the board. Ground, connect to GND pin of the board. No need to connect. Connection Description RX, connect to RXD pin of the CP210X Module. TX, connect to TXD pin of the CP210X Module. Ground, connect to GND pin of the CP210X Module. - Page 11 Your Idea Customize the embedded system based on Step 3, confirm that the CP210x driver has been installed and the CP2102 module is connecting to the PC. Step 4, click the Quick Connect button to go to the Quick Connect configuration screen. Step 5, configure as shown in the following figure.
- Page 12 Your Idea Customize the embedded system based on Step 6, after clicking connect button, the terminal serial interface will be successfully accessed.
-
Page 13: Debian11
Your Idea Customize the embedded system based on Debian11 1.Compiler Environment It is recommended to use Ubuntu 22.04 system or above. If you encounter an error during compilation, you can check the error message and install the corresponding software packages accordingly. -
Page 14: Images Operation
Your Idea Customize the embedded system based on Pick a defconfig: 1. rockchip_defconfig 2. rockchip_rk3566_evb2_lp4x_v10_32bit_defconfig 3. rockchip_rk3566_evb2_lp4x_v10_defconfig 4. rockchip_rk3568_evb1_ddr4_v10_32bit_defconfig 5. rockchip_rk3568_evb1_ddr4_v10_defconfig 6. rockchip_rk3568_evb2_lp4x_v10_defconfig 7. rockchip_rk3568_uvc_evb1_ddr4_v10_defconfig Which would you like? [1]: // Select rockchip_rk3568_evb2_lp4x_v10_defconfig Switching to defconfig: /home/name/opt/EM3568-TU/linux- 5.10/device/rockchip/.chip/rockchip_rk3568_evb2_lp4x_v10_defconfig Step 3, compile uboot $ ./build.sh uboot Step 4, compile the kernel $ ./build.sh kernel... -
Page 15: Pack Image
Your Idea Customize the embedded system based on Step 2, click Advanced Function -> Firmware, select update.img, then click Unpack to unzip. Step 3, the unzip files will be generated in \RKDevTool\RKDevTool_Release\Output\Android and \RKDevTool\RKDevTool_Release\Output\Android\Image directory. 4.2 Pack image Step 1, copy the firmware file to be packaged to windows RKDevTool/rockdev/Image. - Page 16 Your Idea Customize the embedded system based on Step 2, enter RKDevTool/rockdev/, double-click to run rk356x-mkupdate.bat. Step 3, the update.img will be generated in rockdev/ directory.
-
Page 17: Burn Images
Your Idea Customize the embedded system based on 5.Burn Images 5.1 Burn update firmware Step 1, open RKDevTool_Release\RKDevTool.exe. Step 3, connect PC and development board with Micro USB cable, keep pressing the Recovery Key and power the board until the windows PC shows Found one LOADER Device release the Recovery Key. - Page 18 Your Idea Customize the embedded system based on Step 4, click Upgrade Firmware -> Firmware, select update.img, then click Upgrade to flash.
-
Page 19: Burn Split Firmware
Your Idea Customize the embedded system based on 5.2 Burn split firmware Step 1, select the checkbox on the left. Step 2, click the column on the right side for the path of the file want to flash. Step 3, click run button to flash the image. Step 4, wait for the completion of burning. -
Page 20: Debian Test
Your Idea Customize the embedded system based on 6.Debian Test 6.1 Display Supports LVDS and TV display. If you want to use the LVDS screen touch, you need to do the following to bind TP to the LVDS screen: Step 1, installing xinput: # apt-get update # apt-get install xinput Step 2, view display name:... - Page 21 Your Idea Customize the embedded system based on Automatic mounting of SD/USB storage devices can be achieved through the following two methods. Step 1, double click on the desktop icon and the SD/USB storage device will automatically mount: Step 2, double click on the Home icon to enter the main directory: Then click on the Devices under the devices directory to achieve automatic mounting:...
-
Page 22: Sata
Your Idea Customize the embedded system based on The USB Host can be used to connect USB mouse, USB keyboard, U-Disk or other USB devices. 6.3 SATA Connect the SATA0 and the sata power to the board.Execute follow command to mount SATA. # ls /dev // view sata device name # mkdir /mnt/sata... -
Page 23: Ethernet
Your Idea Customize the embedded system based on # export GST_MPP_VIDEODEC_DEFAULT_ARM_AFBC=1 // Be sure to open AFBC # GST_DEBUG=*mpp*:4 gst-play-1.0 --flags=3 --videosink="kmssink plane-id=142" /media/linaro/144460C44460AA66/video/H265_HEVC/I.O.I-Dream.Girl.2160p.UHDTV.H265.ts Step 2, playing videos using Chromium (video files in H265 format are not supported): # chromium --no-sandbox file:///media/linaro/560D-DB44/4KP60-Like_you.mp4 Or select the video file you want to open, right-click and select Chromium Browser to open it 6.5 Ethernet # ifconfig... -
Page 24: Rtc
Your Idea Customize the embedded system based on # ping -I eth0 www.boardcon.com # ping -I eth1 www.boardcon.com 6.6 RTC Execute the follow command to set the RTC time: # date -s "2023-06-20 10:22:00" # hwclock -w # hwclock If it takes time to be saved after power failure, please connect the button battery. 6.7 4G(EC20) Step 1, execute the following command to realize ppp dialing: # pppd call quectel-ppp &... -
Page 25: Gps(Ec20)
Your Idea Customize the embedded system based on Step 2, execute the following to view the network interface status: # ifconfig -a Step 3, execute the following to check the connectivity of the detection network: # ping -I ppp0 www.boardcon.com 6.8 GPS(EC20) Plug the EC20 module and connect GPS antenna, then power on and execute the follow command: # echo -e "AT+QGPS=1\r\n"... -
Page 26: Wifi
Your Idea Customize the embedded system based on 6.9 WiFi Step 1, connect the WiFi antenna, then click the network icon in the top right corner of the UI interface, select the SSID from the list of available networks and enter the password. -
Page 27: Bluetooth
Your Idea Customize the embedded system based on Step 2, execute the following to view the network interface status: # ifconfig Step 3, execute the following to check the connectivity of the detection network: # ping -I wlx367de41c8192 www.boardcon.com 6.10 Bluetooth Step 1, click the Buletooth icon in the top right corner of the UI interface, Select “Devices”... - Page 28 Your Idea Customize the embedded system based on Step 3, click the “Search” button to start searching and select the available device in the list to pair. Step 4, the Bluetooth device name is hidden by default. Set the Bluetooth device name to be visible according to the following settings:...
-
Page 29: Can
Your Idea Customize the embedded system based on 6.11 CAN Step 1, connect the CAN ports of board A and board B as follows: Step 2, execute the following commands on the serial terminal of board A and board B respectively. # ip link set can0 down # ip link set can0 type can bitrate 1000000 dbitrate 3000000 fd on # ip link set can0 up... -
Page 30: Uart
Your Idea Customize the embedded system based on Step 2, execute the following commands on the terminal serial ports of board A and board B respectively. # com /dev/ttyS0 115200 8 0 1 Step 3, at this time, you can test the RS485 communication. 6.13 UART Step 1, short circuit RX and TX pins of UART. -
Page 31: Spi
Your Idea Customize the embedded system based on 6.14 SPI Step 1, short circuit MISO_M1 and MOSI_M1 pins of SPI. Step 2, SPI0 test: Step 3, SPI2 test:... -
Page 32: Camera
Your Idea Customize the embedded system based on 6.15 Camera Step 1, camera preview command: # gst-launch-1.0 v4l2src device=/dev/video8 ! video/x-raw,format=NV12,width=1280,height=720, framerate=30/1 ! xvimagesink & # gst-launch-1.0 v4l2src device=/dev/video9 ! video/x-raw,format=NV12,width=1280,height=720, framerate=30/1 ! xvimagesink & # gst-launch-1.0 v4l2src device=/dev/video10 ! video/x-raw,format=NV12,width=1280,height=720, framerate=30/1 ! xvimagesink &...
Need help?
Do you have a question about the EM3568-AV CAM and is the answer not in the manual?
Questions and answers