
Related Manuals for DS18 CA-X3DBATT


Summary of Contents for DS18 CA-X3DBATT
- Page 1 CA-X3DBATT OWNER’S MANUAL MANUAL DEL USUARIO CAN-AM X3 2ND BATTERY KIT (WIRE KIT & BATTERY BRACKET ONLY) KIT DE 2ª BATERÍA CAN-AM X3 (SOLO KIT DE CABLES Y SOPORTE DE BATERÍA) ENGLISH | ESPAÑOL...
- Page 2 CA-X3DBATT allows you to isolate the new cuando está estacionado, este CA-X3DBATT le secondary AGM battery while the vehicle's IGN is permite aislar la nueva batería secundaria AGM...
-
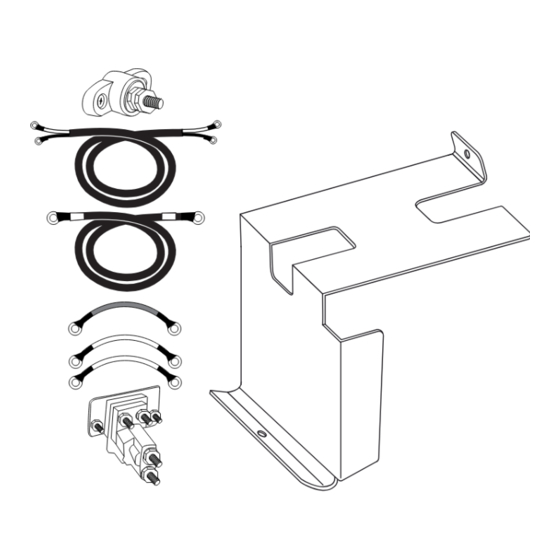
Page 3: What's In The Box
WHAT’S IN THE BOX / QUÉ HAY EN LA CAJA Battery mount Power Distribution Block Soporte de batería Bloque de distribución de energía Isolator Harness (2 x 12Ga) Arnés aislador (2 x 12Ga) 4Ga Accessories Power Wire Cable de alimentación de accesorios 4Ga 80A Battery Isolator Aislador de batería 80A 8Ga Negative Batteries Jump Wire... -
Page 4: Installation
CA-X3DBATT INSTALLATION / INSTALACIÓN Before you start the installation remove passenger seat on 2 seat model or Remove front & rear passenger seats on 4 seat model. Antes de comenzar la instalación retire el asiento del pasajero en el modelo de 2... - Page 5 INSTALLATION / INSTALACIÓN STEP 4. Disconnect battery starting with negative terminal (black). (PICTURE D) PASO 4. Desconecte la batería empezando por el terminal negativo (negro). (IMAGEN D) STEP 5. Turn the starting battery sideways. (Terminals facing towards the driver side of the X3), Place 2nd battery to the left of the starting battery.
- Page 6 CA-X3DBATT INSTALLATION / INSTALACIÓN STEP 7. Place CA-X3DBATT bracket on top of batteries. Mark and drill holes for new mount and secure it with the included 1” bolts with nylon nuts. (PICTURE F) STEP 7. Coloque el soporte CA-X3DBATT encima de las baterías. Marque y taladre orificios para un nuevo montaje y asegúrelo con los pernos de 1”...
- Page 7 INSTALLATION / INSTALACIÓN STEP 9. Mark and drill holes for the isolator in the top left corner of the battery mount bay with the small terminals of the isolator facing up, then take the two ½” bolts & nuts provided in the kit and use them to mount the isolator in the pre-drilled slots.
- Page 8 CA-X3DBATT INSTALLATION / INSTALACIÓN STEP 13. Locate the 4Ga power wire that runs from the 2nd battery and connect it to the distribution block provided in the kit. (PICTURE K) PAS0 13. Localice el cable de alimentación 4Ga que va desde la segunda batería y conéctelo al bloque de distribución...
- Page 9 X3. (IMAGEN M) This concludes the installation of the STEP 16. Zip tie any bundles of wire to clean CA-X3DBATT 2nd Battery kit, and it is ready to up the look of the wire lay. enjoy your new power upgrade! PASO 16.
-
Page 10: Wire Diagram
CA-X3DBATT WIRE DIAGRAM / DIAGRAMA DE CABLES ISOLATOR / AISLADOR STARTER SOLENOID SOLENOIDE DE ARRANQUE GROUND TIERRA ACCESSORY BATTERY STOCK POWER ACCESORIO BATTERY ENERGÍA BATERÍA BATERÍA DE SERIE ACCESSORY ACCESORIO FACTORY BUS BAR BARRA DE AUTOBÚS DE FÁBRICA STOCK CHASIS GROUND... - Page 11 Vista desde abajo 6.93” / 176mm WARRANTY GARANTÍA Please visit our website DS18.com for more information Visita nuestra página web DS18.com para obtener más on our warranty policy. información sobre nuestra garantía. We reserve the right to change products and specifications Nos reservamos el derecho de cambiar productos y at any time without notice.
- Page 12 FOR MORE INFORMATION PLEASE VISIT DS18.COM...
Need help?
Do you have a question about the CA-X3DBATT and is the answer not in the manual?
Questions and answers