Advertisement
Quick Links
MODEL : TM320/ TM321/ TM322
100 – 240V
AC :
0.9OA @ 100V / 0.40A @ 240V
6V
4A / 12V
DC :
Thermally adjusted
1 x 6V from 3 - 160Ah
+
-
1 x 12V from 3 - 120Ah
STD / AGM-MF / GEL
(max. Ah rating based on 48 hour charge).
Automatic charger for 6V & 12V lead/acid batteries •
copyright © 2020 TecMate International – TM320-321-322-IN1-200318
6V 4A / 12V 3A
50-60Hz
3A
INSTRUCTIONS FOR USE
IMPORTANT: Read completely
before charging
Advertisement

Related Manuals for TecMate Optimate 5 Silver Series


Summary of Contents for TecMate Optimate 5 Silver Series
- Page 1 1 x 6V from 3 - 160Ah 1 x 12V from 3 - 120Ah STD / AGM-MF / GEL (max. Ah rating based on 48 hour charge). Automatic charger for 6V & 12V lead/acid batteries • copyright © 2020 TecMate International – TM320-321-322-IN1-200318...
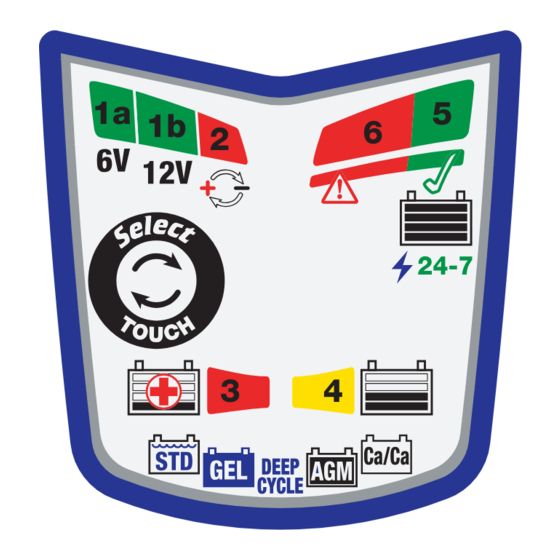
- Page 2 LEDs / SELECT 24-7 24-7 Ca/Ca VOLTS ≥ VOLTS < 7.9V- too high - trop élevé - too low - trop bas - demasiado alto - zu hoch - demasiado baja - zu niedrig te hoog - troppo alto - te laag - troppo basso - för hög för lågt...
-
Page 3: Personal Precautions
IMPORTANT SAFETY INSTRUCTIONS FOR CANADA & USA 6V 4A / 12V 3A SAVE THESE INSTRUCTIONS. THIS PORTION OF THE MANUAL CONTAINS IMPORTANT SAFETY INSTRUCTIONS FOR THE OPTIMATE 5 6V-12V BATTERY CHARGER. IT IS OF THE UTMOST IMPORTANCE THAT EACH TIME, BEFORE USING THE CHARGER, YOU READ AND EXACTLY FOLLOW THESE INSTRUCTIONS. -
Page 4: Preparing To Charge
12. PREPARING TO CHARGE a) If necessary to remove battery from vehicle to charge, always remove grounded terminal from battery first. Make sure all accessories in the vehicle are off, so as not to cause an arc. b) Be sure area around battery is well ventilated while battery is being charged. Gas can be forcefully blown away by using a piece of cardboard or other non-metallic material as a fan. - Page 5 12. PREPARING TO CHARGE a) If necessary to remove battery from vehicle to charge, always remove grounded terminal from battery first. Make sure all accessories in the vehicle are off, so as not to cause an arc. b) Be sure area around battery is well ventilated while battery is being charged. Gas can be forcefully blown away by using a piece of cardboard or other non-metallic material as a fan.
- Page 6 6V 4A / 12V 3A AUTOMATIC BATTERY CHARGER FOR 6V LEAD-ACID BATTERIES FROM 3 to 160 Ah & 12V LEAD-ACID BATTERIES FROM 3 TO 120Ah DO NOT USE FOR NiCd, NiMH, Li-Ion OR NON-RECHARGEABLE BATTERIES. IMPORTANT: READ THE FOLLOWING INSTRUCTIONS BEFORE USING THE CHARGER This appliance can be used by children aged from 8 years and above and persons with reduced physical,sensory or mental capabilities or lack of experience and knowledge if they have been given supervision or instruction concerning use of the appliance in a safe way and understand the hazards...
- Page 7 MOUNTING NOTICE 4,5mm L +20mm 2m / 7ft max. EXTEND OPTIONS: O-3 (1.8m / 6ft) O-13 / O-23 (4.6m / 15ft)
- Page 8 Discover our full range of accessories Battery Performance Guaranteed !
- Page 9 6V 4A / 12V 3A AUTOMATIC BATTERY CHARGER FOR 6V LEAD-ACID BATTERIES FROM 3 to 160 Ah & 12V LEAD-ACID BATTERIES FROM 3 TO 120Ah DO NOT USE FOR NiCd, NiMH, Li-Ion OR NON-RECHARGEABLE BATTERIES. IMPORTANT: READ THE FOLLOWING INSTRUCTIONS BEFORE USING THE CHARGER This appliance can be used by children aged from 8 years and above and persons with reduced physical,sensory or mental capabilities or lack of experience and knowledge if they have been given supervision or instruction concerning use of the appliance in a safe way and understand the hazards...
- Page 10 If voltage selection in STEP 1 matches the expected battery voltage and there are no connection errors as described in STEP 2, then fully automatic operation starts from STEP 3. STEP 1 LED #1a / 1b Confirms AC power supply to the charger and selected battery voltage.
- Page 11 24-7 24-7 STEP 6 LED #4 : The OPTIMIZE mode starts when the voltage has reached 7.2V / 14.4V YELLOW for the first time during CHARGE mode. OPTIMIZE The ampmatic™ current control program now delivers pulses of current to equalise the individual cells within the battery and optimizes State of charge level.
- Page 12 Pay particularly close attention to the following A battery left deep-discharged for an extended period may develop permanent damage in one or more cells. Such batteries may heat up excessively during high current charging. Monitor the battery temperature during the first hour, then hourly there-after. Check for unusual signs, such as bubbling or leaking electrolyte, heightened activity in one cell compared to others, or hissing sounds.
Need help?
Do you have a question about the Optimate 5 Silver Series and is the answer not in the manual?
Questions and answers