Table of Contents
Advertisement
Quick Links
Advertisement
Table of Contents

Related Manuals for Romed-Holland BP-1000

Summary of Contents for Romed-Holland BP-1000
- Page 1 Blood Pressure Meter User Manual Model: BP-1000...
-
Page 2: Table Of Contents
Table of contents Introduction Safety information Product structure Battery installation Setting mode Proper use of the unit -Pre-measurement -Common factors of wrong measurement -Fitting the cuff -Measuring procedure -Discontinuing a measurement -Memory-recall of measurements -Read memory record -Memory-clear of measurements About blood pressure Exceptional situations Care and maintenance... -
Page 3: Introduction
Introduction ▲ Your new digital blood pressure monitor uses the oscillometric method of blood pressure measurement. This means the monitor detects your blood’s movement through your brachial artery and converts the movements into a digital reading. An oscillometric monitor does not need a stethoscope, so the monitor is simple to use. -
Page 4: Safety Information
Safety information ▲ To assure the correct use of the product, basic safety measures should always be followed including the warnings and the cautions listed in the instruction manual: Symbol descriptions The following symbols may appear in this manual, on the label, on the device, or on its accessories. - Page 5 Safety information Those who have arrhythmia, diabetes, blood circulation or apoplexy problems, please use the product under the physician's instruction. Contact your physician for specific information about your blood pressure. Self-diagnosis and treatment with use of measured results may be dangerous.
- Page 6 Safety information Consecutive blood pressure measurements should be repeated after 1 minute pause or after the arm has been held up in order to allow the accumulated blood to flow away. If the arm circumference size is beyond the measuring range of the CUFF, it can’t be measured and used, because it will prevent the blood from flowing smoothly and it causes wrong measurement data.
- Page 7 Safety information Do not mix the old and new batteries. Do not use a cellular phone near the unit. It may result in operational failure. Please avoid using in a high radiation area in order to make your measuring data correctly. Do not use the equipment where flammable gas (such as anesthetic gas, oxygen or hydrogen) or flammable liquid (such as alcohol) is present.
-
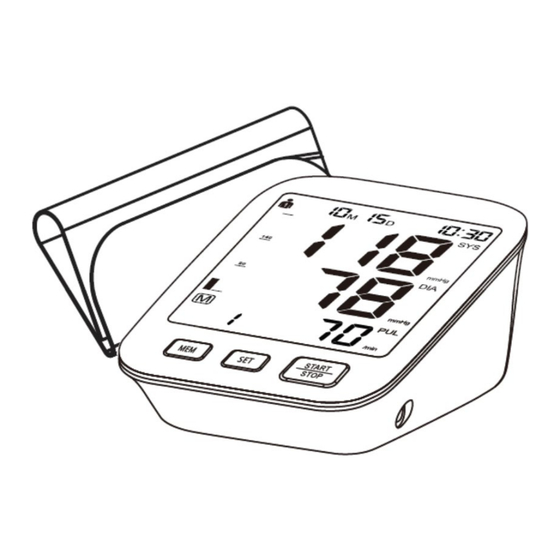
Page 8: Product Structure
Product structure Body Air socket Memory button AC/DC socket Setting button START/STOP button Display User Year/Month/Date/Time Blood pressure Systolic blood pressure classification Diastolic blood pressure Memory symbol Irregular heart beat Memory times Pulse rate Low battery Pulse Cuff size and connection The accessory cuff is M size, for upper arm circumference 22-32cm use. -
Page 9: Battery Installation
Battery installation Battery installation Remove the battery cover from the battery compartment, insert the battery. a) Remove the battery cover as shown on the picture. b) Insert 4 AAA powerful batteries into the compartment and ensure each battery is in the proper direction. -
Page 10: Setting Mode
Setting mode Note: ·When using an AC adapter, the power of battery won't be consumed. ·When the measurement suddenly stops (e.g. the plug is from the outlet by carelessness), you must reinsert the plug into the unit, and restart the measurement. - Page 11 Setting mode 3. Month and date setting Following the above step, the screen will display xxMxxD and xxxx and keep flashing on month. The digit will increase with 1 when pressing button MEM each time. You can choose from 1 to 12. Press button SET when you confirm the month, then it will set the date.
-
Page 12: Proper Use Of The Unit
Proper use of the unit Measurement Pre-measurement ▲ Relax for about five to ten minutes prior to the measurement. Avoid eating, drinking alcohol, smoking, exercising and bathing for 30 minutes before taking a measurement. All these factors will influence the measurement result. ▲... -
Page 13: Fitting The Cuff
Proper use of the unit Fitting the cuff 1). Put the cuff flatly on a table with the velcro side down. Pass the end of the cuff through the metal loop so that a circle is formed. The velcro closer will now face outwards (ignore this step if the cuff has already been prepared). -
Page 14: Measuring Procedure
Proper use of the unit Measuring procedure After the cuff has been positioned appropriately, the measurement can begin: 1). Press the START/STOP button, all symbols appear on the display, then the pump begins to inflate the cuff, the rising pressure in the cuff is shown on the display. -
Page 15: Read Memory Record
Proper use of the unit Read memory record Press the button MEM when the power is off, the latest 3 times average value will be shown. Press the button MEM again, the latest measurement value will be shown, as well as subsequent measurements can be displayed one after the other by pressing the button MEM each time. - Page 16 About blood pressure According to the blood pressure classification by the WHO/ISH. SYS lower than 100mmHg(13.3kPa) is considered as hypotension. Blood pressure type Optimal blood pressure Normal blood pressure High normal value Mild hypertension Moderate hypertension Severe hypertension...
-
Page 17: Exceptional Situations
Exceptional situations Error indicators The following symbols will appear on the display when measuring abnormal. Symbol Cause Correction Weak signal or pressure change Wrap the cuff properly. suddenly. Out of range indicates HI. Remeasure in correct way. External strong disturbance When near a cell phone or other high radiant device, the measurement will fail. -
Page 18: Care And Maintenance
Care and maintenance Care for the main unit and blood pressure monitor cuff . Keep the unit in the storage case when not using. . Clean the unit with a soft dry cloth. Do not use any abrasive or volatile cleaners. . -
Page 19: Specification
Specification Description Automatic upper arm blood pressure monitor Display Color LCD digital display Measuring principle Oscillometric method Measuring location Upper arm Measurement range Pressure 0~299 mmHg Pulse 40~199 pulses/min Accuracy Pressure ±3mmHg ±5% of reading Pulse LCD indication Pressure 3 digits display of mmHg Pulse 3 digits display Symbol... -
Page 20: Warranty Information
Warranty information Statement The intended use: the unit is intended to be used by adults at home or medical center to measure blood pressure and pulse rate from the upper arm. The unit satisfies the requirements of EN ISO81060-1 Part 1 Non-invasive sphygmomanometers, EN 1060-3:1997+A2:2009 Non- invasive sphygmomanometers, IEC80601-2-30 Part 2 Non-invasive sphygmomanometers. -
Page 21: Emc Declaration
EMC Declaration IEC 60601-1-2: 2014 ME EQUIPMENT and ME SYSTEMS identification, marking and documents for Class B products Instructions for use The ME EQUIPMENT or ME SYSTEM is suitable for home healthcare environments etc. Warning Don’t get near active HF surgical equipment and the RF shielded room of an ME system for magnetic resonance imaging, where the intensity of EM disturbances is high. - Page 22 EMC Declaration Technical description 1. All necessary instructions for maintaining BASIC SAFETY and ESSENTIAL PERFORMANCE with regard to electromagnetic disturbances for the excepted service life. 2. Guidance and manufacturer’s declaration - electromagnetic emissions and immunity Table 1 Guidance and manufacturer’s declaration - electromagnetic emissions Emissions test Compliance...
- Page 23 EMC Declaration Table 2 Guidance and manufacturer’s declaration - electromagnetic immunity IEC 60601-1-2 Compliance level Immunity test Test level ±8 kV contact Electrostatic discharge (ESD) ±8 kV contact ±2 kV, ±4 kV, ±8 kV, ±15 kV IEC 61000-4-2 ±2 kV, ±4 kV, ±8 kV, ±15 kV air Electrical fast transient/burst Power supply lines ±2 kV Power supply lines ±2 kV...
- Page 24 EMC Declaration Table 3 Guidance and manufacturer’s declaration - electromagnetic immunity Test Band Service Modulation Modulation Distance IMMUNITY frequency (MHz) TEST (MHz) LEVEL (V/m) 380– TETRA 400 Pulse modulation 18 Hz 430 – GMRS 460, FRS 460 ± 5 kHz deviation 1 kHz sine 704 –...
- Page 25 Romed Blood Pressure Meter Model: BP-1000 Software Ver: UA1.0 Van Oostveen Medical B.V. – Romed Holland Herenweg 269, 3648 CH Wilnis, The Netherlands www.romed.nl – V001,2022-05...
Need help?
Do you have a question about the BP-1000 and is the answer not in the manual?
Questions and answers