Table of Contents
Advertisement
Quick Links
MODEL / MODELE / MODELO
ETK - S 50 DX
Thank you for purchasing our product.
■ Before using this product, be sure to read this Instruction Manual to ensure proper usage. Please
keep this manual for later reference.
■ Improper use of this product may result in a malfunction, failure, unexpected accident, or create a
potential hazard.
Nous vous remercions d'avoir acheté notre produit.
■ Avant toute utilisation de ce produit, veuillez lire attentivement cette notice d'utilisation pour un
usage approprié. Veuillez conserver cette notice pour pouvoir la consulter ultérieurement.
■ Une utilisation inappropriée de ce produit peut être la cause de disfonctionnements, pannes,
accidents imprévisibles ou représenter un danger potentiel.
NMuchas gracias por su compra de nuestro producto.
■ Antes de utilizar este producto, asegúrese de leer este manual de instrucciones para asegurarse
que lo usa adecuadamente. Guarde este manual para su referencia en el futuro.
■ Un mal uso de este producto puede resultar en un mal funcionamiento, falla, accidente
inesperado o provocar un peligro en potencia.
AIR PURIFIER
INSTRUCTION MANUAL
PURIFICATEUR D'AIR
MODE D'EMPLOI
PURIFICADOR DE AIRE
MANUAL DE INSTRUCCIONES
Advertisement
Table of Contents

Related Manuals for Toyotomi ETK-S50DX


Summary of Contents for Toyotomi ETK-S50DX
- Page 1 MODEL / MODELE / MODELO ETK - S 50 DX Thank you for purchasing our product. ■ Before using this product, be sure to read this Instruction Manual to ensure proper usage. Please keep this manual for later reference. ■ Improper use of this product may result in a malfunction, failure, unexpected accident, or create a potential hazard.
-
Page 2: Table Of Contents
· ··· ··· ··· ··· ··· ··· ··· ··· ··· ···· · · ·· · ·· · ·· · ·· · ·· · ·· · ·· · ·· · ·· · ·· · ·· · ·· · ·· · ·· · ·· · ·· · · 1~4 1. -
Page 3: Safety Precautions
SAFETY PRECAUTIONS ¡Items shown here are labeled “ Be sure to follow the warnings and cautions as they explain important details regarding safety. WARNING CAUTION ¡Be sure to follow the advice in the instruction manual in order to use this unit properly. Must be Caution performed. - Page 4 SAFETY PRECAUTIONS ★Remove all dust and dirt from the power plug and insert it completely into the outlet to ensure proper contact. ¡Dust and dirt on the plug or incomplete insertion creates the danger of electrical shock and fire. ★When unplugging the power plug, grip the plug and not the cord.
- Page 5 SAFETY PRECAUTIONS ★When using with another combustion appliance, ventilation is necessary. ¡The unit cannot add oxygen or remove carbon monoxide. Toxic substances ( such as carbon monoxide ) contained in tobacco cannot be removed. ★ Do not expose the unit to vapor or mist from something like a humidifier or electric shock or failure may result.
-
Page 6: Safety Precautions
SAFETY PRECAUTIONS ★ Do not use the unit in places where inverter lighting equipment and/or electronic instant-on lamps are nearby or where the unit is exposed to direct sunlight. ¡This may prevent the function of the remote control, resulting in operation problems or malfunctions. ★Place the Air Purifier more than 3.3 ft. -
Page 7: Functions And Efficacy Of The High-Concentration Oxygen Supplier
FUNCTIONS AND EFFICACY OF THE HIGH-CONCENTRATION OXYGEN SUPPLIER The concentration of oxygen, which is about 21% of atmospheric air, is increased to about 30% before being supplied through the unit. OXYGEN ENRICHMENT MEMBRANE Air with high concentrations of oxygen is produced by taking advantage of the fact that oxygen molecules pass through the membrane more rapidly than nitrogen molecules, which separates air. -
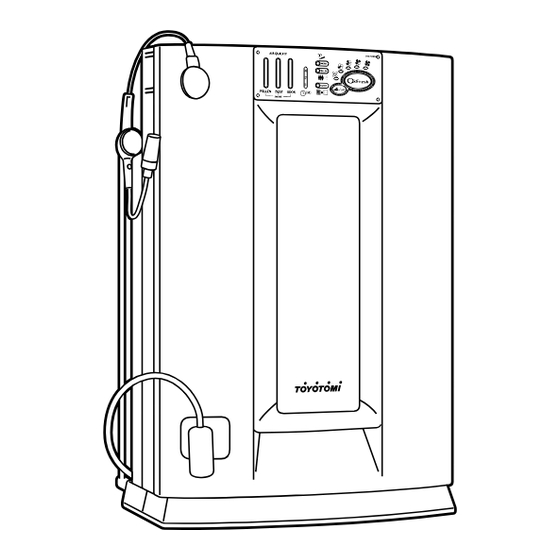
Page 8: Name Of Component Parts
NAME OF COMPONENT PARTS MAIN UNIT Front Panel Oxygen Outlet FILTER UNIT INSIDE OF THE MAIN UNIT Activated Carbon Filter ( Deodorant Filter ) This filter absorbs foul odors. Battery ( 2 pcs. ) Remote Control [AAA/R03] Air Outlet OXYGEN Operation Button Button HEPA TYPE Filter ( Antibactrial Filter ) - Page 9 NAME OF COMPONENT PARTS DISPLAY / CONTROL PANEL Press the button to start operation. The air volume changes with every push. Auto REMOVE THE FRONT PANEL Odor Sensor RESET BUTTON Press this button after the HEPA Type filter is replaced. When the filter lamp lights, replace the HEPA Type filter.
-
Page 10: Name Of Component Parts
NAME OF COMPONENT PARTS OPERATION PANEL Pollen/Dust Lamp Lamp REMOTE CONTROL TRANSMITTING PART OF REMOTE CONTROLLER Sends operation signals to the Remote Control receptor on the main unit. The effective Remote Control is within about 23 FT. (7m) directly from the front. ON / OFF BUTTON Press the button to start operation and push the same button again to stop... -
Page 11: Preparation Before Use
PREPARATION BEFORE USE HOW TO INSTALL THE FILTERS Pull the front panel toward you and remove it while pressing the right and left buttons at the bottom of the main unit. Remove the Prefilter. Remove the HEPA Type filter and activated carbon filter in the bag from the main unit. -
Page 12: How To Install Air Purifier
PREPARATION BEFORE USE HOW TO INSTALL AIR PURIFIER ¡ How to effectively install the Air Purifier Install the Air Purifier in a high place (on a table) when cleaning relatively small-sized dust such as Heavy smoke. Install the unit in a low place (on the floor) when cleaning large-sized dust such as pollen. -
Page 13: Preparation For Oxygen Inhalation
PREPARATION BEFORE USE PREPARATION FOR OXYGEN INHALATION Secure the O Head Set, Tube, and Joint Tank accessories as shown in the figure below. Insert Securely Insert Securely When not using the Air Purifier, you can hang it on the O Head Set Hanger at the back of the main unit. - Page 14 PREPARATION BEFORE USE THE PLACE TO USE THE MAIN UNIT ¡The temperature of the room where the Air Purifier is used should be between 50˚F (10˚C) and 86˚F (30˚C). At lower temperatures, oxygen concentration is higher and air blower speed will be slower, and at a higher temperature the oxygen concentration will be lower and the air blower speed will be faster, though such differences are insignificant.
-
Page 15: Operation Procedure
OPERATION PROCEDURE OPERATION BY OPERATION PANEL Filter Life Lamp Odor Lamp Pollen/Dust Lamp ON/OFF AUTOMATIC OPERATION CHANGING THE FAN OPERATION MODE 1 Press the operation button ¡The Air Purifier Operation starts. ¡Each press of the operation button switches the operation mode in the following order. Select desired operation mode. - Page 16 OPERATION PROCEDURE AUTOMATIC OPERATION ¡During Automatic operation the AUTO Lamp ( Green ) lights together with a red lamp indicating the fan speed. ■Lighting of the air monitor lamp in the automatic operation mode. ¡The air monitor lamp will not light for three minutes after plugging in the power cord. (The three minutes are required for preliminary operation of the sensor.) Automatic operation means standard operation when the air monitor is not lighting up.
-
Page 17: On/Off Automatic Operation Changing The Operation Mode
OPERATION PROCEDURE OPERATION BY REMOTE CONTROL Remote Control Receptor HOW TO USE THE REMOTE CONTROL ¡Operate the Remote Control by pointing fowards the main unit ( receiver ) . ¡The maximum signal range is about 23 FT. ( 7m ) ( front ) . ¡Make sure no object obstructs the signal. -
Page 18: Timer Operation
OPERATION PROCEDURE Remote Control Receptor TIMER OPERATION ( Automatic operation is stopped after set time. ) 1 Press the "TIMER" button while in operation. ¡The setting time changes in the following modes as the button is pressed each time. Set at your desirable time mode. -
Page 19: Smoking Operation
OPERATION PROCEDURE Remote Control Receptor SMOKING OPERATION 1 Press the Smoking button. ¡The Smoking lamp ( Green ) will light up. ¡Smoking Operation starts and the air blower speed changes automatically as shown below, then the mode will switch to automatic operation. 2 To stop the smoking operation, press the ON / OFF button one more time. -
Page 20: Pollen Operation
OPERATION PROCEDURE Remote Control Receptor POLLEN OPERATION 1 Press the Pollen button. ¡The Pollen lamp ( Green ) will light up. ¡By pressing Pollen button, Pollen operation starts. The fan speed will next be changed automatically to repeat the operation in the following sequence. 2 To stop the Pollen operation, press the ON / OFF button one more time. -
Page 21: How To Use The Oxygen Inhalation
OPERATION PROCEDURE HOW TO USE THE OXYGEN INHALATION ¡Please refer to PREPARATION FOR OXYGEN INHALATION , page11~12, and install the O Set,Tube, and Joint Tank accessories on the main unit. OPERATION BY OPERATION PANEL ON/OFF OF THE OXYGEN OPERATION 1 Press the Oxygen Generation button. ¡Oxygen Operation will start. - Page 22 OPERATION PROCEDURE OPERATION BY REMOTE CONTROL Remote Control Receptor ON/OFF OF THE OXYGEN OPERATION 1 Press the Oxygen Generation button. ¡Oxygen Operation will start. ¡Pressing the button once more will stop the operation. ¡Oxygen Operation is controlled by the timer set for 15 minutes.
-
Page 23: Routine Maintenance
ROUTINE MAINTENANCE BEFORE MAINTENANCE ★ Only authorized technicians should disassemble, repair, or modify this product. ¡Ignition or malfunction may occur, causing injury. ★ Be sure to remove the power plug from the electrical outlet WARNING when performing maintenance. Do not remove or insert the plug with wet hands. -
Page 24: Routine Maintenance
ROUTINE MAINTENANCE MAINTENANCE OF HEPA FILTER ( LIGHTING OF FILTER LAMP ) Filter Lamp LIGHTING OF FILTER LAMP ¡ When the HEPA Type filter is dirty, the filter lamp will light. If it lights, please refer to the HOW TO INSTALL THE FILTERS and replace the old and dirty HEPA Type filter with a new one, which is optionally available. -
Page 25: Troubleshooting
TROUBLESHOOTING Since the following cases may not indicate a serious problem, check each of them before asking for repair service. PROBLEM Does not operate. Does not remove odors. Does not remove smoke. Audible cracking sound Automatic operation does not function. Automatic continues operation... -
Page 26: Specifications
SPECIFICATIONS Power source Air flow rate adjustment Power consumption Air flow rate Applicable floor space Cord length Exterior dimensions Product weight Accessories AC 120V / 60 Hz Rapid High Standard 80 W 45 W 30 W 176 CFM (5 m /min.) 106 CFM (3 m /min.) -
Page 27: Limited Warranty
WHO IS COVERED : The ordinal purchaser at retail. WHAT WE WILL DO : TOYOTOMI will either repair or replace, at its option, all defective parts free of charge that are covered by this limited warranty on a carry-in basis, to your nearest authorized dealer or distributor of TOYOTOMI. - Page 28 TOYOTOMI CO., LTD. 5-17, Momozono-cho, Mizuho-ku, Nagoya, 467-0855 Japan Printed in Japan New 3/06 0000000000...
Need help?
Do you have a question about the ETK-S50DX and is the answer not in the manual?
Questions and answers