Table of Contents
Advertisement
Quick Links
2018
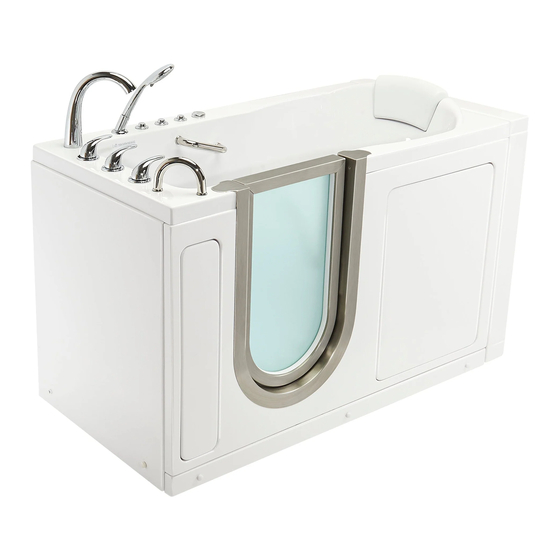
ELLA HYDRO MASSAGE W ALK
IN BATHS OWNERS MANUAL
REPRESENTING THESE MODEL NUMBERS:
H3117 L / H3118 R
H3057 L / H3058 R
H3107 L / H3108 R
Royal
Deluxe
Elite
H3167 L / H31688 R
H3085
Petite
Companion
IMPORTANT
Warranty Activation Form MUST be completed for both the Owner and Installer to
validate the warranty.
Failure to complete both pages will void the warranty on this bathtub.
Completed Ella Warranty Activation Forms can be emailed to warranty@ellasbubbles.com,
faxed to 312.666.3551, OR mailed to 2101 S. Carpenter St., Chicago, IL 60608
Advertisement
Table of Contents

Related Manuals for Ella's Bubbles Deluxe H3057 L


Summary of Contents for Ella's Bubbles Deluxe H3057 L
- Page 1 2018 ELLA HYDRO MASSAGE W ALK IN BATHS OWNERS MANUAL REPRESENTING THESE MODEL NUMBERS: H3117 L / H3118 R H3057 L / H3058 R H3107 L / H3108 R Royal Deluxe Elite H3167 L / H31688 R H3085 Petite Companion IMPORTANT Warranty Activation Form MUST be completed for both the Owner and Installer to validate the warranty.
-
Page 2: Table Of Contents
Table of Contents Unpack and Inspect ............................1 Move your Ella Walk in Bath ..........................2 Important Safety Instructions ........................3-4 Before Installation ............................5 Drain and Plumbing ............................6 Preparing the Sub-floor........................... 7 Service Access and Door Seal ........................8 Hydro Massage System Diagram ........................9 Heated Seat and Backrest Option Diagram .................... -
Page 3: Unpack And Inspect
Unpack and Inspect NOTE: Returns are only accepted in original packaging used for shipping. Use caution so as not to damage cardboard crate or its wooden pallet. Do not dispose of shipping material until installation is complete. Please visit our website, www.ellasbubbles.com for complete details of return/exchange policy. -
Page 4: Move Your Ella Walk In Bath
Move your Ella Walk in Bath •Remove all four (4) access panels before moving the tub •Take off the screw caps •Unscrew the screws with a Philips head screwdriver Large Access Panel (1) •Remove the end access panel Small Access Panel (2) End Access Panel (4) White Screw Caps Screw... -
Page 5: Important Safety Instructions
Important Safety Instructions WARNING: ***Read through the entire manual completely before beginning installation.*** Contract a licensed plumber and electrician for installation. Be sure you and your contractor are aware and follow all local plumbing and electrical codes. Your Ella Walk in Bath is not intended for outdoor use. - Page 6 Important Safety Instructions Continued WARNING: To prevent stripping the PVC threads, ONLY hand tighten the drain elbow. DO NOT tighten with tools. www.ellasbubbles.com Page 4 03/18...
-
Page 7: Before Installation
Before Installation Protecting the Bath Cover and protect the bath shell and fixtures from scratches or other damages during the installation and tests. Remove the access panels when moving the Walk in Bath and always lift the bathtub from the frame (Page #2). Water Test Fill tub for a minimum of 20 minutes to test that the Hydro and Air Pumps are functioning properly before final in-wall installation to avoid unnecessary repairs or removal. -
Page 8: Drain And Plumbing
Drain and Plumbing Make sure that the drain rough in has been placed at the proper location. The specifications and drawings shown below and on page #7 are for the Ella Deluxe (each model comes with separate specifications, please refer each model's specification). The dual drain can be connected with a “T”... -
Page 9: Preparing The Sub-Floor
Preparing the Sub-floor Prepare the sub-floor for the drain and ensure that the area is level. The supporting sub-floor must be able to support the total weight of the bathtub, bather and water. Use a level and make sure that the sub-floor below the tub is leveled. If the floor is not perfectly level, adjust the appropriate leveling legs to re-align the tub to perfect level. -
Page 10: Service Access And Door Seal
Service Access and Ventilation It is the responsibility of the installer or owner to provide access for service required, per code. Ella is not responsible for any costs related to obtaining access for repair. The owner shall assume responsibility for such costs, and if appropriate, must seek recovery from the installer. -
Page 11: Hydro Massage System Diagram
Hydro Massage System Diagram with In-Line Water Heater System Diagram www.ellasbubbles.com Page 9 09/17... -
Page 12: Heated Seat And Backrest Option Diagram
Optional: heated seat and backrest Heated Seat and Backrest Specifications Components: Voltage: (1) Controller Box Input - 120V (1) LED Keypad Wattage: (2) Seat Heater Back - 47.4W (2) Backrest Heater Seat - 44.6W Total - 92W ellasbubbles.com page 10 03/18... -
Page 13: Water Supply Lines
Water Supply Lines Ella Dual Massage Walk in Baths with the Standard Ella Faucet (Thermostatic Control Valve) include two 4 ft. long 1/2” I.P.S. connection flexible water supply lines. Please note: The 5-Piece Fast Fill Roman and 5-Piece Traditional Roman Fauce Sets do not include the I.P.S. connection flexible water supply lines. -
Page 14: Installation Of Spout
Installation of Spout ALWAYS INSTALL SPOUT BEFORE THE WALK IN BATH IS IN PLACE. Parts List: Rubber gasket x (1) Rubber washer x (1) Brass mounting nut x (1) Spout Thermostatic Control Valve Spout Spout Diverter Rubber Gasket Shell Rubber Washer Spout Water Line To Install the supplied spout, first place the rubber gasket on the bottom of the spout and... -
Page 15: Installation Of Deck Mount Grab Bar
Installation of Deck Mount Grab Bar Parts List: Chrome grab bar x (1) Escutcheon x (2) Rubber washers x (4) Metal washers x (2) Bolts x (2) Grab Bar Escutcheon Tub Shell Rubber Washer Rubber Washer Metal Washer* Bolt To install the supplied grab bar first locate all the parts needed for installation. See drawing shown above. -
Page 16: Installing Extension Kits
Installing Extension Kits Installing Extension Kits Deluxe Dimensions: 5"W x 29 1/2"L x 37"H L" Stainless Steel Brackets ......Qty (3) Elite Dimensions: 7"W x 29 3/4"L x 37 3/4"H L" Acrylic Bracket ........Qty (1) Royal Dimensions: 7"W x 31 3/4"L x 37 3/4"H 1"... -
Page 17: Finishing Installation
Finishing Installation After all of the water and electrical testing is completed and all fixtures are checked, the tub can be installed to the surrounding wall or walls. Ella Walk in Baths come with low rise tile flange which allows for two or one wall installations. The extension panel of the bathtub can be installed as needed for 60"... -
Page 18: Operating Instructions
Operating Instructions 1. Thermostatic Control Valve: Before turning on the water, please adjust the thermostatic control valve to the desired water temperature. To raise the temperature above the preset 100.4 Fahrenheit, press and hold in the button handle while turning. For hotter water turn counterclockwise. Conversely, turn the valve clockwise for colder water. - Page 19 Operating Instructions Continued 5. Using the Hydro Massage: To activate and deactivate the hydro massage pump, push the on/off the control button (Page #9). There are two types of hydro jets in your walk in bath; adjustable and non- adjustable types. Simply push on the head of an adjustable jet and turn the head in the desired position.
- Page 20 Operating Instructions Continued 9. Using the LED system The LED Chromatherapy light system may be controlled manually. Push the on/off control button (Page # 11). Pull Out Hand Shower Air Flow Control Dial Thermostatic Control Valve Hand Shower Air Pump ON/OFF Spout Diverter Spout...
-
Page 21: Cleaning And Maintenance
Cleaning and Maintenance Recommended Acrylic Cleaners DO NOT USE the following on your ACRYLIC Bath System. The use of the Use only cleaning products whose labels state that they are SAFE for ACRYLIC. following chemicals will cause a dull Always test products on a small are of skirt surface or chemical cracks. -
Page 22: Nuwhirl System
TOUCHSTONE Dual Load Controller CIMC-296-01-01-01 (15 Amp) CIMC-296-01-02-01 (20 Amp) Configuration #1 Single Speed Pump Variable Speed Blower Owner’s Manual NuWhirl Systems Corp • www.nuwhirl.com • 951-817-5600 900150-CIMC-296-01-XX-01 C1 Rev 3/22/2016 Page 1 Page 20... - Page 23 Important Safety Instructions PLEASE READ CAREFULL Y PRIOR TO Troubleshooting and Servicing Electrical Equipment Definitions: WARNING (May cause serious injuries or death) CAUTION (May cause property damage) For information on NuWhirl Instructions, see: www.nuwhirl.com/docs/product-instructions.html When installing and using this electrical equipment, basic safety precautions should always be followed, including: WARNING: Keep dry.
- Page 24 TOUCHSTONE Dual Load Bath Control System Configuration #1 Owner’s Manual Your whirlpool bathtub has been equipped with TOUCHSTONE Electronic Controls to provide features that allow you to customize your bathing experience to your individual preference. Please familiarize yourself with the features and operating instructions below in order to maximize the enjoyment you receive from your bath.
- Page 25 Air Button Operating Instructions Single Speed Pump (Water): The Whirlpool Water System is activated by pressing the Water Button. Ensure first that there is sufficient water in the Tub to at Water least cover the Jets. (If not, the Water Detection Function will prevent the Pump from starting dry).
- Page 26 Page 24...
-
Page 27: Warranty Information
Ella's Bubbles offers cleaning service for the cartridges for a nominal fee: labor + shipping. The cartridge cleaning is done at Ella's Bubbles facility, or it can be done by the contractor hired by customer. The removal and cleaning of TCV should... -
Page 28: Warranty Activation Form
Warranty Activation Form 1 of 2 INSTALLER'S INFORMATION _______________________________________________________________________________________ Page 1 Name _______________________________________________________________________________________ Address City State _________________________________ _________________________________________________ Telephone Email _________________________________ _________________________________________________ Date Signature Upon completing the installation of an Ella Walk In Bath, the following Warranty Activation Form must be completed, signed by both the customer and installer, and returned to Ella’s Bubbles, LLC. - Page 29 Copy of sales receipt must be included with warranty activation forms. To activate manufacturer's warranty, please complete both pages and use one of the options below to submit. Via mail: Ella's Bubbles, LLC. Warranty Department 2101 S. Carpenter St., Chicago, IL 60608 Via fax: 1-312-666-3551 Via email: warranty@ellasbubbles.com...
Need help?
Do you have a question about the Deluxe H3057 L and is the answer not in the manual?
Questions and answers