IBC HPX 3 Installation And Operating Manual

Hydronic heat pump
Table of Contents

Advertisement

Quick Links

INSTALLATION AND
OPERATING MANUAL
Risk of Electric shock. If the information in this manual is not followed exactly, a fire or
electricution may result causing property damage, personal injury, or loss of life.
Do not store or use gasoline or other flammable vapors and liquids or other combustible
materials in the vicinity of this or any other appliance.
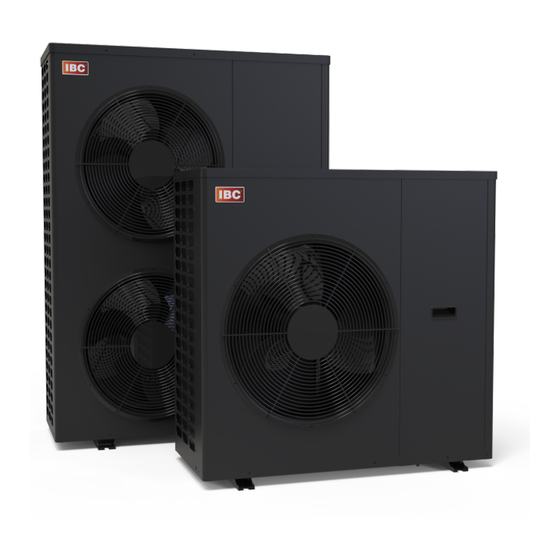
Hydronic Heat Pump
HPX 3 (3 ton model #IHEXXF1-003T)
HPX 5 (5 ton model #IHEXXF1-005T)
WARNING

Advertisement

Table of Contents
loading

Summary of Contents for IBC HPX 3

  • Page 1 INSTALLATION AND OPERATING MANUAL Hydronic Heat Pump HPX 3 (3 ton model #IHEXXF1-003T) HPX 5 (5 ton model #IHEXXF1-005T) WARNING Risk of Electric shock. If the information in this manual is not followed exactly, a fire or electricution may result causing property damage, personal injury, or loss of life.
  • Page 2 Water quality Warning Water quality has a significant impact on the lifetime and performance of a boiler's heat exchanger. Improperly prepared water in a heating circuit may cause damage to the heat exchanger through fouling or corrosion. Repeated or uncontrolled water fills will increase the potential for damage.
  • Page 3: Table Of Contents

    Contents Safety information 2.0 Manual safety markings Important safety instructions Known contaminants 3.0 Specifications 3.1 Cabinet dimensions HPX-Series dimensions 3.2 Connection specifications 3.3 Capacities and COPs 4.0 Introduction 4.1 Standard features and benefits 4.2 Warranty 5.0 Before installation 6.0 Installation 6.1 Code requirements 6.2 Determining location of the appliance 6.2.1 Installation clearances...
  • Page 4 6.8.6 Other wiring 6.8.7 Buffer tank sensor wiring 7.0 About the hydronic heat pump controller 7.1 Use with the IBC Sky 35 Controller 7.2 Use in Stand-alone mode 7.2.1 Entering the Parameters menu for Stand-alone operation 7.2.2 Adjusting Temperature Units in the Parameters Menu 7.2.3 Adjustment in the Parameters Menu for Cooling...
  • Page 5: Safety Information

    Important safety instructions Installation, start-up and servicing of IBC hydronic heat pumps must be performed by competent, qualified, licensed and trained technicians. Failure to read and comply with all instructions and applicable national and local codes may result in hazardous conditions that could result in property damage and injury to occupants, and in extreme cases to death.
  • Page 6: Known Contaminants

    Section: Safety information Warning Improper installation, adjustment, alteration, service or maintenance can cause property damage, personal injury, or loss of life. Read and understand the entire manual before attempting installation, start-up, operation, or service. Installation and service must be performed only by an experienced, skilled installer or service agency. Failure to follow all instructions in the proper order can cause personal injury or death.
  • Page 7: Specifications

    3.0 Specifications Hydronic Heat Pump Specifications HPX 3 HPX 5 Rated Voltage / Frequency / Phase 208/230V 60Hz 1Ph Heating Capacity Range * 9.6 - 44.2 MBH 14.4 - 56.6 MBH Heating Capacity Range * 2.8 - 12.9 kW 4.2 - 16.6 kW Cooling Capacity Range ** 15.5 - 34.5 MBH...
  • Page 8: Cabinet Dimensions

    Section: Specifications 3.1 Cabinet dimensions HPX-Series dimensions Figure 1 Front view- HPX 3 Figure 2 Side view- HPX 3 Figure 3 Top view- HPX 3...
  • Page 9: Connection Specifications

    HPX 5 Figure 5 Side view - HPX 5 Figure 6 Top view- HPX 5 3.2 Connection specifications Description HPX 3 HPX 5 Return water inlet 1" NPT-M 1¼" NPT-M Supply water outlet 1" NPT-M 1¼" NPT-M Supply power knock-out Dual 3/4"...
  • Page 10: Capacities And Cops

    Section: Specifications 3.3 Capacities and COPs...
  • Page 11 3.3 Capacities and COPs Table 2 Capacity and COP tables HPX 3...
  • Page 12 Section: Specifications...
  • Page 13 3.3 Capacities and COPs Table 3 Capacity and COP tables HPX 5...
  • Page 14 Intentionally left empty...
  • Page 15: Introduction

    4.0 Introduction Wiring connection area Electrical connection rubber grommet (2) Supply water connection Heat Exchanger Compressor Outdoor finned coil Return water connection Figure 7 Interior view of HPX 3...
  • Page 16 Section: Introduction Wiring connection area Outdoor finned coil Electrical connection rubber grommet (2) Return water connection Supply water connection Fan (1 of 2) Heat Exchanger Compressor Figure 8 Interior view of HPX 5...
  • Page 17: Standard Features And Benefits

    4.1 Standard features and benefits 4.1 Standard features and benefits Highly efficient heating and cooling Enhanced Vapor Injection (EVI) design increases efficiency, lowers ambient temperature operating range, and increases maximum supply water temperature Renewable energy source Modulating Quiet operation Easy set-up for Set-Point or Outdoor Reset heating Flow-proving and high limit safeties built in...
  • Page 18: Warranty

    Section: Introduction 4.2 Warranty For residential applications, IBC offers a 2-year parts and a 5-year compressor limited warranty against defects in materials or workmanship. For commercial applications, IBC offers a 2-year parts and a 2-year compressor limited warranty against defects in materials or workmanship.
  • Page 19: Before Installation

    5.0 Before installation Before installing the hydronic heat pump, it is important to review and observe the following checklist of precautions: Precautions Check □ Care must be taken to properly size the hydronic heat pump for its intended use. Prolonged full output run time, over-sizing or under-sizing, and incorrect flow rates can lead to increased maintenance costs, equipment stress and premature failure.
  • Page 20 Intentionally left empty...
  • Page 21: Installation

    6.0 Installation Refer to the Specifications section for dimensional drawings and connection specifications. Use these drawings to find a suitable location for the appliance. 6.1 Code requirements The appliances are tested and certified under CSA STD.C22.2 No.60335-1 and 60335-2-40. Below are the code requirements for every installation.
  • Page 22: Installation Clearances

    The unit must be mounted above the anticipated snow level. Do not mount at ground level where grass trimmings can block the fan vents. IBC recommends mounting the unit on a cement pad with rubber or neoprene blocks to absorb vibration noise, or a similarly durable, level and permanent mounting surface.
  • Page 23 6.3 Important Design Considerations Table 6 COPs of by Supply Water Temperatures and Outdoor Temperatures (at 60Hz) HPX 5 See charts in Specification section for capacity and COP details on both models across their modulation ranges. It is always best practice for any heat pump to design for a supply temperature maximum of 120°F.
  • Page 24: Water Piping

    Section: Installation 6.4 Water Piping IBC recommends using unions on the inlet and outlet water connections. Unions simplify many service procedures, for example cleaning of an inlet water strainer. See System piping on page 27below for other piping recommendations. Warning Water quality has a significant impact on the lifetime and performance of a hydronic heat pump's heat exchanger.
  • Page 25: Hydronic Heat Pump Circulator Selection

    It is up to the installer to select a circulator that can overcome the head resistance shown in the appropriate table below: Table 7 heat exchanger head loss (requires correction if glycol is used) HPX 3 Table 8 heat exchanger head loss (requires correction if glycol is used) HPX 5...
  • Page 26 Ethylene glycol is toxic, and may be prohibited for use by codes applicable to your installation location. For environmental and toxicity reasons, IBC recommends only using non-toxic propylene glycol. Propylene glycol solution is commonly used in a closed loop where freeze protection is required.
  • Page 27: Relief Valve

    For this design IBC recommends, presuming 12-inch tubing centers, a six-inch slab with a minimum equivalent area of 34 feet by 40 feet for the...
  • Page 28 Note The piping drawings in this manual are simple schematic guides to a successful installation. For further information and details, consult our concept drawings – which provide details on specific applications (available in IBC's Technical Portal). There are many necessary components not shown, and details such as thermal traps are left out so the drawings have greater clarity.
  • Page 29: Essential Components

    6.7.2 Essential components 6.7.2 Essential components Pressure relief valve: located indoors, discharges into glycol fill tank Microbubble air eliminators are best installed where the fluid is at the highest temperature and lowest pressure To buffer tank From buffer tank Glycol fill tank Expansion tank connection (point of no pressure change);...
  • Page 30 Section: Installation Warning Close the fill valve after any addition of water to the system, to reduce risk of water escaping. Caution Contact local water purveyors about the suitability of the supply for use in hydronic heating systems. If unsure about water quality, bring water or hydronic fluid of known quality to the site.
  • Page 31: Glycol Isolation With External Heat Exchanger

    6.7.3 Glycol isolation with external heat exchanger 6.7.3 Glycol isolation with external heat exchanger Glycol fill tank Heat Exchanger. Note: the external heat exchanger separates the outside glycol fluid from the inside distribution fluid. The heat exchanger must be sized generously so as to keep the distribution supply temperature within 5°F (3°C) of the glycol supply.
  • Page 32: Glycol Isolation With Indirect / Buffer Tank

    Section: Installation 6.7.4 Glycol isolation with indirect / buffer tank Hydronic Heat Pump circulator with integral check valve Glycol fill tank. Extended-coil buffer tank for glycol isolation. Note extra surface area of specialty heat pump indirect tank for efficient heat transfer: domestic model of indirect tank would likely cause short-cycling.
  • Page 33: Buffer Tank Piping

    6.7.5 Buffer tank piping 6.7.5 Buffer tank piping Hydronic Heat Pump circulator with integral check valve Glycol fill tank: 25%-50% propylene glycol throughout system. Alternatively, a flat plate heat exchanger or heat pump indirect tank can isolate glycol from distribution water (see previous figures).
  • Page 34: Buffer Tank Sizing

    Q = heat source output rate, i.e. minimum output (Btu/h) q = lowest rate of heat extraction from tank: may be zero (Btu/h) ΔT = tank differential (°F); IBC recommends 10 and advises this should not exceed 20°F Quick calculation for buffer tank sizing 6.7.7 Quick calculation for buffer tank sizing...
  • Page 35: Multiple Hydronic Heat Pumps Piping

    Glycol fill tank (shown), or fill station with isolation closed Supply piping to loads Returns from loads Figure 13 Multiple hydronic heat pumps piping concept with buffer tank Note that multiple heat pumps should be staged using an external control such as the IBC Sky...
  • Page 36: Multiple Heat Sources With Buffer Tank

    6.7.9 Multiple heat sources with buffer tank Hydronic heat pump; system fluid circulates outdoors so typically requires glycol treatment. High Efficiency Hydronic Gas Boiler or Electric boiler staged (by IBC Sky 35 controller) to supplement heat pump below system balance point. Check Valves Closely-spaced tees: max.
  • Page 37: Electrical Connections

    6.8.1 Power management, quality and electrical protection Note The IBC hydronic heat pump (like any modern appliance that contains electronic equipment) must have a “clean” power supply, and is susceptible to power surges and spikes, lightning strikes and other forms of severe electrical “noise”. Power conditioning equipment (surge protectors) may be required in areas where power quality is suspect.
  • Page 38: Hydronic Heat Pump Circulator

    Figure 16 HPX Series circulator relay field wiring IBC recommends the application of the either the IBC Sky 35 module for load circulator control or, alternatively, using a pressure-activated load circulator for which control is unnecessary. See also Control wiring overview on page 40.
  • Page 39: Thermostat Wiring

    6.8.4 Thermostat wiring 6.8.4 Thermostat wiring Thermostat-type control wiring will go to the J4 terminals (On Off Heat Cool). To make the control signal a call for heating (no cooling), wire the J2 (Heat Cool) and J4 (On Off Heat Cool) terminals in parallel as shown.
  • Page 40: Control Wiring Overview

    Section: Installation 6.8.5 Control wiring overview This drawing combines the t-stat and pump wiring drawings above, and adds details for cooling and system pump control. Jumper between J1 terminals O/B terminal of heat pump thermostat (interlock) set to B type (reversing valve energized during heating mode) J2 terminals receive 24V for heating Heat pump thermostat call for heating or...
  • Page 41: Other Wiring

    Shown in Figure above, as "Remote On/Off." 6.8.7 Buffer tank sensor wiring IBC recommends the use of a buffer tank to separate the operation cycles from the load HPX Series operation cycles.
  • Page 42 Section: Installation IBC strongly recommends the use of a properly sized buffer tank with each system. Where a buffer tank is not used, IBC recommends the application of the either the IBC Sky 35 module for load control.
  • Page 43: About The Hydronic Heat Pump Controller

    7.1 Use with the IBC Sky 35 Controller All HPX Heat Pump setup and configuration can be done through IBC's Sky 35 controller. Using the Sky 35 controller gives the installer the advantage that control wiring to the HPX will consist of only two wires, i.e.
  • Page 44 Section: About the hydronic heat pump controller In the Settings Menu there are five tiles. Select the upper right tile, Factory. A keypad will appear. Enter the code 22. The Factory menu (with five tiles) will appear: select Parameters The Parameters table is five pages long. For stand-alone operation, a value on the first page, Parameter H07, Display/Remote Control, must be changed to...
  • Page 45: Adjusting Temperature Units In The Parameters Menu

    7.2.2 Adjusting Temperature Units in the Parameters Menu Changes are saved by backing out from the Parameter menu. 7.2.2 Adjusting Temperature Units in the Parameters Menu To adjust the temperature units between °Fahrenheit and °Celcius, go to the Parameters table by the path Settings >...
  • Page 46: Adjustment In The Parameters Menu For Cooling

    Section: About the hydronic heat pump controller 7.2.3 Adjustment in the Parameters Menu for Cooling To activate cooling mode, a value on the first page, Parameter H05, Cooling Mode, must be changed to Yes; see illustration above. Changes are saved by backing out from the Parameter menu.
  • Page 47: Before Operating The Hydronic Heat Pump

    8.0 Before operating the hydronic heat pump Danger Do not store or use gasoline or other flammable vapors or liquids in the vicinity of this or any other appliance. If you smell gas vapors, do not try to operate any appliance - do not touch any electrical switch or use any phone in the building.
  • Page 48 Intentionally left empty...
  • Page 49: Heat Pump Operation

    9.0 Heat Pump Operation Before operating the appliance, there are some important checks that need to be performed. For more information, see Before operating the hydronic heat pump on page 9.1 Starting and Shutting Down the Heat Pump Start-up Checklist Check □...
  • Page 50 Intentionally left empty...
  • Page 51: Service And Maintenance

    10.0 Service and maintenance Inspection of the hydronic heat pump is to be performed annually by a qualified service technician. Caution The owner is responsible for general care of the hydronic heat pump. Improper maintenance may result in a hazardous condition. 10.1 Maintenance checklist for homeowner Maintenance Required Frequency...
  • Page 52 Section: Service and maintenance □ Review logs □ Observe noises / vibrations / leaks / puddles As the refrigeration system is hermetically sealed, the compressor oil is likely to be in good condition. However, in the event of a compressor motor winding short, acidic oil is a possibility.
  • Page 53: Troubleshooting

    11.0 Troubleshooting This section includes various conditions as well as possible solutions. Often, a problem can be identified and solved through basic checks: confirming the electrical power supply and resetting the thermostat control. Below are some common troubleshooting issues including fixes. 1.
  • Page 54: Troubleshooting Error Messages

    Section: Troubleshooting 11.2 Troubleshooting error messages ERROR MESSAGES Code Error Description Fix / Comment Inlet temperature sensor fault Check inlet temperature sensor for open line or short Outlet temperature sensor fault Check outlet temperature sensor for open line or short P032 Hot water temperature sensor fault Check hot water temperature sensor for open line or short...
  • Page 55 11.2 Troubleshooting error messages ERROR MESSAGES Code Error Description Fix / Comment Low pressure protection Monitor operating pressure and check pressure switch safety circuit E171 Freeze protection Return water temperature is low. Primary (outdoors) freeze Ambient temperature is low. protection Secondary (outdoors) freeze Ambient temperature is low.
  • Page 56: Temperature Issues

    Section: Troubleshooting 11.2.1 Temperature issues Temperature issues Issue Diagnosis Low heat Operating Increase temperature target. temperature too low. Load configuration Review load configuration parameters. improperly set up. Hydronic Heat Compare heat load calculation to maximum Pump undersized. unit output. Air trapped within Bleed system as required.
  • Page 57: Miscellaneous Issues

    11.2.2 Miscellaneous issues 11.2.2 Miscellaneous issues Miscellaneous issues Issue Diagnosis ‘Ghost’ call Triac or ‘Power- Remove connections from hydronic heat pump to confirm for heat. robbing’ thermostat that stray voltage, or current induced in thermostat wiring, sending current to is source of nuisance signal. If so, replace the Power hydronic heat pump.
  • Page 58: Exploded Views Of The Hpx Series Heat Pumps

    Section: Exploded views of the HPX series Heat Pumps 12.0 Exploded views of the HPX series Heat Pumps HPX 3 parts diagram...
  • Page 59 HPX 3 parts diagram P-kit Item ID Description replacement Quantity Front door, HPX 3 P-1921 Axial fan grill cover, HPX 3 P-1915 Axial fan blade, HPX 3 P-1913 Axial fan DC motor, HPX 3 P-1911 Compressor driver module, HPX 3 P-1909...
  • Page 60: Hpx 5 Parts Diagram

    Section: Exploded views of the HPX series Heat Pumps HPX 5 parts diagram Front door, HPX 5 P-1922 Axial fan grill cover, HPX 5 P-1916 Axial fan blade, HPX 5 P-1914 Axial fan DC motor, HPX 5 P-1912...
  • Page 61 HPX 5 parts diagram Main control board P-1905 Outdoor fin coil, HPX 5 P-1926 Top controls cover, HPX 5 P-1920 Top chassis cover, HPX 5 P-1918 Fan speed control board P-1906 Switch supply board P-1907 Compressor driver module, HPX 5 P-1910 Low-voltage protection board P-1903...
  • Page 62 Section: Exploded views of the HPX series Heat Pumps Optional Parts: Description P-kit replacement # Outdoor Sensor P-9067 Air Vent Piping Kit P-195 P-9014 External Tridicator Pressure Relief Valve: 30 psi P-9009 Pressure Relief Valve: 45 psi P-9020 Pressure Relief Valve: 50 psi P-9134...
  • Page 63: Installation & Commissioning Report

    Installation & Commissioning Report Installation & Commissioning Report Model Number _____________________ Serial Number ______________________________ Date of Installation ________ Address of installation __________________________________ User contact information ________________________________________________________ Installer Information (Company & Address)_________________________________________ Phone/Fax/E-mail _____________________________________________________________ □ Circuit Breaker # ____ Labeled? Power supply wire gauge _____ □...
  • Page 64 Intentionally left empty...
  • Page 65: Appendices

    13.0 Appendices Wiring diagrams Figure 19 HPX 3 internal wiring diagram...
  • Page 66 Section: Appendices Figure 20 HPX 5 internal wiring diagram...
  • Page 67 • This unit is part of a modular or multiple unit system having a total input of 300,000 BTU/hr or greater. • This unit is equipped with a tankless coil (not applicable to these hydronic heat pumps). US installers should contact IBC for any further information required.
  • Page 68 Toll Free: 1-844-HEAT-IBC / 1-844-432-8422 www.ibcboiler.com Information in this document is subject to change without notice. IBC assumes no responsibility for changes made to the manual due to clerical errors, to regulation changes, or to product development. August 03, 2023 120-441E1 ©...

This manual is also suitable for:

Hpx 5Ihexxf1-003tIhexxf1-005t

Table of Contents