Table of Contents
Advertisement
Quick Links
7396-E06
How to Get Extended Warranty 1 year
2 years
The warranty period will be extended from 1 year to 2 years when you register customer
information. ATAGO Logger NFC can also be downloaded at the same time.
https://www.atago.net/ur/index.php?l=en
Trouble scanning the code? Access this link
Pocket Acidity Meter (Yogurt)
Master Kit
PAL-Easy ACID96
Cat. No. 7396
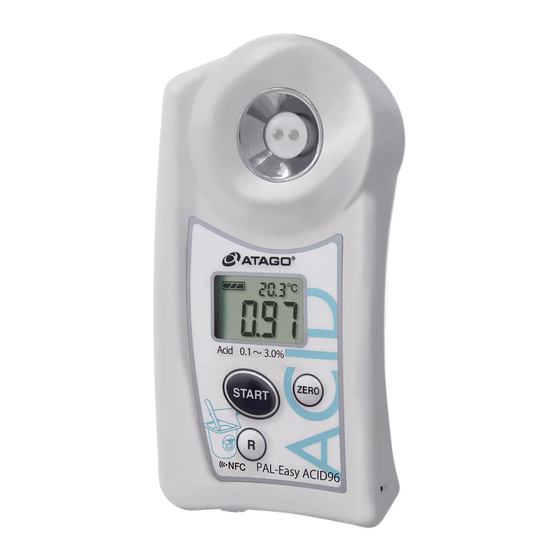
Parts
LCD
Displays the measured values,
sensor temperature, and battery
indicator.
The instrument will turn itself off
after 2 minutes of inactivity.
To manually turn it off, hold down
the START button for more than
2 seconds.
START Button
Press to take measurement.
R Button
Press to restore default settings
for the Offset Feature.
Battery Compartment
Place and remove batteries from
here.
Image is for explanation purposes only.
It may be different than the actual product purchased.
Contents
Main unit...1 Inspection Certificate...1 AAA batteries...2 Measuring Spoon 1mL...1 Beaker 100mL...1
Digital scale...1(CAbout the Digital Scale)
mPlease remove the tape in the battery compartment before first use.
cThe measuring spoon is available from ATAGO.
Part No. RE-39005 Measuring Spoon 1mL
ATAGO instruments are rigorously inspected to ensure each unit meets the highest standards of quality assurance.
Instrument
The instrument measures the acidity (%) in the 1:50 dilution of a sample that is diluted with purified water.
The measurement value is the acidity (%) of the undiluted sample (stock-solution).
Sample Preparation Tips
・Sample dilution
Any amount of sample can be made as long as the dilution ratio is 1:50. We recommend 1.00g of sample to
keep accuracy consistent.
<example>
Sample
Purified water
1.10
55.00
Sample 1.10g
Add purified water until the
total weight is 55.00g.
Measurement Value
This unit measures and determines the acidity through electrical conductivity.
Lactic acid is the primary acid found in Yogurt.
The instrument measures the total acidity in a sample and converts it into lactic acid concentrations.
Automatic Temperature Compensation
The Automatic Temperature Compensation (ATC) feature is based on temperature detected by the thermo sensor located
near the sensor area.
ATC may not work correctly when the temperature of the sensor area is not the same as the actual temperature of the
sample. When measuring a hot or cold sample, let it sit on the sensor for approximately 20 seconds and measure, or take
multiple readings until measurements become stable.
Preparation
Zero-setting
1.
2.
Clean the sensor
Press the START button
with water.
(with nothing on the sensor).
Dry the area with
QR code
tissues thoroughly.
R
Instruction Manual
Measurement
[1]Dilution
CAbout the Digital Scale
Sample Stage
cNecessary Materials : Digital scale, Beaker 100mL
Place sample on the sensor
1.
2.
Press the
Place the beaker on
located at the center of the
POWER Button.
the scale and zero set
sample stage.
(tare).
(Press the Zero-set
button (tare))
ZERO Button
Press to perform zero-setting.
0.00
0.00
Lanyard Hole
[2]Measuring the Acidity
1.
Apply some diluted sample.
At least 0.6mL
Cleaning
・Wipe off the sample. Clean the sensor with water.
Dry the area with tissues thoroughly.
・Clean oily residues with mild soap, and then, rinse with water.
mHandle the sensor with care so as not to scratch it.
Addendum
Measuring Without using a Scale
[1]Dilution
cNecessary Materials : Measuring spoon 1mL, Beaker 100mL
1.
Using the attahced measuring spoon,
place a level spoonful (1mL) of sample in
the attached beaker.
Sample
When there is any doubt regarding accuracy of measurement results, adjust the reference value according to the following procedure.
cThe reference solution is available from ATAGO.
Checking with Reference Solution
1.
2.
Clean the
Press the ZERO
sensor with
button (with nothing
water.
on the sensor) to
Dry the area
zero-set.
with tissues
thoroughly.
"000" will appear.
(Press the
START button
to turn on the
000
instrument.)
Flash
Calibration
6.
Apply the reference solution.
Turn on the instrument.
Press the START and ZERO
buttons simultaneously.
Zero-setting and Measurement
mRecommended on a daily basis.
3.
"000" will appear.
Measurement: not 0.00
20.4
-Zero-setting is required.-
0 0 0
Press the ZERO button
(with nothing on the
Flash
Light up
sensor).
Measurement: 0.00
20.4
℃
Proceed to Measurement
0.0 0
3.
4.
5.
Pour 1.00g of sample into
Add purified water
the beaker.
until the total weight is
cAny amount of sample
50.00g.
can be made as long as the
dilution ration is 1:50. We
Purified water
recommend 1.00g of sample
to keep accuracy consistent.
Sample
T
50.00
1.00
2.
Press the
Measurement is displayed after "---."
START button.
The unit of Acid is %.
20.4
℃
0.2 5
cThe measurement is the value of the sample
(stock-solution).
For approximate measurement only
2.
3.
Add purified water
Gently stir.
to the beaker until the
total amout is 50mL.
Proceed to
[2]Measuring
1mL
50mL
the Acidity
Checking with Reference Solution
Part No. RE-130004
Reference solution (0.04% Citric acid solution)
3.
4.
5.
Apply the reference
Press the
solution.
START button
Measurement: not 1.16 (±0.12) Acid
*Reference solution
Calibration is required.
(0.04% (g/100g) Citric
acid solution)
Measurement: 1.16 (±0.12) Acid
The instrument
20.4
℃
is calibrated
correctly.
At least 0.6mL
Light up
"CCC"
20.4
℃
will appear.
CCC
Flash
Light up
Acid: Offset Function
Discrepancies with titration
Due to the difference in measurement principles, readings
from the instrument may not match up exactly with the
readings by titration for certain samples. However,
correlation between the two testing methods can be seen.
℃
Offset feature use
Create a conversion chart between the two testing methods.
For addition/subtraction (b) [Range: -5.00 to 5.00]
1.
3.
2.
Hold down
Press START
Press ZERO to
ZERO while it is
select either
to confirm.
turned on.
addition (+) or
(While the measured
subtraction (-).
value is displayed)
Addition/subtraction
"b" will appear
(b) will appear.
For addition, only "b"
will appear.
-b
-b
Gently stir.
-b
0.0 0
No plus sign will be
displayed.
For coefficient (a) [Range: 0.50 to 5.00]
6.
7.
Enter the coefficient.
Press
START to
a
confirm the
1.0 0
coefficient.
The 3rd digit: 0 to 9
The 2nd digit: 0 to 9
The 1st digit: 0 to 5
"End" will appear.
START to confirm
ZERO to change
E n d
and move to the
the number.
next digit.
・The measurement range is shifted according to the offset settings.
・Screen images when offset is on.
During measurement
After zero-setting with air
20.4
℃
<example>
- - -
0.3 0
Offset "b" = addition of 0.30
Error Messages
The following messages alert the user when an operation has failed.
Lo
・The battery is low.
A A A
Acid
・The sensor was not empty when zero-setting
was attempted.
・Calibration was attempted with something other
than the calibration solution.
Specifications
Measurement range
Acid 0.10 to 3.00%
Resolution
Acid 0.01%
Measurement accuracy
Acid ±0.10% (0.10 to 1.00%) Relative precision±10% (1.01 to 3.00%)
±1℃
Measurement time
Approx. 2 seconds
Backlight
The backlight stays on for 30 seconds after any button is pressed.
20.4
℃
Output
NFC Forum Type 4 Tag ISO/IEC 14443 Type A
1.16
Output category
Date Time,
Acidity scale
(e.g.) 2019/01/17 09:30:45, 0.24 21.3
Automatic temperature compensation range
10 to 40℃
Ambient temperature range
10 to 40℃
International Protection class
IP65
Power supply
Two (2) AAA alkaline batteries
Dimensions and Weight
55(W)×31(D)×109(H)mm , 100g (main unit only)
( y
An example of conversion chart
y = a x + b
)
0.8
0.7
y:titration readings
x:The instrument readings
0.6
a:coefficient (multiplication)
0.5
b:addition/subtraction number
0.4
0.35
0.45
0.55
0.65
0.75
(ⅹ)
4.
5.
Enter the addition/subtraction
Press START
number.
to confirm the
addition/subtrac
-b
0.0 0
tion number.
The 3rd digit: 0 to 9
The 2nd digit: 0 to 9
The 1st digit: 0 to 5
a
1.0 0
START to confirm
ZERO to change
and move to the
the number.
next digit.
For default
Press the R button while setting up the
Off-Set feature.
Factory default value
b
Addition/subtraction
0.0 0
(b) 0.00
a
Coefficient
1.0 0
(a) 1.00
E n d
L L L
Temperature
・The sensor temperature is below the temperature
range.
H H H
Acid
・The sample measured outside the measurement range.
Temperature
・The sensor temperature is above the temperature
range.
10.0 to 40.0℃
0.1℃
Acidity [%], Temp [degC]
2306K Printed in Japan
Advertisement
Table of Contents

Subscribe to Our Youtube Channel
Related Manuals for ATAGO 7396


Summary of Contents for ATAGO 7396
- Page 1 Dry the area with tissues thoroughly. ・Clean oily residues with mild soap, and then, rinse with water. ATAGO instruments are rigorously inspected to ensure each unit meets the highest standards of quality assurance. mHandle the sensor with care so as not to scratch it.
- Page 2 "0" will appear. The item's weight will appear on the scale. ・ATAGO is not liable for any loss and damage caused by the measurement and use of this instrument. Unit ・If this instrument is used to measure highly acidic samples, the sensor section and sample stage may be damaged, resulting...
Need help?
Do you have a question about the 7396 and is the answer not in the manual?
Questions and answers