Table of Contents
Advertisement
Available languages
Available languages
Quick Links
Questo manuale d'istruzione è fornito da trovaprezzi.it. Scopri tutte le offerte per
Imperial DABMan i510BT Nero
o cerca
il tuo prodotto tra le
migliori offerte di Personal Audio e Hi-Fi
DABMAN i510 BT
D
D
Bedienungsanleitung
All-In-One HiFi System
Fernbedienung über App
Multilingual
V1_20_10_22
www.telestar.de
Advertisement
Chapters
Table of Contents

Summary of Contents for Telestar Imperial DABMAN i510 BT
- Page 1 Questo manuale d’istruzione è fornito da trovaprezzi.it. Scopri tutte le offerte per Imperial DABMan i510BT Nero o cerca il tuo prodotto tra le migliori offerte di Personal Audio e Hi-Fi DABMAN i510 BT Bedienungsanleitung All-In-One HiFi System Fernbedienung über App Multilingual V1_20_10_22 www.telestar.de...
-
Page 3: Table Of Contents
INHALTSVERZEICHNIS 1. VORWORT ..........7 2. - Page 4 INHALTSVERZEICHNIS 6. ERSTE INBETRIEBNAHME ....... . . 30 6.5 Menüsprache..........31 6.6 Datum Zeit Modus .
- Page 5 INHALTSVERZEICHNIS 8. FUNKTIONEN ..........50 8.1 DAB+ Radio .
- Page 6 INHALTSVERZEICHNIS 9. FEHLERBEHEBUNG ........71 10.
-
Page 7: Vorwort
Bitte schicken Sie das Gerät nicht gleich ein, rufen Sie uns an! Technische Hotline für Deutschland: 02676 / 9520101 Gerne können Sie auch eine E-mail an service@telestar.de oder ein Fax an 02676 / 9520159 senden. Sollten wir das Problem auf diesem Wege nicht lösen können, senden Sie das Gerät bitte an unser Service CENTER unter folgender Adresse ein:... -
Page 8: Sicherheitshinweise
2. SICHERHEITSHINWEISE 2.1 Zeichenerklärung SYMBOL BEDEUTUNG Dieses Signalwort bezeichnet eine Gefährdung mit einem GEFAHR! hohen Risikograd, Nichtbeachtung des Hinweises, den Tod oder eine schwere Verletzung zur Folge hat. Dieses Signalwort bezeichnet eine Gefährdung mit einem WARNUNG! mittleren Risikograd, die, bei Nichtbeachtung des Hinweises, den Tod oder eine schwere Verletzung zur Folge haben kann. - Page 9 2. SICHERHEITSHINWEISE 2.1 Zeichenerklärung SYMBOL BEDEUTUNG Dieses Zeichen warnt Gefahren. Schutzklasse II Elektrogeräte mit Schutzklasse II haben eine verstärkte oder doppelte Isolierung in Höhe der- Bemessungsisolationsspannung zwischen aktiven und berührba- ren Teilen (VDE 0100 Teil 410, 412.1). Sie haben meist keinen Anschluss an den Schutzleiter.
- Page 10 2. SICHERHEITSHINWEISE 2.1 Zeichenerklärung SYMBOL BEDEUTUNG Bei Geräten mit Hohlsteckern Abb. 1 kennzeichnen diese Symbole die Polarität des Steckers. Hierbei wird zwischen Abb. 2 Varianten unterschieden Abb 1: Außen Plus/ Innen Minus Abb 2: Innen Plus / Außen Minus Geräte mit diesem Zeichen dür- fen nur im Haus in tockener Umgebung betrieben werden Bedienungsanleitung...
-
Page 11: Bestimmungsgemäßer Gebrauch
2. SICHERHEITSHINWEISE 2.2 Bestimmungsgemäßer Gebrauch Bei diesem Produkt handelt es sich um ein Gerät der Unterhaltungselektronik. Das Gerät dient als Empfänger für DAB+, UKW und Internetradiosignale und zur Wiedergabe von Audiodateien von einem USB Datenträger, Bluetooth Gerät oder einem Netzwerklaufwerk und zur Aufnahme von Audiodateien auf einen USB Datenträger. -
Page 12: Sicherheitshinweise
2. SICHERHEITSHINWEISE 2.3. Sicherheitshinweise Prüfen Sie das Gerät vor der Verwendung. Im Falle einer Beschädigung oder eines Defekts darf das Gerät nicht in Betrieb genommen werden. Verletzungsgefahr! Verletzungsgefahr für Kinder und Personen mit verringerten physischen, sen- sorischen oder mentalen Fähigkeiten (beispielsweise teilweise Behinderte, älte- re Personen mit Einschränkung ihrer physischen und mentalen Fähigkeiten) oder Mangel an Erfahrung und Wissen. -
Page 13: Gerät Anschließen
Wenn Sie sichtbare Schäden feststellen, oder das Gerät sichtbare Schäden aufweist, nehmen Sie es bitte nicht mehr in Betrieb. › Sollten Sie ein technisches oder mechanisches Problem fest stellen, setzen Sie sich bitte mit dem TELESTAR Service in Verbindung. › Verwenden Sie nur das im Lieferumfang enthaltene Netzteil! ›... -
Page 14: Gerät Vor Defekten Schützen
2. SICHERHEITSHINWEISE 2.6. Gerät vor Defekten schützen HINWEIS! Ungünstige Umgebungsbedingungen wie Feuchtigkeit, übermäßige Wärme oder fehlende Belüftung können das Gerät schädigen. Verwenden Sie das Gerät nur in trockenen Räumen. Vermeiden Sie die direkte Nähe von: Wärmequellen, wie z.B. Heizkörpern, offenem Feuer, wie z.B. Kerzen, Geräten mit starken Magnetfeldern, wie z. -
Page 15: Verletzungsgefahr
2. SICHERHEITSHINWEISE 2.7. Verletzungsgefahr WARNUNG! Übermäßiger Schalldruck bei Verwendung von Ohr- oder Kopfhörern kann zu Schädigungen oder zum Verlust des Hörvermögens führen. Das Hören mit Ohrhörer oder Kopfhörer mit erhöhter Lautstärke über einen längeren Zeitraum kann Schäden beim Nutzer verursachen. Bitte prüfen Sie die Lautstärke, bevor Sie Ohrhörer oder Kopfhörer in Ihre Ohren einsetzen bzw. -
Page 16: Gerät Reinigen
Eventuell ist ein Zurücksetzen auf die Werkseinstellungen notwendig. Sollte dies nicht zum Erfolg führen, wenden Sie sich bitte an Ihren Händler oder treten Sie direkt mit TELESTAR DIGITAL GmbH in Kontakt. Nähere Informationen finden Sie auch auf Seite 81. Bedienungsanleitung... -
Page 17: Lieferumfang
3. LIEFERUMFANG Bitte entnehmen Sie alle Teile aus der Verpackung und entfernen Sie alle Verpackungsmaterialien vollständig. Sollten ein oder mehrere der angebenenen Teile fehlen, wenden Sie sich bitte an: TELESTAR Service Center Am Weiher 14, 56766 Ulmen e-mail: service@telestar.de ANZAHL ERKLÄRUNG... -
Page 18: Geräteübersicht
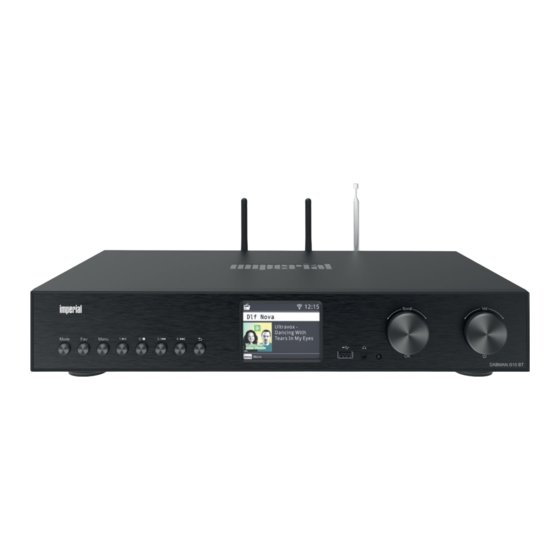
4. GERÄTEÜBERSICHT 4.1 Bedienfeld und Anschlüsse Bedienungsanleitung... -
Page 19: Bedienfeld Vorderseite
4. GERÄTEÜBERSICHT 4.2 Bedienfeld Vorderseite Mode Schalten Sie hier den Betiebsmodus des Gerätes zwischen Internetradio, DAB+, UKW, UPnP, AUX und USB um. Favoriten Taste Schaltet auf einen der individuell abgespeicherten Favoritensendern. Menü Aktivieren Sie das Menü des Gerätes über diese Taste Stationsspeichertaste 1/Play/Pause Schaltet im Radiomodus auf den 1. - Page 20 4. GERÄTEÜBERSICHT 4.2 Bedienfeld Vorderseite Kopfhöreranschluss Stecken Sie hier einen Kopfhörer ein, um die vom Radio wiedergegebene Musik über einen Kopfhörer zu hören. Bei Anschluss eines Kopfhörers, wird die Musikwiedergabe über die Lautsprecher des Gerätes unterbrochen. Kontroll LED Drehregler, Bestätigungstaste Navigieren Sie über den Drehregler durch das Menü...
-
Page 21: Anschlüsse Rückseite
4. GERÄTEÜBERSICHT 4.3 Anschlüsse Rückseite UKW/DAB+ Antenne Antennenanschluss für die im Lieferumfang enthaltene Teleskopantenne. LAN Anschluss Verbinden Sie hier das Gerät mit einem Netzwerkkabel an einem vor- handenem Netzwerk, um die Internetradiofunktion nutzen zu können. Alternativ kann das Gerät auch über W-LAN verbunden werden. Optischer Digital- SPDIF Audio-Ausgang Wenn Sie einen externen HiFi Verstärker nutzen und dieser über einen entsprechenden optischen digitalen Eingang verfügt, verbinden Sie die... - Page 22 4. GERÄTEÜBERSICHT 4.3 Anschlüsse Rückseite Bluetooth Antenne Anschluss für die im Lieferumfang enthaltene Antenne. Über die an die- ser Buchse angeschlossene Antenne empfängt der DABMAN i510 BT Bluetooth Signale z.B. eines mobilen Endgerätes Smartphone oder Tablet W-LAN Antenne Anschluss für die im Lieferumfang enthaltene W-LAN Antenne, um das Gerät über W-LAN mit Ihrem W-LAN Heimnetzwerk zu verbinden.
-
Page 23: Fernbedienung
4. GERÄTEÜBERSICHT 4.4 Fernbedienung Hinweis: Mit der Applikation können Sie Ihr kompatibles Internetradio per Tablet oder Smartphone bedienen. Die App ist sowohl für iOS als auch für Android Betriebssysteme geeignet. Weitere Informationen dazu finden Sie in Kapitel 8.14. IMPERIAL ® DABMAN i510 BT... - Page 24 4. GERÄTEÜBERSICHT 4.4 Fernbedienung 1. Standby Taste Schalten Sie mit dieser Taste das Gerät ein oder aus. 2. Mode Schalten Sie hier die verschiedenen Betriebsarten um. Diese Taste mit einer anderen Funktion belegt werden. Lesen Sie dazu ggf. auch Kapitel 8.12. 3.
- Page 25 4. GERÄTEÜBERSICHT 4.4 Fernbedienung 10. Steuerung und Anwahl der Musiktitel über USB, UPnP, Media I◄◄ Vorheriger Titel auswählen / Schneller Rücklauf Stoppt die Wiedergabe ►II Startet oder Pausiert eine Wiedergabe ►►I Nächster Titel auswählen / Schneller Vorlauf 11. INFO Zeigt Informationen des laufenden Radioprogramms. 12.
-
Page 26: Anschlüsse
5. ANSCHLÜSSE 5.1 Anschluss von Wiedergabegeräten mit Cinch Buchsen (analog) An diese LINE OUT Audioausgänge des DABMAN i510 BT können Sie z.B. einen Audio HiFi Verstärker anschließen. Nutzen Sie dazu die LINE OUT R/L Buchsen. Soundsystem Bedienungsanleitung... -
Page 27: Anschluss Von Audioausgabegeräten Mit
5. ANSCHLÜSSE 5.2 Anschluss von Audioausgabegeräten mit digitalem Audioeingang Dieser Anschluss ist dann zu empfehlen, wenn der Ton des DABMAN i510 BT von einem bereits vorhandenes Soundsystem mit digitalen Audioeingängen wiedergegeben werden soll. Verwenden Sie einen der beiden digitalen Ausgänge OPTICAL OUT oder COAXIAL OUT am DABMAN i510 BT, wenn Ihr vorhandener HiFi Verstärker über einen optischen oder koaxialen Digitaleingang SPDIF verfügt. -
Page 28: Anschluss An Einen Internetrouter
5. ANSCHLÜSSE 5.3 Anschluss an einen Internetrouter Verbinden Sie hier das Gerät mit einem Netzwerkkabel an einem vorhan- denem Internetrouter, um die Internetradiofunktion oder die UPnP-Funktion nutzen zu können. Alternativ kann das Gerät auch über W-LAN verbunden werden. Internetrouter Bedienungsanleitung... -
Page 29: Erste Inbetriebnahme
6. ERSTE INBETRIEBNAHME 6.1 Allgemeine Bedienhinweise › Schalten Sie das Gerät mit der Standby Taste auf der Fernbedienung oder am Gerät ein oder aus. › Die Lautstärke erhöhen Sie mit der Taste VOL+auf der Fernbedienung oder durch Drehen des Reglers VOL+am Gerät. ›... -
Page 30: Antennenanschlüsse
6. ERSTE INBETRIEBNAHME 6.2 Fernbedienung vorbereiten › Bei unsachgemäßer Verwendung von Batterien besteht Explosionsgefahr! Lesen Sie dazu die Sicherheitshinweise in Kapitel 2.8. › Achten Sie auf die richtige Polung der Batterie! › Setzen Sie danach das Batteriefach wieder ein. 6.3 Antennenanschlüsse Schrauben Sie die im Lieferumfang enthaltene DAB+ /UKW Teleskopantenne an den Antennenanschluss auf der Rückseite des... -
Page 31: Menüsprache
6. ERSTE INBETRIEBNAHME 6.5 Menüsprache Über die Tasten ▼▲ der Fernbedienung können Sie die Menüsprache wählen. Bestätigen Sie die gewünschte Menüsprache mit der Taste auf der Fernbedienung. 6.6 Datum Zeit Modus Wählen Sie hier aus, wie das Radio die Uhrzeit synchronisieren soll. Über die Tasten ▼▲... -
Page 32: Gmt Zeitzone
6. ERSTE INBETRIEBNAHME 6.7 GMT Zeitzone Wählen Sie hier aus, in welcher Zeitzone Sie sich befinden. Für Deutschland und den größten Teil Europas wählen Sie GMT + 1:00 aus. Über die ▼▲ Tasten der Fernbedienung können Sie die die Auswahl treffen. Bestätigen Sie mit der Taste auf der Fernbedienung oder durch Druck des Drehreglers am Gerät. -
Page 33: Standby Mode
6. ERSTE INBETRIEBNAHME 6.9 Standby Mode Geben Sie in diesem Punkt an, ob die Uhrzeit im Display angezeigt werden soll, wenn das Radio im Standby Betrieb ist. Über die ▼▲Tasten der Fernbedienung können Sie die Auswahl treffen. Bestätigen Sie mit der Taste auf der Fernbedienung oder durch Druck des Drehreglers am Gerät. -
Page 34: Netzwerkauswahl
6. ERSTE INBETRIEBNAHME 6.10 Standort Über die ▼▲ Tasten der Fernbedienung können Sie die die Auswahl treffen. Bestätigen Sie mit der Taste auf der Fernbedienung oder durch Druck des Drehreglers am Gerät. 6.11 Netzwerkauswahl Entscheiden Sie zunächst, ob die Netzwerkverbindung über LAN oder W-LAN erfolgen soll. - Page 35 6. ERSTE INBETRIEBNAHME 6.11 Netzwerkauswahl Möchten Sie eine Netzwerkverbindung über W-LAN herstellen, wählen Sie W-LAN an und bestätigen Sie mit OK. Im nächsten Schritt werden Ihnen alle verfügbaren W-LAN Netzwerke angezeigt, die sich in Reichweite des Gerätes befinden. Wählen Sie das Netzwerk aus, mit dem eine Verbindung hergestellt werden soll und bestätigen Sie mit der Taste OK.
- Page 36 6. ERSTE INBETRIEBNAHME 6.11 Netzwerkauswahl Geben Sie den W-LAN Schlüssel ein. Mit den ▼▲ Tasten auf der Fernbedienung oder über den Drehregler am Gerät können Sie ein Zeichen auswählen und setzen. Mit der Taste ► oder über den Drehregler bewegen Sie den Curser einen Schritt weiter.
-
Page 37: Bedienung Und Einstellungen
7. BEDIENUNG UND EINSTELLUNGEN 7.1 Allgemeine Bedienhinweise 7.1.1 Menü Drücken Sie die MENU Taste am Gerät oder auf der Fernbedienung. Unabhängig von der aktuellen Einstellung des Gerätes gelangen Sie dadurch immer in das Hauptmenü. Die Navigation im Hauptmenü erfolgt über die Tasten ►◄... -
Page 38: Taste Mode
7. BEDIENUNG UND EINSTELLUNGEN 7.1.4 Taste MODE Über die Taste MODE können Sie durch die verschiedenen Betriebsarten des Radios schalten. 7.2 System Drücken Sie die Taste MENU auf der Fernbedienung oder am Gerät und wählen Sie mit den Tasten ►◄ den Menüpunkt System aus. -
Page 39: Datum/Zeit
7. BEDIENUNG UND EINSTELLUNGEN 7.2.2 Datum/Zeit Über die ▼▲ Tasten der Fernbedienung können Sie die Auswahl treffen. Bestätigen Sie mit der Taste auf der Fernbedienung oder durch Druck des Drehreglers am Gerät. Das Gerät ist werksseitig auf automatische Zeiteinstellung konfiguriert. Wenn das Gerät über Netzwerk mit dem Internet verbunden ist, wird die Uhrzeit und das Datum automatisch synchronisiert. - Page 40 7. BEDIENUNG UND EINSTELLUNGEN 7.2.3 Netzwerk Entscheiden Sie zunächst, ob die Netzwerkverbindung über LAN oder W-LAN erfolgen soll. Wenn Sie das Gerät über ein Netzwerkkabel mit Ihrem Internetrouter verbunden haben, wählen Sie an und bestätigen Sie mit OK. Bedienungsanleitung...
- Page 41 7. BEDIENUNG UND EINSTELLUNGEN 7.2.3 Netzwerk Das Radio zeigt bei einer erfolgreichen Verbindung folgende Informationen. Möchten Sie eine Netzwerkverbindung über W-LAN herstellen, wählen Sie W-LAN an und bestätigen Sie mit OK. Im nächsten Schritt werden Ihnen alle verfügbaren W-LAN Netzwerke angezeigt, die sich in Reichweite des Gerätes befinden.
-
Page 42: Alarm/Wecker
7. BEDIENUNG UND EINSTELLUNGEN 7.2.3 Netzwerk Bitte beachten Sie, dass der Anmeldevorgang am Router einige Zeit dauern kann. 7.2.4 Alarm/Wecker Das Gerät kann als Radiowecker eingesetzt werden. In diesem Menüpunkt können Sie bis zu 5 Weckzeiten einstellen. Um eine Weckzeit einzurichten, gehen Sie bitte wie folgt vor: Drücken Sie die Taste MENU auf der Fernbedienung oder am... - Page 43 7. BEDIENUNG UND EINSTELLUNGEN 7.2.4 Alarm/Wecker Wählen Sie einen der 5 verfügbaren Wecker an und bestätigen Sie mit OK am Gerät oder über die Taste auf der Fernbedienung. Aktivieren Sie den Wecker über die Zeile Status. IMPERIAL ® DABMAN i510 BT...
- Page 44 7. BEDIENUNG UND EINSTELLUNGEN 7.2.4 Alarm/Wecker Stellen Sie in der nächsten Zeile die Zeit ein, zu der der Wecker aktiviert werden soll. Nutzen Sie dazu die Zahlentastatur der Fernbedienung oder den Drehregler am Gerät. Um die einzelnen Eingaben zu bestätigen, müssen diese mit der Taste gespeichert werden.
-
Page 45: Timer Bearbeiten
7. BEDIENUNG UND EINSTELLUNGEN 7.2.5 Timer bearbeiten In diesem Menü können Sie einen eingestellten Aufnahme-Timer bearbeiten. Bitte lesen Sie dazu Kapitel 8.10.1. 7.2.6 Standby Modus Mit dieser Funktion können Sie die Anzeige im Standby Modus anpassen. Wählen Sie mit den Tasten ▼▲... -
Page 46: Sleeptimer
7. BEDIENUNG UND EINSTELLUNGEN 7.2.6 Standby Modus Eco Standby In diesem Modus hat das Gerät im Standby ein sehr geringe Stromaufnahme. Die Uhrzeit im Standby wird nicht angezeigt. Standby mit Uhr In diesem Modus wird die Uhrzeit im Standby angezeigt, wenn Sie das Gerät über die Standby Taste ausschalten. -
Page 47: Hintergrundbeleuchtung
7. BEDIENUNG UND EINSTELLUNGEN 7.2.7 Sleeptimer Wählen Sie Aus, um diese Funktion zu deaktivieren oder wählen Sie eine vorgegebene Zeit zwischen 10 und 120 Minuten aus. Bestätigen Sie Ihre Eingabe mit auf der Fernbedienung oder bestätigen Sie durch Druck auf den Drehregler am Gerät. 7.2.8 Hintergrundbeleuchtung Mit dieser Funktion können Sie die Helligkeit des Displays ändern. -
Page 48: Einstellung Ort
Betriebssoftware nötig sein. Über die USB Schnittstelle haben Sie die Möglichkeit, die Betriebssoftware Ihres Radios zu aktualisieren, die, sofern erforderlich, auf www.telestar.de zum Download bereit steht. Die auf der Internetseite zur Verfügung gestellte Software muss entpackt werden. Die entpackte Datei spielen Sie dann auf ein entsprechendes Speichermedium und verbinden dieses via USB Anschluss mit dem Radio. -
Page 49: Werkseinstellungen
7. BEDIENUNG UND EINSTELLUNGEN 7.2.11 Werkseinstellungen In diesem Menüpunkt können Sie das Gerät in den Auslieferungszustand versetzen. Im Anschluss startet das Gerät mit der ersten Inbetriebnahme. Wählen Sie mit den Tasten ▼▲ der Fernbedienung oder mit Hilfe des Drehreglers am Gerät im Menü System den Menüpunkt Werkseinstellungen... -
Page 50: Funktionen
8. FUNKTIONEN 8.1 DAB+ Radio In diesem Radiomodus können Sie digital übertragene Radiosender empfangen. Halten Sie die Taste MENU auf der Fernbedienung oder am Gerät gedrückt und wählen Sie mit den Tasten ►◄ den Menüpunkt DAB/DAB+ aus. Bestätigen Sie die Auswahl durch Druck auf den Drehregler am Gerät oder durch Druck auf die Taste auf der Fernbedienung. - Page 51 8. FUNKTIONEN 8.1.2 DAB Suchlauf Wechseln Sie in die Zeile automatische Sendersuche und bestätigen Sie mit der Taste auf der Fernbedienung oder durch Druck auf den Drehregler am Gerät. Das Radio sucht nun automatisch nach allen empfangbaren digitalen Radiostationen und speichert diese im Anschluss in eine Senderliste. Diese können Sie, wie in Kapitel 8.1.1.
-
Page 52: Dab Manuelle Suche
8. FUNKTIONEN 8.1.3 DAB Manuelle Suche Sie können DAB Radiosender auch manuell suchen. Dazu muss die Sendefrequenz bekannt sein. Wählen Sie über diesen Menüpunkt die gewünschte Sendefrequenz an und bestätigen Sie mit OK. 8.2 FM Radio (UKW) Drücken Sie die Taste MENÜ... -
Page 53: Ukw Radio Bedienung
8. FUNKTIONEN 8.2.2 UKW Radio Bedienung Um die abgespeicherten Radiostationen aufzurufen, drücken Sie die Taste ▸ ▸I oder I◂ ◂. Alternativ können Sie die ersten 4 abgespeicherten Sender auch über die Stationsspeichertasten am Gerät aufrufen. Wenn Sie die Belegung der Stationsspeichertasten ändern möchten, drücken Sie die Taste 7 (siehe Seite 19) um einen Suchlauf zum nächsten empfangbaren Sendern auszu- führen. -
Page 54: Internet Radiostation Auswählen
8. FUNKTIONEN 8.3 Internet Radio Es stehen Ihnen hier verschiedene Listen zur Verfügung. 8.3.1 Internet Radiostation auswählen Favoritenliste Diese Liste zeigt Ihnen alle individuell gespeicherten Radiosender an. Um einen Radiosender zu speichern, lesen Sie bitte auch Kapitel 8.4. Radio In diesem Punkt erhalten Sie verschiedene Radioprogrammlisten. Podcasts Hier können Sie aus einer Reihe von Radiopodcasts wählen. -
Page 55: Suche Eines Internetradio Senders
8. FUNKTIONEN 8.3.2 Suche eines Internetradio Senders Wählen Sie die Zeile Suche an und bestätigen Sie mit dem Drehregler am Gerät. Geben Sie mit Hilfe der Tastatur auf der Fernbedienung im Suchfeld den Namen des Radiosenders ein. Nutzen Sie dazu die Tasten ▼▲... -
Page 56: Radiostationen In Favoritenliste Abspeichern
8. FUNKTIONEN 8.3.4 Radiostationen in Favoritenliste abspeichern Radiostationen können in einer Favoritenliste abgespeichert werden, die Sie über die Favoritentaste der Fernbedienung schnell aufrufen können. In dieser Liste können Sie bis zu 10 Favoriten Radioprogramme abspeichern. Wählen Sie eine Radiostation aus, die Sie in die Favoritenliste aufnehmen möchten. -
Page 57: Lautstärke Ändern
8. FUNKTIONEN 8.3.5 Lokale Radiostationen Wählen Sie in diesem Menüpunkt eine gewünschte Programmliste über die Tasten ▼▲ aus. Bestätigen Sie die Eingabe mit OK. 8.4 Lautstärke ändern Ändern Sie die Lautstärke über die Tasten VOL+/VOL- auf der Fernbedienung oder über den Drehregler am Gerät. Um den Ton des Radios stumm zu schalten, drücken Sie die Taste Mute der Fernbedienung. -
Page 58: Upnp
8. FUNKTIONEN 8.6 UPnP Sofern das Radio in ein Drahtlosnetzwerk eingebunden ist, kann das Radio auch als Mediaplayer genutzt werden, um via UPnP Musikdateien von im Netzwerk eingebundenen Geräten wie PCs oder Smartphones wiederzugeben. Voraussetzung ist hier einerseits die Einbindung der Gerät ein das gleiche Heimnetzwerk und andererseits die Freigabe der entsprechenden Medieninhalte in diesem Netzwerk. -
Page 59: Usb Wiedergabe/Mulitmedia
8. FUNKTIONEN 8.7 USB Wiedergabe/Mulitmedia Wählen Sie einen Titel aus, den Sie abspielen möchten und bestätigen Sie mit dem Drehregler am Gerät. 8.8 EQ (Equalizer) In diesem Bereich können Sie bestimmte Klangvoreinstellungen anwählen. Neben mehreren Klangvoreinstellungen können Sie den Klang Ihres Radios auch individuell einstellen und diese Einstellung unter Mein EQ abspeichern. - Page 60 8. FUNKTIONEN 8.8 EQ (Equalizer) Wählen Sie mit den Tasten ▼▲ der Fernbedienung oder mit Hilfe des Drehreglers am Gerät eine Klangvoreinstellung aus und bestätigen Sie auf der Fernbedienung oder durch Druckauf den Drehregler am Gerät. Im Punkt Mein EQ Profil können Sie die Grundeinstellung des Radios ändern. Hier können Sie die Grenzfrequenz für hohe Töne (Treble) und tiefe Töne (Bass) entsprechend Ihres Klangempfindens anpassen.
-
Page 61: Wetter
8. FUNKTIONEN 8.9 Wetter Das Gerät kann aktuelle Wetterinformationen von Ihrem Standort anzeigen. Um die Wetterinformationen aufzurufen, wählen Sie im Hauptmenü des Radios den Menüpunkt Wetter an und bestätigen Sie mit OK. Über die Taste MENU können Sie den Standort für die Wettermeldung ändern. -
Page 62: Radiosendungen Aufzeichnen
8. FUNKTIONEN 8.10 Radiosendungen aufzeichnen Mit dem Gerät können Sie UKW, DAB+ und Internetradio- sendungen auf einem angeschlossenen USB Datenträger aufzeichnen. Das Radio legt auf dem angeschlossenen USB Datenträger einen Ordner an, in dem alle Aufzeichnungen abgespeichert werden. Der Ordner hat die Bezeichnung PVR. -
Page 63: Radioauzeichnungen Programmieren
8. FUNKTIONEN 8.10.1 Radioauzeichnungen programmieren Mit dem Radio können Sie, ähnlich wie bei einem Video- oder DVD- Recorder auch Timeraufnahmen programmieren, um Radiosendungen aufzuzeichnen, wenn Sie z.B. nicht zu Hause sind. Halten Sie dazu die Record Taste am Gerät oder auf der Fernbedienung länger als 2 Sekunden gedrückt. Alternativ wählen Sie im Menü... -
Page 64: Radio Als Bluetooth Empfänger
8. FUNKTIONEN 8.11 Radio als Bluetooth Empfänger Das Radio kann via Bluetooth mit einem externen Gerät (z.B.Smartphone/Tablet) verbunden werden. Über die Bluetoothverbindung können dann Medien (Lokal gespeicherte MP3 Dateien, gestreamte Musik, Webradio) vom externen Gerät über das Radio wiedergegeben werden. Wählen Sie über das Menü den Punkt Bluetooth an. Damit Sie via Bluetooth Audiodateien an das Radio senden können, muss eine Bluetooth Verbindung hergestellt werden. -
Page 65: Radio Als Bluetooth Sender
8. FUNKTIONEN 8.11.3 Radio als Bluetooth Sender Das Radio kann als Bluetooth Sender genutzt werden. Damit ist es möglich, Audiosignale des Radios über Bluetooth an geeignete Bluetooth Empfangsgeräte zu übertragen. (z.B. Bluetooth Kopfhörer.) Um in den Bluetooth Sendebetrieb zu gelangen, gehen Sie wie folgt vor: Stellen Sie sicher, dass das Bluetooth Empfangsgerät aktiviert und bereit ist. -
Page 66: Cloud Musik
8. FUNKTIONEN 8.13 Cloud Musik Mit dem DABMAN i510 BT können Sie neben UKW, Internet- und DAB Radiostationen auch zahlreiche Internet Musik Streaming Dienste nutzen. Das Radio unterstützt die Angebote folgender Streaming Anbieter: Amazon Music, Deezer, Napster, Palco MP3, Qobuz, Soundmachine, TIDAL HIGHRESAUDIO* (*Stand Drucklegung, Änderungen jederzeit möglich.) Wenn Sie einen oder mehrere Streaming Dienste nutzen möchten, benötigen... -
Page 67: Bedienung Über App
8. FUNKTIONEN 8.14 Bedienung über App Mit der Applikation können Sie Ihr kompatibles Internetradio per Tablet oder Smartphone bedienen. Die App ist sowohl für iOS als auch für Android Betriebssysteme geeignet. Hinweis: Diese Beschreibung entspricht der App Stand 07/2022. Im Zuge von Software Aktualisierungen der Appkönnen sich Funktionen oder das Erscheindungsbild ändern.Laden Sie sich dazu die Applikation aus dem Google Play Store®... - Page 68 8. FUNKTIONEN 8.14 Bedienung über App Starten Sie die Applikation Beim Starten der App erkennt diese automatisch das Radio, sofern dieses im selben Netzwerk angemeldet ist. Das Hauptmenü der App ist strukturiert, wie das Menü des Radios. Die verwendeten Icons der App sind mit den Symbolen des Menüs des Radios vergleichbar.
- Page 69 8. FUNKTIONEN 8.14 Bedienung über App Favoriten Sender aufrufen Über diese Funktion können Sie Ihre abgespeicherten Favoriten Radiosender aufrufen. Wählen Sie aus der Liste einen gewünschten Radio Favoritensender aus. Radio-Favoritensender können Sie im Radio, wie in der Bedienungsanleitung des Radios beschrieben, abspeichern.
- Page 70 8. FUNKTIONEN 8.14 Bedienung über App Fernbedienung Mit der Funktion Fernbedienung besteht die Möglichkeit, Radio einer virtuellen Fernbedienung zu steuern. Tippen dazu unteren Bereich Fernbedienungssymbol an. Alle Funktionen des Radios können Sie nun mit Hilfe der virtuellen Fernbedienung steuern. Betriebsart umschalten Über dieses Feld können Sie die verschiedenen Betriebsarten des Radios auswählen.
-
Page 71: Fehlerbehebung
9. FEHLERBEHEBUNG SYMPTOM MÖGLICHE URSACHE & ABHILFE Keine Displayanzeige, Radio Stellen Sie die Stromverbindung über das reagiert nicht auf Bedienung im Lieferumfang enthaltene Netzteil her. Bedienung über Batterie leer oder nicht korrekt einge- Fernbedienung ist nicht setzt. Bitte überprüfen Sie, ob die Batterie möglich in der richtigen Richtung eingesetzt sind. - Page 72 9. FEHLERBEHEBUNG SYMPTOM MÖGLICHE URSACHE & ABHILFE Schlechte Audioqualität bei Datei mit geringer Bitrate. Überprüfen Sie der Wiedergabe von Musik die Audiodatei. Tipp: Bei MP3 Dateien sollte die Bitrate 192Kbit/s oder höher sein. Lautstärke zu gering Überprüfen Sie die Lautstärkeeinstellung am Radio.
- Page 73 9. FEHLERBEHEBUNG SYMPTOM MÖGLICHE URSACHE & ABHILFE Keine Internet-Radiosender Überprüfen Sie die Zugangspunkte des verfügbar Netzwerks und kontrollieren Sie, ob noch eine Netzwerkverbindung besteht. Schalten Sie ggf. auf einen anderen Internet-Radiosender um zu überprüfen, ob die Netzwerkverbindung noch funk- tioniert. Der Link des Senders wurde ggf.
-
Page 74: Aufbewahrung
10. AUFBEWAHRUNG Bei Nichtverwendung, ziehen Sie bitte das Netzteil aus der Steckdose, trennen Sie die Zuleitung des Netzteils vom Radio ab und bewahren Sie das Gerät an einem trockenen, vor Staub geschützten Ort auf. Bei längerer Nichtbenutzung muss die Batterie aus der Fernbedienung entnommen werden. -
Page 75: Entsorgung Des Gerätes
12. ENTSORGUNG 12.2. Entsorgung des Gerätes Das rechts abgebildete Symbol einer durchgestrichenen Mülltonne auf Rädern zeigt an, dass dieses Gerät der Richtlinie 2012 / 19 / EU unterliegt. Diese Richtlinie besagt, dass Sie dieses Gerät am Ende seiner Nutzungszeit nicht mit dem normalen Hausmüll entsorgen dürfen, sondern in speziell eingerichteten Sammelstellen, Wertstoffhöfen oder Entsorgungsbetrieben abgeben müs- sen. -
Page 76: Technische Daten
13. TECHNISCHE DATEN INTERNETRADIO Audiocodecs AAC/AAC+ (Bitrate bis 320 Kbits/s, sample rate bis zu 48 KHz) WMA (Bitrate bis 320 Kbits/s, NETZWERK Kommunikationsschnittstellen WiFi IEEE 802.11b/g/n wireless; Bluetooth (BT V5.0, Supports A2DP, AVRCP profiles) Frequenzen WiFi : 2.400 - 2.4835 GHz; W-LAN / Bluetooth Bluetooth: 2.4GHz - 2.48 GHz Sendeleistung... - Page 77 13. TECHNISCHE DATEN ANSCHLÜSSE Vorderseite USB-Buchse (USB 2.0) Max. 1 A Ladestrom 1 x 3,5 mm Klinke Stereo Kopfhörer Rückseite Ausgang 1 x Analoger Audio-Ausgang Cinch L+R 1 x Coaxial digital elektrischer Audioausgang 1 x Optischer digitaler Audioausgang 1 x DC Eingang für Stromversorgung (5,5 mm) 1 x DAB+/UKW Antenneneingang 1 x Antenneneingang WiFi...
- Page 78 13. TECHNISCHE DATEN SPANNUNGSVERSORUNG NETZTEIL Hersteller SHENZHEN SOY TECHNOLOGY CO., LTD. Modell Nummer SOY-1800360-327-II-A Eingangsspannung AC 100 - 240 V Eingangswechselstromfrequenz 50Hz-60Hz Ausgangsspannung 18V DC Ausgangsstrom 3,6A Ausgangsleistung 64,8W Durchschnittliche Effizienz im Betrieb Leistungsaufnahme bei Nullast < 0,21W MASSE UND GEWICHT Abmessungen BxHxT 43 cm x 8 cm x 35,5 cm Gewicht...
-
Page 79: Service Und Support
Unsere Techniker stehen Ihnen von Montag - Freitag von 8.00 Uhr bis 16.45 Uhr unter folgender Rufnummer zur Verfügung: 02676 / 95 20 101 oder per Mail unter: service@telestar.de Falls Ihnen an der Service Hotline nicht weitergeholfen werden kann, schicken Sie Ihren DABMAN i510 BT, möglichst in der original Verpackung, aber unbe-... -
Page 80: Ce Kennzeichnung
Ihr Gerät trägt das CE-Zeichen und erfüllt alle erforderlichen EU-Normen.Hiermit erklärt die TELESTAR DIGITAL GmbH, dass sich das Gerät IMPERIAL DABMAN i510 BT in Übereinstimmung mit den grundlegen- den Anforderungen und den übrigen einschlägigen Bestimmungen der EMV Richtlinie 2014/30/EU der RoHS Richtlinie 2011/65/EG, der Niederspannungsrichtlinie 2006/95/EG, der R&TTE Richtlinie 1999/5/EG... - Page 81 DABMAN i510 BT User manual All-In-One HiFi System Fernbedienung über App www.telestar.de...
- Page 82 Operating manual...
-
Page 83: Table Of Contents
TABLE OF CONTENTS 1. PREFACE ..........87 2. -
Page 84: Table Of Contents
TABLE OF CONTENTS 6.5. Menu language .........111 6.6. -
Page 85: Table Of Contents
TABLE OF CONTENTS 8. FUNCTIONS ..........130 8.1 DAB+ Radio . - Page 86 TABLE OF CONTENTS 9. TROUBLESHOOTING ........151 10.
-
Page 87: Preface
Technical Hotline for Germany: 02676 / 9520101 You are also welcome to send an e-mail to service@telestar.de or a fax to 02676 / 9520159. If we are unable to solve the problem in this way, please return the device to... -
Page 88: Safety Instructions
2. SAFETY INSTRUCTIONS 2.1 Explanation of symbols SYMBOL MEANING This signal word indicates a hazard with a high level of risk DANGER! which, if the instruction is not observed, will result in death or serious injury. This signal word indicates a hazard with a medium level of WARNING! risk which, if the instruction is not... - Page 89 2. SAFETY INSTRUCTIONS 2.1 Explanation of symbols SYMBOL MEANING This symbol indicates danger. Protection class II Electrical devices that fall under protection class II have rein- forced or double insulation to the amount of the rated insula- tion voltage between active and accessible parts (VDE 0100 part 410, 412.1).
-
Page 90: Intended Use
2. SAFETY INSTRUCTIONS 2.1 Explanation of symbols SYMBOL MEANING These symbols indicate the pola- rity of the plug for devices with Fig. 1 hollow plugs. A distinction is made between 2 variants Fig. 2 Fig. 1: Outside plus / inside minus Fig. -
Page 91: Safety Instructions
2. SAFETY INSTRUCTIONS The device is intended for private, non-commercial use only. We assume that the user has some general knowledge about using electronic entertainment equipment. Liability is excluded in the event of improper use. › Only use replacement parts and accessories that have been supplied or approved by us. -
Page 92: Operational Safety
› Please check the device for damage before each use. If the device has visible damages, do not use it any more. › If you discover a technical or mechanical problem, please contact TELESTAR Service. › Only use the power adapter included in the scope of delivery! ›... -
Page 93: Connecting The Device
2. SAFETY INSTRUCTIONS 2.5. Connecting the device › Only connect the device to a properly installed, earthed and electrically protected socket. › Please ensure that the power source (socket) is easily accessible. › Do not kink or crush any cable connections. ›... -
Page 94: Risk Of Injury
2. SAFETY INSTRUCTIONS 2.7. Risk of injury WARNING! Excessive sound pressure when using earphones or headphones can cause hearing damage or loss. Using earphones or headphones at a high volume for a long period of time can cause injury to the user. Please check the volume before putting the earphones or headphones in or onto your ears. -
Page 95: Handling Batteries
2. SAFETY INSTRUCTIONS 2.8. Handling batteries The device is supplied with a CR 2032 battery. Only use this type of battery for the remote control. Only use the type of battery included in the delivery. DANGER! There is a risk of internal injury if batteries are swallowed. The battery acid in the batteries can cause injuries if it comes into contact with the skin. -
Page 96: Cleaning The Device
Reconnect the device to the power supply. It may be necessary to reset to the factory settings. If this is not successful, please contact your dealer or contact TELESTAR Digital GmbH directly. You can also find more information on chapter 14. -
Page 97: Scope Of Delivery
3. SCOPE OF DELIVERY Please remove all parts from the packaging and remove all packaging materi- als completely. If one or more of the specified parts is missing, please contact: TELESTAR Service Center Am Weiher 14, 56766 Ulmen e-mail: service@telestar.de... -
Page 98: Device Overview
4. DEVICE OVERVIEW 4.1 Control panel and connections Operating manual... -
Page 99: Front Control Panel
4. DEVICE OVERVIEW 4.2 Front control panel Mode Switch the operating mode of the device between Internet radio, DAB+, FM, UPnP, AUX and USB here. Favourites button Switches to one of the individually stored favourite stations. Menu Use this button to view the device menu Station memory slot 1/play/pause In radio mode, switches to the 1st station memory slot. - Page 100 4. DEVICE OVERVIEW 4.2 Front control panel USB connection Connect the device to a USB data carrier such as a USB hard disk or USB stick to play back or record music files from it. Headphone connection Insert headphones here to listen to the music played back from the radio through your headphones.
-
Page 101: Connections On The Back
4. DEVICE OVERVIEW 4.3 Connections on the back FM/DAB antenna Antenna connection for the telescopic antenna included in the scope of delivery. LAN connection Connect the device to an existing network using a network cable to use the Internet radio function. Alternatively, the device can also be connected wirelessly via WiFi. - Page 102 4. DEVICE OVERVIEW 4.3 Connections on the back Bluetooth antenna Connection for the antenna included in the scope of delivery. The DABMAN i510 BT receives Bluetooth signals, e.g. from a mobile device (smartphone or tablet), via the antenna connected to this socket. WiFi antenna Connection for the included WiFi antenna to connect the device to your WiFi home network via WiFi.
-
Page 103: Remote Control
4. DEVICE OVERVIEW 4.4 Remote control Please note: You can use the app to operate compatible internet radio services via your tablet or smartphone. The app is suitable for iOS and Android operating systems. For more information, see chapter 8.16. IMPERIAL ®... - Page 104 4. DEVICE OVERVIEW 4.4 Remote control 1. Standby button Switch the device on or off using this button. 2. Mode Switch between different modes. This button can be programmed with a different function. Also see chapter 8.14. 3. Mute Mutes the device. 4.
- Page 105 4. DEVICE OVERVIEW 4.4 Remote control 11. INFO Shows information about the current radio programme. 12. Menu Use this button to view the device menu 13. ▯ Rec Starts recording the current radio programme onto a connected USB sto- rage device. Press and hold the button for more than 2 seconds to activate the timer menu to record a radio programme.
-
Page 106: Connections
5. CONNECTIONS 5.1 Connecting playback devices with cinch sockets (analogue) If you want to play analogue audio from an external device through the speakers connected to the DABMAN i510 BT, connect the analogue audio output of the external device to the LINE IN connectors on the DABMAN i510 BT. -
Page 107: Connecting Audio Output Devices With Digital Audio Input
5. CONNECTIONS 5.2 Connecting audio output devices with digital audio input This connection is recommended if the sound from the DABMAN i510 BT is to be played from an existing sound system with digital audio inputs. Use one of the two digital outputs OPTICAL OUT or COAXIAL OUT on the DABMAN i510 BT if your existing HiFi amplifier has an optical or coaxial digital input SPDIF. -
Page 108: Connecting To An Internet Router
5. CONNECTIONS 5.3 Connecting to an internet router Connect the device here with a network cable to an existing Internet router in order to be able to use the Internet radio function or the UPnP function. Alternatively, the device can also be connected via WiFi. internet router Operating manual... -
Page 109: First Start-Up
6. FIRST START-UP 6.1 General operating instructions › Switch the device on or off using the standby button on the Remote control or on the device. › You can use the VOL+ button on the remote control or turn the VOL+ knob on the device to increase the volume. -
Page 110: Antenna Connections
6. FIRST START-UP 6.2 Preparing the remote control › There is a risk of explosion if batteries are used improperly! Please read the related safety information in Chapter 2.8. › Pay attention to the correct battery polarity! › Reinsert the battery compartment. 6.3 Antenna connections Screw the supplied DAB+ / FM telescopic antenna to the antenna connector on the back of the device and pull out the antenna. -
Page 111: Menu Language
6. FIRST START-UP 6.5. Menu language Use the ▼▲ buttons on the remote control to select the menu language . Confirm the desired menu language with the button on the remote con- trol. 6.6. Date time mode Select how the radio should synchronise the time here. Use the ▼▲... -
Page 112: Gmt Time Zone
6. FIRST START-UP 6.7. GMT time zone Select your time zone here. For Germany and most of Europe, select GMT + 1:00. Use the ▼▲ buttons on the remote control to make a selection. Confirm with button on the remote control or by pressing the knob on the device. 6.8. -
Page 113: Standby Mode
6. FIRST START-UP 6.9. Standby mode Here, define whether the time should be displayed when the radio is in standby mode. Use the ▼▲ buttons on the remote control to make a selection. Confirm with button on the remote control or by pressing the knob on the device. NOTE! If ‘Standby with clock’... -
Page 114: Location
6. FIRST START-UP 6.10. Location Choose your continent and then your country in order to access internet radio broadcasts from your local stations. Use the ▼▲ buttons on the remote control to make a selection. Confirm with the button on the remote control or by pressing the knob on the device. - Page 115 6. FIRST START-UP 6.11. Network selection If you want to establish a network connection via WiFi, select WiFi and confirm with OK. In the next step, you will be shown all the available WiFi networks that are within range of the device. Select the network you want to connect to and confirm by pressing the button.
- Page 116 6. FIRST START-UP 6.11. Network selection Enter the WiFi password. You can select a symbol with the ▼▲ buttons on the remote control or with the knob on the device and set it with OK. Press ► button or use the knob to move the cursor one step further. Confirm the entry via the field.
-
Page 117: Operation And Settings
7. OPERATION AND SETTINGS 7.1 General operating instructions 7.1.1 Menu Press the MENU button on the device or on the remote control. Regardless of current device settings, this always returns you to the main menu. Navigate the main menu using the ►◄... -
Page 118: Mode Button
7. OPERATION AND SETTINGS 7.1.4. MODE button Use the MODE button to switch the different operating modes of the radio. 7.2. System Press the MENU button on the remote control or on the device and System use the ►◄ buttons to select the menu item. -
Page 119: Date Time
7. OPERATION AND SETTINGS 7.2.2 Date time Use the ▼▲ buttons on the remote control to make a selection. Confirm with button on the remote control or by pressing the knob on the device. The device’s factory setting is to automatically set the time. If the device is connected to the internet via the network, the time and date are automatical- ly synchronised. - Page 120 7. OPERATION AND SETTINGS 7.2.3. Network First decide whether the network connection is to be made via LAN or WiFi. If you have connected the machine to your Internet router with a network cable, select and confirm with OK. Operating manual...
- Page 121 7. OPERATION AND SETTINGS 7.2.3. Network The radio displays the following information when the connection is successful. If you want to establish a network connection via WiFi, select WiFi and confirm with OK. In the next step, you will be shown all the available WiFi networks that are within range of the device.
-
Page 122: Alarm
7. OPERATION AND SETTINGS 7.2.3. Network Enter the WiFi password. You can select a symbol with the ▼▲ buttons on the remote control or with the knob on the device and set it with OK. Press the ► button or use the knob to move the cursor one step further. Confirm the entry via the field. - Page 123 7. OPERATION AND SETTINGS 7.2.4. Alarm Select one of the 5 available alarms and confirm with OK on the device or by pressing the button on the remote control. Activate the alarm clock via the Status line. IMPERIAL ® DABMAN i510 BT...
-
Page 124: Edit Timer
7. OPERATION AND SETTINGS 7.2.4. Alarm In the next line, set the time for the alarm. Use the number pad on the remote control or the knob on the device. To confirm the individual entries, they must be saved with the button. -
Page 125: Standby Mode
7. OPERATION AND SETTINGS 7.2.6. Standby mode This function lets you adjust the display in standby mode. Use the ▼ ▲ buttons on the remote control or the on the device to select Standby mode and then press the button on the remote control or con- firm by pressing the knob on the device. -
Page 126: Sleep Timer
7. OPERATION AND SETTINGS 7.2.7. Sleep timer The sleep timer function can be used to automatically switch the radio into standby mode. Use the ▼▲ buttons on the remote control or the control knob on the device to select Sleep timer and press the button on the remote control or press the control knob on the device to confirm. -
Page 127: Backlight
7. OPERATION AND SETTINGS 7.2.8. Backlight This function lets you adapt the brightness of the display. Use the ▼▲ buttons on the remote control or the control knob on the device to select Backlight in the System menu and press the button on the remote con- trol or the knob on the device to confirm. -
Page 128: Software Update
To improve the functions of the device, it may be necessary to update the operating software. You can use the USB interface to update the operating software of your radio, which can be downloaded from www.telestar.de if necessary. The software provided on the website must be unzipped. The unzipped file is then transferred to an appropriate storage medium and connected to the radio via the USB port. -
Page 129: Version
7. OPERATION AND SETTINGS 7.2.11 Default settings If you activate factory settings, the device will return to the settings it had at the time of delivery. PLEASE NOTE: All saved stations and favourites lists will be lost. 7.2.12 Version In this menu item you can find and view information about the firmware version installed on the device. -
Page 130: Functions
8. FUNCTIONS 8.1 DAB+ Radio You can receive digitally transmitted radio stations in this radio mode. Press the MENU button on the remote control or on the device use the ►◄ buttons to select the menu item DAB/DAB+. To confirm your selection, press the button on the remote control or press the knob on the device. - Page 131 8. FUNCTIONS 8.1.2 DAB search Switch to the automatic station search line and confirm by pressing the button on the remote control or by pressing the knob on the device. The radio will now automatically search for all receivable digital radio stations and then save them in a station list.
-
Page 132: Dab Manual Search
8. FUNCTIONS 8.1.3 DAB manual search You can also search for DAB radio stations manually. You will need to know the broadcast frequency to do so. In this part of the menu, select the desired station frequency and press to confirm. 8.2 FM Radio Press the MENU... -
Page 133: Fm Radio Operation
8. FUNCTIONS 8.2.2 FM radio operation To access the stored radio stations, press the ▸ ▸I I◂ ◂ button. Alternatively, you can also call up the first 5 stored stations using the station memory buttons on the device. If you want to change the assignment of the station memory buttons, press the station selection button 6 (see page 19) to perform a search for the next receivable station. -
Page 134: Selecting An Internet Radio Station
8. FUNCTIONS 8.3 Internet Radio Various lists are available here. 8.3.1 Selecting an internet radio station Favourites list This list displays all individually stored radio stations. On how to save a radio station, please also consult Chapter 8.4. Radio Various radio programme lists are provided here. Podcasts Here you can choose from a number of radio podcasts. -
Page 135: Searching For An Internet Radio Station
8. FUNCTIONS 8.3.2 Searching for an internet radio station Select the Search line and confirm with the rotary knob on the device. Enter the name of the radio station in the search field using the keyboard on the remote control. Use the ▼... -
Page 136: Local Radio Stations
8. FUNCTIONS 8.3.4 Saving radio stations to your favourites list Select a radio station that you want to save to the favourites to your favourites list. Press the FAV+ button on the remote control. Select a memory location number where you want to save the radio station. Hold the FAV+ button on the remote control for approx. -
Page 137: Changing The Volume
8. FUNCTIONS 8.4. Changing the volume Change the volume using the VOL+/VOL- buttons on the remote control or by using the knob on the device. To mute the radio, press the Mute button on the remote control. 8.5. Switching operating mode Press the MODE button on the remote control to switch between AUX, UPnP,... -
Page 138: Upnp
8. FUNCTIONS 8.6 UPnP If you have connected the radio to a wireless network,you can also use the radio as a media player to play music files from connected devices in the network such as PCs or smartphones via UPnP on the device. -
Page 139: Usb Playback/Multimedia
8. FUNCTIONS 8.7 USB playback/multimedia You can play MP3 music files from a USB storage device. To do so, insert a USB drive containing music files into the USB port the front. Press the MENU button on the remote control or on the device, and use the ►◄... - Page 140 8. FUNCTIONS 8.8 EQ (Equalizer) Select a sound preset using the ▼▲ buttons on the remote control or by using the rotary control on the device and confirm with on the remote control or by pressing the rotary control on the device. Under My EQ profile you can change the radio’s basic settings.
-
Page 141: Weather
8. FUNCTIONS 8.9. Weather The device can display current weather information about your location. To view the weather, select Weather in the radio’s main menu then press to confirm. You can use the MENU button to change the location for the weather report. Enter the name of the city for which you want the latest weather information. -
Page 142: Recording Radio Broadcasts
8. FUNCTIONS 8.10. Recording radio broadcasts You can use the device to record FM DAB+ and internet radio programmes onto a connected USB data carrier. The radio creates a folder on the connected USB data carrier in which all recordings are stored. The folder is named PVR. The files are saved in the audio format transmitted by the radio station. -
Page 143: Programming Radio Recordings
8. FUNCTIONS 8.10.1 Programming radio recordings The radio, similar to a video or DVD recorder, can also be programmed with a timer recording to record radio broadcasts when you are not at home, for example. Hold the Record button on the device or on the remote control for more than 2 seconds. -
Page 144: Radio As A Bluetooth Receiver
8. FUNCTIONS 8.11 Radio as a Bluetooth receiver The radio can be connected to an external device (e.g. smartphone, tablet) via Bluetooth. The Bluetooth connection can then be used to play media (locally stored MP3 files, streamed music, online radio) from external devices via the radio. Select Bluetooth in the menu. -
Page 145: Radio As Bluetooth Transmitter
8. FUNCTIONS 8.11.3 Radio as Bluetooth Transmitter The radio can also be used as a Bluetooth transmitter. This lets you transfer audio signals from the radio via Bluetooth to suitable Bluetooth receiving devices. (e.g. Bluetooth headphones.) To begin Bluetooth transmission, proceed as follows: Ensure that the Bluetooth receiver is activated and ready. -
Page 146: Changing The Function Of The Mode Button
8. FUNCTIONS 8.12 Changing the function of the MODE button. There is a MODE button on the device itself and on the remote control, the function of which can be changed. To adjust the function of this button to suit your needs, please proceed as follows: Press the MENU... -
Page 147: Operation Via The App
8. FUNCTIONS 8.14. Operation via the app You can use the app to operate compatible internet radio services via your tablet or smartphone. The app is suitable for iOS and Android operating systems. Please note: This description corresponds to the app as at 5/2022. In the course of software updates of the app, functions or the appearance may change. - Page 148 8. FUNCTIONS 8.14. Operation via the app Start the app. When starting the app, it automatically detects the radio if it is registered in the same network. The main menu of the app is structured the same way as the radio menu.
- Page 149 8. FUNCTIONS 8.14. Operation via the app Accessing favourite stations You can use this function to view your saved favourite radio stations. Select a favourite radio station from the list. Favourite radio stations can be saved to the radio as described in the radio’s operating instructions.
- Page 150 8. FUNCTIONS 8.14. Operation via the app Remote control The remote control function lets you control the radio using a virtual remote control. To do this, tap the remote control symbol at the bottom. You can now control all radio functions with the help of this virtual remote control.
-
Page 151: Troubleshooting
9. TROUBLESHOOTING SYMPTOM POSSIBLE CAUSE & REMEDY Display not on, radio does Connect to power using the power cable not react provided. Remote control does not Battery dead or incorrectly inserted. work Please check that the batteries are inser- ted in the correct direction. Point the remote control at the device. - Page 152 9. TROUBLESHOOTING SYMPTOM POSSIBLE CAUSE & REMEDY Poor audio quality when File with low bit rate. Check the audio file. playing music Tip: For MP3 files, the bit rate should be 192Kbit/s or higher. Volume too low Check the volume setting on the i510 BT. Check the volume setting on the paired device from which you are playing music.
- Page 153 9. TROUBLESHOOTING SYMPTOM POSSIBLE CAUSE & REMEDY No Internet radio stations Check the access points of the network available and check if there is still a network con- nection. If necessary, switch to another Internet radio station to check whether the net- work connection is still working.
-
Page 154: Storage
10. STORAGE When not in use, please unplug the power adapter from the socket, disconnect the power adapter cable from the radio and store the device in a dry place protected from dust. If the device is not in use for a longer period of time, the battery must be removed from the remote control. -
Page 155: Disposing Of The Device
12. DISPOSAL 12.2. Disposing of the device The symbol on the right of a crossed out waste bin indicates that this device is subject to Directive 2012 / 19 /EU. This directive specifies that this device may not be disposed of with normal household waste at the end of its life but must be taken to especially equip- ped collection points, recycling centres or waste disposal facilities. -
Page 156: Technical Data
13. TECHNICAL DATA INTERNET RADIO Chip set Nicent Approx. 10,000 internet radio stations available MP3 (bit rate up to 320 Kbits/s, sampling Audio codecs rate up to 48 KHz) AAC/AAC+ (bit rate up to 320 Kbits/s, sample rate up to 48 KHz) WMA (bit rate up to 320 Kbits/s, sampling rate up to 48 KHz) UPnP/ DLNA compatible... - Page 157 13. TECHNICAL DATA NETWORK Communication interfaces WiFi IEEE 802.11b/g/n wireless; Bluetooth (BT V5.0, Supports A2DP, AVRCP profiles) Frequencies WIFI: 2.400 ~ 2.4835 GHz; WIFI / Bluetooth Bluetooth: 2.4GHz - 2.48 GHz Transmission power WiFi: <20dBm; Bluetooth: Max. 8dBm WIFI Encryption WEP, WPA, WPA2 (PSK), WPS CONNECTIONS Front...
- Page 158 13. TECHNICAL DATA POWER SUPPLY Manufacturer SHENZHEN SOY TECHNOLOGY CO., LTD. Model number SOY-1800360-327-II-A Input voltage AC 100 - 240 V Input frequency 50Hz-60Hz Output voltage 18V DC Output power 3.6A Output capacity 64.8W Average operational efficiency in operation Power consumption at no load <...
-
Page 159: Service And Support
Our technicians are available from Monday to Friday between 8 am and 4:45 pm at the following phone number: 02676 / 95 20 101 or via email: service@telestar.de If the Service Hotline is unable to assist you, please send your DABMAN i510 BT to the following address, preferably in its original... -
Page 160: Ce Seal
Your device bears the CE mark and complies with all required EU standards.Hereby TELESTAR DIGITAL GmbH declares that the device IMPERIAL DABMAN i510 BT is in compliance with the essential requirements and other relevant provisions of EMC Directive 2014/30/EU of RoHS Directive 2011/65/EC, Low Voltage Directive 2006/95/EC, R&TTE Directive 1999/5/EC and ErP... - Page 161 NOTES IMPERIAL ® DABMAN i510 BT...
- Page 162 NOTES...
- Page 163 DABMAN i510 BT Manuel d’utilisation Système hi-fi tout-en-un Commande à distance au moyen de l’application www.telestar.de...
- Page 164 Manual d´utilisation...
- Page 165 TABLE DES MATIÈRES 1. PRÉFACE ..........169 2.
- Page 166 TABLE DES MATIÈRES 6.3 Raccord d’antenne ........192 6.4.
- Page 167 TABLE DES MATIÈRES 8. FONCTIONS ..........212 8.1 Radio DAB+ .
- Page 168 TABLE DES MATIÈRES 9. Résolution des problèmes ....... . .233 10.
-
Page 169: Préface
Appelez-nous avant d’envoyer votre appareil ! Assistance technique pour l’Allemagne : 02676 / 9520101 Vous pouvez également envoyer un courriel à service@telestar.de ou un fax au 02676 / 9520159. Si nous ne parvenons pas à résoudre le problème de cette manière, veuillez envoyer l’appareil à... -
Page 170: Consignes De Sécurité
2. CONSIGNES DE SÉCURITÉ 2.1 Explication des symboles SYMBOLE SIGNIFICATION Cette mention d’avertissement désigne un danger à risque élevé DANGER ! qui, en cas de non-respect de la consigne, peut entraîner la mort ou une blessure grave. Cette mention d’avertissement signale un danger à... - Page 171 2. CONSIGNES DE SÉCURITÉ 2.1 Explication des symboles SYMBOLE SIGNIFICATION Ce signe met en garde contre des dangers. Classe de protection II Les appareils électriques de la classe de protection II ont une isolation renforcée ou doub- le égale à la tension d’isolation nominale entre les parties acti- ves et accessibles (VDE 0100 partie 410, 412.1).
-
Page 172: Utilisation Conforme
2. CONSIGNES DE SÉCURITÉ 2.1 Explication des symboles SYMBOLE SIGNIFICATION symboles indiquent polarité de la fiche dans le cas d’appareils équipés de fiches Fig. 1 creuses. On distingue 2 variantes Fig. 2 Fig. 1 : Moins (négatif) à l’extérieur / plus (positif) à l’intérieur Fig. -
Page 173: Consignes De Sécurité
2. CONSIGNES DE SÉCURITÉ Utilisez l’appareil uniquement en intérieur. L’appareil est uniquement destiné à un usage privé et non à un usage commer- cial. Nous partons du principe que l’utilisateur de l’appareil possède des con- naissances générales en ce qui concerne l’utilisation d’appareils électroniques grand public. -
Page 174: Sécurité De Fonctionnement
› Veuillez contacter le service client de TELESTAR si vous constatez un problè- me technique ou mécanique. › Utilisez uniquement le bloc d’alimentation compris dans la livraison. -
Page 175: Branchement De L'appareil
2. CONSIGNES DE SÉCURITÉ › De l’humidité peut se former à l’intérieur de l’appareil si vous le déplacez d’un environnement froid à un environnement chaud. Dans ce cas, attendez environ une heure avant de le mettre en marche. › Débranchez l’appareil en cas d’absence prolongée ou d’orage. ›... -
Page 176: Risque De Blessure
2. CONSIGNES DE SÉCURITÉ Évitez la lumière directe du soleil et les endroits particulièrement poussiéreux. Évitez tout contact avec l’humidité, l’eau ou les éclaboussures et ne placez pas d’objets remplis de liquide, tels que des vases, sur ou à proximité de l’appareil. Ne posez aucun objet lourd sur l’appareil Veillez à... -
Page 177: Manipulation Des Piles
2. CONSIGNES DE SÉCURITÉ 2.8. Manipulation des piles L’appareil est livré avec une pile CR 2032. Utilisez uniquement ce type de pile pour la télécommande. Veillez, par principe, à n’utiliser que des piles de type identique à celles contenues dans la livraison. DANGER ! L’ingestion de piles peut provoquer des blessures internes. -
Page 178: Nettoyage De L'appareil
Il peut être nécessaire de rétablir les paramètres d’usine. Si cela ne résout pas le problème, veuillez vous adresser à votre revendeur ou contacter direc- tement TELESTAR Digital GmbH. Vous trouverez de plus amples informations également à la chapitre 14. -
Page 179: Étendue Des Fournitures
3. ÉTENDUE DES FOURNITURES Veuillez sortir toutes les pièces de l’emballage et éliminer tous les matériaux d’emballage. Si une ou plusieurs pièces indiquées sont manquantes, veuillez contacter : TELESTAR Service Center, Am Weiher 14, 56766 Ulmen Courriel : service@telestar.de QUANTITÉ... -
Page 180: Aperçu Des Appareils
4. APERÇU DES APPAREILS 4.1 Panneau de commande et raccords Manual d´utilisation... -
Page 181: Panneau De Commande À L'avant
4. APERÇU DES APPAREILS 4.2 Panneau de commande à l’avant Mode Cette touche vous permet de basculer entre les modes de fonctionne- ment radio Internet, DAB+, FM, UPnP, AUX et USB. Touche Favoris Cette touche vous permet de sélectionner une station de radio individuelle de la liste des favoris. - Page 182 4. APERÇU DES APPAREILS 4.2 Panneau de commande à l’avant Port USB Connectez ici l’appareil à un support de données USB tel qu’un disque dur USB ou une clé USB pour lire ou enregistrer des fichiers musicaux à partir de celui-ci. Prise pour écouteurs Branchez un casque ici pour écouter la musique émise par la radio au moyen d’écouteurs.
-
Page 183: Raccords À L'arrière
4. APERÇU DES APPAREILS 4.3 Raccords à l’arrière Antenne FM / DAB+ Insérez ici l’antenne télescopique comprise dans la livraison. Prise LAN Connectez votre appareil à un réseau existant au moyen d’un câble réseau pour pouvoir utiliser la fonction radio Internet. L’appareil peut être égale- ment connecté... - Page 184 4. APERÇU DES APPAREILS 4.3 Raccords à l’arrière Antenne Bluetooth Insérez ici l’antenne télescopique comprise dans la livraison. Cette antenne permet au DABMAN i560 CD de recevoir les signaux Bluetooth émis par exemple par un appareil mobile (Smartphone ou tablette). Antenne Wi-Fi Connexion pour l’antenne Wi-Fi incluse, pour connecter l’appareil à...
-
Page 185: Télécommande
4. APERÇU DES APPAREILS 4.4 Télécommande Indication : L’application vous permet d’utiliser votre radio Internet compatible par l’intermédiaire d’une tablette ou d’un Smartphone. L’application est adaptée aux systèmes d’exploitation iOS et Android. Vous trouverez de plus amples informations dans le chapitre 8.16. IMPERIAL DABMAN i510 BT ®... - Page 186 4. APERÇU DES APPAREILS 4.4 Télécommande 1. Touche Standby (Veille) Allumez ou éteignez l’appareil au moyen de cette touche. 2. Mode Cette touche vous permet de passer d’un mode de fonctionnement à l’autre. Il est possible d’attribuer une autre fonction à cette touche. Pour ce faire, veuillez vous reporter au chapitre 8.14.
- Page 187 4. APERÇU DES APPAREILS 4.4 Télécommande 10. Commande et sélection de titres de musiques par USB, UPnP, média ou CD I◄◄ Sélectionner le titre précédent / Retour rapide Arrêter la lecture ►II Démarrer ou mettre la lecture en pause ►►I Sélectionner le titre suivant / Avance rapide 11.
-
Page 188: Raccords
5. RACCORDS 5.1 Connexion de lecteurs avec prises RCA (analogiques) Si vous souhaitez reproduire les signaux audio analogiques d’un appareil externe via les haut-parleurs connectés au DABMAN i510 BT, reliez la sortie audio analogique de l’appareil externe aux prises LINE IN du DABMAN i510 BT. Pour ce faire, utilisez les prises LINE OUT R / L (Gauche / Droite) Les appareils externes peuvent être, par exemple, des lecteurs CD, des lecteurs DVD, des lecteurs MP3, des camé- scopes, des consoles de jeux vidéo, des récepteurs satellite ou câble. -
Page 189: Entrée Audio Numérique
5. RACCORDS 5.2 Connexion de périphériques de sortie audio avec entrée audio numérique Cette connexion est recommandée si le son du DABMAN i510 BT doit être reproduit à partir d’un système audio doté d’entrées audio numériques déjà existant. Utilisez l’une des deux sorties numériques OPTICAL OUT ou COAXIAL OUT du DABMAN i510 BT si votre amplificateur Hi-Fi existant dispose d’une entrée numérique optique ou coaxiale SPDIF. -
Page 190: Connexion À Un Routeur Internet
5. RACCORDS 5.3 Connexion à un routeur internet Connectez ici l’appareil à un routeur Internet existant à l’aide d’un câble réseau afin de pouvoir utiliser la fonction radio Internet ou la fonction UPnP. L’appareil peut être également connecté au réseau par Wi-Fi. Routeur internet Manual d´utilisation... -
Page 191: Première Mise En Service
6. PREMIÈRE MISE EN SERVICE 6.1 Instructions de fonctionnement générales › Allumez et éteignez l’appareil au moyen de la touche Standby (Veille) de la télécommande ou de l’appareil. › Vous pouvez augmenter le volume sonore avec la touche VOL+ de la télécommande ou en tournant le bouton rotatif VOL+ de l’appareil. -
Page 192: Raccord D'antenne
6. PREMIÈRE MISE EN SERVICE 6.2 Préparer la télécommande › L’utilisation inappropriée des piles peut entraîner un risque d’explosion ! Lisez à ce propos les consignes de sécurité contenues dans le chapitre 2.8. › Assurez-vous de la bonne polarité des piles ! ›... -
Page 193: Langue Du Menu
6. PREMIÈRE MISE EN SERVICE 6.5. Langue du menu Les touches ▼▲ de la télécommande vous permettent de sélectionner la langue du menu. Confirmez la langue du menu souhaitée avec la touche de la télécommande. 6.6. Mode date et heure Choisissez ici le mode de synchronisation de l’heure pour la radio. -
Page 194: Fuseau Horaire Gmt
6. PREMIÈRE MISE EN SERVICE 6.7. Fuseau horaire GMT Sélectionnez ici le fuseau horaire dans lequel vous vous trouvez. Sélectionnez GMT + 1:00 pour l’Allemagne et la majeure partie de l’Europe. Les touches ▼▲ de la télécommande vous permettent d’effectuer votre choix. -
Page 195: Mode Standby (Veille)
6. PREMIÈRE MISE EN SERVICE 6.9. Mode Standby (veille) Cet élément de menu vous permet de déterminer si l’heure doit être affichée à l’écran lorsque la radio est en veille. Les touches ▼▲ de la télécommande vous permettent d’effectuer votre choix. Confirmez avec la touche de la télécommande ou en appuyant sur le bou- ton rotatif de l’appareil. -
Page 196: Emplacement
6. PREMIÈRE MISE EN SERVICE 6.10. Emplacement Sélectionnez un continent puis le pays dans lequel vous vous trouvez pour pouvoir accéder aux stations locales de votre région en mode radio internet. Les touches ▼▲ de la télécommande vous permettent d’effectuer votre choix. - Page 197 6. PREMIÈRE MISE EN SERVICE 6.11. Sélection du réseau Si vous souhaitez vous connecter au réseau par le biais du Wi-Fi, sélectionnez Wi-Fi et confirmez en appuyant sur OK. Tous les réseaux Wi-Fi à portée de l’appareil seront affichés à l’étape suivante. Choisissez le réseau auquel vous voulez connecter la radio et confirmez votre choix avec la touche OK.
- Page 198 6. PREMIÈRE MISE EN SERVICE Saisissez la clé Wi-Fi. Vous pouvez sélectionner un caractère avec les touches ▼▲ de la télécommande ou avec le bouton rotatif de l’appareil, et confirmer ► votre choix avec la touche OK. Utilisez la touche ou le bouton rotatif pour faire avancer le curseur d’une étape.
-
Page 199: Fonctionnement Et Réglages
7. FONCTIONNEMENT ET RÉGLAGES 7.1 Instructions de fonctionnement générales 7.1.1 Menu Appuyez sur la touche MENU de l’appareil ou de la télécommande. Elle vous permet d’accéder au menu principal indépendamment du réglage de l’appareil. La navigation dans le menu principal est effectuée au moyen des touches ►◄... -
Page 200: Touche Retour
7. FONCTIONNEMENT ET RÉGLAGES 7.1.2. Touche Retour La touche Retour (touche 8 de l’appareil / touche 5 de la télécommande) vous permet de revenir à l’étape précédente dans tous les réglages. 7.1.3. Touche List (Liste) Vous pouvez obtenir un aperçu des dernières stations de radio réglées en appuyant sur la touche List (Liste) en mode radio. -
Page 201: Langue
7. FONCTIONNEMENT ET RÉGLAGES 7.2.1. Langue Les touches ▼▲ de la télécommande vous permettent de sélectionner la langue du menu. Confirmez la langue du menu souhaitée avec la touche de la télécommande. 7.2.2 Date et heure Les touches ▼▲ de la télécommande vous permettent d’effectuer votre choix. Confirmez avec la touche de la télécommande ou en appuyant sur le bou- ton rotatif de l’appareil. -
Page 202: Réseau
7. FONCTIONNEMENT ET RÉGLAGES 7.2.3. Réseau Pour que l’appareil puisse fonctionner comme une radio Internet, le DABMAN i510 BT doit être intégré à un réseau avec accès à Internet. Si vous ne l’avez pas encore fait lors de la première installation, vous pouvez établir la connexion réseau dans cet élément de menu. - Page 203 7. FONCTIONNEMENT ET RÉGLAGES 7.2.3. Réseau La radio affiche les informations suivantes en cas de connexion réussie. Si vous souhaitez vous connecter au réseau par le biais du Wi-Fi, sélectionnez Wi-Fi et confirmez en appuyant sur OK. Tous les réseaux Wi-Fi à portée de l’appareil seront affichés à...
-
Page 204: Alarme / Réveil
7. FONCTIONNEMENT ET RÉGLAGES 7.2.3. Réseau Saisissez la clé Wi-Fi. Vous pouvez sélectionner un caractère avec les touches ▼▲ de la télécommande ou avec le bouton rotatif de l’appareil, et confirmer votre choix avec la touche OK. Utilisez la touche ►... - Page 205 7. FONCTIONNEMENT ET RÉGLAGES 7.2.4. Alarme / Réveil Sélectionnez l’un des 5 réveils disponibles et confirmez en appuyant sur OK sur l’appareil ou en utilisant la touche de la télécommande. Activez le réveil par l’intermédiaire de la ligne « Statut ». IMPERIAL DABMAN i510 BT ®...
-
Page 206: Modifier La Minuterie
7. FONCTIONNEMENT ET RÉGLAGES 7.2.4. Alarme / Réveil Réglez l’heure et la date auxquelles le réveil doit être activé dans la ligne sui- vante. Utilisez le clavier numérique de la télécommande ou le bouton rotatif de l’appareil. Les saisies individuelles doivent être mémorisées au moyen de la touche OK. Réglez les intervalles de répétition dans la ligne Date. -
Page 207: Mode Standby (Veille)
7. FONCTIONNEMENT ET RÉGLAGES 7.2.6. Mode Standby (veille) Cette fonction vous permet de régler l’affichage en mode veille. Au moyen des touches ▼▲ de la télécommande ou à l’aide du bouton rotatif de l’appareil, sélectionnez le sous-menu Mode Standby (Veille) et appuyez sur la touche de la télécommande ou confirmez an appuyant sur le bouton rotatif de l’appareil. -
Page 208: Sleeptimer (Minuterie De Sommeil)
7. FONCTIONNEMENT ET RÉGLAGES 7.2.7. Sleeptimer (Minuterie de sommeil) La radio se met automatiquement en mode Standby (veille) au moyen de la fonction Sleeptimer (minuterie de sommeil). Vous pouvez régler ici le temps après lequel l’appareil s’éteint automatiquement. Utilisez les touches ▼▲... -
Page 209: Rétroéclairage
7. FONCTIONNEMENT ET RÉGLAGES 7.2.8. Rétroéclairage Cette fonction vous permet de modifier la luminosité de l’écran. Au moyen des touches ▼▲ de la télécommande ou à l’aide du bouton rotatif de l’appareil, sélectionnez dans le menu Système le sous-menu Rétroéclairage et appuyez sur la touche de la télécommande ou confir- mez an appuyant sur le bouton rotatif de l’appareil. -
Page 210: Mise À Jour Du Logiciel
La mise à jour du logiciel d’exploitation peut être nécessaire pour améliorer les fonctions de l’appareil. La mise à jour du logiciel d’exploitation de votre radio, pouvant être téléchargée le cas échéant depuis www.telestar.de, peut être effectuée par l’intermédiaire de l’interface USB. -
Page 211: Réglages Usine
7. FONCTIONNEMENT ET RÉGLAGES 7.2.11 Réglages usine Cet élément de menu vous permet de réinitialiser l’appareil à l’état de livrai- son. L’appareil démarre ensuite avec la première mise en service. Au moyen des touches ▼▲ de la télécommande ou à l’aide du bouton rotatif de l’appareil, sélectionnez dans le menu Système le sous-menu... -
Page 212: Fonctions
8. FONCTIONS 8.1 Radio DAB+ Ce mode radio vous permet de capter des stations de radio numériques. Maintenez la touche MENU de la télécommande ou de l’appareil enfoncée et sélectionnez le sous-menu DAB / DAB+ au moyen des touches ►◄. Confirmez votre choix en appuyant sur le bouton rotatif de l’appareil ou au moyen de la touche de la télécommande. - Page 213 8. FONCTIONS 8.1.2 Recherche DAB Passez à la ligne « Recherche automatique de stations de radio » et Confirmez avec la touche de la télécommande ou en appuyant sur le bouton rotatif de l’appareil. La radio recherche automatiquement toutes les stations de radio numériques disponibles et les mémorise ensuite dans une liste de stations.
-
Page 214: Recherche Dab Manuelle
8. FONCTIONS 8.1.3 Recherche DAB manuelle Vous pouvez également chercher les stations DAB manuellement. Pour cela, vous devez connaître la fréquence de la station. Sélectionnez la fréquence de station souhaitée au moyen de cet élément de menu et confirmez avec OK. 8.2 Mode radio FM (OUC) Appuyez sur la touche MENU... -
Page 215: Fonctionnement De La Radio Ouc
8. FONCTIONS 8.2.2 Fonctionnement de la radio OUC Pour accéder aux stations de radio mémorisées, appuyez sur la touche ▸ ▸I I◂ ◂. Vous pouvez également accéder aux 5 premières stations mémorisées au moyen des touches de mémorisation de stations radio de l’appareil. Si vous souhaitez modifier l’affectation des touches de présélection des stations, appuyez sur la touche de sélection de station 6 (voir page 19) pour effectuer une recherche des stations disponibles les plus proches. -
Page 216: Sélectionner Une Station De Radio Internet
8. FONCTIONS 8.3 Radio Internet Des listes différentes sont disponibles ici. 8.3.1 Sélectionner une station de radio Internet Liste des favoris Cette liste affiche les stations de radio que vous avez mémorisées. Veuillez lire également le chapitre 8.4. pour en savoir plus sur la manière de mémoriser une station radio. -
Page 217: Recherche D'une Station De Radio Internet
8. FONCTIONS 8.3.2 Recherche d’une station de radio Internet Sélectionnez la ligne « Recherche » et confirmez avec le bouton rotatif de l’appareil. Saisissez le nom de la station de radio dans le champ de recherche au moyen du clavier de la télécommande. Pour ce faire, utilisez les touches ▼▲... -
Page 218: Enregistrer Des Stations De Radio Dans La Liste Des Favoris
8. FONCTIONS 8.3.4 Enregistrer des stations de radio dans la liste des favoris Les stations de radio peuvent être mémorisées dans une liste des favoris pouvez ensuite accéder rapidement au moyen de la touche de favoris de la télécommande. Vous pouvez mémoriser jusqu’à 10 programmes radio favo- ris dans cette liste. -
Page 219: Modifier Le Volume Sonore
8. FONCTIONS 8.3.5 Stations de radio locales 8.4. Modifier le volume sonore Réglez le volume sonore souhaité au moyen des touches VOL+/VOL- de la télécommande ou du bouton rotatif de l’appareil. Appuyez sur la touche Mute de la télécommande pour désactiver le son de l’appareil. -
Page 220: Upnp
8. FONCTIONS 8.6 UPnP Si la radio est connectée à un réseau sans fil, elle peut également être utili- sée comme lecteur multimédia pour écouter de la musique via UPnP à partir d’appareils connectés au réseau tels que des PC ou des smartphones. -
Page 221: Eq (Equalizer - Égaliseur)
8. FONCTIONS 8.7 Lecture USB / multimédia Sélectionnez un titre que vous voulez écouter et confirmez votre choix avec le bouton rotatif de l’appareil. 8.8 EQ (Equalizer - Égaliseur) Vous pouvez sélectionner des sons préréglés sous ce point de menu. En plus de plusieurs préréglages sonores, vous avez également la possibilité... - Page 222 8. FONCTIONS Au moyen des touches ▼▲ de la télécommande ou à l’aide du bouton rotatif de l’appareil, sélectionnez un sons préréglé et confirmez votre choix avec la touche de la télécommande ou en appuyant sur le bouton rotatif de l’appareil. Au point Mon profil EQ, vous pouvez modifier le réglage de base de la radio.
-
Page 223: Météo
8. FONCTIONS 8.9. Météo L’appareil peut afficher les informations météo actualisées de votre empla- cement. Pour afficher les informations météo, sélectionnez le sous-menu « Météo » dans le menu principal et confirmez avec OK. Vous pouvez modifier l’emplacement du bulletin météo au moyen de la touche MENU. -
Page 224: Enregistrer Des Émissions Radio
8. FONCTIONS 8.10. Enregistrer des émissions radio L’appareil vous permet d’enregistrer des émissions de radio FM, DAB+ et Internet sur des supports de données USB connectés. La radio crée un dossier dans lequel toutes les émissions vont être enregis- trées dans le support de données USB connecté. Le dossier est dénommé PVR. -
Page 225: Programmer Un Enregistrement D'émission Radio
8. FONCTIONS 8.10.1 Programmer un enregistrement d’émission radio Vous pouvez également utiliser la radio pour programmer des enregistre- ments d’émissions de radio, tout comme un magnétoscope ou un enregist- reur de DVD. Pour ce faire, appuyez sur la touche Record (Enregistrer) l’appareil ou de la télécommande pendant plus de 2 secondes. -
Page 226: La Radio En Tant Que Récepteur Bluetooth
8. FONCTIONS 8.11 La radio en tant que récepteur Bluetooth La radio peut être connectée à un appareil externe (Smartphone / tablette, par exemple) par l’intermédiaire de Bluetooth. Les médias (fichiers MP3 enregistrés localement, streaming audio, radio Web) peuvent être reproduits par la radio à partir de l’appareil externe par l’intermédiaire d’une connexion Bluetooth. -
Page 227: La Radio En Tant Qu'émetteur Bluetooth
8. FONCTIONS 8.11.3 La radio en tant qu’émetteur Bluetooth La radio peut être également utilisée comme émetteur Bluetooth. Il est ainsi possible de transmettre des signaux audio de la radio à des récep- teurs Bluetooth appropriés. (Des écouteurs Bluetooth, par exemple). Procédez comme suit pour passer en mode de transmission : Assurez-vous que le récepteur Bluetooth est activé... -
Page 228: Modifier La Fonction De La Touche Mode
8. FONCTIONS 8.12 Modifier la fonction de la touche MODE. Vous trouverez une touche MODE dont la fonction peut être modifiée aussi bien sur la télécommande de l’appareil que sur l’appareil lui-même. Pour adapter la fonction de cette touche à vos besoins, veuillez procédez comme suit : Appuyez sur la touche MENU... -
Page 229: Manipulation Avec L'application
8. FONCTIONS 8.14. Manipulation avec l’application L’application vous permet d’utiliser votre radio Internet com- patible par l’intermédiaire d’une tablette ou d’un Smartphone. L’application est adaptée aux systèmes d’exploitation iOS et Android. Indication : Cette description correspond à la version de l’application de 5/2022. Les mises à... - Page 230 8. FONCTIONS 8.14. Manipulation avec l’application Lancez l’application. L’application reconnaît automatiquement la radio si celle-ci est connectée au même réseau. Le menu prin- cipal de l’application est structuré comme le menu de la radio. Les icônes utilisées par l’application sont identiques aux icônes du menu de la radio.
- Page 231 8. FONCTIONS 8.14. Manipulation avec l’application Accéder aux stations favorites Cette fonction vous permet d’afficher les stations radio favorites. Sélectionnez une station favorite de la liste. Vous pouvez enregistrer des stations de radio favo- rites dans la radio comme décrit dans le manuel d’utilisation de la radio.
- Page 232 8. FONCTIONS 8.14. Manipulation avec l’application Télécommande La fonction « Télécommande » permet de comman- der la radio avec une télécommande virtuelle. Appuyez en bas sur le symbole Télécommande. Vous pouvez maintenant utiliser la télécommande virtuelle pour utiliser votre radio. Changer de mode de fonctionnement Ce champ vous permet de sélectionner entre les différents modes de fonc-...
-
Page 233: Résolution Des Problèmes
9. RÉSOLUTION DES PROBLÈMES SYMPTÔME CAUSE POSSIBLE ET RÉSOLUTION Pas d’affichage, la radio ne Activez l’alimentation électrique au moyen réagit pas aux commandes du bloc d’alimentation inclus dans la liv- raison. La commande au moyen de Les piles sont vides ou mal installées. la télécommande n’est pas Veuillez vérifier si les piles sont insérées pas possible... - Page 234 9. RÉSOLUTION DES PROBLÈMES SYMPTÔME CAUSE POSSIBLE ET RÉSOLUTION Mauvaise qualité audio lors Fichier avec faible débit binaire. Vérifiez le de la lecture de musique fichier audio. Conseil : le débit binaire de fichiers MP3 devrait être de 192 Kbits/s ou supérieur. Le volume sonore est trop Vérifiez le réglage du volume sonore de faible...
- Page 235 9. RÉSOLUTION DES PROBLÈMES SYMPTÔME CAUSE POSSIBLE ET RÉSOLUTION Aucune station de radio Vérifiez les points d’accès du réseau et Internet disponible contrôlez si une connexion réseau existe toujours. Passez à une autre station de radio Internet pour vérifier si la connexion réseau fonctionne toujours.
-
Page 236: Conservation
10. CONSERVATION Si vous n’utilisez pas l’appareil, débranchez le bloc d’alimentation de la prise électrique, déconnectez le câble du bloc d’alimentation de la radio et conservez l’appareil en un lieu sec et à l’abri de la poussière. La pile doit être retirée de la télécommande en cas de non-utilisation prolongée. -
Page 237: Élimination De L'appareil
12. ÉLIMINATION 12.2. Élimination de l’appareil Le symbole d’une poubelle sur roues barrée d’une croix illustré à droite indique que cet appareil est soumis à la directive 2012/19/UE. Cette directive stipule que vous n’avez pas le droit de jeter cet appareil, au terme de sa période d’utilisation, avec les ordures ménagères habituelles, et qu’il faut le déposer dans les points de collecte prévus à... -
Page 238: Données Techniques
13. DONNÉES TECHNIQUES RADIO INTERNET Chipset Nicent env. 10 000 stations radio disponibles MP3 (Débit binaire jusqu’à 320 Kbits/s, taux d’échantillonnage jusqu’à 48 KHz) Codecs audio AAC / AAC+ (Débit binaire jusqu’à 320 Kbits/s, taux d’échantillonnage jusqu’à 48 KHz) WMA (Débit binaire jusqu’à 320 Kbits/s, taux d’échantillonnage jusqu’à... - Page 239 13. DONNÉES TECHNIQUES RÉSEAU Interfaces de communication WiFi IEEE 802.11b/g/n sans fil ; Bluetooth (BT V5.0, prend en charge les profils A2DP, AVRCP) Fréquences Wi-Fi : 2,400 - 2,4835 GHz Wi-Fi / Bluetooth Bluetooth : 2,4GHz - 2,48 GHz Puissance d’émission Wi-Fi : < 20 dBm ; Bluetooth : Max. 8 dBm Wi-Fi Chiffrement WEP, WPA, WPA2 (PSK), WPS...
- Page 240 13. DONNÉES TECHNIQUES CONNEXIONS Avant Prise USB (USB 2.0) Max. 1 A de cou- rant de charge Prise pour écouteurs 3,5 mm Arrière 1 sortie audio analogique Cinch G + D 1 sortie audio numérique électrique coaxiale 1 sortie audio numérique optique 1 entrée DC pour l’alimentation élec- trique (5,5 mm) 1 sortie Haut-parleur Stéréo D / G...
- Page 241 13. DONNÉES TECHNIQUES ALIMENTATION ÉLECTRIQUE Fabricant SHENZHEN SOY TECHNOLOGY CO., LTD. Numéro de modèle SOY-1800360-327-II-A Tension d’entrée AC 100 V / 240 V Fréquence d’entrée 50Hz - 60Hz Tension de sortie 18 V DC Courant de sortie 3,6 A Puissance de sortie 64,8 W Efficacité...
-
Page 242: Service Et Assistance
: 02676 / 95 20 101 ou par courriel à l’adresse : service@telestar.de Si notre service client n’est pas en mesure de vous aider, envoyez-nous votre DABMAN i560 CD, si possible dans l’emballage d’origine, mais en veillant à ce qu’il soit bien emballé... -
Page 243: Marquage Ce
Votre appareil porte la marque CE et remplit toutes les normes UE. TELESTAR DIGITAL GmbH déclare par la présente que l’appareil IMPERIAL DABMAN i510 BT est conforme aux exigences essentielles et aux autres dispositions pertinentes de la directive CEM 2014/30/UE, de la directive RoHS 2011/65/CE, de la directive basse tension 2006/95/CE, de la directive R&TTE 1999/5/CE et... - Page 244 NOTES...
- Page 245 DABMAN i510 BT Istruzioni d’uso Sistema HiFi Tutto-in Controllo a distanza tramite App www.telestar.de...
- Page 246 Manuale...
- Page 247 INDICE 1. INTRODUZIONE ......... .251 2.
- Page 248 INDICE 6.6. Modalità Data e ora........275 6.7.
- Page 249 INDICE 8. FUNZIONI ..........294 8.1 Radio DAB+ .
- Page 250 INDICE 9. RISOLUZIONE DEI PROBLEMI ......316 10. CONSERVAZIONE........319 11.
-
Page 251: Introduzione
Numero verde tecnico per la Germania: 02676 / 9520101 Potrà anche inviare un'e-mail a service@telestar.de o un fax allo 02676/9520159. Nel caso in cui non riuscissimo a risolvere il problema in questo modo, la preghiamo di inviare il dispositivo al nostro CENTRO di assistenza al seguente... -
Page 252: Avvertenze Di Sicurezza
2. AVVERTENZE DI SICUREZZA 2.1 Spiegazione dei simboli SIMBOLO SIGNIFICATO Questa indicazione segnala un pericolo con un elevato grado PERICOLO! di rischio, che nel caso in cui l'indicazione venisse disattesa, ha come conseguenza la morte o una lesione di grave entità. Questa indicazione segnala un pericolo con un grado medio di rischio, che nel caso in cui... - Page 253 2. AVVERTENZE DI SICUREZZA 2.1 Spiegazione dei simboli SIMBOLO SIGNIFICATO Questo simbolo mette in guardia da pericoli. Classe di protezione II Gli apparecchi elettrici con clas- se di protezione II hanno un isolamento rinforzato o doppio pari alla tensione di isolamen- to nominale fra parti attive e tangibili (VDE 0100 parte 410, 412.1).
-
Page 254: Utilizzo Conforme
2. AVVERTENZE DI SICUREZZA 2.1 Spiegazione dei simboli SIMBOLO SIGNIFICATO Per gli apparecchi provvisti di connettore coassiale, questi simboli indicano la polarità del Fig. 1 connettore. Possono essere contraddistinte Fig. 2 due differenti varianti Fig. 1: Esterno Positivo/Interno Negativo Fig. 2: Interno Positivo/Esterno Negativo Apparecchi con questo simbolo possono essere utilizzati solo al... - Page 255 2. AVVERTENZE DI SICUREZZA L’apparecchio è destinato al solo uso privato e non all’uso commerciale. Da parte nostra viene dato come presupposto che l’utilizzatore dell’apparecchio sia in possesso delle nozioni di base richieste per l'utilizzo di apparecchi elettronici di consumo. La responsabilità...
-
Page 256: Sicurezza Operativa
› Se si dovessero riscontrare problemi di carattere tecnico o meccanico, si prega di mettersi in contatto con il, Servizio TELESTAR. › Utilizzare solo l’alimentatore di rete in dotazione alla fornitura! ›... -
Page 257: Collegamento Del Dispositivo
2. AVVERTENZE DI SICUREZZA › Qualora corpi estranei o liquidi dovessero penetrare all’interno dell’apparecchio, scollegare immediatamente l’alimentatore dalla presa. Far verificare l’apparecchio da personale qualificato prima di rimetterlo in funzio- ne. In caso contrario sussiste il pericolo di scossa elettrica. 2.5. -
Page 258: Pericolo Di Lesioni
2. AVVERTENZE DI SICUREZZA Prestare attenzione ad evitare il contatto con umidità, acqua o schizzi d’acqua e che nessun oggetto contenente liquidi, ad esempio vasi, sia posizionato sopra o vicino all'apparecchio. Non collocare oggetti pesanti sull’apparecchio. Prestare attenzione ad evitare che l’apparecchio o l’alimentatore siano espo- sti a schizzi o gocce d’acqua e che fiamme libere o possibili fonti d’incendio (es. -
Page 259: Gestione Delle Batterie
2. AVVERTENZE DI SICUREZZA 2.8. Gestione delle batterie Nella confezione del dispositivo è inclusa una batteria CR2032. Utilizzare solo questo tipo di batteria per il telecomando. Utilizzare sempre e solo il tipo di batteria analogo alla batteria in dotazione. PERICOLO! In caso di ingestione delle batterie sussiste il pericolo di lesioni interne. -
Page 260: Pulizia Dell'apparecchio
Ricollegare il dispositivo all'alimentazione. Potrebbe essere necessario un ripristino delle impostazioni di fabbrica. Se l'intervento di ripristino non dà esito, si prega di contattare il proprio riven- ditore o direttamente TELESTAR Digital GmbH. Ulteriori informazioni sono disponibili anche a capitolo 14. Manuale... -
Page 261: Contenuto Della Confezione
3. CONTENUTO DELLA CONFEZIONE Estrarre tutti i pezzi dalla confezione ed eliminare completamente tutti i mate- riali d’imballaggio. Qualora dovessero mancare uno o più dei pezzi indicati, si prega di rivolgersi a: TELESTAR Service Center Am Weiher 14, 56766 Ulmen E-mail: service@telestar.de... -
Page 262: Panoramica Del Dispositivo
4. PANORAMICA DEL DISPOSITIVO 4.1 Pannello di controllo e connessioni Manuale... -
Page 263: Pannello Frontale
4. PANORAMICA DEL DISPOSITIVO 4.2 Pannello frontale Mode Commutazione della modalità di funzionamento del dispositivo tra radio Internet, DAB+, UKW, UPnP, AUX e USB. Tasto Preferiti Attiva una delle stazioni preferite memorizzate individualmente. Menu Attivare attraverso questo tasto il menu dell’apparecchio Tasto 1 di memorizzazione di stazione emittente/Riproduzione/Pausa In modalità... - Page 264 4. PANORAMICA DEL DISPOSITIVO 4.2 Pannello frontale Indietro Con questo tasto si ritorna all’interno del menu. Porta USB Collegare il dispositivo con un’unità disco portatile USB o chiavetta USB, per riprodurre o registrare da questa file musicali Attacco per cuffie Collegare qui la cuffia per ascoltare la musica riprodotta dalla radio.
-
Page 265: Connessioni Del Pannello Posteriore
4. PANORAMICA DEL DISPOSITIVO 4.3 Connessioni del pannello posteriore Antenna UKV/DAB+ Collegamento dell'antenna per l'antenna telescopica inclusa nella fornitura. Ingresso LAN Collegare qui l'apparecchio tramite un cavo di collegamento alla rete di cui si dispone, per poter utilizzare la funzione radio via Internet. Il collegamento dell'apparecchio può... - Page 266 4. PANORAMICA DEL DISPOSITIVO 4.3 Connessioni del pannello posteriore Antenna Bluetooth Collegamento dell'antenna inclusa nella fornitura. Mediante questa anten- na, DABMAN i510 BT riceve segnali Bluetooth quali, ad esempio,. quelli di un dispositivo mobile (Smartphone o Tablet). Antenna W-LAN Collegamento per l'antenna W-LAN inclusa nella fornitura, per connettere il dispositivo alla rete domestica W-LAN.
-
Page 267: Telecomando
4. PANORAMICA DEL DISPOSITIVO 4.4 Telecomando Avvertenza: Con l'applicazione è possibile gestire la propria radio Internet com- patibile tramite tablet o smartphone. L'app è adatta sia per i sistemi operativi iOS che Android. Per ulteriori informazioni consultare il cap. 8.16. IMPERIAL DABMAN i510 BT ®... - Page 268 4. PANORAMICA DEL DISPOSITIVO 4.4 Telecomando 1. Tasto Standby Accendere o spegnere l’apparecchio con questo tasto. 2. Mode Effettuare qui la commutazione fra i diversi tipi di funzionamento. A questo tasto può essere assegnata una funzione diversa. Si prega di leggere in proposito anche il cap.
- Page 269 4. PANORAMICA DEL DISPOSITIVO 4.4 Telecomando 10. Comando e scelta dei titoli musicali tramite USB, UPnP, Media o CD I◄◄ Selezionare titolo precedente / Ritorno indietro rapido Ferma la riproduzione ►II Avvia o interrompe una riproduzione ►►I Selezionare titolo successivo / Avanzamento rapido 11.
-
Page 270: Ingressi
5. INGRESSI 5.1 Collegamento di dispositivi di riproduzione con prese cinch (analogiche) Se si desidera riprodurre il segnale audio analogico da un dispositivo esterno agli altoparlanti collegati al DABMAN i510 BT, collegare l‘uscita audio analogi- ca del dispositivo esterno ai connettori LINE IN del DABMAN i510 BT. -
Page 271: Collegamento Del Televisore
5. INGRESSI 5.2 Collegamento del televisore Questo collegamento è consigliato se l‘audio del DABMAN i510 BT deve essere riprodotto da un sistema audio esistente, dotato di ingressi audio digitali. Se l‘amplificatore hi-fi esistente dispone di un ingresso digitale ottico o coas- siale SPDIF, utilizzare una delle due uscite digitali OPTICAL OUT o COAXIAL OUT sul DABMAN i510 BT Soundsystem... -
Page 272: Connessione A Un Router Internet
5. INGRESSI 5.3 Connessione a un router Internet Per poter utilizzare la funzione radio Internet o la funzione UPnP, collegare il dispositivo a un router Internet esistente con un cavo di rete Alternativamente il collegamento dell‘apparecchio può anche avvenire tramite W-LAN. -
Page 273: Primo Avvio
6. PRIMO AVVIO 6.1 Indicazioni generali per l’uso › Accensione o spegnimento dell’apparecchio con il tasto Standby del tele comando o dell’apparecchio. › Aumento del volume con il tasto VOL+ del telecomando o ruotando il controllo VOL+ sul dispositivo. › Riduzione del volume con il tasto VOL- sul telecomando. -
Page 274: Attacco Per L'antenna
6. PRIMO AVVIO 6.2 Predisposizione del telecomando › In caso di uso improprio delle batterie sussiste il pericolo di esplosione! Per ulteriori informazioni leggere le avvertenze di sicurezza nel cap. 2.8. › Prestare attenzione alla corretta polarità della batteria! › Reinserire di nuovo il vano batterie. -
Page 275: Lingua Del Menu
6. PRIMO AVVIO 6.5. Lingua del menu. Tramite i tasti▼▲ del telecomando è possibile selezionare la . . lingua del menu. Confermare la lingua desiderata per il menu con il tasto telecomando. 6.6. Modalità Data e ora Scegliere la modalità secondo la quale la radio deve sincronizzare l’orario. Tramite i tasti ▼▲... -
Page 276: Fuso Orario Gmt
6. PRIMO AVVIO 6.7. Fuso orario GMT Scegliere il fuso orario della zona in cui ci si trova. Per l’Italia e la maggior parte dell’Europa scegliere GMT + 1:00. Tramite i tasti ▼▲ tasti del telecomando è possibile eseguire la selezione. Confermare con il tasto sul telecomando o premendo la manopola sull’apparecchio. -
Page 277: Modalità Standby
6. PRIMO AVVIO 6.9. Modalità Standby A questo punto specificare se l'ora deve essere visualizzata sul display quando la radio è in modalità standby. Tramite i tasti ▼▲ del telecomando è possibile eseguire la selezione. Confermare con il tasto sul telecomando o premendo la manopola sull’apparecchio. -
Page 278: Posizione
6. PRIMO AVVIO 6.10. Posizione Per poter accedere alle stazioni locali della tua regione in modalità radio Internet, seleziona il continente e, nel passaggio successivo, il paese in cui ti trovi. Tramite i tasti▼▲ del telecomando è possibile selezionare la scelta. Confermare con il tasto sul telecomando o premendo la manopola sull’apparecchio. - Page 279 6. PRIMO AVVIO 6.11. Selezione della rete Se la connessione è riuscita, la radio mostrerà le informazioni di seguito riportate. Se si desidera stabilire una connessione di rete tramite WLAN, selezionare W-LAN e confermare con OK . Nel passaggio successivo verranno visualizza- te tutte le reti W-LAN disponibili che si trovano entro la portata del dispositivo.
- Page 280 6. PRIMO AVVIO 6.11. Selezione della rete Inserire la chiave della rete Wi-Fi. Mediante i tasti ▼▲ sul telecomando o medi- ante la manopola rotante sull’apparecchio è possibile selezionare un caratte- re, premendo il tasto OK. Utilizzare il tasto ► o la manopola per spostare il cursore di un ulteriore passo.
-
Page 281: Comandi E Impostazioni
7. COMANDI E IMPOSTAZIONI 7.1 Indicazioni generali per l’uso 7.1.1 Menu Tenere premuto il tasto MENU sul dispositivo o sul telecomando Indipendentemente dalle impostazioni correnti dell’apparecchio, verrà sempre mostrato il menu principale del dispositivo. La navigazione nel menu principale avviene tramite i tasti ►◄... -
Page 282: Tasto Mode
7. COMANDI E IMPOSTAZIONI 7.1.4. Tasto MODE Attraverso il tasto Mode è possibile cambiare le diverse modalità operative della radio. 7.2. Sistema Tenere premuto il tasto MENU sul telecomando o sull’apparecchio per selezionare con i tasti ►◄ la voce del menu Sistema. Confermare la selezione con il tasto del telecomando o premendo la manopola rotante sull'apparecchio. -
Page 283: Data E Ora
7. COMANDI E IMPOSTAZIONI 7.2.2 Data e ora Tramite i tasti ▼▲ tasti del telecomando è possibile eseguire la selezione. Confermare con il tasto sul telecomando o premendo la manopola sull’apparecchio. La configurazione di fabbrica dell’apparecchio prevede l’impostazione auto- matica della data e dell’ora. Quando l’apparecchio viene collegato in rete a Internet, l’ora e la data vengono sincronizzate automaticamente. -
Page 284: Rete
7. COMANDI E IMPOSTAZIONI 7.2.3. Rete Affinché il dispositivo possa funzionare come radio Internet, DABMAN i510 BT deve essere integrato in una rete con accesso a Internet. Se non è già stato eseguito durante la prima installazione, è possibile stabilire la connessione di rete in questa voce di menu. Premere il tasto MENU sul telecomando o sull’apparecchio per... - Page 285 7. COMANDI E IMPOSTAZIONI 7.2.3. Rete Se la connessione è riuscita, la radio mostrerà le informazioni di seguito riportate. Se si desidera stabilire una connessione di rete tramite WLAN, selezionare W-LAN e confermare con Nel passaggio successivo verranno visualizzate tutte le reti W-LAN disponibili che si trovano entro la portata del dispositivo.
-
Page 286: Sveglia
7. COMANDI E IMPOSTAZIONI 7.2.3. Rete Inserire la chiave della rete Wi-Fi. Mediante i tasti ▼▲ sul telecomando o medi- ante la manopola rotante sull’apparecchio è possibile selezionare un caratte- re, premendo il tasto OK. Utilizzare il tasto ► o la manopola per spostare il cursore di un ulteriore passo. - Page 287 7. COMANDI E IMPOSTAZIONI 7.2.4. Sveglia Selezionare una delle 5 sveglie disponibili e confermare OK sul dispositivo sul dispositivo o tramite il tasto del telecomando. Attivare la sveglia tramite la riga Status. IMPERIAL DABMAN i510 BT ®...
- Page 288 7. COMANDI E IMPOSTAZIONI 7.2.4. Sveglia Nella riga successiva impostare l’ora in cui deve essere attivata la sveglia. Utilizzare il tastierino numerico del telecomando o la manopola rotante del dispositivo. Per confermare i singoli inserimenti, questi devono essere memorizzati con il tasto OK.
-
Page 289: Modifica Del Timer
7. COMANDI E IMPOSTAZIONI 7.2.5. Modifica del timer In questo menu è possibile modificare un timer di registrazione già impostato. Si prega di consultare in proposito anche il cap. 8.12. 7.2.6. Modalità Standby Con questa funzione è possibile impostare il display in modalità standby. Selezionare con i tasti ▼▲... -
Page 290: Timer Sleep
7. COMANDI E IMPOSTAZIONI 7.2.6. Modalità Standby Eco Standby In modalità standby l’apparecchio ha un consumo di corrente molto basso. In modalità standby non viene visualizzato l’orario. Standby con orario In questa modalità l’orario viene mostrato anche in modalità standby, quando l’apparecchio viene spento cliccando sul tasto Standby. -
Page 291: Illuminazione Dello Sfondo
7. COMANDI E IMPOSTAZIONI 7.2.7. Timer Sleep Selezionare Off per disattivare questa funzione o selezionare un intervallo di tempo preimpostato tra 10 e 120 minuti. Confermare la scelta premendo sul telecomando o confermare premendo la manopola rotante sull'apparecchio. 7.2.8. Illuminazione dello sfondo Con questa funzione è... -
Page 292: Impostazione Della Località
Attraverso l’interfaccia USB si ha la possibilità di aggiornare il software operativo della propria radio, che qualora sia necessario è a disposizione per il download su www.telestar.de. Il software messo a disposizione sulla pagine Internet deve essere decom- presso. -
Page 293: Impostazioni Di Fabbrica
7. COMANDI E IMPOSTAZIONI 7.2.11 Impostazioni di fabbrica In questa voce di menu si può ripristinare l’apparecchio allo stato di con- segna. L’apparecchio si avvierà come la prima volta. Selezionare con i tasti ▼▲ del telecomando o con l’aiuto della manopola rotante del dispositivo, selezionare nel menu Sistema la voce Impostazioni di fabbrica... -
Page 294: Funzioni
8. FUNZIONI 8.1 Radio DAB+ In questa modalità radio è possibile ricevere stazioni digitali. Tenere premuto il tasto MENU sul telecomando o sull'apparecchio e selezio- nare con i tasti ►◄ la voce del menù DAB/DAB+. Confermare la selezione premendo la manopola rotante sull’apparecchio o premendo il tasto OK sul telecomando. - Page 295 8. FUNZIONI 8.1.2 Ricerca DAB Passare alla riga Ricerca automatica delle stazioni e confermare con il tasto sul telecomando o premendo la manopola rotante sull’apparecchio. La radio ricercherà automaticamente tutte le stazioni radio digitali ricevibili e le memorizzerà in una lista delle stazioni. Questa può essere selezionata seguendo le istruzioni nel capitolo 8.1.1.
-
Page 296: Ricerca Dab Manuale
8. FUNZIONI 8.1.3 Ricerca DAB manuale È possibile anche procedere alla ricerca DAB manuale. Per procedere è necessario conoscere la frequenza della stazione. In questa voce di menu selezionare la frequenza della stazione desiderata e confermare con 8.2 Modalità radio FM Premere il tasto MENU sul telecomando o sull'apparecchio e selezionare con i... -
Page 297: Funzionamento Della Radio Fm
8. FUNZIONI 8.2.2 Funzionamento della radio FM Per accedere alle stazioni radio memorizzare, premere il tasto ▸ ▸I I◂ ◂. In alternativa è possibile accedere alle prime 5 emittenti memorizzate anche tramite i tasti di memorizzazione delle stazioni sull'apparecchio. Se si desidera modificare l'assegnazione dei pulsanti di memoria delle stazioni, premere il tasto di selezione delle stazioni 6 (vedere pagina 19) per cercare le successive stazioni ricevibili. -
Page 298: Selezione Di Una Stazione Internet Radio
8. FUNZIONI 8.3 Internet radio Sono qui a disposizione diversi elenchi. 8.3.1 Selezione di una stazione Internet radio Lista preferiti Questo elenco mostra tutte le stazioni radio salvate. Per salvare una stazione radio, consultare anche il capitolo 8.4. Radio Cliccando su questa voce si visualizzano i diversi elenchi di programmi radio. Podcast Qui si può... -
Page 299: Ricerca Di Una Stazione Radio Internet
8. FUNZIONI 8.3.2 Ricerca di una stazione radio Internet Selezionare la riga Cerca e confermare con la manopola del dispositivo. Inserire nel campo di ricerca, con l’aiuto della tastiera sul telecomando, il nome della stazione radio. Premere i tasti ▼▲ ►◄. -
Page 300: Memorizzazione Delle Stazioni Radio Nell'elenco Dei Preferiti
8. FUNZIONI 8.3.4 Memorizzazione delle stazioni radio nell’elenco dei preferiti Le stazioni radio possono essere memorizzate in un elenco dei preferiti che è possibile richiamare velocemente premendo il tasto Preferiti del teleco- mando. È possibile salvare fino a 10 programmi radio preferiti nell'elenco. Scegliere una stazione radio che si vuole includere nell’elenco delle preferite. -
Page 301: Stazioni Radio Locali
8. FUNZIONI 8.3.5 Stazioni radio locali 8.4. Modifica del volume Impostare il volume desiderato tramite i tasti VOL+/VOL telecomando o con la manopola rotante sull’apparecchio. Per silenziare il volume della radio, premere sul tasto Mute sul telecomando. 8.5. Commutazione del tipo di funzionamento Premere sul tasto MODE sul telecomando per poter cambiare tra le moda-... -
Page 302: Upnp
8. FUNZIONI 8.6 UPnP Se la radio è integrata in una rete wireless, la radio può essere utilizzata anche come lettore multimediale per riprodurre file musicali da dispositivi collegati in rete come PC o smartphone tramite UPnP sul dispositivo. Ciò presuppone da un lato il collegamento degli apparecchi nella stessa rete domestica e dall'altro l'autorizzazione alla distribuzione dei relativi contenuti mediatici in questa rete. -
Page 303: Riproduzione Usb/Multimedia
8. FUNZIONI 8.7 Riproduzione USB/Multimedia I file musicali MP3 possono essere riprodotti da un supporto dati USB Inserire un‘unità USB contenente file musicali nella porta USB anteriore. Premere il tasto MENU sul telecomando o sull’apparecchio e selezionare con i tasti ►◄... - Page 304 8. FUNZIONI 8.8 EQ (Equalizzatore) Selezionare con i tasti ▼▲ del telecomando o con l’aiuto della manopola rotante del dispositivo un’impostazione suono e confermare con OKsul telecomando o premendo la manopola rotante. Sotto la voce Profilo de Il mio EQ si possono modificare le impostazioni di base della radio.
-
Page 305: Meteo
8. FUNZIONI 8.9. Meteo L’apparecchio può mostrare le informazioni meteo del luogo. Per visualizzare le informazioni meteo, scegliere nel menu principale della radio la voce Meteo e confermare con È possibile modificare la posizione per il bollettino meteorologico sul tasto MENU.Inserire il nome della città... -
Page 306: Registrare Una Stazione Radio
8. FUNZIONI 8.10. Registrare una stazione radio Con il dispositivo puoi ascoltare la radio FM, DAB+ e Internetsu un supporto dati USB collegato . La radio crea una cartella sul supporto dati USB collegato nel quale vengono salvate tutte le registrazioni. La cartella viene denominata PVR. -
Page 307: Programmazione Delle Registrazioni Radio
8. FUNZIONI 8.10.1 Programmazione delle registrazioni radio Come con un video o DVD recorder, anche con la radio è possibile program- mare la registrazione usando un timer, per registrare le emissioni radiofoni- che quando non si è a casa. Tenere premuto il tasto Record sull’apparecchio o sul telecomando per circa 2 secondi. -
Page 308: Radio Come Ricevitore Bluetooth
8. FUNZIONI 8.11 Radio come ricevitore bluetooth La radio può anche essere collegata via Bluetooth a un dispositivo esterno (ad es. smartphone/tablet). I media (file MP3 archiviati localmente, musica in streaming, web radio) pos- sono quindi essere riprodotti dal dispositivo esterno tramite la radio tramite la connessione Bluetooth. -
Page 309: Radio Come Trasmettitore Bluetooth
8. FUNZIONI 8.11.3 Radio come trasmettitore Bluetooth La radio può essere utilizzata come trasmettitore Bluetooth. Ciò consente di trasmettere segnali audio dalla radio a ricevitori Bluetooth idonei tramite Bluetooth. ( ad es. una cuffia Bluetooth) Per entrare in modalità di trasmissione Bluetooth, procedere come segue Verificare che il dispositivo di ricezione Bluetooth sia attivato e pronto. -
Page 310: Modifica Della Funzione Del Tasto Mode
8. FUNZIONI 8.12 Modifica della funzione del tasto MODE. Il tasto MODE, la cui funzione può essere modificata, si trova sia sul teleco- mando del dispositivo che sul dispositivo stesso. Per adattare la funzione di questo tasto alle tue esigenze, procedi come segue: Premere il tasto MENU... - Page 311 8. FUNZIONI 8.13. Cloud Music Inserire i dati di accesso al proprio account nella maschera corrispondente. Se sono stati inseriti correttamente tutti i dati, si avrà accesso diretto al servizio musicale. IMPERIAL DABMAN i510 BT ®...
-
Page 312: Controllo A Distanza Tramite App
8. FUNZIONI 8.14. Controllo a distanza tramite App Con l'applicazione è possibile gestire la propria radio Internet compatibile tramite tablet o smartphone. L'app è adatta sia per i sistemi operativi iOS che Android. Avvertenza: Questa descrizione corrisponde alla versione della app 5/2022. Nel corso degli aggiornamenti software dell'app, le funzioni o l'aspetto possono cambi- are, scaricare l'applicazione dal Google Play Store®... - Page 313 8. FUNZIONI 8.14. Controllo a distanza tramite App Avviare l'applicazione. All'avvio della app, questa riconosce automaticamente la radio, se questa è collegata alla stessa rete. Il menù principale della app è strutturato come il menù della radio. Le icone utilizzate dalla app sono paragonabili ai sim- boli del menù...
- Page 314 8. FUNZIONI 8.14. Controllo a distanza tramite App Accesso alle stazioni preferite Con questa funzione vengono visualizzate le stazioni radio preferite. Selezionarne una dall'elenco. Per salvare le stazioni preferite, Salvare la radio come descritto nelle istruzioni per l'uso della radio. Funzione di riproduzione Utilizzare questo tasto per richiamare la riproduzione corrente.
- Page 315 8. FUNZIONI 8.14. Controllo a distanza tramite App Telecomando Questa funzione viene utilizzata per controllare la radio con un telecomando virtuale. Premere il simbolo del telecomando in basso. È ora possibile utilizzare il telecomando virtuale per azionare la radio. Commutazione del tipo di funzionamento È...
-
Page 316: Risoluzione Dei Problemi
9. RISOLUZIONE DEI PROBLEMI SINTOMO POSSIBILE CAUSA E RIMEDIO Nessun display, la radio non Realizzare il collegamento elettrico trami- risponde ai comandi te l'alimentatore compreso nella fornitura. Non è possibile Batteria scarica o inserita non corretta- l’azionamento tramite mente. Controllare se la batteria è inserita telecomando nella giusta direzione. - Page 317 9. RISOLUZIONE DEI PROBLEMI SINTOMO POSSIBILE CAUSA E RIMEDIO qualità audio durante la File con bitrate basso. Controllare il file riproduzione di musica. audio. Suggerimento: Per i file MP3 il bitra- te deve essere uguale o superiore a 192Kbit/s. Volume troppo basso Controllare l'impostazione del volume sull'i510 BT.
- Page 318 9. RISOLUZIONE DEI PROBLEMI SINTOMO POSSIBILE CAUSA E RIMEDIO Nessuna emittente radio Controllare i punti di accesso alla rete che trasmette via Internet e verificare se è ancora presente una disponibile connessione di rete. Se necessario, passare a un'altra stazione radio Internet per verificare se la connes- sione di rete funziona ancora.
-
Page 319: Conservazione
10. CONSERVAZIONE Quando non viene utilizzato, staccare l’alimentatore di rete dalla presa, scollegare il cavo di alimentazione dell’alimentatore di rete dalla radio e con- servare l’apparecchio in un luogo asciutto e al riparo dalla polvere. In caso di prolungato non utilizzo è necessario estrarre la batteria dal telecomando. -
Page 320: Smaltimento Dell'apparecchio
12. SMALTIMENTO 12.2. Smaltimento dell’apparecchio Il simbolo di un bidone su ruote barrato raffigurato a destra indica che questo apparecchio è soggetto alle disposizioni della direttiva 2012/19/UE . Tale direttiva stabilisce che questo apparecchio, al termine della sua durata in servizio, non deve smaltito con i normali rifiuti domestici, ma deve essere conferito presso appositi punti di raccolta, centri di raccolta differenziata o società... -
Page 321: Dati Tecnici
13. DATI TECNICI INTERNET RADIO Serie di chip Nicent ca. 10.000 stazioni radio su Internet dispo- nibili MP3 (bitrate fino a 320 kbits/s, frequenza di Codec audio campionamento fino a 48 kHz) AAC/AAC+ (bitrate fino a 320 kbits/s, fre- quenza di campionamento fino a WMA (bitrate fino a 320 kbits/s, frequenza di campionamento fino a 48 kHz) Compatibile con UPnP/DLNA... - Page 322 13. DATI TECNICI RETE Interfaccia di comunicazione WiFi IEEE 802.11b/g/n wireless; Bluetooth (BT V5.0, Supports A2DP, AVRCP profiles) Frequenze WiFi : 2.400 - 2.4835 GHz; W-LAN / Bluetooth Bluetooth: 2.4GHz - 2.48 GHz Potenza di trasmissione WiFi: <20dBm; Bluetooth: max. 8dBm W-LAN Codifica WEP, WPA, WPA2 (PSK), WPS...
- Page 323 13. DATI TECNICI INGRESSI Lato frontale Attacco USB (USB 2.0) Max. 1A di cor- rente di carica Ingresso per gli auricolari da 3,5 mm Lato posteriore 1 x uscita audio analogica cinch L+R 1 x uscita audio coassiale digitale elettrica 1 x uscita audio ottica digitale 1 x ingresso DC per alimentazione elet- trica (5,5 mm)
- Page 324 13. DATI TECNICI ALIMENTAZIONE ELETTRICA Fabbricante SHENZHEN SOY TECHNOLOGY CO.LTD. Modello numero SOY-1800360-327-II-A Tensione di ingresso AC 100 - 240 V Frequenza d'ingresso 50Hz-60Hz Tensione di uscita 18V DC Corrente di uscita 3,6A Rendimento 64,8W Efficienza media operativa Consumo energetico a vuoto <...
-
Page 325: Servizio Assistenza E Supporto
I nostri tecnici sono a Sua disposizione dal lunedì al venerdì, dalle ore 8:00 alle ore 16:45 al seguente numero: 02676 / 95 20 101 o via e-mail all’indirizzo: service@telestar.de Se il servizio di assistenza non è in grado di aiutarLa, invii il Suo apparecchio DABMAN i510 BT, preferibilmente nella propria confezione originale, ma... -
Page 326: Contrassegno Ce
Il Suo apparecchio è provvisto del marchio CE ed è conforme a tutte norme UE. Con la presente TELESTAR DIGITAL GmbH dichiara che il dispo- sitivo IMPERIAL DABMAN i510 BT è conforme ai requisiti di base e ad altre disposizioni pertinenti della Direttiva EMC 2014/30/UE, la Direttiva RoHS 2011/65/CE, la Direttiva Bassa Tensione 2006/95/CE, la Direttiva R&TTE 1999/5/CE e... - Page 327 NOTE IMPERIAL DABMAN i510 BT ®...
- Page 329 DABMAN i510 BT Gebruikershandleiding Alles-in-één hifi-systeem Bediening op afstand via app www.telestar.de...
- Page 330 Handleiding...
- Page 331 INHOUDSOPGAVE 1. VOORWOORD ......... . .335 2.
- Page 332 INHOUDSOPGAVE 6.3 Antenne-aansluiting ........358 6.4.
- Page 333 INHOUDSOPGAVE 8. FUNCTIES ..........377 8.1 DAB+-radio.
- Page 334 INHOUDSOPGAVE 9. FOUTOPLOSSING ........397 10.
-
Page 335: Voorwoord
Technische Hotline voor Duitsland: 02676 / 9520101 U kunt ook een e-mail sturen naar service@telestar.de of een fax naar 02676 / 9520159. Als we het probleem op deze manier niet kunnen oplossen, stuur het apparaat... -
Page 336: Veiligheidsaanwijzingen
2. VEILIGHEIDSAANWIJZINGEN 2.1 Tekenverklaring SYMBOOL BETEKENIS Dit signaalwoord duidt op een gevaar met een hoge risicograad GEVAAR! die de dood of zware verwonding tot gevolg heeft als de instructie niet in acht wordt genomen. Dit signaalwoord duidt op een gevaar met een gemiddelde risi- cograad die de dood of zware WAARSCHUWING! verwonding tot gevolg kan heb-... - Page 337 2. VEILIGHEIDSAANWIJZINGEN 2.1 Tekenverklaring SYMBOOL BETEKENIS Dit teken waarschuwt voor geva- ren. beschermingsklasse II Elektrische apparaten beschermingsklasse II hebben een verstevigde en dubbele iso- latie ter hoogte van de nominale isolatiespanning en toegankelij- ke onderdelen (VDE 0100 deel 410, 412.1). Ze hebben meestal geen aansluiting aan de bescher- mende geleider.
-
Page 338: Beoogd Gebruik
2. VEILIGHEIDSAANWIJZINGEN 2.1 Tekenverklaring SYMBOOL BETEKENIS Bij apparaten met holle stekkers Afb. 1 wordt de polariteit van de stek- ker met dit symbool gekenmerkt. Hierbij wordt er een onderscheid Afb. 2 gemaakt tussen 2 varianten Afb. 1: Buiten plus/ binnen min Afb. -
Page 339: Veiligheidsaanwijzingen
2. VEILIGHEIDSAANWIJZINGEN kennis dient te beschikken betreffende de omgang met consumentenelektro- nica. De aansprakelijkheid vervalt als het apparaat niet zoals beoogd wordt gebruikt. › Gebruik alleen door ons geleverde of goedgekeurde reserveonderdelen of accessoires. › Breng geen wijzigingen aan het apparaat aan en gebruik geen extra apparaten of reserveonderdelen die niet expliciet door ons zijn goedgekeurd of geleverd. -
Page 340: Bedrijfsveiligheid
› Indien u een technisch of mechanisch probleem vaststelt, neemt u contact op met de TELESTAR Service. › Gebruik alleen de meegeleverde stekker! ›... -
Page 341: Apparaat Aansluiten
2. VEILIGHEIDSAANWIJZINGEN 2.5. Apparaat aansluiten › Sluit het apparaat alleen aan op een correct geïnstalleerd, geaard en elek- trisch gezekerd stopcontact. › Let erop dat de stroomvoorziening (stopcontact) makkelijk bereikbaar is. › Knik of knel geen kabelverbindingen. › Controleer voor u het apparaat in gebruik neemt of de spanningsweergave, die zich op het apparaat bevindt, met de plaatselijke netspanning overeen- komt. -
Page 342: Verwondingsgevaar
2. VEILIGHEIDSAANWIJZINGEN 2.7. Verwondingsgevaar WAARSCHUWING! Overmatige geluidsdruk bij gebruik van oortjes of hoofdtelefoons kan bescha- diging of verlies van het gehoorvermogen tot gevolg hebben. Luisteren met oortjes of hoofdtelefoon met verhoogd volume gedurende een langere periode kan schade veroorzaken bij de gebruiker. Controleer het geluidsvolume voor u oortjes of een hoofdtelefoon in uw oren steekt of over uw oren zet. -
Page 343: Omgang Met Batterijen
2. VEILIGHEIDSAANWIJZINGEN 2.8. Omgang met batterijen Het apparaat wordt geleverd met een CR 2032 batterij. Gebruik voor de afstandsbediening alleen dit batterijtype. Gebruik principieel alleen het batteri- jtype van de batterij die meegeleverd wordt. GEVAAR! Bij het inslikken van batterijen bestaat gevaar voor interne verwondingen. Het batterijzuur in de batterijen kan bij contact met de huid verwondingen tot gevolg hebben. -
Page 344: Apparaat Reinigen
Sluit het apparaat opnieuw aan op de stroomvoorziening. Het terugzetten naar de fabrieksinstellingen is eventueel noodzakelijk. Als dit niet mocht lukken, neem dan contact op met uw dealer of rechtstreeks met TELESTAR Digital GmbH. Meer informatie vindt u ook in hoofdstuk 14. Handleiding... -
Page 345: Leveromvang
3. LEVEROMVANG Neem alle onderdelen uit de verpakking en verwijder alle verpakkingsmateri- alen volledig. Mochten één of meerdere vermelde onderdelen ontbreken, neem dan contact op met: TELESTAR Service Center Am Weiher 14, 56766 Ulmen e-mail: service@telestar.de AANTAL VERKLARING IMPERIAL DABMAN i510 BT ®... -
Page 346: Overzicht Van De Apparaten
4. OVERZICHT VAN DE APPARATEN 4.1 Bedieningsveld en aansluitingen Handleiding... -
Page 347: Bedieningsveld Voorkant
4. OVERZICHT VAN DE APPARATEN 4.2 Bedieningsveld voorkant Modus Schakel hier de bedrijfsmodus van het apparaat om tussen internetradio, DAB+, FM, UPnP, AUX en USB. Favorieten-toets Schakelt naar één van de individueel opgeslagen favoriete zenders. Menu Activeer het menu van het apparaat via deze toets Stationsgeheugentoets 1/Play/Pause Schakelt in de radiomodus naar de 1ste programmageheugenplaats. - Page 348 4. OVERZICHT VAN DE APPARATEN 4.2 Bedieningsveld voorkant USB-aansluiting Verbind het apparaat hier met een USB-gegevensdrager zoals een USB- harde schijf of USB-stick om vanaf hier muziekbestanden af te spelen of op te nemen. Hoofdtelefoonaansluiting Sluit hier een hoofdtelefoon aan om de door de radio afgespeelde muziek via een hoofdtelefoon te beluisteren.
-
Page 349: Aansluitingen Achterkant
4. OVERZICHT VAN DE APPARATEN 4.3 Aansluitingen achterkant FM/DAB-antenne Antenne-aansluiting voor de meegeleverde telescoopantenne. LAN-aansluiting Sluit het apparaat hier met een netwerkkabel aan op een aanwezig net- werk om de internetradiofunctie te kunnen gebruiken. Alternatief kan het apparaat ook draadloos via W-LAN worden aangesloten. Optische digitale SPDIF audio-uitgang Als u een externe hifi-versterker gebruikt en deze heeft een overeenkom- stige optische digitale ingang, sluit dan de aansluiting SPDIF OUT van de... - Page 350 4. OVERZICHT VAN DE APPARATEN 4.3 Aansluitingen achterkant Bluetooth-antenne Aansluiting voor de meegeleverde antenne. Via de aan deze bus aanges- loten antenne ontvangt de DABMAN i510 BT bijvoorbeeld bluetooth- signalen bijv. van een mobiel eindapparaat (smartphone of tablet). W-LAN-antenne Aansluiting voor de meegeleverde W-LAN-antenne, om het apparaat via W-LAN met haar W-LAN-thuisnetwerk te verbinden.
-
Page 351: Afstandsbediening
4. OVERZICHT VAN DE APPARATEN 4.4 Afstandsbediening Opmerking: Met de applicatie kunt u uw compatibele internetradio bedienen via tablet of smartphone. De app is geschikt voor zowel iOS als Android besturingssystemen. Meer informatie daarover vindt u in hoofdstuk 8.16. IMPERIAL DABMAN i510 BT ®... - Page 352 4. OVERZICHT VAN DE APPARATEN 4.4 Afstandsbediening 1. Stand-by-toets Schakel het apparaat met deze toets in of uit. 2. Modus Schakel hier tussen de verschillende bedrijfsmodi. Aan deze toets kan een andere functie worden toegewezen. Lees daarvoor ev. ook hoofdstuk 8.14. 3.
- Page 353 4. OVERZICHT VAN DE APPARATEN 4.4 Afstandsbediening 10. Besturing en keuze van de muziektitels via USB, UPnP, media of cd I◄◄ Vorige titel selecteren/Snel terugspoelen Stopt het afspelen ►II Start of pauzeert het afspelen ►►I Volgende titel selecteren/Snel verder spoelen 11.
-
Page 354: Aansluitingen
5. AANSLUITINGEN 5.1 Aansluiten van weergaveapparaten met cinch-bussen (analoog) Als u de analoge audiosignalen van een extern apparaat wilt afspelen via de aan de DABMAN i510 BT aangesloten luidspreker, sluit u de analoge audio- uitgang van het externe apparaat aan op de LINE IN aansluiting op de DABMAN i510 BT. -
Page 355: Met Digitale Audio-Ingang
5. AANSLUITINGEN 5.2 Aansluiten van audio-uitvoerapparaten met digitale audio-ingang Deze aansluiting wordt aanbevolen als u het signaal van de DABMAN i510 BT van een bestaande soundsysteem met digitale audio-ingangen moet worden afgespeeld. Gebruik één van de twee digitale uitgangen OPTICAL OUT of COAXIAL OUT op de DABMAN i510 BT als uw bestaande hifi-versterker een optische of coaxiale digitale ingang SPDIF heeft. -
Page 356: Aansluiten Van Een Internetrouter
5. AANSLUITINGEN 5.3 Aansluiten van een internetrouter Sluit het apparaat hier met een netwerkkabel aan op een aanwezige Internetrouter om de internetradiofunctie of de UPnP-functie te kunnen gebruiken. Alternatief kan het apparaat ook via W-LAN worden aangesloten. Internet Router Handleiding... -
Page 357: Eerste Ingebruikname
6. EERSTE INGEBRUIKNAME 6.1 Algemene bedieningsinstructies › Schakel het apparaat aan of uit met de stand-by-toets op de ..Afstandsbediening of op het apparaat aan of uit. › Het geluidsvolume verhoogt u met de toets VOL+op de afstandsbediening of door aan de regelaar VOL+op het apparaat te draaien. -
Page 358: Afstandsbediening Voorbereiden
6. EERSTE INGEBRUIKNAME 6.2 Afstandsbediening voorbereiden › Bij onjuist behandelen van batterijen bestaat er een risico op explosie! Lees hierover de veiligheidsinstructies in hoofdstuk 2.8. › Let op de juiste polariteit van de batterij! › Plaats het batterijvak daarna terug. 6.3 Antenne-aansluiting Schroef de meegeleverde DAB+ /UKW telescoopantenne op de antenne- aansluiting... -
Page 359: Menutaal
6. EERSTE INGEBRUIKNAME 6.5. menutaal Via de toetsen ▼▲ van de afstandsbediening kunt u de menutaal kiezen. Bevestig de gewenste menutaal met de toets op de afstandsbedie- ning. 6.6. Datum- en tijdmodus Selecteer hier hoe de radio de tijd moet synchroniseren. Via de toetsen ▼▲... -
Page 360: Gmt-Tijdzone
6. EERSTE INGEBRUIKNAME 6.7. GMT-tijdzone Selecteer hier de tijdzone waarin u zich bevindt. Selecteer GMT + 1:00 voor Duitsland en het grootste deel van Europa. Via de toetsen ▼▲ van de afstandsbediening kunt u de selectie maken. Bevestig met de toets op de afstandsbediening of door op de draaiknop op het apparaat te drukken. -
Page 361: Stand-By-Modus
6. EERSTE INGEBRUIKNAME 6.9. Stand-by-modus In dit item kunt u aangeven of de tijd op het display moet worden getoond wanneer de radio zich in stand-by-modus bevindt. Via de toetsen ▼▲van de afstandsbediening kunt u de selectie maken. Bevestig met de toets op de afstandsbediening of door op de draaiknop op het apparaat te drukken. -
Page 362: Locatie
6. EERSTE INGEBRUIKNAME 6.10. Locatie Selecteer het continent en in de volgende stap het land waar u zich bevindt om toegang te krijgen tot lokale zenders uit uw regio in internetradiomodus. Via de toetsen ▼▲ van de afstandsbediening kunt u de selectie maken. Bevestig met de toets op de afstandsbediening of door op de draaiknop op het apparaat te drukken. - Page 363 6. EERSTE INGEBRUIKNAME 6.11. Netwerkselectie Als u een netwerkverbinding via W-LAN tot stand wilt brengen, selecteert u W-LAN en bevestigt u met OK. In de volgende stap worden alle beschikbare W-LAN-netwerken weergegeven die zich in het bereik van het apparaat bevinden. Selecteer het netwerk waarmee verbinding gemaakt moet worden en beve- stig met de toets OK.
- Page 364 6. EERSTE INGEBRUIKNAME 6.11. Netwerkselectie Voer het wifi-wachtwoord in. Met de toetsen ▼▲ op de afstandsbediening of via de draaiknop aan het apparaat kunt u een teken selecteren en met instellen. Met de toets ► of via de draaiknop verplaatst u de cursor een stap verder.
-
Page 365: Bediening En Instellingen
7. BEDIENING EN INSTELLINGEN 7.1 Algemene bedieningsinstructies 7.1.1 Menu Druk op de toets MENU op het apparaat of op de afstandsbediening. Ongeacht de huidige instelling van het apparaat, gaat u altijd naar het hoofd- menu. De navigatie in het hoofdmenu vindt plaats via de toetsen ►◄... -
Page 366: Toets Modus
7. BEDIENING EN INSTELLINGEN 7.1.4. toets MODUS U kunt de toets Modus gebruiken om door de verschillende bedrijfsmodi van de radio te schakelen. 7.2. Systeem Druk op de toets MENU op de afstandsbediening of op het apparaat en selecteer met de toetsen ►◄... -
Page 367: Datum En Tijd
7. BEDIENING EN INSTELLINGEN 7.2.2 Datum en tijd Via de toetsen ▼▲ van de afstandsbediening kunt u de selectie maken. Bevestig met de toets op de afstandsbediening of door op de draaiknop op het apparaat te drukken. Het apparaat is standaard geconfigureerd voor automatische tijdinstelling. Als het apparaat via een netwerk met het internet is verbonden, wordt de tijd en de datum automatisch gesynchroniseerd. - Page 368 7. BEDIENING EN INSTELLINGEN 7.2.3. Netwerk Beslis eerst of de netwerkverbinding via LAN of W-LAN moet worden gemaakt. Als het apparaat via een netwerkkabel met uw internetrouter hebt aangesloten, selecteert u en bevestigt u met OK. De radio geeft de volgende informatie weer wanneer de verbinding succesvol Als u een netwerkverbinding via W-LAN tot stand wilt brengen, selecteert u W-LAN en bevestigt u met OK.
- Page 369 7. BEDIENING EN INSTELLINGEN 7.2.3. Netwerk In de volgende stap worden u alle beschikbare W-Lan-netwerken weergegeven die zich in het bereik van het apparaat bevinden. Selecteer het netwerk waarmee een verbinding gemaakt moet worden en bevestig met de toets OK. Voer het wifi-wachtwoord in.
-
Page 370: Alarm/Wekker
7. BEDIENING EN INSTELLINGEN 7.2.4. Alarm/wekker Het apparaat kan als wekkerradio gebruikt worden. In dit menu-item kunt u tot 5 wektijden instellen. Om een wektijd in te stellen gaat u als volgt te werk: Druk op de toets MENU op de afstandsbediening of op het apparaat en selecteer met de toetsen ►◄... - Page 371 7. BEDIENING EN INSTELLINGEN 7.2.4. Alarm/wekker Stel in de volgende regel het tijdstip in waarop de wekker geactiveerd moet worden. Gebruik daarvoor het cijfertoetsenbord van de afstandsbediening of de draaiknop op het apparaat. Om de individuele gegevens te bevestigen, moeten deze met de toets worden opgeslagen.
-
Page 372: Timer Bewerken
7. BEDIENING EN INSTELLINGEN 7.2.5. Timer bewerken In dit menu kunt u een ingestelde opnametimer bewerken. Lees hiervoor hoofdstuk 8.12. 7.2.6. Stand-by-modus Met deze functie kunt u het display in de stand-by-modus aanpassen. Selecteer met de toetsen ▼▲ van de afstandsbediening of met behulp van de draaiknop op het apparaat het menupunt standby-modus en druk op de toets... -
Page 373: Sleeptimer
7. BEDIENING EN INSTELLINGEN 7.2.6. Stand-by-modus Eco-stand-by In deze modus heeft het apparaat een zeer laag stroomverbruik in stand-by- positie. De tijdsweergave wordt in stand-by-positie niet weergegeven. Stand-by met tijdsweergave In deze modus wordt de tijd weergegeven in de stand-by-positie wanneer u het apparaat uitschakelt met de stand-by-toets. -
Page 374: Achtergrondverlichting
7. BEDIENING EN INSTELLINGEN 7.2.7. Sleeptimer Selecteer om deze functie te deactiveren of kies een ingestelde tijd tussen 10 en 120 minuten. Bevestig uw ingave met op de afstandsbediening of bevestig door op de draaiknop op het apparaat te drukken. 7.2.8. -
Page 375: Locatie Instellen
Via de USB-interface hebt u de mogelijkheid om de besturingssoftware van uw radio te actualiseren die indien nodig op www.telestar.de als download beschikbaar is. De op de internetpagina beschikbare software moet unzipt worden. Het unzip- te bestand slaat u dan binnen een overeenkomstig opslagmedium op en sluit dit via USB-aansluiting aan op de radio. -
Page 376: Fabrieksinstellingen
7. BEDIENING EN INSTELLINGEN 7.2.11 Fabrieksinstellingen In dit menu-item kunt u het apparaat opnieuw instellen in de afleverstatus. Het apparaat start vervolgens als tijdens de eerste ingebruikname op. Selecteer met de toetsen ▼▲ van de afstandsbediening of met behulp van de draaiknop op het apparaat in het menu Systeem het menupunt Fabrieksinstellingen... -
Page 377: Functies
8. FUNCTIES 8.1 DAB+-radio In deze radiomodus kunt u digitaal uitgezonden radiozenders ontvangen. Houd de toets MENU op de afstandsbediening of het apparaat ingedrukt en selecteer met de toetsen ►◄ het menupunt DAB/DAB+. Bevestig de selectie door op de draaiknop op het apparaat of door op de toets op de afstandsbediening te drukken. -
Page 378: Dab Handmatige Zoekprocedure
8. FUNCTIES 8.1.2 DAB-zoekprocedure ga naar de regel automatische zenderzoekprocedure en bevestig met de toets op de afstandsbediening of door op de draaiknop op het apparaat te drukken. De radio zoekt nu automatisch naar alle te ontvangen, digitale radiostations en slaat deze vervolgens op in een zenderlijst. Deze kunt u oproepen zoals beschreven in hoofdstuk 8.1.1. -
Page 379: Fm-Radio (Ukw)
8. FUNCTIES 8.2 FM-radio (UKW) Druk op de toets MENÜ op de afstandsbediening of het apparaat en selecteer met de toetsen ►◄ FM . In dit menu vindt u alle relevante instellingen om radiozenders via UKW te ontvangen. 8.2.1. UKW-zenderzoekopdracht Als de DABMAN i510 BT voor het eerst in de UKW-modus wordt geschakeld, moet een zenderzoekopdracht uitgevoerd worden. -
Page 380: Ukw-Radiobediening
8. FUNCTIES 8.2.2 UKW-radiobediening Om de opgeslagen radiostations op te roepen drukt u op de toets ▸ ▸I I◂ ◂. Alternatief kunt u de eerste 5 opgeslagen zenders ook via de stationopslag- toetsen op het apparaat oproepen. Als u de bezetting van de stationsopslag- toetsen wilt wijzigen, druk u op de stationopslagtoets 6 (zie pagina 19) om een zoekopdracht naar de volgende te ontvangen zenders uit te voeren. -
Page 381: Internetradiozender Selecteren
8. FUNCTIES 8.3.1 Internetradiozender selecteren Favorietenlijst Deze lijst toont alle individueel opgeslagen radiozenders. Lees om een radiozender op te slaan ook hoofdstuk 8.4. Radio In dit item verkrijgt u verschillende radioprogrammalijsten. Podcasts Hier kunt u kiezen uit een aantal radiopodcasts. Laatst beluisterd Deze lijst bevat de 40 radiozenders die het laatst zijn geselecteerd. -
Page 382: Radiozenders Opslaan
8. FUNCTIES 8.3.3 Radiozenders opslaan U kunt tot 4 radiostations op een stationsgeheugentoets opslaan. Selecteer een radiozender die u wilt opslaan en houd de zenderge- heugentoets op het apparaat waarop u de radiozender wilt opslaan ongeveer 3 seconden ingedrukt. De radiozender wordt opgeslagen. De radiozender kan nu via deze toets worden teruggevonden. -
Page 383: Lokale Radiozenders
8. FUNCTIES 8.3.5 Lokale radiozenders Om het zoeken naar zenders in uw omgeving in de modus internetradio een- voudiger te maken, kunt u in het menu van het apparaat gericht naar radio- stations uit uw regio zoeken. Selecteer in het hoofdmenu van het apparaat en kies met de toetsen ►◄... -
Page 384: Geluidsvolume Wijzigen
8. FUNCTIES 8.4. Geluidsvolume wijzigen Wijzig het geluidsvolume via de toetsen VOL+/VOL- op de afstandsbediening of via de draaiknop op de het apparaat. Om het radiogeluid te dempen, drukt u op de toets Mute op de afstandsbe- diening. 8.5. Bedrijfsmodus omschakelen Druk op de toets MODE op de afstandsbediening om tussen de bedrijfsmodi... -
Page 385: Usb Weergave/Mulitmedia
8. FUNCTIES 8.6 UPnP Om UPnP te selecteren gaat u als volgt te werk: Druk op de toets MENU op de afstandsbediening of op het apparaat en selecteer met de toetsen ►◄ van de afstandsbediening of via de draaiknop op het apparaat UPnP. bevestig met OK. Selecteer een titel die u wilt afspelen en bevestig met OK. -
Page 386: Eq (Equalizer)
8. FUNCTIES 8.8 EQ (Equalizer) In dit gedeelte kunt u bepaalde instellingen voor de klank selecteren. Naast verschillende voorgaande geluidsinstellingen kunt u ook het geluid van uw radio individueel aanpassen en deze instelling opslaan onder Mijn EQ. Selecteer met de toetsen ▼▲... -
Page 387: Weer
8. FUNCTIES 8.8 EQ (Equalizer) Binnen het item EQ Advanced Settings kunt u verschillende frequentieberei- ken aanpassen. 8.9. Weer Het apparaat kan actuele weersinformatie over uw locatie weergeven. Om de weersinformatie te verkrijgen, selecteert u in het hoofdmenu van de radio het menu-item Weer en bevestigt u dit met OK. -
Page 388: Radioprogramma's Opnemen
8. FUNCTIES 8.9. Weer Vergeet niet dat: Het apparaat maakt voor de weersvoorspelling verbinding met een internet- server waarop de weersinformatie opgeslagen is. Daardoor kunnen de getoonde weergegevens eventueel van de werkelijke weergegevens op uw locatie afwijken. 8.10. Radioprogramma's opnemen Met het apparaat kunt u FM-, DAB+- en internetradio- uitzendingen op een aangesloten USB-gegevensdrager opnemen. -
Page 389: Radioprogramma's Programmeren
8. FUNCTIES 8.10.1 Radioprogramma’s programmeren Net als bij een video- of dvd-recorder, kunt u de radio ook gebruiken om timeropnamen te programmeren om radioprogramma's op te nemen, bijvoor- beeld wanneer u niet thuis bent. Houd hiervoor de toets opname op het appa- raat of op de afstandsbediening ongeveer 2 seconden ingedrukt. -
Page 390: Radio Als Bluetooth-Ontvanger
8. FUNCTIES 8.11 Radio als Bluetooth-ontvanger De radio kan via Bluetooth met een extern apparaat (bijv.smartphone/ tablet) worden verbonden. Via de Bluetoothverbinding kunnen vervolgens media (lokaal opgeslagen MP3- bestanden, gestreamde muziek, webradio) van het externe apparaat via de radio afgespeeld worden. Selecteer via het menu het punt Bluetooth. Opdat u via Bluetooth audiobestanden naar de radio kunt sturen, moet er een Bluetooth-verbinding worden gemaakt. -
Page 391: Radio Als Bluetooth-Zender
8. FUNCTIES 8.11.3 Radio als Bluetooth-zender De radio kan worden gebruikt als een Bluetooth-zender. Dit maakt het mogelijk om audiosignalen van de radio via Bluetooth naar geschikte Bluetooth-ontvangers te verzenden. (bijv. Bluetooth-hoofdtelefoon.) Ga als volgt te werk om over te schakelen naar de Bluetooth-verzendmodus: Zorg ervoor dat het Bluetooth-ontvanger is geactiveerd en gereed is. -
Page 392: De Functie Van De Toets Modus Veranderen
8. FUNCTIES 8.12 De functie van de toets MODUS veranderen. De Toets MODUS, waarvan de functie kan worden gewijzigd, bevindt zich zowel op de afstandsbediening van het apparaat als op het apparaat zelf. Om de functie van deze toets aan uw wensen aan te passen, gaat u als volgt te werk: Druk op de toets MENU... -
Page 393: Bediening Via App
8. FUNCTIES 8.14. Bediening via app Met de applicatie kunt u uw compatibele internetradio bedie- nen via tablet of smartphone. De app is geschikt voor zowel iOS als Android besturingssystemen. Opmerking: Deze beschrijving komt overeen met de appversie 5/2022. In de loop van software-updates van de app kunnen functies of het verschijningsbeeld wijzi- gen. - Page 394 8. FUNCTIES 8.14. Bediening via app Start de applicatie. Bij het starten van de app herkent deze automatisch de radio indien deze in hetzelfde netwerk is aange- meld. Het hoofdmenu van de app is gestructureerd, net zoals het menu van de radio. De gebruikte iconen van de app zijn vergelijkbaar met de symbolen van het menu van de radio.
- Page 395 8. FUNCTIES 8.14. Bediening via app Favorietenzender oproepen Via deze functie kunt u uw opgeslagen favoriete radio- zender oproepen. Selecteer een gewenste favorieten- zender in de lijst. Favoriete radiozenders kunt u op de Bewaar de radio zoals beschreven in de gebruiks- handleiding van de radio.
- Page 396 8. FUNCTIES 8.14. Bediening via app Afstandsbediening Met de functie afstandsbediening hebt u de mogelijk- heid om de radio met een virtuele afstandsbediening te besturen. Druk daarvoor onderaan op het afstandsbedienings- symbool. Alle functies van de radio kunt u met behulp van de virtuele afstandsbediening besturen.
-
Page 397: Foutoplossing
9. FOUTOPLOSSING SYMPTOOM MOGELIJKE OORZAAK EN OPLOSSING Geen displayweergave, radio Sluit de stroom aan met het meegelever- reageert niet op bediening de netsnoer. Bediening via de afstands- Batterij leeg of niet correct geplaatst. bediening is niet Controleer of de batterij in de juiste mogelijk richting geplaatst is. - Page 398 9. FOUTOPLOSSING SYMPTOOM MOGELIJKE OORZAAK EN OPLOSSING Slechte audiokwaliteit tij- Bestand met geringe bitrate. Controleer dens afspelen het audiobestand. muziek Tip: Bij MP3-bestanden moet de bitrate 192Kbit/s of hoger zijn. Geluidsvolume te laag Controleer de geluidsvolume-instelling op de i510 BT. Controleer de geluidsvolume- instellingen van het gekoppelde apparaat van welke u muziek afspeelt.
- Page 399 9. FOUTOPLOSSING SYMPTOOM MOGELIJKE OORZAAK EN OPLOSSING Geen internetradiozender Controleer de toegangspunten van het beschikbaar netwerk en controleer of er nog steeds een netwerkverbinding is. Schakel eventueel over naar een andere internetradiozender om te controleren of de netwerkverbinding nog werkt. De radiozender is momenteel niet beschi- kbaar.
-
Page 400: Opslag
10. OPSLAG Tijdens het niet gebruiken van het apparaat trekt u de stekker uit het stop- contact, de netkabel uit het apparaat en bewaart u de radio op een droge, stofvrije plaats. Indien de radio langere tijd niet wordt gebruikt, moet de batterij uit de afstandsbediening worden verwijderd. -
Page 401: Weggooien Van Het Apparaat
12. WEGGOOIEN 12.2. Weggooien van het apparaat Het rechts afgebeelde symbool van een doorstreepte vuilnisbak op wielen geeft aan dat dit apparaat onder de richtlijn 2012 / 19 / EU valt. Deze richtlijn bepaalt dat dit apparaat aan het einde van zijn technische levensduur niet met het normale huishoudelijk afval mag afvoeren, maar bij speciaal ingerichte verz- amelplaatsen, recyclingcentra of afvalverwerkende bedrijven moet afgeven. -
Page 402: Technische Gegevens
13. TECHNISCHE GEGEVENS INTERNETRADIO Chipset Nicent ong. 10.000 internetradiostations beschi- kbaar MP3 (bitrate tot 320 Kbits/s, sample rate Audiocodecs tot 48 KHz) AAC/AAC+ (bitrate tot 320 Kbits/s, sample rate tot 48 KHz) WMA (bitrate tot 320 Kbits/s, sample rate tot 48 KHz) UPnP/ DLNA-compatibel Wifi IEEE 802.11b/g... - Page 403 13. TECHNISCHE GEGEVENS NETWERK Communicatie-interfaces WiFi IEEE 802.11b/g/n wireless; Bluetooth (BT V5.0, Supports A2DP, AVRCP profiles) Frequenties Wifi: 2.400 - 2.4835 GHz; W-LAN/Bluetooth Bluetooth: 2,4 GHz - 2,48 GHz Zendvermogen Wifi: < 20 dBm; Bluetooth: Max. 8 dBm W-LAN- versleuteling WEP, WPA, WPA2 (PSK), WPS IMPERIAL DABMAN i510 BT...
- Page 404 13. TECHNISCHE GEGEVENS AANSLUITINGEN Voorkant USB-aansluiting (USB 2.0) max. 1 A laadstroom 3,5 mm hoofdtelefoonaansluiting Achterkant 1 x analoge audio-uitgang cinch L + R 1 x coaxiale digitale elektrische audio- uitgang 1 x optische digitale audio-uitgang 1 x DC-ingang voor stroomvoorziening (5,5 mm) 1x DAB+/UKW-antenne-ingang 1 x antenne-ingang wifi...
- Page 405 13. TECHNISCHE GEGEVENS VOEDING Producent SHENZHEN SOY TECHNOLOGY CO.LTD. Modelnummer SOY-1800360-327-II-A Ingangsspanning AC 100 - 240 V Ingangsfrequentie 50Hz-60Hz Uitgangsspanning 18V DC Uitgangsstroom 3,6A Uitgangsvermogen 64,8W Gemiddelde efficiëntie tijdens werking Nullastverbruik < 0,21W ENERGIEVERBRUIK In gebruik Max. W Stand-by < 1 W AFMETINGEN EN GEWICHT Afmetingen BxHxD (mm) 430 x 80 x 355...
-
Page 406: Service En Support
02676/95 20 101 of via mail op: service@telestar.de Indien u bij de service-hotline niet verder geholpen kunt worden, stuurt u uw DABMAN i510 BT indien mogelijk in de originele verpakking, maar in elk geval... -
Page 407: Ce-Markering
15. CE-MARKERING Uw apparaat draagt het CE-kenmerk en voldoet aan alle vereiste EU-normen.Hiermee verklaart TELESTAR DIGITAL GmbH dat het IMPERIAL DABMAN i510 BT-apparaat voldoet aan de basisvereisten en andere rele- vante bepalingen van de EMV-richtlijn 2014/30/EU van de RoHS-richtlijn 2011/65/EU, van de laagspanningsrichtlijn 2006/95/EG, van de R&TTE-richtlijn 1999/5/EG...
Need help?
Do you have a question about the Imperial DABMAN i510 BT and is the answer not in the manual?
Questions and answers