
Related Manuals for Dell Axim X51


Summary of Contents for Dell Axim X51
- Page 1 Dell™ Axim™ X51/X51v Owner’s Manual Models HC03U, HC03UL, and HD04U w w w . d e l l . c o m | s u p p o r t . d e l l . c o m...
- Page 2 Other trademarks and trade names may be used in this document to refer to either the entities claiming the marks and names or their products. Dell Inc. disclaims any proprietary interest in trademarks and trade names other than its own.
-
Page 3: Table Of Contents
....Related Information ....Contacting Dell ....1 Getting Started Unpacking Your Device . - Page 4 Connecting to a Computer ....Using the Cradle ....Using the Sync Cable .
- Page 5 Entering Information ....Entering Text Using the Input Panel ..Typing With the Soft Keyboard ..Letter Recognizer .
- Page 6 Contacts ..... . Finding a Contact ....Using the Summary Screen .
- Page 7 Using Odyssey Client to Get a ....Certificate of Authority Using Infrared ....Using Bluetooth®...
- Page 8 PowerPoint Mobile ........MSN Messenger Setting Up .
-
Page 9: Before You Begin
Microsoft ActiveSync Help. Last-minute updates and detailed The readme files, located in the technical information ActiveSync folder on the computer and on the Dell Getting Started CD. Up-to-date information about your www.microsoft.com/windowsmobile Pocket PC support.dell.com My Service Tag and/or Express Service... -
Page 10: Contacting Dell
Before your warranty period expires, call us at one of the numbers provided in table on page 11. Have your Dell Service Code or order number ready while making the call. For details see your Product Information Guide. - Page 11 Toll-Free Numbers Country Code City Code toll-free: 800-335-0031 Anguilla General Support 1-800-805-5924 Antigua and General Support Barbuda Argentina Website: www.dell.com.ar (Buenos Aires) E-mail: International us_latin_services@dell.com Access Code: 00 E-mail for desktop and portable Country Code: 54 computers: la-techsupport@dell.com City Code: 11 ®...
- Page 12 Website and E-Mail Address Local Numbers, and Access Code Toll-Free Numbers Country Code City Code Australia E-mail (Australia): (Sydney) au_tech_support@dell.com International E-mail Customer Care (ANZ): Access Code: 0011 Apcustserv@dell.com Country Code: 61 E-mail (New Zealand): nz_tech_support@dell.com City Code: 2 1-300-655-533...
- Page 13 Area Codes, International Website and E-Mail Address Local Numbers, and Access Code Toll-Free Numbers Country Code City Code Austria (Vienna) Website: support.euro.dell.com International E-mail: Access Code: 900 tech_support_central_europe@dell .com Country Code: 43 0820 240 530 00 Home/Small Business Sales City Code: 1...
- Page 14 Department Name or Service Area, Area Codes, International Website and E-Mail Address Local Numbers, and Access Code Toll-Free Numbers Country Code City Code Belgium Website: support.euro.dell.com (Brussels) E-mail for French-speaking International Customers: Access Code: 00 support.euro.dell.com/be/fr/email dell/ Country Code: 32 02 481 92 96...
- Page 15 604 633 4888 Customer Service (Penang, Malaysia) 604 633 4955 Transaction Sales (Penang, Malaysia) Canada (North Online Order Status: York, Ontario) www.dell.ca/ostatus toll-free: 1-800-247-9362 International AutoTech (automated technical Access Code: 011 support) toll-free: 1-800-847-4096 Customer Care (Home Sales/Small Business) toll-free: 1-800-326-9463 Customer Care (med./large...
- Page 16 Technical Support Fax toll-free: 800 858 2969 Technical Support (Dell™ Dimension™ and Inspiron) toll-free: 800 858 0950 Technical Support (OptiPlex™, Latitude™, and Dell Precision™) toll-free: 800 858 0960 Technical Support (servers and storage) toll-free: 800 858 2920 Technical Support (projectors,...
- Page 17 800 858 2621 Large Corporate Accounts Spare Parts 980-9-15-3978 Colombia General Support 0800-012-0435 Costa Rica General Support Czech Republic Website: support.euro.dell.com (Prague) E-mail: czech_dell@dell.com International 22537 2727 Technical Support Access Code: 00 22537 2707 Customer Care Country Code: 420...
- Page 18 Department Name or Service Area, Area Codes, International Website and E-Mail Address Local Numbers, and Access Code Toll-Free Numbers Country Code City Code Denmark Website: support.euro.dell.com (Copenhagen) E-mail: International support.euro.dell.com/dk/da/email Access Code: 00 dell/ 7010 0074 Country Code: 45 Technical Support for Inspiron...
- Page 19 Area Codes, International Website and E-Mail Address Local Numbers, and Access Code Toll-Free Numbers Country Code City Code France (Paris) Website: support.euro.dell.com (Montpellier) E-mail: International support.euro.dell.com/fr/fr/emaildell/ Access Code: 00 Home and Small Business Country Code: 33 0825 387 129 Technical Support for Inspiron...
- Page 20 Department Name or Service Area, Area Codes, International Website and E-Mail Address Local Numbers, and Access Code Toll-Free Numbers Country Code City Code Germany Website: support.euro.dell.com (Langen) E-mail: International tech_support_central_europe@dell Access Code: 00 .com 06103 766-7222 Country Code: 49 Technical Support for Inspiron...
- Page 21 Access Code: 001 apsupport@dell.com 2969 3188 Country Code: 852 Technical Support (Dimension and Inspiron) 2969 3191 Technical Support (OptiPlex, Latitude, and Dell Precision) 2969 3196 Technical Support (PowerApp™, PowerEdge™, PowerConnect™, and PowerVault™) 3416 0910 Customer Care 3416 0907 Large Corporate Accounts...
- Page 22 Area Codes, International Website and E-Mail Address Local Numbers, and Access Code Toll-Free Numbers Country Code City Code Ireland Website: support.euro.dell.com (Cherrywood) E-mail: International dell_direct_support@dell.com Access Code: 16 1850 200 722 Technical Support for Inspiron Country Code: 353 XPS computers only...
- Page 23 International Website and E-Mail Address Local Numbers, and Access Code Toll-Free Numbers Country Code City Code Italy (Milan) Website: support.euro.dell.com International E-mail: Access Code: 00 support.euro.dell.com/it/it/emaildell/ Country Code: 39 Home and Small Business 02 577 826 90 City Code: 02...
- Page 24 City Code: 44 Technical Support (Dimension and Inspiron) 81-44-520-1435 Technical Support outside of Japan (Dimension and Inspiron) toll-free:0120-198-433 Technical Support (Dell Precision, OptiPlex, and Latitude) 81-44-556-3894 Technical Support outside of Japan (Dell Precision, OptiPlex, and Latitude) toll-free: 0120-981-690 Technical Support (PDAs,...
- Page 25 Country (City) Department Name or Service Area, Area Codes, International Website and E-Mail Address Local Numbers, and Access Code Toll-Free Numbers Country Code City Code 044-556-3430 Japan (Kawasaki) Large Corporate Accounts Sales (over 3500 employees) International 044-556-1469 Access Code: 001 Public Sales (government agencies, educational institutions, Country Code: 81...
- Page 26 Customer Service (Xiamen, China) 29 693 115 Transaction Sales (Xiamen, China) Malaysia Website: support.ap.dell.com (Penang) toll-free: 1 800 88 0193 Technical Support (Dell Precision, International OptiPlex, and Latitude) Access Code: 00 toll-free: 1 800 88 1306 Technical Support (Dimension, Country Code: 60...
- Page 27 01-800-888-3355 toll-free: 1-866-278-6822 Montserrat General Support 001-800-882-1519 Netherlands General Support Antilles Netherlands Website: support.euro.dell.com (Amsterdam) 020 674 45 94 Technical Support for Inspiron International XPS computers only Access Code: 00 020 674 45 00 Technical Support for all other...
- Page 28 Home and Small Business 0800 444 617 Government and Business 0800 441 567 Sales 0800 441 566 001-800-220-1006 Nicaragua General Support Norway (Lysaker) Website: support.euro.dell.com International E-mail: Access Code: 00 support.euro.dell.com/no/no/email dell/ Country Code: 47 671 16882 Technical Support 671 17575...
- Page 29 Area Codes, International Website and E-Mail Address Local Numbers, and Access Code Toll-Free Numbers Country Code City Code Poland (Warsaw) Website: support.euro.dell.com International E-mail: Access Code: 011 pl_support_tech@dell.com 57 95 700 Country Code: 48 Customer Service Phone 57 95 999...
- Page 30 International and Inspiron, and Electronics and Access Code: 005 Accessories) toll-free: 1800 394 7488 Country Code: 65 Technical Support (OptiPlex, Latitude, and Dell Precision) toll-free: 1800 394 7478 Technical Support (PowerApp, PowerEdge, PowerConnect and PowerVault) 1800-394-7430 (Option Customer Care toll-free: 1 800 394 7412...
- Page 31 City Code 604 633 4810 Southeast Asian Customer Technical Support, and Pacific Customer Service, and Sales Countries (Penang, Malaysia) Spain (Madrid) Website: support.euro.dell.com International E-mail: Access Code: 00 support.euro.dell.com/es/es/email dell/ Country Code: 34 Home and Small Business City Code: 91...
- Page 32 Department Name or Service Area, Area Codes, International Website and E-Mail Address Local Numbers, and Access Code Toll-Free Numbers Country Code City Code Sweden Website: support.euro.dell.com (Upplands Vasby) E-mail: International support.euro.dell.com/se/sv/email Access Code: 00 dell/ 08 590 05 199 Country Code: 46 Technical Support...
- Page 33 00801 651 227 Corporate Sales Thailand Website: support.ap.dell.com toll-free: 1800 0060 07 International Technical Support (OptiPlex, Access Code: 001 Latitude, and Dell Precision) toll-free: 1800 0600 09 Country Code: 66 Technical Support (PowerApp, PowerEdge, PowerConnect, and PowerVault) 1800-006-007 (Option 7) Customer Care...
- Page 34 Area Codes, International Website and E-Mail Address Local Numbers, and Access Code Toll-Free Numbers Country Code City Code U.K. (Bracknell) Website: support.euro.dell.com International Customer Care website: Access Code: 00 support.euro.dell.com/uk/en/ECare/Form/Home.asp Country Code: 44 City Code: 1344 E-mail: dell_direct_support@dell.com 0870 908 0500...
- Page 35 (1-877-335-5638) toll-free: 1-800-695-8133 Employee Purchase Program (EPP) Customers Financial Services website: www.dellfinancialservices.com toll-free: 1-877-577-3355 Financial Services (lease/loans) toll-free: 1-800-283-2210 Financial Services (Dell Preferred Accounts [DPA]) Business toll-free: 1-800-822-8965 Customer Service and Technical Support toll-free: 1-800-695-8133 Employee Purchase Program (EPP) Customers...
- Page 36 (continued) Software and Peripherals Sales toll-free: 1-800-357-3355 Spare Parts Sales toll-free: 1-800-247-4618 Extended Service and Warranty Sales toll-free: 1-800-727-8320 toll-free: 1-877- Dell Services for the Deaf, Hard- DELLTTY of-Hearing, or Speech-Impaired (1-877-335-5889) 1-877-673-3355 U.S. Virgin General Support Islands 8001-3605 Venezuela...
-
Page 37: Getting Started
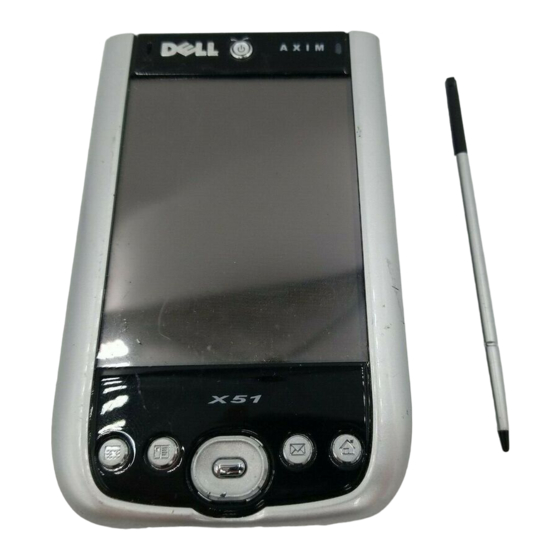
Getting Started Dell Axim X51 and Dell Axim X51v are Dell's newest PDAs (Personal Digital Assistant). Axim X51 refers to the low and mid configurations while Axim X51v refers to the high configuration which has VGA support. See the table for "Accessories"... - Page 38 Accessories Contents High Axim X51/X51v Getting Standard Standard Standard Started CD AC adapter & localized power Standard Standard Standard cord standard battery (1100 mAH) Standard Standard Standard High capacity battery (2200 Optional Optional Optional mAH) Screen Protector Optional Optional Optional Optional: Needs to be ordered separately.
-
Page 39: Front, Side, And Back Views
Front, Side, and Back Views CAUTION: Before performing any of the procedures in this section, read and follow the safety instructions in the Product Information Guide. Front and Side Views CompactFlash card and infrared sensor (top) Secure Digital memory card audio connector (top) slots (top) microphone... - Page 40 OWER UTTON — Press the power button to turn the device on or off. Press and hold the power button to dim the display. Press and hold again to light the display. Use Power Button tab to configure power button to turn off power completely. This saves your battery power.
-
Page 41: Back View
Back View stylus (extended) reset button battery (inside) battery lock in locked position cradle/sync cable connector (bottom) BATTERY LOCK — Use this switch to release and remove the main battery. See "Installing and Removing the Battery" on page 42. BATTERY —... -
Page 42: Using The Battery
Using the Battery Your device ships with a standard 1100 mAH (milli-Ampere-Hour) battery with an expected minimum of 5-8 hours of battery life. A higher capacity 2200 mAH can also be purchased. The 2200 mAH battery has an expected minimum battery life of 10-16 hours. NOTICE: Do not use your device until you have charged the main battery for at least 8 hours for the first charge. - Page 43 Close the battery cover. Lock the battery cover by sliding the battery lock to the right. battery cover battery lock in lock position To remove the battery: Slide the battery lock to the left to unlock the battery cover. Lift the battery cover. battery cover battery lock unlocked...
-
Page 44: Charging The Battery
NOTE: Your Service Tag is located underneath the battery in the battery slot. You need your Service Tag to access Dell Support at support.dell.com or to call Dell for customer service or technical support. Charging the Battery You must charge your battery before using it for the first time. Subsequently, recharge the battery every time it runs low (power button light flashes amber). -
Page 45: Checking Battery Power
To recover from a critically low battery: Plug in the AC adapter or replace the main battery with a charged battery. Press the power button to turn on the device. By default, the device turns off if the device is left unused for a period of time. -
Page 46: Changing The Display Mode On Your Device
Changing the Display Mode on Your Device ® The Axim X51/X51v with Microsoft Windows Mobile™ Version 5.0 software for Pocket PC Premium Edition can display the screen in both landscape and portrait views. To change the display mode from landscape to portrait: →... -
Page 47: Operating The Axim
Operating the Axim Using the Power Button Press the power button to turn the device on or off. Press and hold the power button to dim the display. This is the power saver mode. Press and hold again to light the display. Use Power Button tab to configure power button to turn off power completely. -
Page 48: Connecting To A Computer
NOTE: Before connecting your device to a computer for the first time, install ActiveSync on the computer using the Dell™ Getting Started CD. To connect your device to the cradle: Connect the AC adapter to the cradle and to an electrical outlet. - Page 49 cradle power cord AC adapter cradle cable USB connector on the computer cradle spare battery status light Operating the Axim...
-
Page 50: Using The Sync Cable
The sync cable is optional depending on the configuration of your device. To connect the sync cable: Connect the sync cable connector to your device. Ensure that the Dell logo is facing upwards. Connect the USB connector of the cable to the USB connector on your computer. -
Page 51: Connecting To A Projector
NOTE: You need to install the Viewer program from the Dell Getting Started CD for the device to detect the projector. To configure the program, see the Help section in the program. -
Page 52: Using Cards
Using Cards Your device has two slots located on the top of the unit. The larger slot supports CompactFlash Type II cards. The smaller slot supports Secure Digital (SD) memory cards, Secure Digital I/O (SDIO) cards, and the MultiMediaCard (MMC). All three memory card types are available in sizes from 64 MB to 1 GB or 2 GB. -
Page 53: Secure Digital Memory Cards
Secure Digital Memory Cards Use Secure Digital memory cards to save or back up data. To install a Secure Digital memory card: If a card or plastic blank is already installed, press in to release it, and then remove it. blank Ensure that the card is oriented correctly, and slide it into the slot until you feel a click. -
Page 54: Hard Reset
To do a soft reset, use the stylus to press the reset button. stylus reset button Hard Reset NOTICE: When you do a hard reset, you lose all the data stored in your device Flash memory, and any programs that you installed on your device. Do a hard reset if: •... -
Page 55: Using Microsoft Windows Mobile Version
To do a hard reset: Press and hold the power button. Using the stylus, hold down the reset button for about 2 seconds. Follow the instructions on the screen. ® ™ Using Microsoft Windows Mobile Version 5.0 Software for Pocket PC Premium Edition Mobile 5.0 The Windows Mobile 5.0 operating system comes with a host of new features and interface improvements. -
Page 56: Programs
Icon Description Volume off Bluetooth Wi-Fi on Wi-Fi data call Help icon Programs You can switch from one program to another by selecting a program from the Start menu. To access programs that are not listed in the Start menu, tap →... -
Page 57: Switcher Bar
• Tap Exit Switcher Bar to close the menu. The following table contains a partial list of programs that are on your device. See the Dell™ Getting Started CD for additional programs that you can install on your device. Icon... -
Page 58: Navigation Bar And Command Bar
Icon Program Description Excel Mobile Create new workbooks or view and edit Excel workbooks that you created on your computer. Pocket MSN Send and receive instant messages with your MSN Messenger contacts. Word Mobile Create new documents or view and edit Word documents that you created on your computer. -
Page 59: Pop-Up Menus
navigation bar Start menu command bar Pop-Up Menus With pop-up menus, you can quickly select an action for an item. For example, you can use the pop-up menu in the contact list to delete a contact, make a copy, or send an e-mail message to a contact. The actions in the pop-up menus vary from program to program. -
Page 60: Searching For Information
Add new task Searching for Information The Search feature on your device helps you to quickly locate information. To search for files or other items: → → Tap Start Programs Search. In Search for, enter the file name, word, or other information you want. If you have looked for this item before, tap the Search for arrow to select the item from the list. -
Page 61: Backing Up Data
You can also use File Explorer to find files on your device and to organize → your files into folders. On the Start menu, tap Programs File Explorer. sort menu folder location Backing Up Data To prevent or minimize data loss, you should periodically back up the data stored on your device. -
Page 62: Entering Information
Entering Information You have several options for entering information: • Use the input panel to enter typed text using the soft keyboard or another input method. • Write directly on the screen using the stylus. • Draw pictures on the screen with the stylus. •... -
Page 63: Typing With The Soft Keyboard
When you use the input panel, your device anticipates the word you are typing or writing and displays it above the input panel. When you tap the displayed word, the word is inserted at the insertion point. The more you use your device, the more words it learns to anticipate. -
Page 64: Letter Recognizer
Letter Recognizer Letter Recognizer allows you to use your stylus to write letters on the screen as you would write them on paper. NOTE: Letter Recognizer is included with the English, French, German, Italian, and Spanish operating systems. Other versions do not support Letter Recognizer. Tap the input selection arrow and tap Letter Recognizer. -
Page 65: Transcriber
Transcriber Transcriber allows you to write anywhere on the screen using the stylus similar to the way that you would write on paper. Unlike Letter Recognizer and Block Recognizer, you can write a sentence or more, and then pause to let Transcriber change the written characters to typed characters. -
Page 66: Editing Written Text
Editing Written Text To edit or format written text: Drag the stylus across the text that you want to select. Tap and hold the selected text. Tap the appropriate editing command in the pop-up menu. → You can also tap Menu Edit at the bottom of the screen to select editing commands. - Page 67 If you want to convert only certain words, select them before tapping Recognize (or tap and hold the selected words and then tap Recognize on the pop-up menu). If a word is not recognized, it is not converted to print-style text. If the conversion is incorrect, you can select different words from a list of alternatives or return to the original written text: Tap and hold the incorrect word.
- Page 68 alternate words Tips for getting good recognition: • Write neatly. • Write on the lines and draw descenders below the line. Write the cross of the "t" and apostrophes below the top line so that they are not confused with the word above. Write periods and commas above the line.
-
Page 69: Drawing On The Screen
Drawing on the Screen You can draw on the screen the same way that you write on the screen. However, selecting and editing drawings is different than selecting and editing written text. For example, selected drawings can be resized, while written text cannot. -
Page 70: Editing A Drawing
Editing a Drawing To edit or format a drawing, you must first select it: Tap and hold the stylus on the drawing until the selection handles appear. To select multiple drawings, drag to select the drawings. You can cut, copy, and paste selected drawings by tapping and holding the selected drawings and then tapping an editing command on the pop-up menu. -
Page 71: Using My Text
Using My Text When using Messaging or MSN Messenger, use My Text to quickly insert preset → or frequently used messages. To insert a message, tap Menu My Text and tap a message. NOTE: You can add text to a My Text message after you insert the message. To edit a My Text message: →... -
Page 72: Personal Tab
Personal Tab • Buttons — Assign the programs that launch when you press the device buttons. • Input — Adjust the settings for input method, word completion, and other options. • Menus — Add or remove items from the Start menu. •... -
Page 73: Connections Tab
By default, the radio is off. • Connections — Add and configure modem and server connections. • Dell WLAN Utility — Available only on devices with internal Wi-Fi. Use the WLAN utility to connect to the wireless network using EAP/TTLS. •... - Page 74 Operating the Axim...
-
Page 75: Communicating And Scheduling
To synchronize your data, you need both the Microsoft Windows Pocket PC versions of ActiveSync. You must install the Windows version of ActiveSync on your computer using the Dell™ Getting Started CD. The Pocket PC version is already installed on your device. -
Page 76: Installing And Using Activesync
NOTE: Before connecting your device to a computer for the first time, ensure that you install ActiveSync on the computer using the Dell™ Getting Started CD. NOTE: If your Axim fails to syncronize, check your computer security software to see if you have any firewall running. Firewalls may block the communication from your computer to your Axim. -
Page 77: About Microsoft Pocket Outlook
NOTE: Pocket Outlook is pre-installed on your device. If not already installed, your Dell Getting Started CD has a copy of the Pocket Outlook installation program. Ensure that you install Pocket Outlook and not Outlook Express. Note that you can only install Pocket Outlook once from the program, as it is a licensed version. -
Page 78: Calendar
→ For an existing item in Calendar and Tasks, tap Edit Categories. → → For an existing item in Contacts, tap Menu Edit Categories. Tap OK to return to the appointment, contact, or task. Calendar Use Calendar to schedule appointments, including meetings and other events. -
Page 79: Using The Summary Screen
To create an appointment: → Tap Start Calendar. → Tap Menu New Appointment. Enter a name for the appointment, and enter information such as start and end times. To schedule an all-day event, in the All Day box, tap Yes. When finished, tap OK to return to the calendar. -
Page 80: Contacts
Contacts Use Contacts to maintain a list of your friends and colleagues. You can quickly share Contacts information with other device users using the infrared port. category search field NOTE: To change the way information is displayed in the list, →... -
Page 81: Finding A Contact
To add notes, tap the Notes tab. You can enter text, draw, or create a recording. For more information on creating notes, see "Notes" on page 83. When you have finished entering information, tap OK to return to the calendar. Finding a Contact To find a contact: →... - Page 82 sort menu To create a task: → → Tap Start Programs Tasks. Tap New, enter a subject for the task, and fill in information such as start and due dates. When finished, tap OK. To copy an existing task from the task list, select the task you want to copy. →...
-
Page 83: Notes
Notes Quickly capture thoughts, reminders, ideas, drawings, and phone numbers with Notes. You can create a written note or a recording. You can also include a recording in a note. If a note is open when you create the recording, it is included in the note as an icon. -
Page 84: Messaging
ISP or a network. NOTE: To create an e-mail account for your device, contact your internet service provider. Dell does not provide this service. Synchronizing E-Mail Messages You can synchronize e-mail messages along with the rest of your data if you enable Messaging synchronization in ActiveSync. -
Page 85: Using The Message List
When you connect to the e-mail server: • New messages are downloaded to the device Inbox folder. • Messages in the device Outbox folder are sent. • Messages that have been deleted on the e-mail server are removed from the device Inbox folder. Messages that you receive directly from an e-mail server are linked to your e-mail server rather than to your computer. -
Page 86: Composing Messages
Composing Messages To compose and send a message: → In the message list, tap Menu Switch Accounts and select the account. Tap New. Enter the e-mail address of one or more recipients, separating them with a semicolon. To access addresses and phone numbers from Contacts, tap To. -
Page 87: Managing E-Mail Messages And Folders
Managing E-Mail Messages and Folders By default, messages are displayed in one of the five folders for each service you have created: Inbox, Deleted Items, Drafts, Outbox, or Sent Items. The Deleted Items folder contains messages that have been deleted on the device. -
Page 88: Notifications
Notifications You can set your device to remind you when you have something to do. For example, if you have set up an appointment in Calendar, a task with a due date in Tasks, or an alarm in Clock, you are notified in one of the following ways: •... -
Page 89: Using File Explorer
Using File Explorer File Explorer lets you browse the folder contents on your device. The root folder is called My Device. My Device is similar to My Computer on the computer and contains My Documents, Program Files, Temp, Storage Card, and Windows folders, among others. - Page 90 Communicating and Scheduling...
-
Page 91: Getting Connected
For a Low configuration device, you must purchase the 802.11b SD card, insert it in your device, and load the drivers. NOTE: The default Wireless Networking Client utility for your device is the Dell WLAN utility. The following configuration steps are for the Dell WLAN utility. Getting Connected... -
Page 92: If The Network Card Is Set Up
If the Network Card is Set Up Normally the internal wireless card is already set up. There are times when you must choose the network card. On the Axim X51/X51v configurations that have built-in wireless, the network card is associated with the enabled wireless. -
Page 93: If The Wireless Network Is Not Broadcasting Ssid
If the Wireless Network is Not Broadcasting SSID The Configure Wireless Networks window only shows wireless networks that broadcast a Network Name (SSID) and those that have been added. Add the network if it is not listed. Contact your network administrator for the following information: •... -
Page 94: Using Odyssey Client
LAN (WLAN) users, ensuring that only authorized users can connect. Odyssey is mostly used in place of a manufacturer’s wireless networking client such as the Dell WLAN utility, Intel ProSET, or Windows XP’s Zero Config Service. To use Odyssey: →... - Page 95 Enter security settings: • Association Mode allows for open, shared, or WPA association methods. • Encryption Method changes based on what mode is chosen. Options include none, WEP, and TKIP. • If 802.1x is used, check the box Authenticate using 802.1X. •...
-
Page 96: Using Cisco Leap Wireless Lan Security
® Using Cisco LEAP Wireless LAN Security Your Dell Axim X51/X51v supports 802.1x network authentication between the client and server with a logon password using Cisco LEAP. Cisco LEAP can be configured using the Odyssey Client application. NOTE: Before starting, ensure that the Wireless power is enabled using the Wireless On/Off button. -
Page 97: Using Odyssey Client To Get A Certificate Of Authority
Tap OK. Select the network that you added from the drop-down menu and tap the box beside Connect to. The status displays as connected (authenticated) when this process is complete. NOTE: For further details, please refer to the Odyssey Client help file included in your device. -
Page 98: Using Infrared
Tap Browse to navigate to a .pfx file you have stored on your device. Select the file, and tap OK. Type in the RSA-type private key password for this certificate under Private key password. You can optionally click Unmask to make this password visible while you type it. -
Page 99: Creating A Modem Connection
Next. Otherwise, leave Passkey blank, and tap Next. NOTE: The Passkey for a remote Bluetooth device is usually found in the user manual for that device. The default Passkey for any Dell Axim is 1234. Enter the same passkey for the other device. Tap Finish. -
Page 100: Creating An Ethernet Connection
Enter the phone number just the way you would dial it. If you need an area code, be sure to include it. Tap Next. Enter your user name, password, and, if applicable, your domain. This information is provided by your ISP or network administrator. NOTE: You should not need to change any settings in Advanced. -
Page 101: Creating A Vpn Connection
The Network Settings window appears automatically the first time you insert the network card, so that you can configure the network card. To change settings later, tap Start →Settings →Connections tab → Connections. If you need to enter specific server information, tap the appropriate adapter, and then tap Properties. -
Page 102: Ending A Connection
Tap Finish. To manually start a connection, tap and hold the connection, and tap Connect. NOTE: A VPN connection requires physical connection to a network. Ensure the unit is linked to a wire or wireless network before you manually start a VPN connection. Ending a Connection To disconnect: •... -
Page 103: Getting Help On Connecting
To set up an e-mail service: → In Messaging on your device, tap Accounts New Account. Follow the directions in the E-mail Setup wizard. → For more information, tap Start Help. → To connect to your e-mail server, tap Account Connect. - Page 104 Getting Connected...
-
Page 105: Adding And Removing Programs
Adding and Removing Programs Some programs are already installed in the ROM when you received your device. You cannot remove these programs or accidentally lose the ROM contents. You can update ROM programs using installation programs with the *.pku extension. You can save data to Flash ROM. You can install any program created for your device, as long as your device has sufficient memory. -
Page 106: Downloading Programs From The Internet
Connect your device to your computer. Double-click the *.exe file. If the file is an installer file, the installation wizard begins. Follow the directions on the screen. Once the software is installed on your computer, the installer automatically transfers the software to your device. -
Page 107: Adding A Program To The Start Menu
Adding a Program to the Start Menu → Tap Start Settings. Tap Menus and then tap the check box for the program. If the program is not listed, you can either use File Explorer on the device to move the program to the Start Menu folder, or use ActiveSync on the computer to create a shortcut to the program using the following steps: Use Explorer in ActiveSync to explore your device files and locate... - Page 108 Adding and Removing Programs...
-
Page 109: Using Companion Programs
Using Companion Programs Companion programs include Word Mobile, Excel Mobile, PowerPoint Mobile, and Windows Media Player for Pocket PC. → To use a companion program on your device, tap Start Programs, and then tap the program name. Word Mobile Word Mobile works with Microsoft Word on your computer to give you easy access to copies of your documents. - Page 110 formatting toolbar input panel icon You can open only one document at a time. If you open a second document, you are asked to save the first one. You can create, save, or edit a document in a variety of formats, including Word (.doc), Word template (.dot), Rich Text Format (.rtf), and Plain Text (.txt).
-
Page 111: Excel Mobile
Excel Mobile Excel Mobile works with Microsoft Excel on your computer to give you easy access to copies of your workbooks. You can create new workbooks on your device, or you can copy workbooks from your computer to your device. Synchronize workbooks between your computer and your device, to have up-to-date content in both locations. -
Page 112: Tips For Working In Excel Mobile
You can open only one workbook at a time. If you open a second workbook, you are asked to save the first one. You can create, save, or edit a workbook in a variety of formats, including Excel template (.xlt) and Excel (.xls). Excel Mobile contains a list of the files stored on your device. - Page 113 will play back on the device. If the presentation is set up as a timed slide show, one slide will advance to the next automatically. Links to URLs are also supported. PowerPoint features not supported on the device include: • Notes: Notes written for slides will not be visible.
-
Page 114: Msn Messenger
MSN Messenger With the MSN Messenger instant message program, you can: • See who is online. • Send and receive instant messages. • Have instant message conversations with groups of contacts. To use MSN Messenger, you must have a Microsoft Passport account or a Microsoft Exchange e-mail account. -
Page 115: Chatting With Contacts
To see who is online without them seeing you, tap Menu →My Status → Appear Offline. If you block a contact, you appear offline but remain on the blocked contact's list. To unblock a contact, tap and hold the contact, and then tap Unblock on the pop-up menu. -
Page 116: Using Internet Explorer Mobile
Using Internet Explorer Mobile Use Internet Explorer Mobile to view Web or WAP pages: • During synchronization with your computer, download your favorite links and mobile favorites that are stored in the Mobile Favorites subfolder in Internet Explorer on your computer. •... -
Page 117: Conserving Memory
In the Download tab, specify the number of levels deep you want to download. To conserve device memory, go only one level deep. Synchronize your device and computer. Mobile favorites stored in the Mobile Favorites folder in Internet Explorer are downloaded to your device. If you did not specify an update schedule in step 3, you need to manually download content to keep the information updated on your computer and device. -
Page 118: Favorite Links
Favorite Links During synchronization, the list of favorites in the Mobile Favorites folder on your computer is synchronized with Internet Explorer Mobile on your device. The computer and the device are updated, with changes made to either list, each time you synchronize. Unless you mark the favorite link as a mobile favorite, only the link is downloaded to your device—you need to connect to your ISP or network to view the content. - Page 119 To view mobile favorites and channels: Tap the favorites icon to display your list of favorites. Tap the page you want to view. The page that was downloaded the last time you synchronized with your computer appears. If the page is not on your device, the favorite is dimmed. You need to synchronize with your computer again to download the page to your device, or connect to the Internet to view the page.
- Page 120 Using Companion Programs...
-
Page 121: Maintenance And Troubleshooting
Maintenance and Troubleshooting Maintaining the Axim To conduct periodic maintenance of your device, use the Dell Axim Self Diagnostic Utility available on the Getting Started CD. This diagnostic utility tests many features of your device: buttons, operating system version, battery status, video play, LED, driver, mirror mode, Bluetooth, Wireless, and USB Link Test. -
Page 122: Troubleshooting
• Soft reset the device, then: → → • Tap Start Settings Dell Axim Executive Keyboard • Tap Enable and try to setup the keyboard again • Replace the batteries in the keyboard. • Hold Left CTRL, Left FN, Right FN for 3-5 seconds. - Page 123 Problem Solution Click New Partnership to start a fresh GPS Unit not showing in Bluetooth Manager after new search search for devices. No GPS signal when placed on the Many new cars from VW, BMW and dashboard Mercedes have a metal UV filter in the front window preventing GPS signals.
-
Page 124: File Download Security Warning
As a safety precaution, the File Download Security Warning appears whenever you attempt to install a software program on your system. This occurs regardless of who makes the software you are attempting to install. NOTE: This warning does not indicate a problem with your Dell system. Maintenance and Troubleshooting... -
Page 125: Appendix
Appendix Specifications System Information ® Intel XScale™ PXA270 processor at up to 624 MHz ® Intel XScale™ PXA270 processor at Processor up to 520 MHz ® Intel XScale™ PXA270 processor at up to 416 MHz 64 MB/256 MB NAND Flash ROM Memory 64 MB/128 MB NAND Flash ROM 64 MB/128 MB NAND Flash ROM... - Page 126 Controls and Lights Navigation 5-way navigation button Buttons: four program buttons: Calendar, Contacts, Messaging, Home power on/off ® on/off button for WLAN/Bluetooth wireless technology voice record button reset button lock button Lights: synchronization/communication event notification charge status Expansion Slots Secure Digital memory card one Secure Digital memory card slot (3.3v) supports 1-bit and 4-bit SDIO card CompactFlash card...
- Page 127 Physical Dimensions: Length 119.0 mm (4.69 inches) Width 73.0 mm (2.87 inches) Height 16.9 mm (0.67 inch) Weight 175 g (6.2 oz) VGA with standard battery NOTE: The weight 167 g (5.9 oz) VGA with standard battery described refers to the 167 g (5.9 oz) VGA with standard battery device, not including the CompactFlash card or the...
- Page 128 Wireless Connectivity Network architecture ad-hoc and infrastructure Operating frequencies 2.4–2.497 GHz Operating channels 1–11 (North America); 1–13 (Europe and Japan) RF output power 13.0 dBm maximum Range indoor — up to 10 m (120 ft) at 5 Mbps and 75 m at 0.5 Mbps Client utility automatic location profile, site survey, diagnostics, current link status, ping...
- Page 129 Power Supply Battery type: Main 1100-mAh lithium-ion removable, rechargeable battery (standard) 2200-mAh lithium-ion removable, rechargeable battery (optional) Backup Capacitor to preserve RTC data AC adapter: Supply voltage 100–240 VAC Frequency 50–60 Hz Current consumption 0.4 A Output voltage 5.4 VDC Output current 2.41 A Environmental...
- Page 130 Environmental Altitude (maximum): operating 0 to 3048 m (0 to 10,000 ft) storage 0 to 12,190 m (0 to 40,000 ft) Maximum shock (measured with a 2 ms half-sine pulse): operating 200 G storage 400 G Maximum vibration (using a random- vibration spectrum that simulates user environment): operating...
-
Page 131: Glossary
Glossary ) — A wireless technology standard for mid-range networking 8 0 2 . 1 1 ( W devices that allows for enabled devices to automatically recognize each other. ® L U E T O O T H WIRELESS TECHNOLOGY —... - Page 132 R O M — read-only memory — Memory that stores data and programs that cannot be deleted or written to by the device. ROM, unlike RAM, retains its contents after you perform a reset. Some programs essential to the operation of your device reside in ROM.
-
Page 133: Index
Index ActiveSync Calendar installing, 76 about, 78 appointments, 79 appointments meeting requests, 79 scheduling, 79 Categories, 77 audio Media player, 115 command bar, 58 notifications, 88 communicating with other devices, 91 CompactFlash about, 52 battery installing, 52 charging, 44 slot, 39 main, 42 computer using and installing, 42... - Page 134 delete a contact, 59 expansion slots CompactFlash, 52 delete a file in Excel, 112 locations, 39 delete a file in PowerPoint, 113 delete a file in Word, 110 device Buttons and the Stylus, 47 File Download Security disconnecting Warning, 124 dial-up connection, 102 files from a cable or cradle, 102...
- Page 135 keyboard navigation bar, 58 soft, 63 network connecting to, 91 Notes creating, 83 letter recognizer, 64 notifications about, 88 Media Player about, 115 Pocket Outlook meeting requests about, 77 creating, 79 pop-up menus, 59 memory PowerPoint conserving, 117 about, 112 Messaging delete files, 113 about, 84...
- Page 136 programs software. programs Pocket Outlook, 77 specifications, 125 PowerPoint Mobile, 112 stylus removing, 107 using, 47 Start menu, 107 Switcher Bar, 57 Switcher Bar, 57 Tasks, 81 sync cable Word Mobile, 109 connecting to a computer, 50 projector, 51 synchronizing with your computer, 48 recording voice messages, 70...
- Page 137 Using the Power Button, 47 Using Your Axim, 45 video Media Player, 115 VPN connection, 101 Word about, 109 delete files, 110 writing block recognizer, 64 converting written text to print-style text, 64-65 drawing, 69 letter recognizer, 64 on the screen, 65 transcriber, 65 Index...
- Page 138 Index...
Need help?
Do you have a question about the Axim X51 and is the answer not in the manual?
Questions and answers