Table of Contents
Advertisement
Available languages
Available languages
Quick Links
Make
A
Difference
卓 / 尔 / 不 / 凡
WATER HEATER
房车即热式燃气热水器
RV Instantaneous Gas Water Heater
Installation and Operating Instructions
RV Instantaneous Gas Water Heater
Installation and Operating Instructions
RV chauffe-eau au gaz instantané
Instructions d'installation et d'utilisation
RH09G
安装和使用说明书
CN
AU
US
CA
Advertisement
Chapters
Table of Contents

Related Manuals for ARANA RH09G

Summary of Contents for ARANA RH09G
- Page 1 WATER HEATER Make RH09G Difference 卓 / 尔 / 不 / 凡 房车即热式燃气热水器 安装和使用说明书 RV Instantaneous Gas Water Heater Installation and Operating Instructions RV Instantaneous Gas Water Heater Installation and Operating Instructions RV chauffe-eau au gaz instantané Instructions d'installation et d'utilisation...
- Page 2 非常感谢您选购阿雷纳的即热式燃气热水器设备,在安装或使用该设备之前,请您仔细 阅读此说明书。请将说明书保存在所有用户都可以找到的地方,以便随时查阅使用。如 果该设备转让或者出售,请确保此说明书也交付给新用户,以便告知他们安装方法、使 用和安全要求。 警告 ! 为确保本设备的持续安全,必须按照制造商的说明进行安装、操作和维护。 警告 ! 如果不完全遵循说明书中的信息,可能会导致火灾或爆炸,从而导致财产损失、人身 伤害或死亡。 • 请勿在本设备或任何其他设备附近储存或使用汽油或其他易燃蒸气和液体。 如果您闻到气体怎么办: • 将所有人员从车辆上撤离。 • 关闭气体容器或气源处的气体供应。 • 请勿触摸电动开关,或使用车内的任何电话或收音机。 • 请勿启动车辆的发动机或发电机。 • 联系最近的气体供应商或合格的维修技术人员进行维修。 • 如果您无法联系到气体供应商或合格的维修技术人员,请联系最近的消防部门。 • 在气体泄漏修复之前不要打开气体供应。. • 安装和服务必须由合格的安装人员、服务代理或燃气供应商执行。...
-
Page 3: Table Of Contents
Make A Difference 卓 / 尔 / 不 / 凡 目录 1.0 安全符号说明 ......................4 2.0 安全说明 ......................4 2.1 安装 / 操作者的责任 ......................6 3.0 产品特点 ......................6 4.0 安装说明 ......................7 4.1 型号和规格 ...........................11 4.2 外观 ............................12 4.3 零部件名称 ...........................13 4.4 安装位置 ..........................14 4.5 连接管路... -
Page 4: 安全符号说明
1.0 安全符号说明 警告 ! 表示潜在的危险情况,如果不避免,可能会导致死亡或重伤。 小心 ! 表示潜在的危险情况, 如果不避免, 可能会导致轻微或中度伤害。 注意 ! 表示潜在的危险情况,如果不避免,可能会导致财产损失。 2.0 安全说明 • 该设备仅限安装在休闲车辆(房车)中使用。房车 作为休闲车,有自己的动力或由另一辆车牵引,设 计为娱乐、露营或旅行使用的临时居住区。 • 为防止火灾或爆炸事故,请勿在热水器和烟道排气 管附近放置易燃,易爆和易挥发的物品。 • 在热水器运行期间和使用后,烟道排气管及其周围 CAUTION 组件的温度很高,请勿用手触摸,以免烫伤。 • 不管是淋浴还是盆浴,为了防止烫伤,应先用手测 试水温,水温合适后再使用。... - Page 5 Make A Difference 卓 / 尔 / 不 / 凡 • 请勿以任何方式改装热水器。自行改装很危险,并且将不 在保修范围内。 • 长期不使用热水器时,为防止热水器水路冻裂及漏气,应 排尽设备内存水,并关闭进水阀、燃气及电源。环境温度 低于 4℃时,必须排出热水器内的水,或者接通电源(12V DC)并打开燃气阀启动防冻功能,做好防冻处理。(具体 操作内容见说明书相关章节) • 使用期间,按照此手册中指示定期保养。请经常检查排烟口和进气口是否有堵塞,是 否有积雪积冰,尘土污垢。确定热水器能吸入清洁空气,并能将燃烧产生的废气顺利 排放。 • 热水器仅限用于提供热水,不可用于其它用途,以防止意外事故的发生。 • 热水器的热水不能饮用。 • 请勿使用电池充电器给热水器供电或测试。热水器所使用的车载电源必须是符合 2 级 安全隔离的电源。请使用合格的电源,避免热水器发生损坏。 • 请勿改装热水器的正极接地系统。 • 除非热水器电源开关处于关闭状态,否则请勿高压通电测试。 • 车辆行驶时请勿使用热水器。 • 车辆加油时请勿使用热水器,并关闭热水器电源。 •...
-
Page 6: 安装 / 操作者的责任
2.1 安装 / 操作者的责任 • 安装和服务必须由授权的安装人员、服务代理或气体供应商进行。 • 本产品不适合 DIY 安装。 • 阅读并遵守所有安全规则。 • 加油时关闭燃气器具及其指示灯(如果有)。 • 保留好这份说明书以供将来参考。 • 遵守所有适用的国家和地方法规。 • 遵循本手册中概述的定期维护计划。 警告 ! 热水器的燃烧废气很热且含有一氧化碳,请勿呼吸或阻塞废气。 不遵守指示将导致严 重伤害、财产损失或死亡。 3.0 产品特点 • 数字恒温系统:微电脑控制系统,构成整个热水器的“电脑”,协调控制热水器的水、 电和气,将出水温度控制到选定的温度。 • 低水压启动:启动水压低,使用更方便。 • 熄火保护 : 当热水器在使用过程中意外熄火时,可自动切断燃气,确保燃气不会泄漏。 • 变速和风阻功能:当烟道堵塞或烟雾堵塞时,内置微电脑系统将提高风扇的运行速度, 消除有害气体的产生。当速度达到预定的最大速度时,微电脑系统将发出停气和停火 指令,以有效保障安全。 • 水和气体泄漏控制:当供水中断或出水阀关闭时,热水器将自动停止燃烧并关闭。... -
Page 7: 安装说明
Make A Difference 卓 / 尔 / 不 / 凡 • 出水温度显示:带出水温度显示功能。 • 防冻功能: • 当热水器中的水管温度低于 6±1℃(43 ℉ ±2 ℉)时,线控制器将显示“Fd”字符, 热水器将启动点火并在一定负荷下运行,热水器将在整机运行 7 秒后自动关闭。当 热水器的水温达到 32±1℃(90 ℉ ±2 ℉),热水器将自动关闭。 • 关机后,等待 3 分钟自检。当温度低于 6±1℃(43 ℉ ±2 ℉)或防冻恒温控制器 停止工作时,它将再次开始运行。 • 在启动防冻功能的过程中,当发生故障时,会报告相应的故障并显示相应的代码。 15 分钟后,系统自动清除故障代码。如果仍然满足防冻启动条件,防冻功能将自 动重新启动。... - Page 8 警告 ! 不正确的安装、调整、更改、服务或维护可能会导致财产损失、人身伤害或生命损失。 安装和维护必须由专业人员、服务代理或燃气热水器供应商进行。 必须按照本手册中提供的说明进行安装, 还必须遵守所有其他相关的国家、 省和地方法规, 包括(但不限于): GB 6932-2015 。 以下说明适用于房车安装,如果您对特定安装或应用有其他疑问,请咨询我司或我司授 权公司进行安装和维修服务。 • 热水器必须正确安装,以确保进气百叶窗和排气口就位时气流通畅。 • 对系统进行压力测试时,应断开设备与燃气管道的连接。 • 请勿将设备安装在悬垂物下方,如遮阳篷。 • 安装设备时,确保热水器门不会被遮挡或堵住。如果条件不允许,请确保车门打开时, 热水器通风口与车门之间留出至少 160mm 的距离。(见图 01) • 如果房车墙体不是防火材料,则设备的背面和周围易燃结构和可燃材料之间的间隙必 须填充防火材料。 • 由于乙烯基墙板的差异,设备不应安装在乙烯基墙板上。 • 当热水器排气口距离门窗小于 305mm 时,请勿安装在该位置。(见图 02) • 热水器的安装位置应高于地面 305mm 以上。(见图 03) • 不要将热水器或其他电器安装在排气口面向遮阳篷、天蓬或任何其他外壳覆盖的区域。...
- Page 9 Make A Difference 卓 / 尔 / 不 / 凡 160mm 限制开门角度 305mm 305mm >305mm...
- Page 10 • 热水器可安装在可伸缩遮阳篷下,但遮阳篷不能有围墙等遮蔽设施,需保证通风良好。 • 热水器必须直立安装,否则会影响热水器的正常使用。 • 安装热水器时,应确保接地可靠。 • 将进水管清洁干净后,再接到热水器上。在水泵后面要装一个易组装的过滤网用于过 滤水质,如果没有过滤网, 我司将不予保修。 • 在燃气管道、进水管道和出水管道上应安装阀门,便于维护和保养。 • 安装后检查漏气和漏水,确保没有任何气体和水泄漏。 • 从排气口到易燃物的最小距离应 >500mm。(见图 04) • 热水器正常运行的气体压力范围是最大入口压力不能超过 3.3KPa,最小压力不能低于 2.0KPa,超出范围将无法正常工作。 >500mm 危险 小心 ! 如果安全阀定期排放,这可能是由于封闭供水系统中的热膨胀过大造成的。请联系供 水商或当地管道检查员,了解如何纠正这种情况。不要堵塞安全阀。...
-
Page 11: 型号和规格
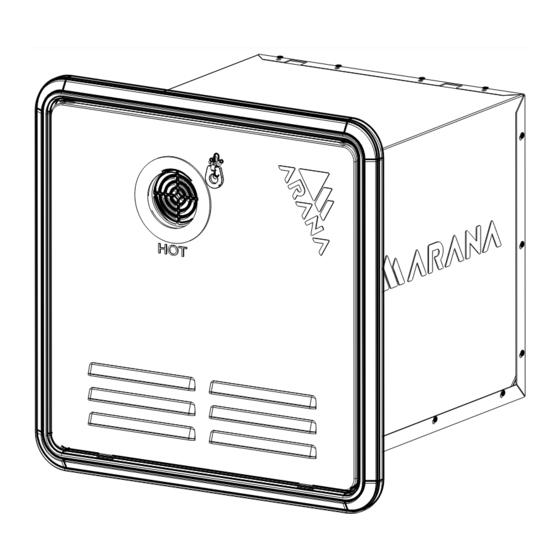
Make A Difference 卓 / 尔 / 不 / 凡 警告 ! 锋利的边缘会导致割伤和伤害! 在安装和操作设备时,务必戴上防护手套,以避免被锋利边缘割伤。 4.1 型号和规格 热水器型号 RH09G 液化石油气(20Y) 气体 输入负荷 17.5kW 喷嘴数量 喷嘴尺寸 1.1MM 最大工作水压力 0.4MPa 最小工作水压力 0.1MPa 标称燃气压力 2.8kPa 标称分气杆压力 1.92kPa 电源 12V DC, 3amp 水加热能力(温度 9L/min 上升 25K) 最高水温... - Page 12 4.2 外观 410mm 347mm 320mm 门锁 装饰 进气口格栅 直流 12V 请使用 12V DC 房车电池 出水口 G 1/2" 进气口 SAE 3/8" 进水口 G 1/2"...
-
Page 13: 零部件名称
Make A Difference 卓 / 尔 / 不 / 凡 4.3 零部件名称... -
Page 14: 安装位置
序号 名称 序号 名称 壳体上盖 进水接头部装 风机部装 控制器 热交换器部装 安装板 温控器 电源开关 防尘堵盖 保险丝 电源线固定头 进气组件 壳体底板 燃烧器部装 进水管组件 测压管组件 三通 导气管组件 定位支架 进水温度探头 引水槽 出水温度探头 安全阀 出烟口密封圈 分气杆部装 防倒风装置 燃气比例阀 门部装 水流量传感器 发泡橡胶 4.4 安装位置 根据如下标准,请在房车上选择合适的安装位置。 • 不要将热水器安装在房车的通道中。 • 应安装在房车的外墙上。 •... - Page 15 Make A Difference 卓 / 尔 / 不 / 凡 • 如果安装开口的周围是可燃材料,则需使用阻燃绝缘材料,例如隔热毡或隔热板,以 使热水器的后侧与可燃表面完全隔离。填充材料的最小厚度必须大于 20mm。 • 热水器后面的外壳连接间隙应在安装过程中用耐高温密封胶密封,将其与房车内部空 间隔离。以使燃烧的空气来自房车外部,燃烧产生的废气排到车外。 • 开孔尺寸为 330×330mm。 • 开口深度应足以容纳燃气管、电线和水管。 • 在孔的底部或后部,请预留燃气管、进 / 出水管、电源线和其他管线通道孔。 • 应预留足够的燃气管道、电线、水管的长度,推荐大于开口深度的 1.5 倍,以便维护 和测试。 • 孔的四周应确保足够的强度来固定热水器。(见图 07) • 在热水器下方增加支撑框架可以增加牢固性,以确保热水器不会因车辆的加速或停止 而造成损坏。 开口...
-
Page 16: 连接管路
4.5 连接管路 • 将 G1/2" 冷热水管正确连接到热水器后部。 • 在热水器背面正确安装 SAE 3/8" 液化气管。 • 将电源线正确连接到热水器。黑色是正极,白色是负极。 • 将线控器与热水器背面的两条蓝线连接起来,不区分正负极。 • 注意热水器背面的水管、燃气管和电线,需留出足够的长度将热水器从安装孔中取出。 • 必须由专业人员或燃气热水器供应商安装接线、线控器等(见图 08)。 黑色/12V正极+ 蓝色/线控器 白色/12V负极 - 蓝色/线控器 蓝线接线控器 黑线和白线接 12V DC 房车电池正负极 出水口 G 1/2" 进水口 G 1/2" 进气口 SAE 3/8" 警告 ! • 该热水器专为房车用户设计。... -
Page 17: 固定热水器
Make A Difference 卓 / 尔 / 不 / 凡 4.6 固定热水器 将门框插入热水器外壳,并将门框牢牢压在侧壁上。(见图 09) 使用 ST5×30 大扁自攻螺钉通过周围的每个孔将门框固定到车辆上。检查侧壁和门 框之间是否密封严密。(见图 10)... - Page 18 注意 ! 确保丁基胶带在 RV 壁板和设备⻔框之间完成紧密密封。如果有间隙,请取出器具 并涂上一层双层丁基胶带。 在门框周围涂上适量的密封胶,以填补房车墙面的任何缝隙。(见图 11) 将门底部的恐套入门框上的插销。(见图 12) 插销 孔 将门框上的门手环对准门上的槽位,然后推门,旋转门手环将门锁到位。(见图 13) • 拉动并旋转手柄 90°,锁住锁扣。 • 翻下折叠门手环。...
-
Page 19: 安装线控器
Make A Difference 卓 / 尔 / 不 / 凡 门手环 槽 注意 ! 如果组装⻔不能正常关闭,则组装⻔和房车都会受到损坏!当关闭时,请确保组装⻔ 与⻔框盖板⻬平。 4.7 安装线控器 选择一个方便操作的位置来放置线控器。 • 线控器和热水器之间的连接应根据具体环境合理布局。 • 将线控器上的面盖取下,使用提供的两个螺钉固定线控器底座,并将线控器面盖盖上 即可。(见图 14) 注意 ! 房车热水器配有水压安全阀,如果进水压力过高安全阀就会启动,将水排出泄压,以 保护水管免受高压损坏。... -
Page 20: 安全检查
警告 ! 完成安装并调整房车后,应锁紧热水器⻔,以防止意外打开。 Power Power Water Water Flame Flame 安装孔 安装孔 线控器 线控器面盖 线控器底座 4.8 安全检查 检查燃气管线有无泄漏。 • 例如, 将肥皂水涂抹到连接处, 看是否有气泡。 如果没有, 则表示没有泄漏 ; 如果有气泡, 请检查连接处并重新安装。 检查水路有无泄漏。 安装人员在确认任何气体连接之间没有发生泄漏后,应检查热水器的运行情况。 • 从排气口到易燃物的最小距离应 > 500mm。 • 不要将热水器或其他电器安装在排气口,面向遮阳篷、天篷或任何其他外壳覆盖的区 域。 • 热水器可安装在拖车内或可伸缩遮阳篷下,但遮阳篷必须通风良好。 • 该房车热水器适用于不低于 4Kgs 的气瓶,并符合当地法规。 气瓶... -
Page 21: 电路接线图
Make A Difference 卓 / 尔 / 不 / 凡 4.9 电路接线图 +24V... -
Page 22: 操作说明
5.0 操作说明 警告 ! • 在设备运行时请勿在该设备附近喷洒气溶胶。 • 请勿在该设备内或附近使用或存放易燃物品。 • 请勿在该设备上方及周围放置物品。 • 请勿改装该设备。 警告 ! • 首次操作前,请拆除任何包装材料,如塑料袋,塑料密封胶带等,任何包装材料 都可能堵塞热水器的出口。 • 用户在初次使用前确认热水器是否安装正确, 仔细检查连接是否正确并且无泄漏。 5.1 启动设备 • 确认热水器中的电源开关已打开;(见图 16) • 确认电源打开后,按下线控器上的按键“ ”; • 打开进水阀和气瓶上的燃气阀; • 打开出水阀(热水龙头),热水器启动,流出热水。 电源 开关 12V DC 出水口 进气口 入水口... -
Page 23: 线控器说明
Make A Difference 卓 / 尔 / 不 / 凡 警告 ! • 本设备不适合身体、感官或精神上有缺陷或缺乏经验和知识的人(包括儿童)使用, 除非他们在负责其安全的人员的监督下或指导下使用本设备。 • 使用设备时请保持车⻔关闭。 关机或断电后,热水器会自动切断燃气供应。用户在停电或关机时应关闭燃气阀,请在 下次操作前检查 12V DC 的电源连接。 警告 ! • 为了确保该设备的安全,必须按照制造商的说明进行安装,操作和维护。 • 没有监护人的指导,儿童不得操作该热水器。 • 从该设备上取下的任何部件都应存放在儿童无法触及的地方。 • 在阅读说明书之前,请勿操作该设备。 • 请勿在该设备上放置物品。 • 请勿在该设备附近存放化学品或易燃材料,或喷洒气溶胶。 • 请勿移除该设备的面板、盖板和防护装置。 5.2 线控器说明 •... -
Page 24: 设定水温
5.3 设定水温 该设备出水温度设定范围为 35℃~ 51℃;设计出水温度不超过 51℃(124 ℉)。 每按一下“ ”按键,温度上升 1℃。持续按上升键,温度每 0.25 秒上升 1℃。 每按一下“ ”按键,温度下降 1℃。持续按下降键,温度每 0.25 秒下降 1℃。 显示设定温度 显示故障代码 电源指示灯 摄氏温度 / 华氏温度 水流指示灯 Power 显示 Water 火焰指示灯 Flam e 降温按钮 加热按钮 摄氏 / 华氏度 电源按钮 ℉/℃ 切换按钮 警告... -
Page 25: 故障判断与处理
Make A Difference 卓 / 尔 / 不 / 凡 6.0 故障判断与处理 当热水器发生故障时,显示屏将显示故障代码,蜂鸣器将连续发出“哔,哔,哔”报警声。 请按照下表进行相应的处理。 故障代码 故障说明及处理方法 出口温度探头打开或短路。 点火失败,没有点火,或意外熄火,请检查燃气是否正常供应并在使 用前检查。 伪火故障,需重新启动热水器。 温控器发生故障,在启动或热水器运行期间未检测到温度控制。 入口温度探头故障,入口温度探头打开或短路。 风扇故障,在启动或热水器运行期间未检测到风扇信号。 过热故障。 当水温在 60℃(140 ℉)以上持续 3 秒时,显示屏将显示错误代码。 请检查供水压力是否过低。 电磁阀故障。 烟道堵塞故障。 故障报警和复位:如果出现上述代码,在确保水、气是否正常的情况下,请关闭热水器 前面的开关按钮,等待 5 秒钟之后,再重新开启设备,设备将正常运行。如果上述操作 未能使设备恢复正常使用,请联系您所在地最近的经销商。 注意 ! 在 15 分钟内连续开关热水器 5 次 ( 风扇启动 5 次 ),热水器将被锁定, 等待 15 分钟或错误代 码消失后,热水器将自动解锁... - Page 26 以下情况并非缺陷: 现象 原因和处理方法 排气口冒白烟 当室外温度太低时, 排出的烟雾遇到室外冷空气并凝结成白雾。 如果水流量太小,水就会变冷。为确保热水器的稳定运行,需 水没有被加热 要每分钟 1 加仑的最小水流量。 进水温度太低,且进水的水流量超过热水器的加热能力。请将 水温不达标 进水量适当调小。 为了防止缺氧,一些型号具有 20 或 40 分钟的定时保护。请关 20 分钟或 40 分钟后, 闭水龙头并等待一段时间后再使用。 热水器突然熄灭 关闭热水阀,但风扇 这是风扇延迟关闭的功能,以便完全排出热水器的废气,以确 不能立即停止 保用户的安全。 打开热水阀门不能立 从热水器到热水阀有一段管道距离,因为水管中留有冷水,所 即出热水 以在冷水加热前需要等待一段时间,管道越长,等待时间越长。 设备开机后,线控器 打开热水器, 确保开关打开, 保险丝完好无损。 如果保险丝熔断, 无响应 请更换相同尺寸的保险丝。(保险丝:10A 125V) 7.0 保养...
-
Page 27: 日常检查
Make A Difference 卓 / 尔 / 不 / 凡 7.1 日常检查 • 检查进气格栅, 排气口是否有灰尘, 避免堵塞。 • 检查设备外观是否有异常。 • 运行期间检查设备是否有异响。 • 检查水和气体有无泄漏。 • 当发现积炭时, 应及时通知售后服务提供商进行维护。 维修人员拆下燃烧器将喷嘴朝下, 使用毛 刷清除焦炭。 7.2 维护说明 • 定期清洁设备。不要使用化学洗剂和挥发性溶剂。 • 为了使设备具有更好的性能,请定期清洁进气格栅,防尘滤网和排气口。以保证近期 和排烟通畅。 • 要卸下防尘滤网:需要打开门板,卸下四个翼形螺钉,取下滤网,用水清洁。 • 关闭进水口,取下过滤器,清洁过滤器并重新安装。 • 定期排放房车系统中的水,并用经过认可的除垢溶液冲洗热交换器。 •... -
Page 28: 排水和清洁进水过滤器
7.3 排水和清洁进水过滤器 警告 ! 燃气供应开启时的高温或维修尝试可能导致烫伤! • 在开始维护和维修工作之前,请关闭电源和燃气供应。 • 让设备冷却下来。 • 只要设备仍然很热,切勿启动安全阀! 请始终佩戴防护装备,例如手套、护目镜和衣服,以避免在产品安装和维修过程中 受伤。 • 当房车打算不使用,即处于存储或者转运状态时,需要将热水器内的水排干。 • 为使热水器保持完整功能,请每年至少清洁一次进水过滤器。 • 关闭燃气阀门,关闭热水器的电源开关。 • 关闭供水或者水泵开关。 • 让所有的热水水龙头保持打开状态,以便对水系统进行减压和排气。 • 旋转安全阀,将热水器内的水排空。 • 取出进水过滤器,用清水将滤网清洗干净,然后重新插入并拧好(可以使用 1 元硬币 辅助拧动过滤器)。(见图 18) 进水过滤器 安全阀... - Page 29 Make A Difference 卓 / 尔 / 不 / 凡 7.4 备件 备件 图片 锁环 气体控制阀 引风机组件 燃烧器 点火针组件 进气口总成...
- Page 30 备件 图片 进水口组件 导气管 测压管 保险丝(125V 10A) 线控器 水流量传感器...
- Page 31 Make A Difference 卓 / 尔 / 不 / 凡 备件 图片 进水温度探头 出水温度探头 过耐压保护恒温器 反馈针 燃烧器控制器 进水口过滤器...
-
Page 32: 防冻系统
8.0 防冻系统 警告 ! 在霜冻条件下,环境温度低于 39 ° F (4 ° C),管道、水龙头和电器中的水可能会结冰。 这会对热水器的水系统组件和设备造成严重的损坏! 因冻结或不合适的防冻液对热水器造成的任何损坏均不在保修范围! 在前往可能的冷冻环境之前,必须做好热水器的保护,冷冻损坏不在保修范围。防冻方 法如下: • 将热水器中的水完全排干。适用于长时间不使用该设备的情况。(有关具体操作,请 参阅“排水和清洁进水过滤器”) • 添加房车制造商推荐的防冻剂。 • 启动防冻功能以防止冻结。打开电源开关和燃气阀,关闭进水口。热水器将自动进入 防冻模式(请确保房车中有足够的燃气可供使用)。 当热水器中的水温低于 6±1℃ (43 ℉ ±2 ℉)时,线控器显示“Fd”,设备启动点火 并以一定负载运行。整机运行 7 秒后,热水器将自动关机,或者当水管温度在 2 秒内达 到 32±1℃ (90 ℉ ±2 ℉) 时, 它将自动关机。 关机等待 3 分钟后热水器将再次自检运行。 在启动防冻功能的过程中,如果发生故障,则报告相应的故障并显示相应的代码。15 分... -
Page 33: 保修须知
Make A Difference 卓 / 尔 / 不 / 凡 9.0 保修须知 尊敬的用户:感谢您使用我公司产品,我们将依据相关法律规定为您提供优质的服务。 为确保您的利益,请仔细填写保修卡。此保修仅适用于房车燃气热水器。 该产品的保修期是(以购机证明开局日期起计算):一年(12 个月)。 请勿将其用于商业用途,这会缩短产品的使用寿命,如果将其用于商业目的,即使在保 修期内也会收取费用。 以下情况不在免费保修服务范围之内,我公司可以为您提供付费产品服务。超过免费保 修期的有效期,产品经维修后仍可继续使用 ; • 由于运输、保管不善等用户自身原因而损坏或未按照说明书要求操作而造成的损坏 ; • 未经我公司许可,自行拆动或维修,经非授权服务代理商维修的产品; • 没有有效购机证明的产品 ; • 被改动过的产品 ; • 由于电压不稳定或超出正常电压范围(12V DC),或电源线安装不符合国家电气安装 标准要求而造成损坏的产品 ; • 根据规范,如果操作不当导致产品损坏,不可再使用。 根据国家有关标准,人工燃气热水器的使用寿命为 6 年,天然气和液化气热水器的使用 寿命为... -
Page 34: 包装清单
10.0 包装清单 序号 物品 数量 备注 燃气热水器 1 台 使 用 说 明 书 1 本 (含保修卡) 线控器 1 个 不提供安装工具 安装螺钉 若干 其他单独包装 门 1 个 门框 1 个... -
Page 35: 保修卡
Make A Difference 卓 / 尔 / 不 / 凡 11.0 保修卡... - Page 36 Thanks for choosing ARANA RV instantaneous gas water heater. Please read the instructions carefully before installation or first use of the device and store it in a place where all users could find it for easy reference. If the device is transferred or sold, please hand over the instructions along with it so that the new user is aware of installation methods, usage and safety requirements.
- Page 37 Make A Difference 卓 / 尔 / 不 / 凡 TABLE OF CONTENT 1.0 Explanation of Symbols ..................38 2.0 Safety Instructions ..................38 2.1 Installer/Operator Responsibilities ..................40 3.0 Product Features .....................40 4.0 Installation Instructions ..................42 4.1 Model and Specifications ....................46 4.2 Product Overview .......................47 4.3 Parts List ..........................48 4.4 Installation Location ......................49 4.5 Pipes &...
-
Page 38: Explanation Of Symbols
1.0 Explanation of Symbols WARNING! Indicates a potential hazardous situation which, if not avoided, could result in death or serious injury. CAUTION! Indicates a potential hazardous situation which, if not avoided, could result in minor or moderate injury. NOTICE! Indicates a potential hazardous situation which, if not avoided, can result in property damage. - Page 39 Make A Difference 卓 / 尔 / 不 / 凡 • DO NOT modify the water heater in any way. Self-modification is dangerous and will void the warranty. • When the water heater is not used for a long time, in order prevent the water heater from hydro block, freezing and leaking, it shall be drained, and turn off the water inlet valve, turn off the gas as well as the power supply.
-
Page 40: Installer/Operator Responsibilities
2.1 Installer/Operator Responsibilities • Installation and service must be carried out by authorised installer, service agency or gas supplier. • This product is not suitable for DIY installation. • Read and observe all safety rules. • Shut off gas appliances and their pilot lights(if any) when refueling. •... - Page 41 Make A Difference 卓 / 尔 / 不 / 凡 issue the instruction to stop heating and gas supply, effectively safeguard the heater and occupants. • Water and gas leakage control: When the water supply is interrupted or the water outlet valve is closed, the water heater will automatically stop the combustion and shut down.
-
Page 42: Installation Instructions
4.0 Installation Instructions WARNING! THIS APPLIANCE MUST ONLY BE INSTALLED IN ACCORDANCE WITH THE ACCEPTABLE PLUMBING CONFIGURATIONS SPECIFIED IN THESE INSTRUCTIONS. FAILURE TO DO SO MAY RESULT IN CONDITIONS WHERE DELIVERY TEMPERATURE CONTROL IS INADEQUATE. WARNING! • TO BE INSTALLED ON A FIRE RESISTANT MATERIAL, SUITABLE ONLY FOR INDOOR INSTALLATION. • I N S TA L L AT I O N S H A L L CO N F O R M TO T H E P LU M B I N G CO D E O F AUSTRALIA(PCA). - Page 43 Make A Difference 卓 / 尔 / 不 / 凡 WARNING! • Improper installation, adjustment, alteration, service or maintenance can cause property damage, personal injury or loss of life. • Installation and maintenance must be carried out by a professional person, service company or gas water heater suppliers.
- Page 44 • The equipment should not be installed on vinyl panel, due to the difference in the vinyl panel. • Do not install the appliance at a position where the distance from venting pipe to the door is less than 305mm. See FIG.02. 305mm 305mm •...
- Page 45 Make A Difference 卓 / 尔 / 不 / 凡 • When the water heater is installed, it should be reliably grounded. • Clean any dirt in the supply pipes before they are connected to the heater. An easy- to-assemble filter is required behind the pump to filter the water. If there is no filter, it will not be covered under warranty.
-
Page 46: Model And Specifications
WARNING! Sharp edges can cause cuts and injury Always wear protective gloves when installing and operating the equipment to avoid cuts from sharp edges. 4.1 Model and Specifications Model RH09G Gas intended for Universal LPG Total nominal gas consumption 63.3MJ/h Number of injector Injector size 1.1mm Max. working water pressure 0.4MPa... -
Page 47: Product Overview
Make A Difference 卓 / 尔 / 不 / 凡 4.2 Product Overview 410mm 371mm 320mm Door latch Exhaust Air inlet grilles 12V DC Please use 12V DC RV battery Water outlet G 1/2" Gas inlet SAE 3/8" Water inlet G 1/2"... -
Page 48: Parts List
4.3 Parts List... -
Page 49: Installation Location
Make A Difference 卓 / 尔 / 不 / 凡 Name Name Housing upper cover Water inlet joint Controller Fanparts installation Heat exchanger Mounting plate Thermostat ON/OFF switch Dust cap Fuse Mounting nut for power line Gas inlet pipe Housing bottom plate Burner Water inlet pipe Piezometer... -
Page 50: Pipes & Lines Connection
surface. And the minimum thickness of the filling material must be greater than 20mm. The housing connection gap behind the water heater should be sealed with a high temperature sealant during installation to isolate it from the inside of the RV. •... -
Page 51: Securing The Water Heater
Make A Difference 卓 / 尔 / 不 / 凡 lines, wires and water pipes should be reserved to pull the water heater from the mounting hole. See FIG.08. Black/+12V Battery Blue/Wall Controller WHITE/-12V Battery Blue/Wall Controller 12V DC Please use 12V DC RV battery Water outlet G 1/2'' Water inlet G 1/2'' Gas inlet SAE 3/8"... - Page 52 • Secure the door frame to the vehicle using ST5 x 30 large flat tapping screw through each hole along the perimeter. Verify that a tight seal exists between the side wall and the door frame. See FIG.10. NOTICE! Ensure the butyl tape completes a tight seal between the RV siding and appliance door frame.
- Page 53 Make A Difference 卓 / 尔 / 不 / 凡 • Insert the pin of the door frame into the bottom of the door. See FIG.12. Hole • Align the door ring-pull on the door frame with the slot on the door, then push the door and rotate the door ring-pull to lock the door into place.
-
Page 54: Installation The Wire Controller
Door ring-pull Slot 4.7 Installation The Wire Controller Choose a convenient location to place the wire controller. • The connection between the wire controller and the water heater should be reasonably laid out according to the specific environment. • Firstly, remove the cover from the wire controller, use the supplied 2 screws to fix the base of the wire controller, then put on the wire controller cover. -
Page 55: Leak Check
Make A Difference 卓 / 尔 / 不 / 凡 CAUTION! The appliance is equipped with a water pressure relief valve that activates if the inlet pressure is too high, releasing the water and protecting the pipe from high pressure damage. -
Page 56: Product Wiring Diagram
4.9 Product Wiring Diagram To subsection valve To switch To proportional valve To thermostat +24V Black... -
Page 57: Operation Instructions
Make A Difference 卓 / 尔 / 不 / 凡 5.0 Operation Instructions WARNING! • DO NOT SPRAY AEROSOLS AROUND THIS APPLIANCE WHILE IT IS IN OPERATION. • DO NOT USE OR STORE FLAMMABLE MATERIALS IN OR NEAR THIS APPLIANCE. • DO NOT PLACE ARTICLES ON OR AGAINST THIS APPLIANCE. •... - Page 58 WARNING! • This appliance is not intended for use by persons (including children) with reduced physical, sensory or mental capabilities, or lack of experience and knowledge, unless they have been given supervision or instruction concerning use of the appliance by a person responsible for their safety. • The door shall be kept closed during operation. The gas valve is cut off after the power supply is turned off or powered off. The user should turn off the gas cylinder when the power is off or when the power is turned off. Please check the electrical connection of 12V DC before the next operation.
-
Page 59: Wire Controller Instructions
Make A Difference 卓 / 尔 / 不 / 凡 5.2 Wire Controller Instructions • The wire controller emits a buzzer sound "B,B,B" when the power is turned on. The display shows the gas source code, and this code will only be displayed for 3 seconds. - Page 60 Display setting temperature Display fault code Power indicator Celsius display Power Water flow indicator Fahrenheit display Water Flame indicator Flam e Decrease button Increase button Power switch Celsius/Fahrenheit ℉/℃ WARNING! Do not store or use gasoline or other flammable vapours and liquids in the vicinity of this or any other appliance.
-
Page 61: Fault Judgment And Processing
Make A Difference 卓 / 尔 / 不 / 凡 6.0 Fault Judgment and Processing Fault treatment: When the water heater fails, the display will show the fault code, and the buzzer will continuously issue alarms "B, B, B". Please follow the table below for the corresponding treatment. - Page 62 NOTICE! If you switch ON and OFF 5 times continuously within 15 minutes (the fan starts 5 times), the water heater will be locked. Waiting for 15 minutes or the error code disappears, the water heater will be automatically unlocked (reset), and resume normal use.
-
Page 63: Maintenance
Make A Difference 卓 / 尔 / 不 / 凡 Example Reason and handling method There is a pipe distance from the water heater to the hot Hot wate r ca nnot water valve. Because cold water is left in the water pipe, it flow out immediately after the hot water takes a while before the cold water is heated. -
Page 64: Maintenance Instructions
7.2 Maintenance Instructions • Clean the unit regularly. Do not use chemical lotion and volatile solvents. • To ensure better performance, please clean the air intake grill, dust filter and exhaust port regularly. This ensures there is no obstruction of the flow of combustion and ventilation air. -
Page 65: Drain And Clean Water Filter
Make A Difference 卓 / 尔 / 不 / 凡 7.3 Drain and Clean Water Filter WARNING! High temperatures or repair attempts while the gas supply is turned on may result in scalding injuries! • Turn OFF the electrical power supply and the gas supply before starting maintenance and repair work. • Allow the appliance to cool down. • Never actuate the pressure relief valve as long as the water heater is still hot. Always wear protective gear such as gloves, eyewear and clothing to avoid injuries during installation and servicing of the product. -
Page 66: Replacement Parts
Water Inlet Filter Relief Valve 7.4 Replacement Parts Parts Photo Lock Gas control valve Draught fan assembly Burner... - Page 67 Make A Difference 卓 / 尔 / 不 / 凡 Parts Photo Ignition pin assembly Gas inlet assembly Water inlet assembly The connection pipe of burner and valve Piezometer FUSE (125V 10A) Wired controller...
- Page 68 Parts Photo Water flow sensor Inflow temperature probe Water temperature probe Overtempera-ture protection thermostat Flame sensor Burner controller Water inlet filter...
-
Page 69: Antifreeze System
Make A Difference 卓 / 尔 / 不 / 凡 8.0 Antifreeze System WARNING! In frost conditions, ambient temperatures below 39 ° F (4 ° C), there is a risk that water in pipes, faucets and appliance could freeze. This can cause severe damage to the water system components and the appliance! Any damage caused by freezing or an unsuitable winterizing fluid will not be covered by warranty. Water heaters must be protected before travelling to a possible freezing environment. Freezing damage is not covered by the warranty. The anti-freezing function operation method is: •... -
Page 70: Warranty Notice
9.0 Warranty Notice The statutory warranty period applies. If the product is defective, please contact the nearest dealer in your location. For repair and guarantee processing, please prepare the following documents: • A copy of the invoice with purchasing date. • A reason for the claim or description of the fault. No warranty claim shall be applicable under the following circumstances: •... -
Page 71: Packing List
Make A Difference 卓 / 尔 / 不 / 凡 10.0 Packing List Order Design Quantity Remarks Gas water heater Instruction manual (including warranty card) Controller Tools required (not provided) Screw some Door assembly (packed separately) Door Door frame... - Page 72 Thanks for choosing ARANA RV instantaneous gas water heater. Please read the instructions carefully before installation or first use of the device and store it in a place where all users could find it for easy reference. If the device is transferred or sold, please hand over the instructions along with it so that the new user is aware of installation methods, usage and safety requirements.
- Page 73 Make A Difference 卓 / 尔 / 不 / 凡 TABLE OF CONTENT 1.0 Explanation of Symbols ..................74 2.0 Safety Instructions ..................74 2.1 Installer/Operator Responsibilities ..................76 3.0 Product Features .........................76 4.0 Installation Instructions ..................78 4.1 Model andSpecifications ....................82 4.2 Product Overview .......................83 4.3 Parts List ..........................84 4.4 Installation Location ......................85 4.5 Pipes &...
-
Page 74: Explanation Of Symbols
1.0 Explanation of Symbols WARNING! Indicates a potential hazardous situation which, if not avoided, could result in death or serious injury. CAUTION! Indicates a potential hazardous situation which, if not avoided, could result in minor or moderate injury. NOTICE! Indicates a potential hazardous situation which, if not avoided, can result in property damage. 2.0 Safety Instructions • Please only install it in recreational vehicles (RVs). RV's are recreation vehicles, having their own power or towed by another vehicle, designed as temporary living quarters for recreation, camping, or travel use. •... - Page 75 Make A Difference 卓 / 尔 / 不 / 凡 • DO NOT modify the water heater in any way. Self-modification is dangerous and will void the warranty. • When the water heater is not used for a long time, in order prevent the water heater from hydro block, freezing and leaking, it shall be drained, and turn off the water inlet valve, turn off the gas as well as the power supply.
-
Page 76: Installer/Operator Responsibilities
2.1 Installer/Operator Responsibilities • Installation and service must be carried out by authorised installer, service agency or gas supplier. • This product is not suitable for DIY installation. • Read and observe all safety rules. • Shut off gas appliances and their pilot lights(if any) when refueling. •... - Page 77 Make A Difference 卓 / 尔 / 不 / 凡 issue the instruction to stop heating and gas supply, effectively safeguard the heater and occupants. • Water and gas leakage control: When the water supply is interrupted or the water outlet valve is closed, the water heater will automatically stop the combustion and shut down.
-
Page 78: Installation Instructions
4.0 Installation Instructions WARNING! THIS APPLIANCE MUST ONLY BE INSTALLED IN ACCORDANCE WITH THE ACCEPTABLE PLUMBING CONFIGURATIONS SPECIFIED IN THESE INSTRUCTIONS. FAILURE TO DO SO MAY RESULT IN CONDITIONS WHERE DELIVERY TEMPERATURE CONTROL IS INADEQUATE. WARNING! • This product is only suitable for recreational vehicle (RV) installation. • Installation and maintenance must be carried out by a professional person, service company or gas water heater suppliers. - Page 79 Make A Difference 卓 / 尔 / 不 / 凡 WARNING! • Improper installation, adjustment, alteration, service or maintenance can cause property damage, personal injury or loss of life. • Installation and maintenance must be carried out by a professional person, service company or gas water heater suppliers.
- Page 80 vinyl panel. • Do not install the appliance at a position where the distance from venting pipe to the door is less than 12". See FIG.02. 12" 12" • The appliance should be installed at a position with minimum 12" height.
- Page 81 Make A Difference 卓 / 尔 / 不 / 凡 of the water heater. • When the water heater is installed, it should be reliably grounded. • Clean any dirt in the supply pipes before they are connected to the heater. An easy- to-assemble filter is required behind the pump to filter the water.
-
Page 82: Model Andspecifications
WARNING! Sharp edges can cause cuts and injury Always wear protective gloves when installing and operating the equipment to avoid cuts from sharp edges. 4.1 Model andSpecifications Model RH09G Type of gas Propane LP Gas Max. nominal heat imput 60000BTU/h Max. inlet gas pressure 13"WC Min. inlet gas pressure 8"WC... -
Page 83: Product Overview
Make A Difference 卓 / 尔 / 不 / 凡 4.2 Product Overview 16⅛" 14⅝" Door latch 12⅝" Exhaust Air inlet grilles 12V DC Please use 12V DC RV battery Water outlet NPT 1/2" Gas inlet UNF 5/8" Water inlet NPT 1/2"... -
Page 84: Parts List
4.3 Parts List... -
Page 85: Installation Location
Make A Difference 卓 / 尔 / 不 / 凡 Name Name Housing upper cover Water inlet joint Controller Fanparts installation Heat exchanger Mounting plate Thermostat ON/OFF switch Dust cap Fuse Mounting nut for power line Gas inlet pipe Housing bottom plate Burner Water inlet pipe Piezometer... -
Page 86: Pipes & Lines Connection
The housing connection gap behind the water heater should be sealed with a high temperature sealant during installation to isolate it from the inside of the RV. • In this way, the burning air does not come from the inside of the RV, but from the outside of the RV and the exhaust gas generated by the combustion is discharged outside the vehicle. -
Page 87: Securing The Water Heater
Make A Difference 卓 / 尔 / 不 / 凡 mounting hole. See FIG.08. Black/+12V Battery Blue/Wall Controller WHITE/-12V Battery Blue/Wall Controller 12V DC Please use 12V DC RV battery Water outlet NPT 1/2'' Gas inlet UNF 5/8" Water inlet NPT 1/2'' •... - Page 88 • Secure the door frame to the vehicle using ST5 x 30 large flat tapping screw through each hole along the perimeter. Verify that a tight seal exists between the side wall and the door frame. See FIG.10. NOTICE! Ensure the butyl tape completes a tight seal between the RV siding and appliance door frame.
- Page 89 Make A Difference 卓 / 尔 / 不 / 凡 • Insert the pin of the door frame into the bottom of the door. See FIG.12. Hole • Align the door ring-pull on the door frame with the slot on the door, then push the door and rotate the door ring-pull to lock the door into place.
-
Page 90: Installation The Wire Controller
Door ring-pull Slot 4.7 Installation The Wire Controller Choose a convenient location to place the wire controller. • The connection between the wire controller and the water heater should be reasonably laid out according to the specific environment. • Firstly, remove the cover from the wire controller, use the supplied 2 screws to fix the base of the wire controller, then put on the wire controller cover. -
Page 91: Leak Check
Make A Difference 卓 / 尔 / 不 / 凡 CAUTION! The appliance is equipped with a water pressure relief valve that activates if the inlet pressure is too high, releasing the water and protecting the pipe from high pressure damage. -
Page 92: Product Wiring Diagram
4.9 Product Wiring Diagram To subsection valve To switch To proportional valve To thermostat +24V Black... -
Page 93: Operation Instructions
Make A Difference 卓 / 尔 / 不 / 凡 5.0 Operation Instructions WARNING! • DO NOT SPRAY AEROSOLS AROUND THIS APPLIANCE WHILE IT IS IN OPERATION. • DO NOT USE OR STORE FLAMMABLE MATERIALS IN OR NEAR THIS APPLIANCE. • DO NOT PLACE ARTICLES ON OR AGAINST THIS APPLIANCE. •... - Page 94 WARNING! • Children and juveniles are not advised to operate the water heater by themselves unless they are accompanied by a guardian. • The door shall be kept closed during operation. The gas valve is cut off after the power supply is turned off or powered off. The user should turn off the gas cylinder when the power is off or when the power is turned off.
-
Page 95: Wire Controller Instructions
Make A Difference 卓 / 尔 / 不 / 凡 5.2 Wire controller instructions • The wire controller emits a buzzer sound "B,B,B" when the power is turned on. The display shows the gas source code, and this code will only be displayed for 3 seconds. - Page 96 Display setting temperature Display fault code Power Power indicator Celsius display Water Water flow indicator Fahrenheit display Flam e Flame indicator Decrease button Increase button ℉/℃ Power switch Celsius/Fahrenheit WARNING! Do not store or use gasoline or other flammable vapours and liquids in the vicinity of this or any other appliance.
-
Page 97: Fault Judgment And Processing
Make A Difference 卓 / 尔 / 不 / 凡 6.0 Fault Judgment and Processing Fault treatment: When the water heater fails, the display will show the fault code, and the buzzer will continuously issue alarms "B, B, B". Please follow the table below for the corresponding treatment. - Page 98 NOTICE! If you switch ON and OFF 5 times continuously within 15 minutes (the fan starts 5 times), the water heater will be locked. Waiting for 15 minutes or the error code disappears, the water heater will be automatically unlocked (reset), and resume normal use.
-
Page 99: Maintenance
Make A Difference 卓 / 尔 / 不 / 凡 Example Reason and handling method There is a pipe distance from the water heater to the hot Hot water cannot water valve. Because cold water is left in the water pipe, it flow out immediately after the hot water takes a while before the cold water is heated. -
Page 100: Maintenance Instructions
7.2 Maintenance Instructions • Clean the unit regularly. Do not use chemical lotion and volatile solvents. • To ensure better performance, please clean the air intake grill, dust filter and exhaust port regularly. This ensures there is no obstruction of the flow of combustion and ventilation air. -
Page 101: Drain And Clean Water Filter
Make A Difference 卓 / 尔 / 不 / 凡 7.3 Drain and Clean Water Filter WARNING! High temperatures or repair attempts while the gas supply is turned on may result in scalding injuries! • Turn OFF the electrical power supply and the gas supply before starting maintenance and repair work. • Allow the appliance to cool down. • Never actuate the pressure relief valve as long as the water heater is still hot. Always wear protective gear such as gloves, eyewear and clothing to avoid injuries during installation and servicing of the product. -
Page 102: Replacement Parts
Water Inlet Filter Relief Valve 7.4 Replacement Parts Parts Photo Lock Gas control valve Draught fan assembly Burner... - Page 103 Make A Difference 卓 / 尔 / 不 / 凡 Parts Photo Ignition pin assembly Gas inlet assembly Water inlet assembly The connection pipe of burner and valve Piezometer FUSE (125V 10A) Wired controller...
- Page 104 Parts Photo Water flow sensor Inflow temperature probe Water temperature probe Overtempera-ture protection thermostat Flame sensor Burner controller Water inlet filter...
-
Page 105: Antifreeze System
Make A Difference 卓 / 尔 / 不 / 凡 8.0 Antifreeze System WARNING! In frost conditions, ambient temperatures below 39 ° F (4 ° C), there is a risk that water in pipes, faucets and appliance could freeze. This can cause severe damage to the water system components and the appliance! Any damage caused by freezing or an unsuitable winterizing fluid will not be covered by warranty. Water heaters must be protected before travelling to a possible freezing environment. Freezing damage is not covered by the warranty. The anti-freezing function operation method is: •... -
Page 106: Warranty Notice
9.0 Warranty Notice The statutory warranty period applies. If the product is defective, please contact the nearest dealer in your location. For repair and guarantee processing, please prepare the following documents: • A copy of the invoice with purchasing date. • A reason for the claim or description of the fault. No warranty claim shall be applicable under the following circumstances: •... -
Page 107: Packing List
Make A Difference 卓 / 尔 / 不 / 凡 10.0 Packing List Order Design Quantity Remarks Gas water heater Instruction manual (including warranty card) Controller Tools required (not provided) Screw some Door assembly (packed separately) Door Door frame... - Page 108 Merci d'avoir choisi notre chauffe-eau instantané au gaz pour véhicules récréatifs. Veuillez lire attentivement les instructions avant l'installation ou la première utilisation de l'appareil et conservez-le dans un endroit où tous les utilisateurs pourraient le trouver pour une référence facile. En cas de transfert ou de vente de l'appareil, veuillez remettre les instructions avec celui-ci afin que le nouvel utilisateur soit informé...
- Page 109 Make A Difference 卓 / 尔 / 不 / 凡 TABLE DES MATIÈRES 1.0 Explication des symboles ................110 2.0 Consignes de sécurité ...................110 2.1 Responsabilités de l'installateur/opérateur ..............112 3.0 Caractéristiques du produit ................112 4.0 Instructions d'installation ................114 4.1 Modèle et spécifications ....................118 4.2 Présentation du produit ....................119 4.3 Liste des pieces .........................120 4.4 Emplacement d'installation ....................121...
-
Page 110: Explication Des Symboles
1.0 Explication des symboles ATTENTION! Indique une situation potentiellement dangereuse qui, si elle n'est pas évitée, peut entraîner la mort ou des blessures graves. AVERTISSEMENT! Indique une situation dangereuse potentielle qui, si elle n'est pas évitée, pourrait entraîner des blessures légères ou modérées. AVIS! Indique une situation potentiellement dangereuse qui, si elle n'est pas évitée, peut entraîner des dommages matériels. 2.0 Consignes de sécurité • Veuillez l'installer uniquement dans les véhicules récréatifs (VR). Les véhicules récréatifs sont des véhicules récréatifs, équipés de leur propre moteur ou remorqués par un autre véhicule, conçus comme des logements temporaires pour les loisirs, le camping ou les... - Page 111 Make A Difference 卓 / 尔 / 不 / 凡 • NE PAS modifier le chauffe-eau de quelque façon que ce soit. L'auto-modification est dangereuse et annulera la garantie. • Lorsque le chauffe-eau n'est pas utilisé pendant une longue période, afin d'empêcher le chauffe-eau de bloquer l'eau, de geler et de fuir, il doit être vidangé...
-
Page 112: Responsabilités De L'installateur/Opérateur
2.1 Responsabilités de l'installateur/opérateur • L'installation et l'entretien doivent être effectués par un installateur agréé, une agence de service ou un fournisseur de gaz. • Ce produit ne convient pas à une installation de bricolage. • Lisez et respectez toutes les règles de sécurité. •... - Page 113 Make A Difference 卓 / 尔 / 不 / 凡 le chauffage et l'alimentation en gaz, protège efficacement le chauffage et les occupants. • Contrôle des fuites d'eau et de gaz: Lorsque l'alimentation en eau est interrompue ou que la vanne de sortie d'eau est fermée, le chauffe-eau arrête automatiquement la combustion et s'éteint.
-
Page 114: Instructions D'installation
4.0 Instructions d'installation ATTENTION! CET APPAREIL DOIT UNIQUEMENT ÊTRE INSTALLÉ CONFORMÉMENT AUX CONFIGURATIONS DE PLOMBERIE ACCEPTABLES SPÉCIFIÉES DANS CES INSTRUCTIONS. NE PAS LE FAIRE PEUT ENTRAÎNER DES CONDITIONS OÙ LE CONTRÔLE DE LA TEMPÉRATURE DE LIVRAISON EST INADÉQUAT. ATTENTION! • Ce produit convient uniquement à l'installation de véhicules récréatifs (VR). • L'installation et l'entretien doivent être effectués par un professionnel, une entreprise de services ou des fournisseurs de chauffe-eau à gaz. • Une installation, une mise en service, une modification ou un entretien incorrect entraînera des dommages matériels, des blessures corporelles ou la mort. L'installation doit être effectuée conformément aux instructions fournies dans ce manuel. - Page 115 Make A Difference 卓 / 尔 / 不 / 凡 ATTENTION! • Une installation, un réglage, une modification, un service ou un entretien inappropriés peuvent causer des dommages matériels, des blessures corporelles ou la mort. • L'installation et l'entretien doivent être effectués par un professionnel, une entreprise de services ou des fournisseurs de chauffe-eau à...
- Page 116 • L'équipement ne doit pas être installé sur un panneau en vinyle, en raison de la différence entre le panneau en vinyle. • N'installez pas l'appareil à un endroit où la distance entre le tuyau de ventilation et la porte est inférieure à 12". Voir FIG.02. 12"...
- Page 117 Make A Difference 卓 / 尔 / 不 / 凡 normale du chauffe-eau. • Lorsque le chauffe-eau est installé, il doit être mis à la terre de manière fiable. • Nettoyez toute saleté dans les tuyaux d'alimentation avant de les connecter à l'appareil de chauffage.
-
Page 118: Modèle Et Spécifications
Les arêtes vives peuvent causer des coupures et des blessures Portez toujours des gants de protection lors de l'installation et de l'utilisation de l'équipement pour éviter les coupures causées par des arêtes vives. 4.1 Modèle et spécifications Modèle RH09G Type de gaz Propane LP Gas Apport de chaleur max./nominal 60000BTU/h Pression de gaz d'entrée max. -
Page 119: Présentation Du Produit
Make A Difference 卓 / 尔 / 不 / 凡 4.2 Présentation du produit 16⅛" 14⅝" Loquet de porte 12⅝" Échappement Grilles d'entrée d'air 12V DC Veuillez utiliser une batterie RV 12V DC Sortie d'eau NPT 1/2" Entrée de gaz UNF 5/8" Arrivée d'eau NPT 1/2"... -
Page 120: Liste Des Pieces
4.3 Liste des pieces... -
Page 121: Emplacement D'installation
Make A Difference 卓 / 尔 / 不 / 凡 NO. Nom Couvercle supérieur du boîtier Joint d'arrivée d'eau Manette Installation des pièces détachées Échangeur de chaleur Plaque de montage Thermostat Bouton ON / OFF Bouchon anti-poussière fusible Tuyau d'arrivée de gaz Écrou de montage pour ligne électrique Plaque inférieure du boîtier Brûleur... -
Page 122: Connexion De Tuyaux Et De Lignes
l'épaisseur minimale de la le matériau de remplissage doit être supérieur à 0,8". L'espace de connexion du boîtier derrière le chauffe-eau doit être scellé avec un scellant à haute température lors de l'installation pour l'isoler de l'intérieur du VR. • De cette façon, l'air brûlant ne vient pas de l'intérieur du VR, mais de l'extérieur du VR et les gaz d'échappement générés par la combustion sont évacués à... -
Page 123: Sécurisation Du Chauffe-Eau
Make A Difference 卓 / 尔 / 不 / 凡 adéquate de conduites de gaz, de fils et de conduites d'eau doit être réservée pour retirer le chauffe-eau du trou de montage. Voir FIG.08. Black/+12V Battery Blue/Wall Controller WHITE/-12V Battery Blue/Wall Controller 12V DC Please use 12V DC RV battery... - Page 124 • Fixez le cadre de la porte au véhicule à l'aide d'une grande vis taraudeuse plate ST5 x 30 dans chaque trou le long du périmètre. Vérifiez qu'un joint étanche existe entre la paroi latérale et le cadre de la porte. Voir FIG.10. AVIS! Assurez-vous que le ruban de butyle complète un joint étanche entre le revêtement du VR et le cadre de la porte de l'appareil.
- Page 125 Make A Difference 卓 / 尔 / 不 / 凡 • Insérez la goupille du cadre de porte dans le bas de la porte. Voir FIG.12. Goupille Trou • Alignez l'anneau de porte sur le cadre de la porte avec la fente sur la porte, puis poussez la porte et faites tourner l'anneau de porte pour verrouiller la porte en place.
-
Page 126: Installation Le Contrôleur Filaire
Anneau de traction Fente 4.7 Installation Le Contrôleur Filaire Choisissez un emplacement pratique pour placer la commande filaire. • La connexion entre le contrôleur filaire et le chauffe-eau doit être raisonnablement disposée en fonction de l'environnement spécifique. • Tout d'abord, retirez le couvercle de la commande filaire, utilisez les 2 vis fournies pour fixer la base de la commande filaire, puis placez le couvercle de la commande filaire. -
Page 127: Vérification Des Fuites
Make A Difference 卓 / 尔 / 不 / 凡 AVERTISSEMENT! The appliance is equipped with a water pressure relief valve that activates if the inlet pressure is too high, releasing the water and protecting the pipe from high pressure damage. -
Page 128: Schéma De Câblage Du Produit
4.9 Schéma de câblage du produit To subsection valve To switch To proportional valve To thermostat +24V Black... -
Page 129: Instructions D'utilisation
Make A Difference 卓 / 尔 / 不 / 凡 5.0 Instructions d'utilisation ATTENTION! • NE PAS PULVÉRISER D'AÉROSOLS AUTOUR DE CET APPAREIL PENDANT QUE CELUI-CI FONCTIONNE. • NE PAS UTILISER OU ENTREPOSER DE MATÉRIAUX INFLAMMABLES DANS OU À PROXIMITÉ DE CET APPAREIL. •... - Page 130 ATTENTION! • Il est déconseillé aux enfants et aux adolescents de faire fonctionner le chauffe- eau seuls, sauf s'ils sont accompagnés d'un tuteur. • La porte doit rester fermée pendant le fonctionnement. La vanne de gaz est coupée après la coupure ou la mise hors tension de l'alimentation électrique.
-
Page 131: Instructions Du Contrôleur De Fil
Make A Difference 卓 / 尔 / 不 / 凡 5.2 Instructions du contrôleur de fil • Le contrôleur filaire émet un signal sonore "B, B, B" lorsque l'alimentation est allumée. L'écran affiche le code de la source de gaz, et ce code ne sera affiché que pendant 3 secondes. - Page 132 Afficher la température de réglage Afficher le code d'erreur Voyant d'alimentation Affichage Celsius Power Affichage en degrés Indicateur de débit d'eau Water Fahrenheit Indicateur de flamme Flam e Bouton de diminution Bouton d'augmentation Interrupteur Celsius/Fahrenheit ℉/℃ ATTENTION! Ne stockez pas et n'utilisez pas d'essence ou d'autres vapeurs et liquides inflammables à...
-
Page 133: Jugement Et Traitement Des Fautes
Make A Difference 卓 / 尔 / 不 / 凡 6.0 Jugement et traitement des fautes Traitement des pannes : lorsque le chauffe-eau tombe en panne, l'écran affiche le code de panne et le buzzer émet en permanence des alarmes "B, B, B". Veuillez suivre le tableau ci-dessous pour le traitement correspondant. - Page 134 AVIS! Si vous allumez et éteignez 5 fois de suite en 15 minutes (le ventilateur démarre 5 fois), le chauffe-eau sera verrouillé. En attendant 15 minutes ou le code d'erreur disparaît, le chauffe-eau sera automatiquement déverrouillé (réinitialisé) et reprendra une utilisation normale. Il ne s'agit pas d'un échec lorsque les conditions suivantes se produisent : Exemple Raison et méthode de traitement...
-
Page 135: Entretien
Make A Difference 卓 / 尔 / 不 / 凡 Example Reason and handling method Il y a une distance de tuyau entre le chauffe-eau et la L'eau chaude ne vanne d'eau chaude. Étant donné que l'eau froide reste peut pas s'écouler immédiatement dans la conduite d'eau, il faut un certain temps avant que après l'ouverture du l'eau froide ne soit chauffée. -
Page 136: Consignes D'entretien
le brûleur avec les jets vers le bas, en utilisant une brosse à poils pour enlever le carbone. 7.2 Consignes d'entretien • Nettoyez l'appareil régulièrement. Ne pas utiliser de lotion chimique et de solvants volatils. • Pour garantir de meilleures performances, veuillez nettoyer régulièrement la grille d'admission d'air, le filtre à... -
Page 137: Vidanger Et Nettoyer Le Filtre À Eau
Make A Difference 卓 / 尔 / 不 / 凡 7.3 Vidanger et nettoyer le filtre à eau ATTENTION! Des températures élevées ou des tentatives de réparation alors que l'alimentation en gaz est ouverte peuvent entraîner des blessures par entartrage ! • Coupez l'alimentation électrique et l'alimentation en gaz avant de commencer les travaux d'entretien et de réparation. -
Page 138: Pièces De Rechange
Filtre d'entrée d'eau Soupape de décharge 7.4 Pièces de rechange Parties Photo Bloquer Vanne de commande de gaz Projet d'assemblage de ventilateur brûleur... - Page 139 Make A Difference 卓 / 尔 / 不 / 凡 Parties Photo Assemblage de la broche d'allumage Assemblage d'admission de gaz Ensemble d'arrivée d'eau Le t u ya u d e ra cco rd e m e n t d u brûleur et de la vanne Piézomètre FUSIBLE (125V 10A)
- Page 140 Parties Photo Capteur de débit d'eau Sonde de température de départ Sonde de température d'eau Thermostat de protection contre la surchauffe Détecteur de flamme Contrôleur de brûleur Filtre d'entrée d'eau...
-
Page 141: Système Antigel
Make A Difference 卓 / 尔 / 不 / 凡 8.0 Système antigel ATTENTION! Dans des conditions de gel, des températures ambiantes inférieures à 39 ° F (4 ° C), il y a un risque que l'eau dans les tuyaux, les robinets et l'appareil gèle, ce qui peut causer de graves dommages aux composants du système d'eau et à... -
Page 142: Avis De Garantie
9.0 Avis de garantie La période de garantie légale s'applique. Si le produit est défectueux, veuillez contacter le revendeur le plus proche de chez vous. Pour le traitement de la réparation et de la garantie, veuillez préparer les documents suivants : • Une copie de la facture avec la date d'achat. •... -
Page 143: Liste De Colisage
Make A Difference 卓 / 尔 / 不 / 凡 10.0 Liste de colisage Ordre Articles Quantité Remarques Chauffe-eau à gaz Manuel d'instructions Contrôleur de câblage Outils nécessaires Des vis some (non fournis) Ensemble de porte (emballé séparément) Porte Cadre de porte... - Page 144 All rights reserved. ARANA TECH (Shenzhen) Co., Ltd. reserves the right to modify at any time without notice, prices, materials, specifications and models or to cease production of any model. 版权所有,侵权必究 阿雷纳科技(深圳)有限公司 保留随时修改价格、材料、规格和型号的权利 或停止任何产品型号的生产 , 恕不另行通知 www.arana.com.cn 服务热线:400 110 1890...
Need help?
Do you have a question about the RH09G and is the answer not in the manual?
Questions and answers